***
Roasted Cherry Black Forest Birthday Cake: The Ultimate Celebration Showstopper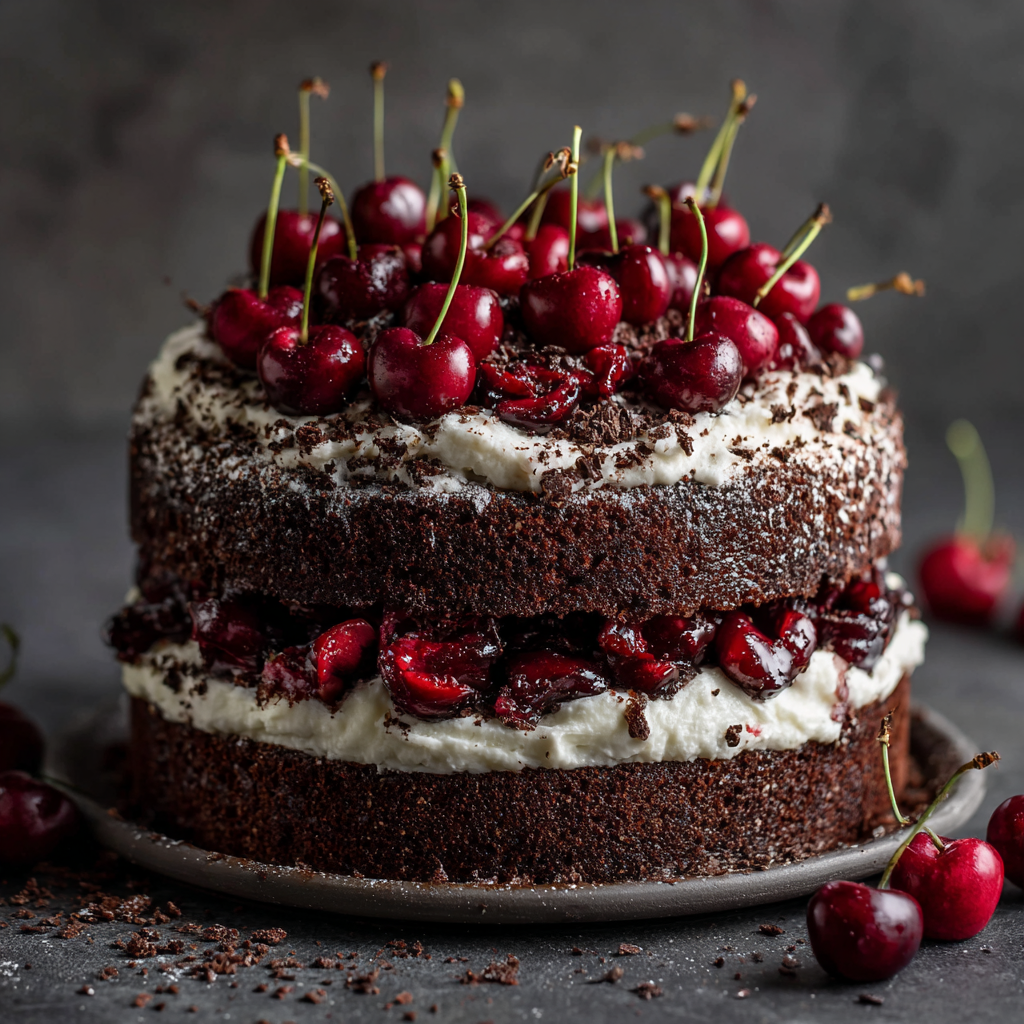
Hello, my fabulous foodie friend! Anna here, ready to dive into one of my all-time favorite projects: a birthday cake that’s anything but ordinary. We’re talking about a dessert that doesn’t just sit on the table—it makes a grand entrance. A cake that whispers of deep, dark chocolate, sings with boozy, roasted cherries, and wraps it all up in a cloud of the fluffiest whipped cream. This, my friend, is my Roasted Cherry Black Forest Birthday Cake.
Now, I know what you might be thinking. “Anna, a Black Forest cake? Isn’t that a bit… retro?” And you’d be right! It’s a glorious classic. But what we’re doing here is giving it a full-blown, modern, sophisticated makeover. We’re swapping out the canned cherries for a deeply caramelized, roasted version that will make your taste buds do a happy dance. We’re introducing a secret weapon of toasted sesame oil for a nutty, complex depth that will have everyone asking, “What is *that* incredible flavor?” And we’re using a double-layer, sky-high structure that just screams “celebration.”
This cake is a labor of love, and I am so excited to guide you through every single step. Whether you’re baking it for a milestone birthday, an anniversary, or just because Tuesday felt like a day that deserved a spectacular cake, I’m here with you. We’re going to create magic, one layer at a time. So, tie on your favorite apron, put on some feel-good music, and let’s bake a memory.
A Cake That Tastes Like a Hug
PrintRoasted Cherry Black Forest Birthday Cake

Rich, chocolaty, and layered with roasted cherries and whipped cream, this Black Forest cake gets a stunning birthday makeover. Elevated with toasted sesame oil and chocolate balsamic, this double-layer beauty is perfect for milestone moments or when you simply want to wow the crowd.
- Prep Time: 40 mins
- chill: 1 hour
- Cook Time: 40 mins
- Total Time: 2 hrs 20 mins
- Yield: 16–20 slices 1x
Ingredients
For the Cake (Double Batch – Two 9-inch layers)
4 ¼ cups all-purpose flour
4 cups sugar
1 ½ cups dark cocoa powder (Hershey’s Special Dark recommended)
3 teaspoons baking powder
1 ½ teaspoons baking soda
1 ½ teaspoons salt
6 large eggs
2 cups whole milk
1 cup toasted sesame oil (La Tourangelle preferred)
2 teaspoons vanilla extract
2 tablespoons chocolate balsamic vinegar
½ cup Kirsch (cherry brandy)
Roasted Cherry Filling
4 cups pitted cherries (fresh or frozen)
2 tablespoons sugar
1 tablespoon chocolate balsamic vinegar
¼ cup Kirsch
Whipped Cream Frosting
3 cups heavy cream, chilled
½ cup powdered sugar
1 tablespoon vanilla extract
To Decorate
Whole cherries (fresh or maraschino)
Dark chocolate curls or shavings
Instructions
1. Roast the Cherries
Preheat oven to 400°F (200°C). Toss cherries with sugar and balsamic. Spread on a lined baking sheet and roast for 20–25 minutes until syrupy and slightly caramelized. Stir in Kirsch, then cool completely.
2. Bake the Cake
Preheat oven to 350°F (175°C). Grease and line two 9-inch round pans.
In a large bowl, sift flour, sugar, cocoa, baking powder, soda, and salt. In another bowl, whisk eggs, milk, sesame oil, vanilla, and vinegar. Gradually mix wet into dry until smooth. Stir in Kirsch.
Divide batter evenly into pans and bake 35–40 minutes or until a toothpick comes out clean. Let cool in pans 10 minutes, then turn out onto wire racks.
3. Make the Whipped Cream
Beat chilled cream with powdered sugar and vanilla until stiff peaks form. Chill until ready to use.
4. Assemble the Cake
Slice each cake in half for four layers. Place the first layer on a serving plate. Brush lightly with reserved cherry syrup, then spread whipped cream and spoon roasted cherries over it. Repeat with all layers. Frost the top and sides with remaining whipped cream.
5. Decorate
Top with whole cherries and a generous dusting of chocolate shavings. Chill 1–2 hours before slicing.
Nutrition
- Calories: 480 per slice
This recipe has a special little corner in my heart, and it all goes back to my grandfather. Every year for my birthday, without fail, he would present me with a slightly lopsided, generously frosted Black Forest cake from our local German bakery. The cherries were always a little too syrupy, the cream a little too sweet, but to my childhood self, it was absolute perfection. It was the taste of being loved, of being celebrated.
When I started creating my own recipes, I knew I wanted to recreate that feeling, but with my own grown-up, from-scratch spin. I wanted to capture the joy and nostalgia, but elevate the flavors to match the foodie I’d become. The first time I tried roasting the cherries with a splash of balsamic, the whole kitchen filled with this incredible, tart-sweet aroma. It was a “Eureka!” moment. I knew I’d found a way to honor that beautiful memory while creating something entirely new and exciting. This cake is my love letter to those childhood birthdays, and my hope is that it becomes part of your own family’s cherished traditions.
Gathering Your Cake-Making Magic
Here’s your shopping list for this glorious creation! Don’t be intimidated by the number of ingredients—we’re building incredible layers of flavor. I’ve included all my favorite tips and substitutions to make this work for you.
For the Cake (A Double Batch for Two Beautiful 9-Inch Layers)
- 4 ¼ cups all-purpose flour: The sturdy foundation of our cake. For a lighter crumb, make sure to fluff it up in the bag before you spoon and level it into your measuring cup.
- 4 cups sugar: It seems like a lot, but trust me, it balances the intense dark cocoa. You can reduce it slightly, but the texture and moisture might change.
- 1 ½ cups dark cocoa powder (Hershey’s Special Dark is my go-to): This is non-negotiable for that deep, intense chocolate flavor. Regular cocoa just won’t give you the same rich, dark color or taste.
- 3 tsp baking powder & 1 ½ tsp baking soda: Our leavening dream team! They work together to give this dense batter a beautiful, tender rise.
- 1 ½ tsp salt: A crucial flavor enhancer! Salt makes the chocolate taste more chocolatey and balances the sweetness.
- 6 large eggs: Bring them to room temperature! This is my #1 cake tip. Room temp eggs incorporate more air, leading to a lighter, fluffier cake.
- 2 cups whole milk: The fat content in whole milk adds incredible richness and moisture. For a dairy-free version, unsweetened oat milk works surprisingly well!
- 1 cup toasted sesame oil (I adore La Tourangelle): Here’s our secret weapon! It adds a subtle, nutty, almost savory depth that makes this cake truly unforgettable. If you’re nervous, you can swap half for a neutral oil, but I promise the result is magical.
- 2 tsp vanilla extract: The classic flavor workhorse.
- 2 tbsp chocolate balsamic vinegar: This is a fun gourmet touch that amplifies the chocolate flavor. Don’t have it? Regular balsamic works beautifully too!
- ½ cup Kirsch (cherry brandy): This is the authentic spirit of a Black Forest cake! It adds a lovely cherry-kissed boozy note. For an alcohol-free version, you can use the syrup from a jar of maraschino cherries or even cherry juice.
For the Roasted Cherry Filling
- 4 cups pitted cherries (fresh or frozen are both great!): Frozen cherries are a fantastic year-round option—no need to thaw!
- 2 tbsp sugar: Just a bit to help them caramelize and release their gorgeous juices.
- 1 tbsp chocolate balsamic vinegar: Echoing the flavor from the cake and adding a lovely tangy note to the sweet cherries.
- ¼ cup Kirsch: We’ll stir this in after roasting for an extra punch of flavor.
For the Whipped Cream Frosting
- 3 cups heavy cream, CHILLED: I cannot stress “chilled” enough. Cold cream, a cold bowl, and cold beaters are the key to stiff, perfect peaks.
- ½ cup powdered sugar: It dissolves easily and sweetens the cream gently without grittiness.
- 1 tbsp vanilla extract: For that lovely, aromatic vanilla flavor.
For the Grand Finale (Decoration!)
- Whole cherries (fresh or maraschino): For that classic, celebratory look.
- Dark chocolate curls or shavings: Use a vegetable peeler on a bar of good dark chocolate for stunning, professional-looking curls.
Let’s Build This Masterpiece, Step-by-Step!
Okay, deep breath! We’re going to tackle this in stages. Read through all the steps first, and remember, baking is a journey, not a race. You’ve got this!
Step 1: Roast the Cherries to Perfection
Preheat your oven to 400°F (200°C). While it’s warming up, toss your pitted cherries with the 2 tablespoons of sugar and 1 tablespoon of chocolate balsamic vinegar on a parchment-lined baking sheet. This is where the magic starts! Roasting concentrates the cherry flavor and gives them a slightly caramelized, jammy quality that is just divine. Pop them in the oven for 20-25 minutes. You’ll know they’re ready when your kitchen smells amazing and the cherries are soft and swimming in a dark, syrupy juice. As soon as they come out of the oven, carefully stir in the ¼ cup of Kirsch. It will sizzle and steam, releasing an incredible aroma. Let this mixture cool completely—this is important so it doesn’t melt our whipped cream later!
Chef’s Hack: If you’re in a hurry, spread the cherry mixture into a shallow bowl and pop it in the fridge to speed up the cooling process.
Step 2: Bake the Deepest, Darkest Chocolate Cake
Now, for the main event! Lower your oven temperature to 350°F (175°C). Grease the bottoms and sides of two 9-inch round cake pans, then line the bottoms with a circle of parchment paper. This is your insurance policy for a flawless release—don’t skip it!
In a truly large bowl, I like to sift together the flour, sugar, dark cocoa powder, baking powder, baking soda, and salt. Sifting not only removes lumps but also aerates the dry ingredients, leading to a lighter cake. In a separate bowl, whisk together the room-temperature eggs, milk, toasted sesame oil, vanilla, and the 2 tablespoons of chocolate balsamic vinegar until they are one happy, homogenous mixture.
Here’s the key: gradually pour the wet ingredients into the dry ingredients, mixing on low speed (or by hand) until they *just* come together. A few lumps are okay! Over-mixing is the enemy of a tender cake. Once it’s mostly smooth, gently stir in the ½ cup of Kirsch. The batter will be thin—that’s perfectly normal!
Divide the batter evenly between your two prepared pans. I like to use a kitchen scale for ultimate precision, but eyeballing it works too. Give the pans a little tap on the counter to release any large air bubbles. Bake for 35-40 minutes, or until a wooden toothpick inserted into the center comes out with just a few moist crumbs attached.
Chef’s Hack: Let the cakes cool in their pans on a wire rack for exactly 10 minutes. Then, run a knife around the edge, invert them onto the rack, and carefully peel off the parchment paper. Let them cool completely before assembling. For a super-flat cake, you can even wrap them in plastic wrap and freeze for an hour—this makes them so much easier to slice!
Step 3: Whip Up the Dreamiest Frosting
This is the easiest part, but it requires a little patience. Place your metal mixing bowl and beaters (or whisk attachment) in the freezer for about 15 minutes. Pour the chilled heavy cream, powdered sugar, and vanilla into the cold bowl. Start beating on low speed, then gradually increase to high. Watch as it transforms from liquid to soft peaks, and finally to stiff peaks. You’ll know it’s ready when you lift the beaters and the peaks stand straight up. Don’t walk away! Over-whipping will give you butter. Immediately cover and pop it back in the fridge until you’re ready to assemble.
Step 4: The Grand Assembly
This is where the fun really begins! If your cakes have domed tops, use a long serrated knife to carefully slice them in half horizontally, so you have four even layers. Place a small dollop of whipped cream on your cake stand or serving plate to act as “glue,” then place your first cake layer on top.
Brush the layer lightly with some of the reserved syrup from the roasted cherries. This adds moisture and an extra burst of flavor. Now, spread a thin, even layer of whipped cream over the cake. Using a slotted spoon, spoon a portion of the roasted cherries over the cream, leaving a little border around the edge so the filling doesn’t squish out.
Repeat this process—cake layer, cherry syrup, whipped cream, cherries—until you’ve used all four layers. Finally, use the remaining whipped cream to frost the top and sides of the cake. Don’t worry about it being perfectly smooth! A rustic, “naked cake” look with the layers peeking through is absolutely beautiful.
Step 5: The Decorative Final Touch
Pile those dark chocolate curls generously on top and artfully arrange your whole cherries. I love a dramatic, tall pile of chocolate in the center. Once it’s decorated, it’s crucial to chill the cake for at least 1-2 hours before serving. This allows the layers to set, making it infinitely easier to slice and serving up a clean, beautiful piece.
How to Serve Your Stunning Creation
When it’s time for the grand reveal, use a long, sharp knife that you’ve run under hot water and wiped dry. This will give you the cleanest slices, showcasing all those beautiful layers. Wipe the knife between each cut for a picture-perfect presentation. Serve each slice on its own plate, maybe with a tiny extra dollop of cream on the side for the true indulgent souls at the table. This cake is rich, so a modest slice is often plenty—but let’s be real, seconds are always an option!
Make It Your Own: Delicious Twists & Swaps
The beauty of this recipe is its versatility! Here are a few ways to play with it:
- Nutty Delight: Add ½ cup of finely chopped toasted almonds or hazelnuts to the cake batter for a delightful crunch.
- Peppermint Patty: Add 1 tsp of peppermint extract to the whipped cream for a cool, refreshing twist that pairs amazingly with the chocolate.
- Dairy-Free Dream: Use your favorite plant-based milk and chilled coconut cream (from a can) for the frosting. The coconut flavor is a natural friend to both cherry and chocolate.
- Orange Blossom: Add the zest of one orange to the cake batter and 1 tsp of orange extract to the whipped cream for a chocolate-orange fantasy.
- Mini Marvels: Turn this into a stunning tier of cupcakes! Fill them with the roasted cherries and top with whipped cream. Baking time will be reduced to about 18-20 minutes.
Anna’s Extra Kitchen Chatter
This recipe has been a living, evolving thing in my kitchen. The first time I made it, I was so nervous about the sesame oil that I only used a quarter of the amount. The cake was good, but it was missing that “wow” factor. It took a brave, “let’s just go for it” moment to use the full cup, and oh my goodness, what a difference! It’s the ingredient that gets the most “What IS that? It’s incredible!” comments.
I also have a funny story about the first time I tried to make chocolate curls. I didn’t warm the chocolate bar at all, and I just ended up with a pile of chocolate dust and a very frustrated chef. The trick is to let the chocolate bar sit in your hands for a few minutes to warm up slightly, *then* use the vegetable peeler. You live and you learn!
Most importantly, this cake is meant to be shared with love. Don’t stress over every little imperfection. A lopsided layer or a slightly messy frosting job just adds to its homemade charm. The love you bake into it is the most important ingredient of all.
Your Questions, Answered!
I’ve gotten so many wonderful questions about this cake over the years. Here are the ones that pop up most often!
Q: Can I make any parts of this cake ahead of time?
A: Absolutely! This is a fantastic make-ahead dessert. You can roast the cherries and bake the cake layers up to two days in advance. Just let everything cool completely, wrap the cake layers tightly in plastic wrap, and store the cherries in an airtight container in the fridge. You can even make the whipped cream frosting a day ahead, but be sure to keep it chilled and give it a quick re-whisk before using.
Q: My cake layers are sinking in the middle! What happened?
A: Oh, I’ve been there! This is usually caused by a few things: 1) The oven door was opened too early in the baking process, letting out crucial heat. 2) The leavening agents (baking powder/soda) might be old and have lost their potency. 3) The batter was potentially under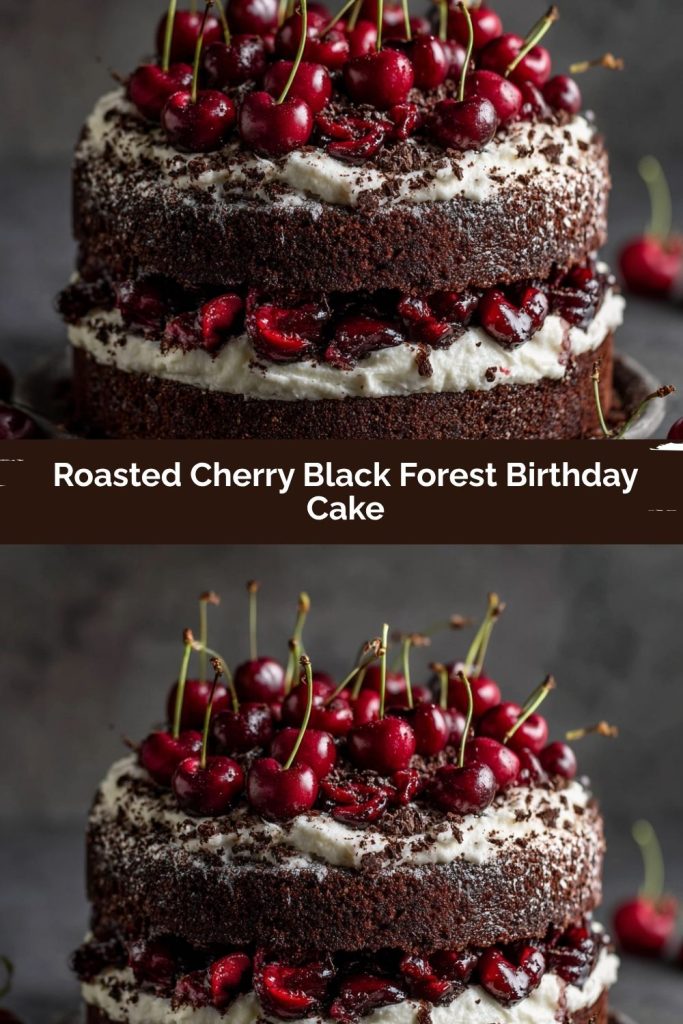
Final Thoughts
There’s something truly magical about baking a cake that feels like both a celebration and a love letter. This Roasted Cherry Black Forest Birthday Cake is more than just layers of chocolate and cream — it’s nostalgia, joy, and a little kitchen daring all wrapped up in one showstopping dessert. Every bite carries the richness of dark cocoa, the sparkle of roasted cherries, and that whisper of toasted sesame that makes people pause and smile before asking for seconds.
Whether you’re baking it for someone special or just to celebrate life’s small victories, this cake has a way of turning any day into an occasion. It’s indulgent yet heartfelt, elegant yet homey — exactly the kind of dessert that reminds us why we fell in love with baking in the first place. So take a deep breath, slice into that masterpiece, and let every forkful be a sweet reminder that food made with love always tastes the best.