Soft Banana Chocolate Chip Bars: Your New Favorite Way to Use Up Those Brown Bananas
Hey there, friend! Can we talk about that sad little fruit bowl for a second? You know the one. It’s got a couple of lonely, overripe bananas sitting there, looking more freckled than a kid after a summer day. We’ve all been there. You had grand plans for smoothies, but life happened. Now, they’re just… there. Whispering sweet nothings about their impending doom.
Well, I’m here to tell you to REJOICE. Those spotty, super-soft bananas are not a kitchen fail—they’re a secret weapon. They’re about to become the star of the most magical, chewy, chocolate-studded treat you’ll make all week. Forget complicated layer cakes and fussy pastries. Today, we’re making my legendary Soft Banana Chocolate Chip Bars.
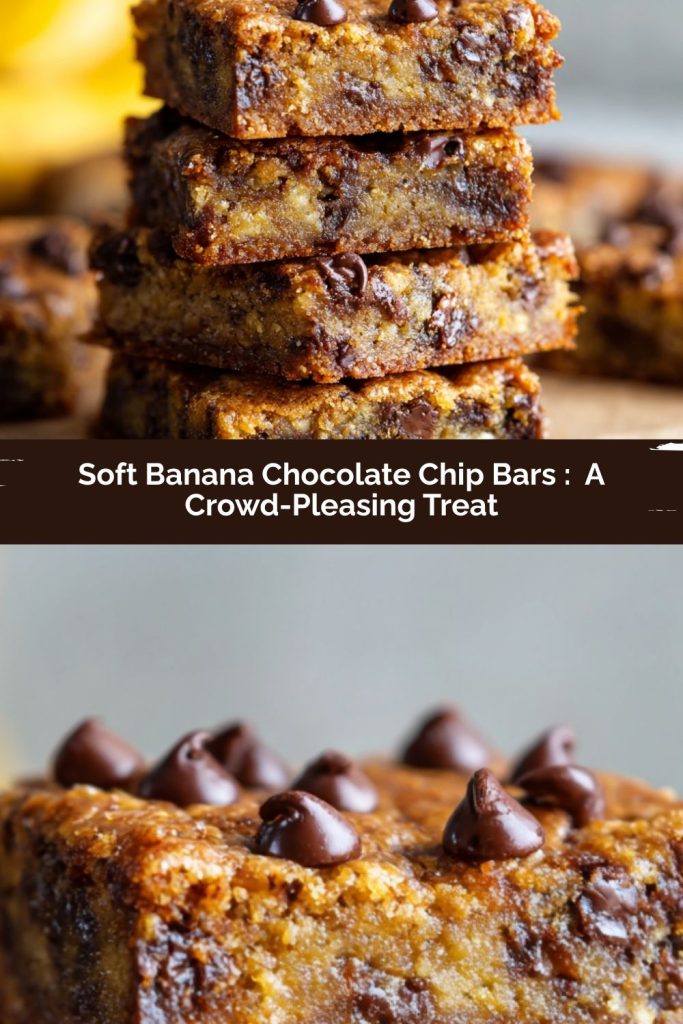
Imagine this: a bar that’s the love child of gooey banana bread and a soft-batch chocolate chip cookie. The edges are golden and slightly crisp, giving way to a perfectly tender, cakey center that’s absolutely packed with melty chocolate chips. It’s the kind of treat that makes your kitchen smell like a warm hug and disappears from the cooling rack at an alarming speed. Perfect for lunchboxes, last-minute potlucks, or that 3 pm “I need something sweet” moment. They come together in one bowl, with zero fancy equipment, in about the time it takes to watch your favorite sitcom. So, let’s rescue those bananas and cook up some magic together. Your future self (and anyone within sniffing distance of your oven) will thank you.
Why This Recipe Feels Like Home
PrintSoft Banana Chocolate Chip Bars : A Crowd-Pleasing Treat
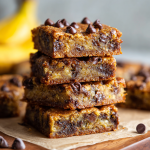
These Banana Chocolate Chip Bars are the ultimate chewy, gooey dessert with golden edges and melty chocolate chips in every bite. They come together fast with simple pantry ingredients and are a great way to use those extra bananas. Perfect for lunchboxes, bake sales, or late-night cravings—these bars disappear quick, so make a double batch if you’re sharing.
- Prep Time: 10 minutes
- Cook Time: 30 minutes
- Total Time: 40 minutes
- Yield: 12 bars 1x
Ingredients
1/2 cup unsalted butter, melted
1 cup brown sugar, packed
1 large egg
2 teaspoons vanilla extract
2 ripe bananas, mashed
1 cup all-purpose flour
1/2 teaspoon baking powder
1/2 teaspoon salt
1 cup semi-sweet chocolate chips (plus extra for topping)
Instructions
Preheat oven to 350°F (175°C). Line an 8×8 or 9×9-inch baking pan with parchment paper or lightly grease.
In a large bowl, whisk together melted butter and brown sugar until smooth.
Add egg, vanilla, and mashed bananas. Mix until fully combined.
Stir in flour, baking powder, and salt until just incorporated.
Fold in chocolate chips.
Spread the batter evenly in the pan and sprinkle extra chocolate chips on top.
Bake for 25 to 30 minutes, or until the center is set and the edges are golden.
Cool completely before slicing into bars for the cleanest cuts.
Nutrition
- Calories: 230
- Fat: 10g
- Carbohydrates: 33g
This recipe isn’t just a list of ingredients to me; it’s a little piece of my childhood kitchen, reimagined. My grandma, the queen of “waste not, want not,” had a permanent spot on her countertop for ripening bananas. To her, a black banana wasn’t trash—it was the starting line for something wonderful. Her classic banana bread was a weekly staple, and the smell of it baking is one of my core memory scents.
But as a busy mom myself, I often found I wanted that same comforting flavor in a faster, more shareable form. One rainy afternoon, with two impatient kids and three very sad bananas, I decided to experiment. I threw my favorite cookie and banana bread techniques into a bowl, crossed my fingers, and popped it in the oven. What emerged was a pan of pure joy. These bars were quicker to make, easier to pack, and somehow even more crowd-pleasing than the original loaf. They became an instant family legend—the recipe my kids now beg for and the one I’m most excited to pass on. Every time I make them, I think of my grandma’s thrifty wisdom and feel that same warm, sweet satisfaction of creating something delicious out of simple, humble ingredients.
Gathering Your Kitchen Allies
Here’s everything you’ll need to make these magic bars. I love to think of ingredients as friends in the kitchen—each one plays a special role!
- 1/2 cup unsalted butter, melted: This is our flavor and tenderness MVP. Melting it first makes the batter come together in a snap and gives the bars a chewy, rich texture. Chef’s Insight: Using unsalted lets you control the salt level. If you only have salted, just reduce the added salt in the recipe by a pinch.
- 1 cup brown sugar, packed: Don’t just spoon it in—really pack it into the measuring cup! The molasses in the brown sugar is the secret to that deep, caramel-like flavor and the beautifully soft, moist crumb. Light or dark brown sugar works great.
- 1 large egg: Our binding agent, bringing everything together and adding structure. Make sure it’s at room temperature for the smoothest batter. In a hurry? Place your cold egg in a bowl of warm water for 5 minutes.
- 2 teaspoons vanilla extract: A double dose! Vanilla is the background singer that makes the chocolate and banana flavors pop. Use the real stuff if you can—it makes a difference.
- 2 ripe bananas, mashed: The star of the show! The riper they are (black spots are good!), the sweeter and more banana-flavored your bars will be. Pro Tip: I mash mine right in the bowl with a fork—no need for extra equipment. You want them well-mashed but a few tiny lumps are totally fine.
- 1 cup all-purpose flour: The foundation. It gives our bars just the right amount of structure without making them tough.
- 1/2 teaspoon baking powder: Our little lift agent. It helps the bars rise gently and become soft and cakey, not dense.
- 1/2 teaspoon salt: Crucial! Salt balances all the sweetness and amplifies every other flavor in the pan. Never skip it.
- 1 cup semi-sweet chocolate chips (plus extra for topping): The pockets of joy! I prefer semi-sweet to balance the sweetness of the banana and brown sugar. Fun Swap: Try milk chocolate for a sweeter bar, dark chocolate for a more grown-up twist, or even a mix of chips and chopped nuts!
Let’s Make Some Magic: Step-by-Step
Alright, apron on? Let’s do this! This is where the fun happens. I’ll walk you through every step with all my favorite kitchen hacks.
- Preheat & Prep: First things first, get that oven warming up to a cozy 350°F (175°C). This is the perfect baking temperature for even cooking and golden edges. While it heats, line your 8×8 or 9×9-inch pan with parchment paper, letting some hang over the sides. This is my BEST hack for life—it creates a sling so you can lift the entire slab of bars out of the pan for flawless, crumble-free slicing. No parchment? A light coating of butter or non-stick spray works too.
- The Wet Team Mix-Up: In a large bowl, grab your melted butter and packed brown sugar. Whisk them together with some enthusiasm until it looks like a smooth, glossy caramel sauce. This is the base of all the chewy goodness! Now, crack in the egg, add the vanilla, and plop in your mashed bananas. Mix it all up until it’s one happy, unified batter. Don’t worry if it looks a little lumpy from the banana—that’s perfect.
- Bringing in the Dry Crew: Time to add the flour, baking powder, and salt right on top of the wet mixture. Here’s my big tip: mix until just combined. That means you stop stirring the second you no longer see dry streaks of flour. Over-mixing is the enemy of tender bars—it develops the gluten in the flour and can make them tough. A few tiny flour specks are okay; they’ll disappear when you add the chips.
- The Best Part—Chocolate! Dump in that glorious cup of chocolate chips. Use a spatula to gently fold them in. Folding is just a gentle turning motion that incorporates the chips without overworking the batter. Now, pour this beautiful, chunky batter into your prepared pan and use the spatula to spread it evenly into all the corners. For a bakery-worthy look, sprinkle a handful of extra chocolate chips over the top and gently press them in.
- Bake to Perfection: Slide the pan into your preheated oven. Now, the hard part: the wait! Bake for 25-30 minutes. You’re looking for the edges to pull away from the pan and turn a lovely golden brown, and the center to be set—it might still look a tiny bit soft, but it shouldn’t look wet or jiggle. The toothpick test is your friend: a few moist crumbs clinging to it is ideal; wet batter means it needs a few more minutes.
- The Crucial Cool Down: I know, I KNOW. It’s torture. But you must let the pan cool completely on a wire rack before you slice. This allows the structure to set, giving you those clean, beautiful bars instead of a gooey (albeit delicious) mess. I promise it’s worth the wait!
How to Serve Up the Goodness
Once they’re cool, use the parchment paper sling to lift the whole slab onto a cutting board. Slice into squares or rectangles—I usually go for 12 generous bars. They are heavenly all on their own, still slightly warm with those melty chips. For pure decadence, serve a bar slightly warmed with a small scoop of vanilla ice cream on top. The contrast of cold cream and warm, soft banana and chocolate is next-level. For a morning treat (we don’t judge here!), they pair beautifully with a hot cup of coffee.
Make It Your Own: Fun Recipe Twists
The beauty of this recipe is its flexibility! Here are a few of my favorite ways to switch it up:
- Blondie Boost: Stir in 1/2 cup of chopped toasted walnuts or pecans with the chocolate chips for a crunchy contrast.
- Peanut Butter Paradise: Swirl 1/3 cup of creamy peanut butter into the batter after spreading it in the pan. Use peanut butter chips instead of chocolate for a full PB experience.
- Funfetti Fun: Feeling festive? Replace 1/4 cup of the chocolate chips with rainbow sprinkles for a birthday-ready treat.
- Gluten-Free Goodness: Swap the all-purpose flour for a 1:1 gluten-free baking blend. The texture might be slightly more delicate, but just as delicious.
- Dairy-Free Delight: Use vegan butter or coconut oil and your favorite dairy-free chocolate chips.
A Few More Thoughts From My Kitchen
Over the years, this recipe has seen many iterations. I’ve learned that using super-ripe, almost black bananas is non-negotiable for the deepest flavor. I’ve also started keeping a “banana stash” in my freezer—whenever bananas go past their prime, I just peel them, pop them in a bag, and freeze them. They thaw in minutes for baking, and it means I’m never more than 30 minutes away from a pan of these bars. My kids have gotten so used to the ritual that they now announce, “Mom, the bananas are ready for their mission!” when they see them browning. It’s these little kitchen traditions that turn a simple recipe into a family favorite.
Your Questions, Answered!
Q: My bars turned out dense/gummy. What happened?
A: The most common culprit is over-mixing the batter once the flour is added, or using bananas that weren’t ripe enough. Next time, mix just until combined and wait for those bananas to get really spotty!
Q: Can I make these ahead of time? How do I store them?
A> Absolutely! They store beautifully. Once completely cool, keep them in an airtight container at room temperature for up to 3 days, or in the fridge for up to 5. They also freeze perfectly for up to 3 months. Just wrap individual bars or the whole slab tightly.
Q: Can I use a different size pan?
A> You can! A 9×9-inch pan will yield slightly thinner bars that may bake a few minutes faster. An 8×8 pan gives you thicker, more bakery-style bars. Just keep an eye on the bake time and use the visual cues (golden edges, set center) as your guide.
Q: My center sank a little after baking. Is that okay?
A> A slight dip in the center is totally normal, especially with such a moist, banana-heavy batter. It’s not a flaw—it’s a sign of a fudgy, tender texture! As long as it’s baked through, it’s perfect.
Nutritional Information*
Prep Time: 10 mins | Cook Time: 30 mins | Total Time: 40 mins | Servings: 12 bars
*Please note: These values are estimates calculated using an online tool and will vary based on specific ingredients and portion sizes.
- Calories: ~230
- Fat: 10g
- Carbohydrates: 33g
- Sugar: 21g
- Protein: 2g
Final Thoughts
These Soft Banana Chocolate Chip Bars are proof that humble, overripe bananas can transform into something extraordinary. They’re soft, tender, and packed with chocolatey pockets of joy—comfort food at its most approachable and satisfying. Every bite is a little hug, perfect for lunchboxes, afternoon snacks, or dessert with a scoop of ice cream.
What I love most is how forgiving and versatile this recipe is. Swap in nuts, swirl in peanut butter, or add a festive touch with sprinkles—the bars adapt beautifully to your mood and pantry. The key is embracing those super-ripe bananas; they’re the secret to rich flavor and tender texture that keeps everyone coming back for more.
At the end of the day, these bars aren’t just about the recipe—they’re about creating little kitchen traditions, rescuing ingredients, and turning simple moments into memories. Every time I bake a batch, I’m reminded that the sweetest things often come from the simplest ingredients and a little bit of love.