Forget Takeout: Your Journey to the Perfect Homemade Pizza Starts Here
Hey there, pizza lover! Let’s talk about that magical, elusive thing we all chase: the perfect pizza crust. You know the one. It’s got a crisp, lightly charred bottom that crackles when you bite in. The edge is golden and puffed, soft and chewy inside like a delicious cloud. It’s sturdy enough to hold a mountain of your favorite toppings but never tough or cracker-like. For so long, I thought that kind of pizza magic only happened in wood-fired ovens or the back of professional bakeries.
I’m here to let you in on the happiest kitchen secret: you can absolutely make a bakery-quality, soft and chewy homemade pizza dough right in your own kitchen. And the best part? It doesn’t require a sourdough starter, a degree in bread science, or even a whole afternoon. With just six simple, pantry-friendly ingredients and about an hour of mostly hands-off time, you can transform your kitchen into the best pizzeria in town.
This recipe is my forever go-to, the one I’ve tweaked and loved for years. It’s the foundation for our family’s legendary Friday Pizza Nights, the hero behind impromptu gatherings with friends, and my absolute favorite way to turn an ordinary Wednesday into something special. Whether you’re a nervous first-timer or a seasoned cook who’s never quite nailed the dough, I’m walking you through every single step. Grab your favorite mixing bowl and let’s cook up some serious magic—and the most satisfying pizza you’ve ever made. Your future self, biting into that first glorious homemade slice, will thank you.
My First Pizza & The “Aha!” Moment
My own pizza story starts with a minor kitchen disaster. Picture a much younger, overly am
PrintSoft & Chewy Homemade Pizza Dough
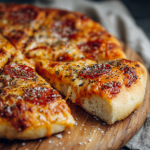
This soft and chewy homemade pizza dough is everything you want in a perfect crust—crispy on the bottom, pillowy inside, and sturdy enough for all your favorite toppings. Made with just six pantry staples and ready in under an hour, it’s a foolproof recipe that delivers bakery-quality results without specialty flours. Skip takeout tonight and experience the satisfaction of crafting your own perfect pizza from scratch.
- Prep Time: 40 minutes
- Cook Time: 15 minutes
- Total Time: 55 minutes
- Yield: 1 (20-ounce) pizza dough 1x
Ingredients
1 cup (240ml) warm water (about 110°F / 43°C)
1 tablespoon honey
2 ¼ teaspoons active dry yeast
2 ¾ cups (335g) all-purpose flour
1 tablespoon olive oil
1 teaspoon fine sea salt
Instructions
In a mixing bowl, combine warm water, honey, and yeast. Let sit 5–10 minutes until foamy. If no bubbles form, start again with fresh yeast.
Add flour, olive oil, and salt to the bowl.
Knead with a dough hook on low speed for 8–9 minutes (or by hand for 10 minutes) until smooth and soft. The dough should clean the sides of the bowl and feel slightly tacky.
Shape into a tight ball and place in a lightly oiled bowl. Cover and let rise in a warm spot for 30–40 minutes, or until doubled in size.
Gently punch down the dough to release air.
Roll to desired thickness and transfer to a baking sheet or preheated pizza stone.
Add sauce and toppings. Bake at 475°F (250°C) for 12–15 minutes, until golden brown and bubbly.
Nutrition
- Calories: 1,150
- Fat: 15g
- Carbohydrates: 210g
- Protein: 30g
bitious me, determined to make “authentic” pizza on a whim. I found a complicated recipe that required 72 hours of fermentation and a specific type of Italian “00” flour I had to hunt down. The result? A stressed-out cook and a crust that could have doubled as a roofing tile. My poor, supportive family chewed their way through it with brave smiles, but my pizza dreams felt deflated.
The turning point came a few years later, not in Italy, but in my friend Marco’s cramped, incredibly warm Brooklyn apartment. His nonna was visiting, and she decided to teach us how to make pizza “the way you make it when you’re hungry now.” She didn’t weigh anything. She used all-purpose flour from a giant bag in the pantry. She made a well in the flour, poured in yeast she’d awakened with a pinch of sugar from the bowl on the table, and mixed it with her hands. There was no stress, no special tools—just intuition, simple ingredients, and the joyful expectation of a shared meal. That dough, risen on the sun-drenched windowsill, baked into the most beautifully puffed, fragrant, and delicious crust I’d ever tasted.
That was my “aha!” moment. Great homemade pizza dough isn’t about perfection or obscure ingredients; it’s about understanding a few simple principles and cooking with confidence and joy. This recipe is my love letter to that lesson—simple, reliable, and guaranteed to fill your kitchen with that same wonderful, expectant smell of possibility.
Your Pizza Toolkit: Simple Ingredients, Big Flavor
See? I told you it was simple! Just six humble ingredients come together to create something truly extraordinary. Here’s what you’ll need and why each one matters:
- 1 cup (240ml) warm water (about 110°F / 43°C): Think baby bottle warm, not hot tub hot. Too hot and you’ll shock the yeast; too cold and it won’t wake up. If you don’t have a thermometer, it should feel pleasantly warm, not hot, on your wrist. Chef’s Insight: This is the bath that wakes up our tiny yeast friends, so getting the temperature right is your first step to success!
- 1 tablespoon honey: This is the yeast’s favorite snack! It gives them a quick burst of energy to get bubbling. Don’t worry, your crust won’t taste sweet. You can absolutely use an equal amount of granulated sugar if that’s what you have. Sub Tip: White sugar, brown sugar, or even maple syrup will work in a pinch.
- 2 ¼ teaspoons active dry yeast: That’s one standard packet. This is our leavening magic. We’re using “active dry” because it’s reliable and available everywhere. Make sure your yeast isn’t ancient—if it doesn’t foam in the first step, it won’t rise your dough. Chef’s Insight: You can use instant yeast interchangeably here; just mix it right in with the flour and skip the “foaming” step.
- 2 ¾ cups (335g) all-purpose flour: The workhorse! All-purpose flour has the perfect protein level (usually 10-12%) to give us a chewy yet tender crust. I give the weight in grams because it’s the most accurate way to measure flour. If using cups, fluff your flour with a spoon, spoon it into the cup, and level it off—don’t scoop! Sub Tip: For a slightly chewier, more “artisan” crust, you can swap in ½ cup of bread flour for ½ cup of the all-purpose.
- 1 tablespoon olive oil: Fat is flavor and tenderness! The oil enriches the dough, giving it a better texture and a lovely golden color. It also helps prevent the dough from sticking. Use a good extra virgin olive oil for a hint of fruity flavor. Chef’s Insight: This is also your secret weapon for an easy-to-handle, less sticky dough.
- 1 teaspoon fine sea salt: The flavor enhancer. Salt does more than just season—it tightens the gluten structure, giving the dough strength. Always add it separately from the yeast in the initial mix, as direct contact with salt can inhibit the yeast. Sub Tip: Table salt works fine; just use the same volume.
Let’s Make Dough! Your Foolproof, Step-by-Step Guide
Ready to get your hands a little dusty? Follow these steps, and you’ll have perfect pizza dough before your favorite show finishes an episode.
- Wake Up the Yeast: In the bowl of your stand mixer (or a large mixing bowl if kneading by hand), combine the warm water, honey, and yeast. Give it a quick stir with a fork and let it sit for 5-10 minutes. You’re looking for a foamy, creamy layer on top—this is called “proofing” and it’s your sign that the yeast is alive and hungry! Chef’s Hack: No bubbles? Your water might have been too hot/cold or your yeast is old. Start over with a new packet—it’s worth it!
- Bring It All Together: Once your yeast mixture is nice and foamy, add the flour, olive oil, and salt to the bowl. Attach the dough hook to your stand mixer. Chef’s Note: You can 100% do this by hand! I’ll give you tips for that, too.
- The Knead for Speed (or By Hand!): Turn the mixer on low speed and let it knead the dough for 8-9 minutes. What are we looking for? The dough will start out shaggy, then come together into a ball that cleans the sides of the bowl. It should be smooth, soft, and slightly tacky to the touch but not stickily wet. Hand-Kneading Hero Time: If kneading by hand, dump the shaggy dough onto a lightly floured surface. Use the heels of your hands to push the dough away from you, then fold it back over itself, give it a quarter turn, and repeat. Do this for a full 10 minutes. It’s a great arm workout and incredibly satisfying! The dough is ready when it’s smooth, elastic, and springs back slowly when you poke it.
- The First Rise (The “Puffy Nap”): Lightly oil a clean bowl (or just wipe out your mixing bowl and oil it). Shape your kneaded dough into a smooth, tight ball by pulling the edges under. Place it seam-side down in the bowl, turning it once to coat it lightly in oil. Cover the bowl with a damp kitchen towel, plastic wrap, or a fitted lid. Now, find it a warm, draft-free spot to rise. On top of the fridge, in a turned-off oven with the light on, or on the counter on a sunny day are all perfect. Let it rise for 30-40 minutes, or until about doubled in size. Chef’s Hack: In a hurry? You can use this dough after this single rise! The flavor develops more with a longer rise, but for a quick weeknight pizza, it’s still fantastic.
- Punch & Shape: Gently press your fist into the center of the risen dough to deflate it—this is called “punching down” and it releases the large gas bubbles. Turn it out onto a lightly floured surface. At this point, you can divide it in half for two thinner, crispier crusts, or keep it as one ball for a thicker, chewier deep-dish style. Let the dough rest for 10 minutes under the towel—this relaxes the gluten and makes it MUCH easier to stretch.
- Stretch, Top, & Bake! Preheat your oven as high as it will go (ideally 475°F-500°F / 245°C-260°C). If you have a pizza stone or steel, put it in the lower third of the oven now to preheat for at least 30 minutes. To shape, start by pressing the dough into a disc, then use your hands to gently stretch it from the center outward, letting gravity help. Don’t roll it with a pin if you can help it—you’ll push out all the lovely air! Transfer your shaped dough to a piece of parchment paper (this is your lifeline for easy transfer to a hot stone). Add your sauce and toppings lightly—overloading is the enemy of a crisp crust. Slide the pizza (on the parchment) onto your preheated stone or a regular baking sheet. Bake for 12-15 minutes until the crust is golden, the cheese is bubbly, and your kitchen smells like heaven.
Time for the Grand Finale: Serving Your Masterpiece
The moment of truth! Slide that gorgeous, bubbly pizza onto a large cutting board. Let it rest for just 2-3 minutes—this allows the cheese to set slightly so it doesn’t slide off in one sheet when you slice. Use a pizza wheel or a large chef’s knife to cut it into wedges. I love finishing it with a final flourish: a drizzle of good olive oil, a sprinkle of flaky sea salt, fresh basil leaves, or a pinch of red pepper flakes. Serve it right on the board in the middle of the table for that true pizzeria-at-home feel. Gather everyone, pour some drinks, and get ready for the compliments to roll in!
Make It Your Own: Delicious Twists & Swaps
The fun begins once you’ve mastered the base recipe! Here are a few ways to play:
- Herb & Garlic Infused: Add 1 teaspoon each of dried oregano and garlic powder to the flour before mixing.
- Whole Wheat Blend: Substitute up to 1 cup of the all-purpose flour with whole wheat flour for a nuttier flavor and more fiber. You may need an extra tablespoon or two of water.
- Mini Pizza Party: Divide the dough into 4-6 small balls after the first rise. Let guests top their own personal pizzas!
- Dough for Later: After the first rise, punch down, place the ball in an oiled zip-top bag, and refrigerate for up to 3 days (flavor gets better!) or freeze for 3 months. Thaw overnight in the fridge before using.
- Gluten-Free Option: Use a trusted 1:1 gluten-free all-purpose flour blend (like Bob’s Red Mill) and add 1 teaspoon of xanthan gum if your blend doesn’t include it.
Anna’s Kitchen Notes & Stories
This dough has been on quite a journey with my family. It’s been shaped into hearts for Valentine’s Day, rolled into mini “pizza bites” for toddler parties, and even used as the base for a truly epic breakfast pizza with scrambled eggs and bacon. One of my favorite memories is of my then-five-year-old nephew, completely covered in flour, proudly presenting his lopsided, sauce-heavy creation. It was the best pizza I ever ate because of the joy that went into it.
The biggest lesson? Don’t fear the stickiness. When you first start mixing, you might think, “This is too wet!” Trust the process. Keep kneading (adding only the tiniest dusting of flour if absolutely necessary), and it will transform. This dough is forgiving. Even if your shape is more “rustic country” than “perfect circle,” I promise it will taste incredible. The goal isn’t Instagram perfection; it’s a delicious, happy meal made with your own two hands.
Your Questions, Answered (Let’s Troubleshoot!)
Q: My dough didn’t rise at all. What happened?
A: The most common culprit is expired yeast or water that was too hot (which killed the yeast) or too cold (which put it to sleep). Always proof your yeast in step one to ensure it’s active. If it doesn’t foam, start fresh with a new packet.
Q: My dough is too sticky to handle! Help!
A> Don’t panic! Stickiness is normal, especially before kneading. First, make sure you kneaded for the full time—gluten development makes dough less sticky. When shaping, use a light hand with flour on your work surface and hands. You can also coat your hands in a little olive oil instead of flour for easy handling.
Q: Can I make this dough ahead of time?
A: Absolutely, and I often do! For the best flavor, do the first rise at room temperature, then punch it down, place it in an oiled container, and refrigerate for 1-3 days. When ready to use, let it sit at room temp for 30-60 minutes to take the chill off before shaping. You can also freeze the dough ball for up to 3 months.
Q: Why is my crust tough/chewy in a bad way?
A> This usually means the dough was over-kneaded or too much flour was worked in during shaping. We’re going for soft and chewy, not tough. Measure your flour carefully (using a scale is best) and knead just until smooth. Also, avoid over-rolling with a pin—gentle stretching