***
Let’s Bake a Little Sunshine: Soft Italian Easter Cookies
Hello, my friend! Can you smell it? That soft, sweet scent of vanilla and almond wafting from a warm kitchen? It’s the smell of spring, of celebration, and for me, it’s the smell of pure, unadulterated joy. Today, we’re diving into one of my all-time favorite traditions: making these utterly delightful Soft Italian Easter Cookies.
Imagine a cookie that’s not quite a cookie, but not quite a cake. It’s a soft, tender, cake-like little cloud, shaped into a cheerful donut form and draped in a simple, shimmering glaze. The real magic happens with a sprinkle of colorful nonpareils, turning each one into a tiny, edible piece of confetti. These aren’t just cookies; they’re little bites of happiness, and they hold a special place in my heart and on my Easter table.
I know the world of baking can sometimes feel intimidating, with its precise measurements and scientific terms. But trust me on this one: this recipe is your new best friend. It’s straightforward, forgiving, and designed to bring you that “wow, I made this!” feeling. We’re creating memories here, not stress. So, tie on your favorite apron, put on some cheerful music, and let’s fill your kitchen with the warmth and magic of this beautiful tradition. You’re about to create something truly amazing.
The Sweet Taste of Memory
PrintSoft Italian Easter Cookies with Vanilla Almond Glaze (Traditional & Festive)

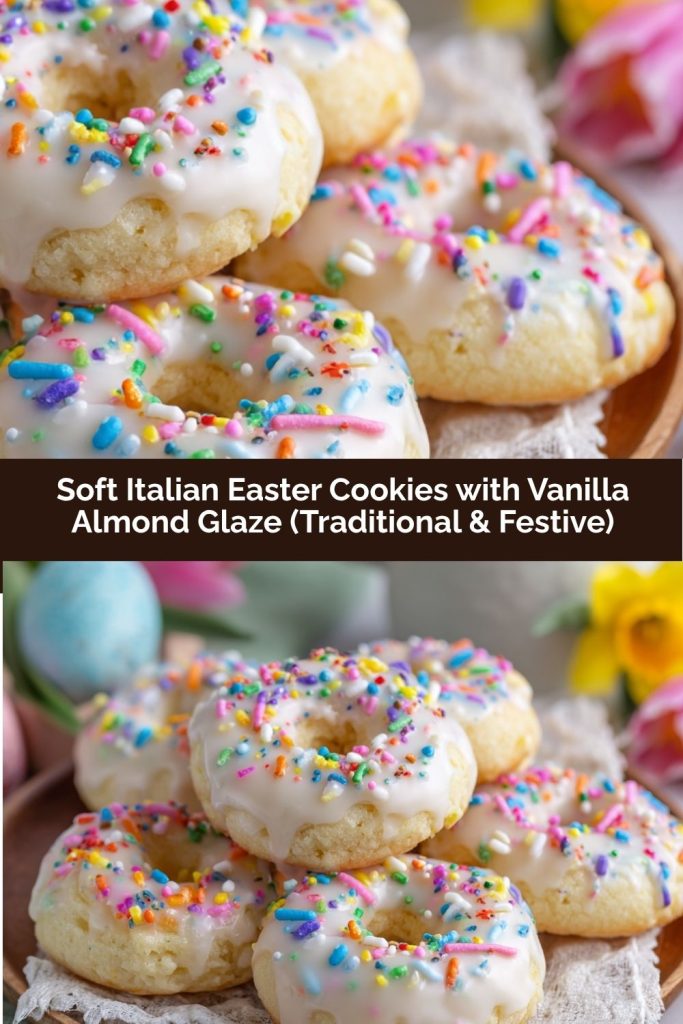
These Italian Easter Cookies are a timeless treat—soft, cakey, and lightly sweet with a delicate vanilla-almond glaze. Shaped like little donuts and topped with colorful icing and sprinkles, they’re a joyful addition to any spring celebration. A beloved classic with a playful twist!
- Prep Time: 15 minutes
- Cook Time: 12 minutes
- Total Time: 27 minutes
- Yield: 24 cookies 1x
Ingredients
For the Cookies:
6 tbsp unsalted butter, softened
½ cup granulated sugar
2 large eggs
2 tsp vanilla extract
1 tsp almond extract
2 tbsp whole milk
2 cups all-purpose flour
2 tsp baking powder
1 tsp salt
For the Glaze:
1 cup powdered sugar
2–3 tbsp milk
½ tsp vanilla or almond extract
Food coloring (pastel shades)
Rainbow nonpareil sprinkles
Instructions
Preheat oven to 350°F (175°C) and line a baking sheet with parchment paper.
Cream butter and sugar together until light and fluffy.
Beat in eggs one at a time, then add vanilla, almond extract, and milk.
In a separate bowl, whisk flour, baking powder, and salt.
Gradually mix dry ingredients into wet until a soft dough forms.
Scoop and roll dough into 1-inch balls. Slightly flatten and use your finger to poke a small hole in the center (like a mini donut).
Bake for 10–12 minutes, until set but not browned. Cool completely.
Mix glaze ingredients and divide into bowls. Tint each with pastel food coloring.
Dip cooled cookies in glaze, top with sprinkles, and let set.
Nutrition
- Calories: ~110
- Sugar: 9g
- Fat: 4g
- Carbohydrates: 15g
- Protein: 2g
My love for these cookies started not in a fancy bakery, but at my Nonna’s linoleum-topped kitchen table. Every year, a few days before Easter, the entire house would transform. The air would grow thick with the promise of sweet dough and the sound of my aunts’ laughter. I was always the designated “sprinkle supervisor,” a title I took with the utmost seriousness.
My job was to add the final, glorious touch. As my Nonna and aunts would dip the pale, warm cookies into the pastel glazes, they’d pass them down the assembly line to me. With a tiny, flour-dusted hand, I’d shower them with rainbow sprinkles, often getting more on the table and my face than on the cookies. Nonna would just chuckle, wipe a smudge of pink icing from my cheek, and say, “Anna, mia cara, you are putting the joy right in.” To this day, the rattle of a sprinkle jar sends me right back to that sunny kitchen, surrounded by love, laughter, and the sweet anticipation of a holiday feast. It’s that feeling—that pure, simple joy—that I want to share with you today.
Gathering Your Sunshine: The Ingredients
One of the things I adore about this recipe is its beautiful simplicity. We’re using simple, pantry-friendly ingredients to create something extraordinary. Here’s your shopping list, complete with my little chef insights to set you up for success!
For the Soft, Cakey Cookies:
- 6 tbsp Unsalted Butter, softened: This is the heart of our cookie’s richness. Using unsalted lets you control the salt level. Chef’s Tip: “Softened” is key! Leave it on the counter for about 30-60 minutes. It should be cool to the touch but yield easily when you press it. Too melted, and your cookies will spread; too cold, and they won’t cream properly.
- ½ cup Granulated Sugar: Just the right amount to sweeten the dough without making it overly sweet, letting the glaze shine.
- 2 large Eggs: They act as a binder and provide structure, giving our cookies that lovely cakey texture. Make sure they’re at room temperature to blend seamlessly with the butter.
- 2 tsp Vanilla Extract & 1 tsp Almond Extract: This is the dynamic flavor duo! The vanilla provides a warm base, while the almond gives it that classic, nostalgic Italian cookie flavor. If you’re not an almond fan, you can use all vanilla, but I highly recommend trying the combo!
- 2 tbsp Whole Milk: This adds a touch of moisture for a supremely tender crumb. Any milk you have on hand will work, but whole milk gives the best richness.
- 2 cups All-Purpose Flour: The foundation of our cookie. Chef’s Hack: For the lightest cookies, fluff your flour with a spoon, sprinkle it into your measuring cup, and level it off. Don’t pack it down!
- 2 tsp Baking Powder: This is our leavening agent, the little miracle worker that makes the cookies puff up and become soft and airy.
- 1 tsp Salt: Never skip the salt! It’s the flavor enhancer that makes all the other ingredients—especially the sugar and extracts—pop and taste more like themselves.
For the Glaze & Toppings:
- 1 cup Powdered Sugar: Also known as confectioner’s sugar, it creates a smooth, melt-in-your-mouth glaze that hardens just slightly.
- 2–3 tbsp Milk: We’ll add this a tablespoon at a time to get our perfect dipping consistency—not too thick, not too runny.
- ½ tsp Vanilla or Almond Extract: A little extra flavor in the glaze makes a world of difference.
- Food Coloring (Pastel Shades): This is where the fun begins! Think soft pinks, blues, yellows, and lavenders. Gel food coloring gives vibrant color without thinning the glaze.
- Rainbow Nonpareil Sprinkles: The non-negotiable, joyful finish! These tiny round sprinkles are the classic choice, but feel free to get creative with your favorites.
Let’s Create the Magic: Step-by-Step Instructions
Alright, my friend, it’s time to get our hands (a little) dirty! Follow these steps, and you’ll have a batch of perfect, soft cookies in no time. I’ve packed this section with all my favorite tips and hacks to guide you.
- Preheat and Prep: First things first, preheat your oven to 350°F (175°C). This gives it plenty of time to reach the perfect, steady temperature. Line a baking sheet (or two!) with parchment paper. Little Chef Hack: Parchment paper is your best friend here. It prevents sticking and makes cleanup an absolute dream. No parchment? A light coating of butter or non-stick spray will work, but parchment is king.
- Cream the Butter & Sugar: In a large mixing bowl, beat the softened butter and granulated sugar together. Now, don’t rush this! We’re not just mixing; we’re “creaming.” Beat it on medium-high speed for a good 2-3 minutes until the mixture becomes pale, light, and fluffy. This step incorporates air into the dough, which is part of what gives the cookies their lovely soft texture.
- Incorporate the Wet Ingredients: Crack in the eggs, one at a time, beating well after each addition. This allows the eggs to emulsify properly with the butter mixture. Then, pour in the vanilla extract, almond extract, and milk. Mix until everything is beautifully combined and smooth. It might look a little curdled at this point—that’s totally okay! It will all come together when we add the dry ingredients.
- Whisk the Dry Team: In a separate, medium-sized bowl, whisk together the all-purpose flour, baking powder, and salt. Chef’s Insight: Whisking is a fantastic way to evenly distribute the baking powder and salt throughout the flour, ensuring every single cookie rises perfectly and has a consistent flavor.
- Bring the Dough Together: Now, with your mixer on a low speed, gradually add the dry ingredients to the wet ingredients. Mix just until the flour disappears and a soft, slightly sticky dough forms. Do not overmix! Overmixing develops the gluten in the flour and can lead to tough cookies. A few stray flour bits are better than an overworked dough.
- Shape with Love: This is the fun part! Scoop up about a tablespoon of dough and roll it between your palms into a smooth, 1-inch ball. Place it on your prepared baking sheet, and gently flatten it just a tad with your palm. Then, using your finger, poke a clean hole right through the center to create that classic donut shape. Don’t worry about it being perfect—rustic is charming! Just make sure the hole is clear so it doesn’t bake closed.
- Bake to Perfection: Slide those beauties into your preheated oven and bake for 10-12 minutes. We’re looking for them to be “set” – meaning they spring back lightly when touched. The key here is that they should not brown. We want them pale and blonde. A hint of golden color on the very bottom is fine, but the tops should remain light. This is what keeps them soft and cake-like.
- The All-Important Cool Down: Once out of the oven, let the cookies cool on the baking sheet for about 5 minutes before transferring them to a wire rack to cool completely. This is a non-negotiable step for glazing! If you try to glaze a warm cookie, the icing will just melt right off and create a puddle. Patience, my friend!
- Create Your Rainbow Glaze: While the cookies cool, let’s make the glaze. In a small bowl, whisk the powdered sugar with 2 tablespoons of milk and your extract of choice. You’re aiming for a consistency that’s thin enough to dip but thick enough to coat the back of a spoon. If it’s too thick, add more milk, a teaspoon at a time. Once you have the perfect base, divide it into small bowls and stir in a tiny drop of your chosen pastel food colorings.
- The Grand Finale: Dip & Decorate! Now for the grand finale! Take a completely cooled cookie, turn it upside down, and dip the top directly into the glaze. Swirl it around gently to get an even coat, let the excess drip off, and then place it back on the rack. Immediately, while the glaze is still wet, shower it with a generous helping of rainbow sprinkles. This is your moment to shine! Let the glaze set completely before stacking or storing.
Sharing the Joy: How to Serve
Presenting these cookies is part of the fun! I love piling them high on a beautiful cake stand or a vintage platter. They look absolutely stunning when you group the colors together, creating a gorgeous pastel rainbow effect. They’re the perfect centerpiece for your Easter brunch, a lovely homemade gift nestled in a cellophane bag tied with a ribbon, or simply the star of your afternoon coffee break. Serve them with a pot of tea, a mug of rich coffee, or a tall glass of cold milk. However you share them, you’re sharing a little piece of homemade happiness.
Make It Your Own: Delicious Recipe Variations
Once you’ve mastered the classic, feel free to play with the recipe! Here are a few of my favorite twists:
- Lemon Bliss: Swap the almond extract in the dough and glaze for fresh lemon zest and juice. It’s incredibly bright and fresh for spring!
- Anise Traditional: For a more traditional flavor profile, replace the almond extract with anise extract. It’s a classic Italian flavor that many remember fondly.
- Chocolate Drizzle: Not a fan of glaze? Simply melt some white or semi-sweet chocolate chips and drizzle it over the cooled cookies for an elegant finish.
- Colorful Dough: Add a drop of pastel food coloring directly to the cookie dough before baking for a fun, colorful surprise on the inside!
- Gluten-Free Swap: You can use a 1:1 gluten-free all-purpose flour blend in place of the regular flour. The texture will be slightly more delicate, but just as delicious.
From My Kitchen to Yours: A Few Parting Thoughts
This recipe has been a living, evolving tradition in my family. My Nonna, of course, never wrote anything down—it was all “a handful of this, a splash of that.” It took me several batches to finally nail down the perfect soft texture, and let me tell you, there were a few hockey-puck batches along the way! The biggest lesson I learned was about the baking time. My oven runs a little hot, so I now pull my cookies out at exactly 10 minutes. They continue to cook on the hot pan, and this ensures they stay pillowy-soft for days.
I also remember one year, in a pre-Easter frenzy, I accidentally used salt instead of sugar in the glaze. Let’s just say it was a… memorable experience. My husband, bless him, took one bite and his eyes went wide. We still laugh about the “Savory Easter Cookie Incident of 2018.” So, double-check your ingredients, but don’t be afraid to laugh at the little mishaps. They make the best kitchen stories. The goal here is joy, not perfection.
Your Questions, Answered: FAQs & Troubleshooting
Over the years, I’ve gotten so many wonderful questions about this recipe. Here are the answers to the most common ones to help you on your baking journey!
Q: My dough is really sticky and hard to handle. What did I do wrong?
A: You likely did nothing wrong! This is a soft, sticky dough, and that’s what keeps the cookies tender. If it’s unmanageable, you can pop it in the fridge for 15-20 minutes to firm up slightly. Another trick is to lightly flour your hands before rolling the balls. A little stickiness is a good sign!
Q: Why are my cookies dry or tough?
A: The most common culprit is overmixing the dough once the flour is added. Remember, mix just until the flour disappears. The second reason could be over-baking. We want them just set, not golden brown. Even one extra minute can make a difference, so keep a close eye on that first batch.
Q: My glaze is too thin/too thick. How can I fix it?
A: Glaze consistency is easy to adjust! Too thin? Whisk in a little more powdered sugar, a tablespoon at a time. Too thick? Add more milk, just a teaspoon at a time, until it reaches a smooth, dippable consistency. It should coat the back of a spoon but still be able to drip off slowly.
Q: Can I make these ahead of time?
A> Absolutely! These are fantastic make-ahead treats. You can bake the cookies and let them cool completely a day or two in advance. Store them in an airtight container at room temperature. I recommend waiting to glaze them until the day you plan to serve them for the freshest look and texture. The glazed cookies will keep for 2-3 days in a single layer (or carefully stacked with parchment paper between layers).
Just the Facts: Prep & Nutrition Details
- Prep Time: 15 minutes
- Cook Time: 12 minutes
- Yield: About 24 cookies
Nutritional Information (per cookie, estimated): Calories: ~110 | Carbohydrates: 15g | Fat: 4g | Sugar: 9g | Protein: 2g
Final Thoughts
There’s something so beautifully simple about these Soft Italian Easter Cookies — they’re more than just a dessert; they’re a celebration of love, family, and tradition wrapped in pastel colors and sweet glaze. Every bite carries that tender, cake-like crumb, the warmth of vanilla and almond, and the nostalgia of generations gathered around the kitchen table.
Whether you’re baking them to honor a family memory or starting a new spring tradition of your own, these cookies are pure sunshine in edible form. They’re joyful, forgiving, and filled with the kind of sweetness that lingers long after the last crumb is gone. So go ahead — dust off that sprinkle jar, gather your loved ones, and fill your kitchen with laughter, color, and the sweet scent of home. Because that’s what these cookies are really all about — sharing a little love, one bite at a time.