Soft Sourdough Discard Sandwich Bread: Your New Daily Loaf
The Magic of a Simple, Perfectly Soft Loaf
Hey there, friend! Anna here. Let’s talk about something truly wonderful: the smell of fresh bread filling your kitchen. It’s a kind of everyday magic, isn’t it? That warm, yeasty, comforting aroma that promises a delicious meal and a happy heart. But I’ll let you in on a little secret—for the longest time, I thought making a classic, soft, sandwich-worthy loaf with my sourdough starter was a bridge too far. My discard was destined for pancakes and crackers, while my sandwich bread came from the store. That is, until I cracked the code on this recipe.
This Soft Sourdough Discard Sandwich Bread is my love letter to simple, reliable, utterly delicious homemade bread. It’s the loaf that changed my weekly routine. We’re not talking about a crusty, holey artisan boule that needs a 24-hour schedule (though I love those too!). This is the soft, fluffy, tender-crumbed hero of your breakfast toast, your kid’s PB&J, and the world’s most phenomenal grilled cheese. It has just a whisper of that tangy sourdough flavor, making it interesting without being intimidating.
The best part? We’re using sourdough *discard*—that portion of your starter you’d usually toss or stash in the fridge. It’s the ultimate kitchen win: zero waste, maximum flavor, and a loaf that comes together without an overly long fermentation. It’s approachable, it’s forgiving, and it’s about to become your new favorite project. So, if you’ve ever looked at your jar of starter and wished for a softer, simpler bread life, you’re in exactly the right place. Grab your favorite mixing bowl, and let’s turn that discard into something truly amazing.
A Loaf of Bread and a Side of Nostalgia
PrintSoft Sourdough Discard Sandwich Bread : Perfect for Everyday Toast & Lunch

This soft and fluffy sourdough sandwich bread is your new go-to loaf for daily toast, grilled cheese, or lunchbox sandwiches. Made with sourdough discard, it’s a great way to stretch your starter while keeping things easy and approachable. No overly long fermentation—just simple, delicious homemade bread with that classic sourdough tang and a tender crumb.
- Prep Time: 15 mins
- rise time: 2.5 hrs
- Cook Time: 35 mins
- Total Time: 3 hrs 15 mins
- Yield: 1 loaf 1x
Ingredients
1 cup sourdough discard (unfed)
¾ cup warm milk or water
2 tbsp sugar or honey
2 tbsp melted butter or oil
2 ¾ cups all-purpose or bread flour
1 tsp salt
1 ½ tsp instant yeast
Instructions
In a bowl, combine warm milk/water, sugar, and yeast. Let sit for 5–10 minutes until foamy.
Stir in sourdough discard and melted butter.
Add flour and salt. Mix into a dough, then knead for 6–8 minutes until smooth.
Cover and let rise for 1–2 hours, until doubled.
Punch down and shape into a log. Place into a greased 9×5” loaf pan.
Cover and let rise again for 30–45 minutes.
Preheat oven to 375°F (190°C). Bake for 30–35 minutes until golden and hollow-sounding when tapped.
Cool completely before slicing.
Nutrition
- Calories: 160
- Carbohydrates: 28g
- Protein: 4g
This bread always takes me back to my grandma’s yellow Formica countertop. She wasn’t a sourdough person (her starter was a little packet of Fleischmann’s), but she was a *bread* person. Every Wednesday, without fail, she’d bake two loaves of the softest white bread you can imagine. The ritual was everything: the rhythmic sound of her kneading, the tea towel draped over the bowl as it rose, and the triumphant moment she’d turn out the golden loaf, thumping the bottom to hear that hollow song.
My job was buttering the “heel”—the end piece—while it was still dangerously warm. She’d sprinkle it with a little cinnamon sugar for me, and that first bite, with the butter melting into the steamy, pillowy crumb, was pure joy. This recipe is my grown-up, sourdough-kissed homage to her. It captures that same spirit of comforting ritual and the unbeatable reward of a homemade loaf. It’s the feeling of being cared for, baked right in. Every time I pull this bread from the oven, I get a little flash of her kitchen, and it reminds me that the best recipes aren’t just about feeding the body; they’re about feeding the soul, too.
Your Bread-Baking Toolkit: Simple Ingredients, Big Flavor
Here’s everything you’ll need to create this soft, flavorful loaf. I’ve added my little chef’s notes next to each one—think of it as us chatting over the counter about why each ingredient matters and how you can swap things in a pinch.
- 1 cup (about 240g) sourdough discard, unfed: This is your secret flavor agent! Straight from the fridge is perfect. It doesn’t need to be bubbly or active, which is the beauty of using discard. It adds a subtle tang and wonderful depth. If you only have ¾ cup, that’s okay—just add an extra tablespoon or two of milk or water to the dough.
- ¾ cup (180ml) warm milk or water: I love whole milk for ultimate softness and richness, but any milk (even nondairy like oat or almond) works. Water makes a slightly chewier, more classic “bakery” texture. The key is “warm,” about 105-110°F (40-43°C)—think baby bottle warm, not hot. Too hot will hurt the yeast!
- 2 tbsp sugar or honey: A touch of sweetness balances the sourdough tang and gives the yeast a lovely boost. Honey adds a floral note, while plain sugar lets the wheat and sourdough flavors shine. Don’t worry, your bread won’t taste sweet!
- 2 tbsp melted butter or neutral oil: Butter = flavor and a tender crumb. Oil (like avocado or vegetable) keeps things super soft and is a great dairy-free option. I’m Team Butter, but you do you!
- 2 ¾ cups (345g) all-purpose or bread flour: All-purpose flour is my go-to for a tender sandwich loaf. Bread flour has more protein, giving you a slightly chewier texture and taller rise. I’ve tested it with both, and both are winners. For accuracy (and less mess!), I highly recommend weighing your flour.
- 1 tsp fine sea salt: The flavor enhancer! Never add it directly on top of your yeast. We mix it in with the flour so it distributes evenly and doesn’t inhibit the yeast’s work.
- 1 ½ tsp instant yeast: “But Anna, it’s a sourdough bread!” Yes! And the yeast is our insurance policy. It ensures a reliable, timely rise alongside our sleepy discard starter, making this recipe foolproof and perfect for a single afternoon. You can use active dry yeast too—just make sure to activate it in the warm milk first.
Let’s Get Baking: Your Step-by-Step Guide to Success
Follow these steps, and you’ll be a bread-baking hero in no time. I’ve packed each one with my best tips and little kitchen hacks I’ve learned over countless loaves.
Step 1: Wake Up the Yeast. In your large mixing bowl (or the bowl of a stand mixer), combine the warm milk/water, sugar/honey, and instant yeast. Give it a quick stir and let it sit for 5-10 minutes. You’re looking for a foamy, creamy layer on top—this tells you your yeast is alive and excited! Chef’s Tip: If you’re using active dry yeast instead of instant, this step is non-negotiable. With instant, you can technically skip it, but I love the visual confirmation that we’re off to a great start.
Step 2: Bring in the Discard. Stir the sourdough discard and melted butter (or oil) into the yeasty mixture. It might look a little curdled or shaggy—that’s 100% normal! You’re just combining all your wet ingredients.
Step 3: Form the Dough. Add the flour and salt to the bowl. If using a stand mixer, fit it with the dough hook and mix on low speed until a shaggy dough forms, then increase to medium speed for 6-8 minutes. If kneading by hand, stir with a sturdy spoon until it becomes too difficult, then turn it out onto a lightly floured surface. Knead for 8-10 minutes. You’re aiming for a smooth, slightly tacky (but not sticky) dough that springs back slowly when you poke it. Chef’s Tip: The “windowpane test” is your friend! Gently stretch a small piece of dough between your fingers. If you can stretch it thin enough to see light through it without it tearing, you’ve developed enough gluten. If it tears, knead for another minute or two.
Step 4: The First Rise. Place your beautiful smooth dough ball into a lightly oiled bowl, turning it once to coat. Cover the bowl with a damp kitchen towel, beeswax wrap, or plastic wrap. Let it rise in a warm, draft-free spot for 1 to 2 hours, until it has roughly doubled in size. Chef’s Hack: No warm spot? Turn your oven on to its lowest setting for 1 minute, then turn it OFF. Place the covered bowl in the turned-off, slightly warm oven. It’s the perfect proofing box!
Step 5: Shape the Loaf. Gently deflate the risen dough by pressing down on it in the bowl—no aggressive punching! Turn it out onto a very lightly floured surface. Using your hands, press and shape it into a rough rectangle, about 9 inches long. Tightly roll the rectangle up from the short end, like a jelly roll, pinching the final seam and the ends to seal. Place the log, seam-side down, into a greased 9×5-inch loaf pan.
Step 6: The Second Rise. Cover the loaf pan with the same towel or wrap. Let it rise again for 30-45 minutes. It should crest just about an inch above the rim of the pan. Meanwhile, preheat your oven to 375°F (190°C).
Step 7: Bake to Golden Perfection. Place the loaf pan in the center of your preheated oven and bake for 30-35 minutes. The top will be a deep, golden brown, and the bread will sound hollow when you carefully tap the top. Chef’s Tip: For an extra-soft crust, brush the top of the hot loaf with a little melted butter as soon as it comes out of the oven. It adds a gorgeous sheen and keeps the crust tender.
Step 8: The Hardest Part—Wait! Remove the bread from the pan immediately and let it cool completely on a wire rack before slicing. I know, the temptation is REAL. But slicing into a warm loaf traps steam and makes the crumb gummy. Trust me, the wait is worth it for perfect, non-squished slices!
Serving Up Your Masterpiece
Now for the fun part! Once cooled, use a serrated bread knife to slice your loaf. It’s perfect for thick, sturdy toast slathered with jam or avocado. It makes a grilled cheese sandwich that is nothing short of legendary—the tender crumb gets so crisp on the outside while staying soft inside. For lunchboxes, it holds up beautifully to spreads and won’t get soggy. And don’t you dare throw away the stale ends! Cube them for the best croutons or blitz into breadcrumbs. This loaf is your kitchen’s new best friend.
Make It Your Own: Delicious Twists & Swaps
- Herb & Garlic Swirl: Before rolling the dough into a log, brush the rectangle with olive oil and sprinkle generously with minced garlic, dried Italian herbs, and a pinch of salt. Roll up and bake as directed.
- Whole Wheat Honey: Swap out 1 cup of all-purpose flour for whole wheat flour. Use honey as your sweetener and a touch of extra milk if the dough feels too dry. A heartier, nuttier loaf.
- “Everything Bagel” Loaf: After the second rise and before baking, brush the loaf top with an egg wash (1 egg + 1 tbsp water) and sprinkle liberally with everything bagel seasoning.
- Dairy-Free & Vegan: Use water or plant-based milk, maple syrup or sugar, and a neutral oil. Your loaf will be just as soft and delicious.
- Cinnamon Raisin: Knead 1 tsp of cinnamon into the flour. After shaping the rectangle, sprinkle with a handful of raisins (or dried cranberries) and a mix of cinnamon and sugar before rolling up.
Anna’s Kitchen Notes
This recipe has been a living, evolving thing in my kitchen. The first time I made it, I was so nervous I checked the oven every five minutes! Over time, I’ve learned to relax—bread is surprisingly resilient. One funny fail: I once forgot the salt. The loaf rose like a champion and looked gorgeous, but one bite into that bland, strangely sweet bread was a hilarious lesson I’ll never forget. Now, I always measure my salt first and set it with the flour!
This recipe is also my favorite way to introduce friends to sourdough. It’s less of a commitment than a wild yeast-only loaf, but it still gives you that proud “I baked bread from scratch” feeling and the unique flavor that makes sourdough so special. Every time I slice into a loaf, I’m reminded that the best cooking is about joy, not perfection.
Your Questions, Answered
Q: My dough didn’t double in size during the first rise. What happened?
A: Don’t worry! The most likely culprits are old yeast or a too-cold environment. Yeast is a living thing. To test its vitality, you can proof it with a pinch of sugar in warm water first. If your kitchen is chilly, use the “warm oven” trick I mentioned. Give it more time—it can sometimes take up to 2.5 hours in a cool room. Patience is a key bread ingredient!
Q: Can I make this dough the night before?
A> Absolutely! For a “slow-rise” option, complete the recipe through Step 3 (kneading). Instead of letting it rise at room temp, place the dough in the oiled bowl, cover tightly, and put it in the fridge overnight (8-12 hours). The next day, let it sit on the counter for an hour to take the chill off, then proceed with Step 5 (shaping). The flavor will be even more developed!
Q: My bread is dense and gummy. Where did I go wrong?
A> This is almost always one of two things: 1) The bread was sliced while still warm, trapping steam and making the crumb gluey. Always cool completely! Or 2) The dough was under-kneaded, so the gluten structure wasn’t strong enough to hold all the lovely gas bubbles the yeast created. Next time, knead a few minutes longer or until it passes the windowpane test.
Q: How do I store this bread to keep it fresh?
A> For the best texture, keep it in a bread box or a paper bag at room temp for 2-3 days. For longer storage, slice and freeze it in a zip-top bag. You can pop frozen slices straight into the toaster—it’s a game-changer for busy mornings!
Nutritional Information (Approximate, per slice, 12 slices per loaf)
Calories: ~160 | Carbohydrates: 28g | Protein: 4g | Fat: 4g | Sugar: 2g
Note: This is an estimate based on the ingredients used. Values will vary with specific brands and substitutions.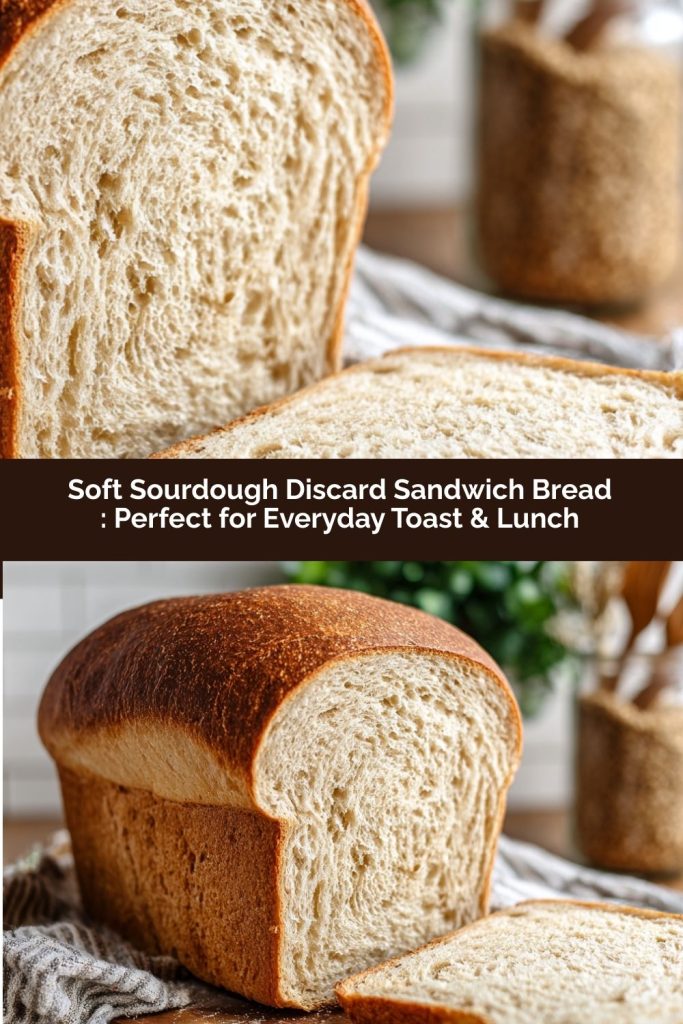
Final Thoughts
This Soft Sourdough Discard Sandwich Bread is proof that homemade bread doesn’t have to be intimidating—or wasteful! Using your sourdough discard turns what would normally be tossed into a soft, tender, and flavorful loaf that elevates breakfast, lunch, and snack time alike. The crumb is pillowy, the crust just lightly golden, and the subtle tang adds a layer of interest without being overpowering.
What makes this bread truly special is its versatility. Thick slices for toast, stacked sandwiches, or even cubed into the fluffiest croutons—every bite feels intentional, comforting, and just a little bit magical. It’s approachable for beginners yet rewarding enough for experienced bakers who want a reliable, everyday loaf.
This recipe is more than bread; it’s a small ritual of joy. From mixing and kneading to the smell of it rising and the first warm slice fresh from the oven, it’s a reminder that the simplest ingredients, combined with a bit of patience and love, can create something extraordinary. Once you try it, this loaf will likely become a weekly favorite—and maybe even a nostalgic ritual in your own kitchen.