The Loaf That Changed My Lunchbox: Your New Favorite Sourdough Sandwich Bread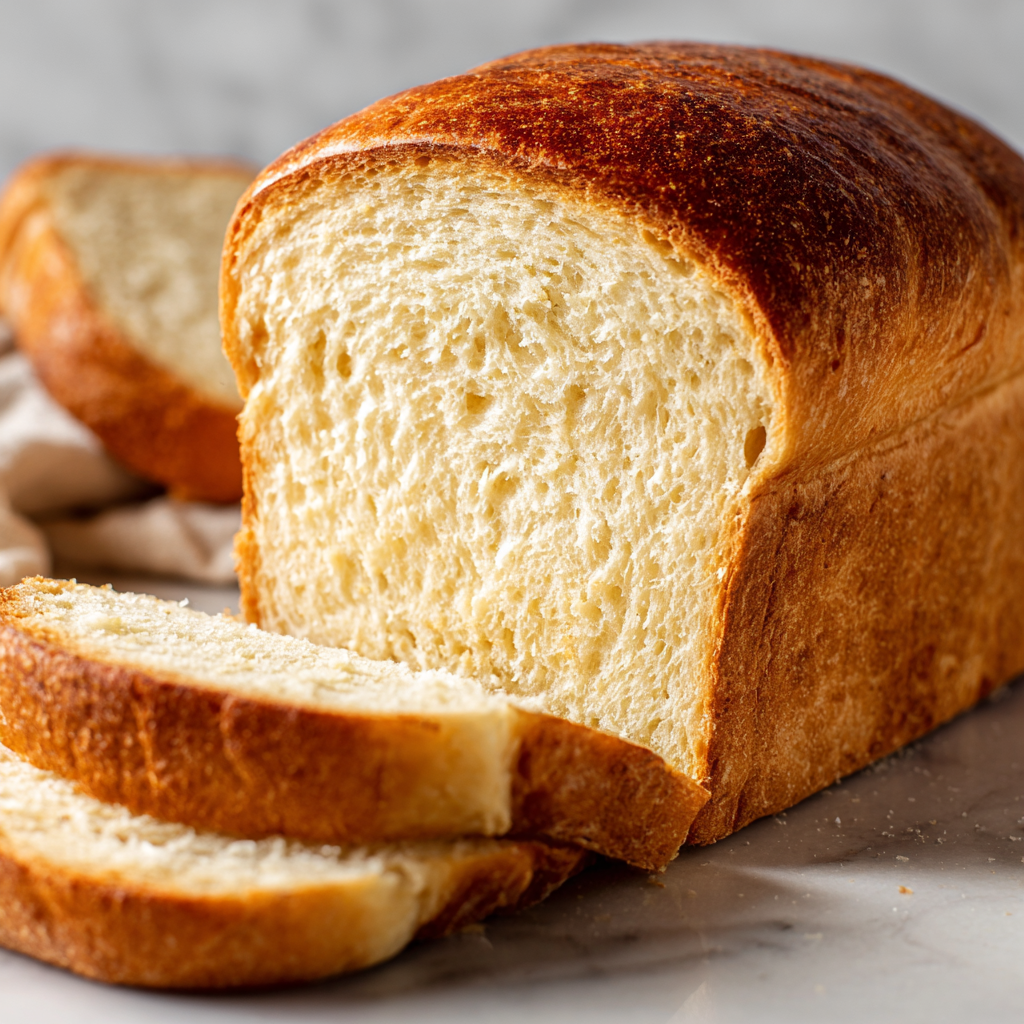
Hey there, friend! Let’s talk about something truly magical: the humble sandwich. But not just any sandwich. I’m talking about a sandwich built on a foundation of pure, homemade love. We’ve all been there, right? You get a craving for a classic grilled cheese or a towering turkey club, but the store-bought bread just… lets you down. It’s either too flimsy, too sweet, or lacks that soul-satisfying character that turns a simple lunch into a moment of joy.
What if I told you that the perfect, sliceable, toastable, cloud-soft yet sturdy sandwich bread is waiting for you right in your own kitchen? And that it’s made with the power of your very own sourdough starter? I know, I know—sourdough can sound intimidating. But this isn’t a fussy, high-hydration artisan loaf that requires a degree in dough-ology. This is our secret weapon: a simple, reliable, and incredibly forgiving sourdough sandwich bread.
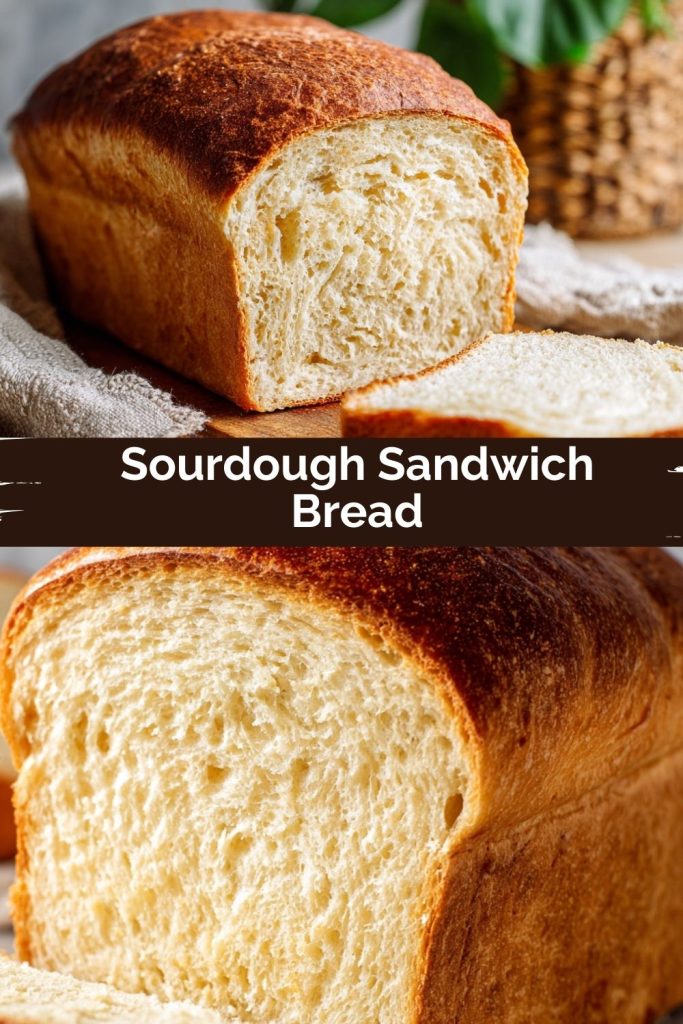
This loaf is my everything bread. It’s soft and fluffy with the most tender crumb, yet it has just a hint of that classic sourdough tang that makes every bite interesting. It slices like an absolute dream without crumbling, and it toasts up to golden-brown perfection. It’s the kind of bread that makes you want to plan your meals around it. Whether you’re slathering it with peanut butter for your kids or building an epic BLT for yourself, this bread turns the everyday into something extraordinary. So, are you ready to fill your kitchen with the best smell in the world? Let’s bake some magic together!
The Little Loaf That Could: A Lunchbox Memory
PrintSourdough Sandwich Bread

Soft, fluffy, and lightly tangy, sourdough sandwich bread is the everyday loaf elevated. It slices beautifully, toasts like a dream, and has a tender crumb that’s perfect for everything from grilled cheese to PB&J. Made with sourdough starter, it’s simple, wholesome, and totally worth the wait.
- Prep Time: 20 min
- rise time: 6–8 hrs
- Cook Time: 40 min
- Total Time: 0 minute
- Yield: 1 loaf (12 slices) 1x
Ingredients
3 ½ cups all-purpose or bread flour
1 cup active sourdough starter (fed and bubbly)
1 cup warm water
2 tbsp olive oil or softened butter
1 tbsp sugar or honey
1 ½ tsp salt
Instructions
In a large bowl, mix starter, warm water, sugar, and oil. Stir in flour and salt until a rough dough forms.
Knead for 8–10 minutes until smooth and elastic. Use a stand mixer or knead by hand.
Place dough in a lightly oiled bowl, cover, and let rise at room temp for 4–6 hours until doubled.
Gently shape into a loaf and place in a greased 9×5-inch loaf pan.
Cover and proof again for 1–2 hours, or until the dough rises about 1 inch above the rim.
Preheat oven to 375°F (190°C).
Bake for 35–40 minutes, until golden brown and hollow-sounding when tapped.
Cool completely on a wire rack before slicing.
Nutrition
- Calories: 160 per slice
- Sodium: 210mg
- Fat: 3g
- Carbohydrates: 28g
- Protein: 4g
I have to share a quick story about why this bread means so much to me. Years ago, when my son started first grade, he was, well, a notoriously picky eater. His lunchbox would come home almost as full as when it left, except for the tradeable snacks, of course. It was a daily puzzle. Then, one weekend, we baked this sourdough sandwich bread together. He loved kneading the dough (read: making a glorious mess) and watching it rise. On a whim, I made his Monday sandwich with our fresh homemade bread.
That afternoon, I opened his lunchbox expecting the usual disappointment. Instead, I found an empty wrapper and a little note his teacher helped him write: “Mom, the bread was yummy. Can I have more?” Cue the heart melting! It wasn’t just about him finally eating his lunch. It was about the connection. That loaf represented time, patience, and love—things you can truly taste. He’s in high school now and still requests this bread for his sandwiches. It’s our little tradition, a delicious reminder that the simplest acts of cooking can create the sweetest memories.
Gathering Your Ingredients: A Little Tour of the Lineup
Great bread starts with great ingredients. Here’s what you’ll need to create your masterpiece. Don’t worry—I’ve included all my favorite tips and swaps to make this work for you!
- 3 ½ cups all-purpose or bread flour: This is the backbone of our loaf! All-purpose flour creates a wonderfully soft and tender crumb, while bread flour, with its higher protein content, will give you a slightly chewier texture and a bit more structure. Both work beautifully, so use what you have. I often use a mix!
- 1 cup active sourdough starter (fed and bubbly): This is the heart and soul of the recipe! Your starter should be active and bubbly, meaning it’s been fed 4-12 hours prior and has doubled in size. It should pass the float test (a spoonful of starter should float in a glass of water). If it sinks, it needs more time to peak! This live starter is what will leaven our bread and give it that signature tang.
- 1 cup warm water: Think baby bottle warm, not hot. Too hot and you’ll harm the precious yeasties in your starter. Around 90-100°F (32-38°C) is perfect. It should feel warm and comfortable on your wrist.
- 2 tbsp olive oil or softened butter: Our fat component! This is the key to a soft, tender crumb and a beautifully supple dough that’s a joy to work with. Olive oil lends a subtle fruitiness, while butter gives a classic, rich flavor. You can’t go wrong.
- 1 tbsp sugar or honey: Don’t worry, this isn’t enough to make the bread sweet! This little bit of food helps energize the yeast and encourages a good rise. It also promotes a gorgeous golden-brown crust. I love the floral note honey adds, but plain white sugar works perfectly too.
- 1 ½ tsp salt: Absolutely non-negotiable! Salt is a flavor powerhouse. It balances the slight tang of the sourdough and tightens the gluten structure, giving your loaf strength. Never add it directly to your starter; always mix it in with the flour.
Let’s Get Baking: Your Step-by-Step Guide to Loaf Glory
Okay, team! Aprons on! Let’s walk through this process together. I’ll be right here with you, sharing all my little hacks to ensure your success.
Step 1: The Mix-Up. In a large bowl, combine your active, bubbly starter, warm water, sugar (or honey), and oil or butter. Give it a good whisk until it looks frothy and combined. This wakes everything up and ensures our ingredients are evenly distributed. Now, add the flour and salt. I like to stir it with a sturdy wooden spoon or a Danish dough whisk until a shaggy, rough dough forms and there’s no dry flour left in the bowl. It will look messy—that’s exactly right!
Step 2: The Knead. Here’s where we build strength and structure! Turn your shaggy dough out onto a lightly floured surface. Now, put on your favorite song and get ready to knead. Push the dough away from you with the heel of your hand, fold it back over itself, give it a quarter turn, and repeat. If the dough feels too sticky, add a tiny sprinkle of flour, but resist the urge to add too much! We want a soft, slightly tacky dough, not a dry one. Knead for 8-10 minutes until it becomes smooth, elastic, and springs back slowly when you poke it. Chef’s Hack: If you have a stand mixer, use the dough hook on medium speed for 6-8 minutes. It does a fantastic job and saves your arms!
Step 3: The First Rise (Bulk Fermentation). Place your beautiful smooth dough into a lightly oiled bowl, turning it once to coat it all over. This prevents a dry skin from forming. Cover the bowl tightly with plastic wrap, a damp tea towel, or, my favorite, a reusable bowl cover. Now, let it rest! Find a warm, draft-free spot in your kitchen. This rise is largely hands-off but requires patience. Let it rise for 4-6 hours, or until it has truly doubled in size. The time can vary wildly based on the temperature of your kitchen and the activity of your starter. Don’t watch the clock; watch the dough!
Step 4: Shape the Loaf. Gently deflate the risen dough by pressing down on it. Turn it out onto a lightly floured surface and gently press it into a rough rectangle. Now, we’re going to shape it for the pan. Tightly roll the rectangle into a log, pinching the final seam closed. Tuck the ends under slightly and place the loaf, seam-side down, into a greased 9×5-inch loaf pan. This shaping creates that lovely, uniform sandwich shape we’re after.
Step 5: The Second Rise (Proofing). Cover your loaf pan with that same plastic wrap or a large, reusable bag. Let the shaped dough proof again for 1-2 hours. It’s ready when the dough has risen about 1 inch above the rim of the pan. It should look puffy and alive. This is the final rise before it goes into the oven, so don’t rush it!
Step 6: Bake to Golden Perfection. Towards the end of the proofing time, preheat your oven to 375°F (190°C). Place a rack in the center position. When the dough is ready, slide it into the hot oven and bake for 35-40 minutes. You’ll know it’s done when the top is a deep, golden brown and the loaf sounds hollow when you tap on the bottom. Pro Tip: For an extra-soft crust, brush the top of the hot loaf with a little butter as soon as it comes out of the oven.
Step 7: The (Hardest Part) Cool Down. I know, I know. You want to tear into it immediately! But trust me on this: you MUST let it cool completely on a wire rack before slicing. This waiting period allows the steam to finish escaping and the crumb to set. Slicing into a hot loaf will result in a gummy, sticky texture. I promise, the wait is worth it for those perfect, non-crumbly slices!
Serving It Up: Let’s Build Something Amazing
Once your loaf is completely cool, it’s time for the main event: slicing and serving! Use a sharp serrated bread knife and a gentle sawing motion for the cleanest slices. This bread is the undisputed champion of the lunchbox, making the ultimate peanut butter and jelly or a classic ham and cheese. For a next-level experience, toast it lightly and slather it with good butter and a drizzle of honey. It makes incredible French toast on the second day and the absolute best, most crisp-yet-chewy grilled cheese you’ve ever had. Honestly, this bread is so good you might just end up eating it plain, and I wouldn’t blame you one bit.
Make It Your Own: Delicious Recipe Variations
The beauty of this base recipe is how adaptable it is! Here are a few of my favorite ways to mix it up:
- Seeded & Grainy: On the second kneading, fold in ¼ cup of a mix of sunflower seeds, pepitas, and rolled oats for a hearty, nutritious twist.
- Whole Wheat Wonder: Substitute 1 to 1 ½ cups of the all-purpose flour with whole wheat flour. You may need to add a tablespoon or two more water, as whole wheat absorbs more liquid.
- Everything Bagel Bliss: Before the final proof, brush the top of the loaf with a little water or an egg wash and sprinkle generously with everything bagel seasoning.
- Herb Garden Loaf: Knead in 2 tablespoons of fresh, finely chopped herbs like rosemary, thyme, and chives for a savory bread that’s incredible with soups and stews.
- Dairy-Free Delight: Simply use olive oil instead of butter and ensure your sugar is used instead of honey to keep it vegan-friendly.
Anna’s Chef Notes: A Little Extra Love
This recipe has been a living, evolving thing in my kitchen for years. The version I’m sharing with you today is the most reliable and crowd-pleasing iteration yet! One of my favorite kitchen memories is of a time I was filming a reel for this very bread and my cat, Pickles, decided to leap onto the counter mid-knead. Let’s just say we had a very fluffy, very floury cat and a slightly dented loaf that still baked up perfectly. The moral of the story? This dough is resilient! Don’t stress about perfection. Baking is about joy, not precision. Your loaf might not look like a magazine cover on the first try, but I guarantee it will taste incredible. The more you bake it, the more you’ll understand the feel of the dough and the rhythm of the rises. You’ve got this!
Your Questions, Answered: Sourdough Sandwich Bread FAQ
Q: My dough didn’t double in size during the first rise. What happened?
A: Don’t panic! This is almost always due to the starter not being active enough or the kitchen being too cold. Your starter should pass the float test before you begin. If your kitchen is chilly, create a warm proofing spot by placing the bowl in the oven with the light on (DO NOT turn the oven on) or on top of a heating pad set to low. Just give it more time. Sourdough operates on its own schedule!
Q: My bread is dense and gummy. Why?
A: The two most common culprits are slicing the loaf while it’s still warm and not baking it long enough. That cooling time is CRUCIAL for the structure to set. Also, ovens can vary, so ensure your bread is deeply golden brown and sounds hollow when tapped. An instant-read thermometer inserted into the center should read at least 190°F (88°C).
Q: Can I slow down the rise and make this overnight?
A: Absolutely! This is a great option. After kneading, place the covered bowl in the refrigerator for a cold ferment for up to 24 hours. The next day, let it sit on the counter for an hour to take the chill off, then shape, proof, and bake as usual. The long, cold ferment will develop an even deeper, tangier flavor.
Q: How do I store this bread to keep it fresh?
A> For the first day or two, it’s fine kept in a bread box or a paper bag on the counter. For longer storage, I highly recommend slicing it and freezing it! Place parchment paper between the slices, pop them in a freezer bag, and you can pull out a slice or two whenever a toast craving strikes. It toasts perfectly straight from the freezer.
Nutritional Information (Per Slice, approx. 12 slices per loaf)
Calories: ~160 | Fat: 3g | Carbohydrates: 28g | Sugar: 1g | Protein: 4g | Sodium: 210mg
Please note: This is an estimate based on the ingredients used. Values can vary depending on specific brands and measurements.
Final Thoughts
This sourdough sandwich bread is so much more than a loaf—it’s a little piece of homemade magic that fits right into your everyday life. Soft, sturdy, and full of flavor, it’s the kind of bread that makes PB&Js taste gourmet and turns an ordinary grilled cheese into pure comfort. Best of all, it’s forgiving, approachable, and packed with love in every slice.
Whether you’re baking it for a picky kiddo, a Sunday family brunch, or just because nothing beats the smell of fresh bread in the kitchen, this recipe delivers every single time. So grab that starter, roll up your sleeves, and bake the loaf that just might change your lunchbox too.