***
Spicy Chili Garlic Deviled Eggs: Your New Party Obsession
Hey there, friend! Let’s talk about a party platter superstar that often gets a polite, maybe even a little boring, nod. You know the one: the classic deviled egg. Don’t get me wrong, I adore a traditional version with a sprinkle of paprika. It’s a taste of pure nostalgia! But what if we took that beloved classic and gave it a little… sass? What if we turned up the volume on flavor and created something that makes people’s eyes light up with surprise and delight?
Well, that’s exactly what we’re doing today. Get ready to meet your new go-to appetizer: Spicy Chili Garlic Deviled Eggs.
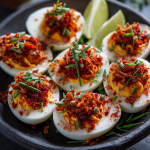
Imagine this: creamy, dreamy egg yolk filling that’s been kicked into high gear with a bold swirl of chili garlic sauce. It’s got that beautiful, slow-building heat that makes you go, “Ooh, hello there!” We’re topping it all off with a confetti of crunchy fried onions, fresh chives, and a whisper of smoked paprika that adds a touch of smoky mystery. This isn’t just a deviled egg; it’s an experience. It’s the bite that disappears from the platter first, the one that has everyone asking, “Wait, who made *these*?” Spoiler alert: it was you, and you’re about to feel like a total kitchen rockstar.
I promise, this recipe is just as simple and joy-filled as the original. We’re not complicating things; we’re just making them a whole lot more exciting. So, let’s grab those eggs and cook up something amazingly, deliciously bold together!
A Fiery Discovery & A Family Tradition
PrintSpicy Chili Garlic Deviled Eggs
Bold, creamy, and packed with heat – a fiery twist on a classic!
Ingredients
6 large eggs
3 tablespoons mayonnaise
1 to 1½ tablespoons chili garlic sauce (adjust for heat)
Salt, to taste
½ teaspoon smoked paprika (for garnish)
2 tablespoons crispy fried onions or shallots
1 tablespoon chopped fresh chives or green onions
Optional: a squeeze of lime or splash of rice vinegar for a tangy finish
Instructions
Boil the Eggs
Place eggs in a pot and cover with water. Bring to a boil, then lower heat and simmer for 10 minutes. Immediately transfer eggs to an ice bath and let cool for at least 5 minutes.
Peel & Halve
Peel eggs and slice in half lengthwise. Carefully remove the yolks and place in a bowl.
Make the Filling
Mash the yolks with mayo and chili garlic sauce until smooth and creamy. Add salt to taste. If you want extra kick, stir in a pinch of cayenne or hot sauce.
Fill the Eggs
Spoon or pipe the filling back into the egg whites.
Top & Garnish
Sprinkle with smoked paprika, crispy onions, and chopped chives. Serve immediately or chill for 15 minutes to let flavors meld.
Tips:
For extra crisp: briefly toast the crispy onions in a dry pan.
These are delicious served slightly warm or fully chilled.
Don’t skip the smoked paprika—it adds depth and smokiness that balances the spice.
Nutrition
- Calories: ~80
- Fat: 6g
- Carbohydrates: 1g
- Protein: 3g
I have to share the little story behind this recipe. It was born out of a happy accident during one of our big, chaotic, and wonderfully loud family potlucks. My uncle, who fancies himself a grill master and heat-seeker, had brought a giant bottle of chili garlic sauce for his famous (and I mean famous) wings. As fate would have it, I was tasked with bringing the deviled eggs. In the whirlwind of setting out food, his bottle of crimson magic ended up right next to my bowl of humble yolk filling.
You can probably guess what happened next. A generous spoonful (or three) somehow found its way into my mix. I gave it a taste, my eyes widened, and I knew I was onto something special. When those spicy little gems hit the table, they were gone in what felt like 60 seconds flat. My uncle, the heat aficionado, declared them the best thing he’d eaten all day. That moment of spontaneous experimentation turned into a new Reynolds family staple. It taught me that the best recipes often come from a dash of courage and a willingness to play with your food. Now, I can’t imagine a game day, picnic, or holiday spread without them.
Gathering Your Flavor All-Stars
Here’s your shopping list for this flavor explosion! The beauty of this recipe lies in its simplicity and the powerful punch of a few key ingredients.
- 6 large eggs – The trusty foundation! I find large eggs are the perfect size for a satisfying one- or two-bite appetizer. Pro tip: If you can, use eggs that are a week or so old—they tend to peel a little easier than super fresh ones.
- 3 tablespoons mayonnaise – This is our creamy dream-maker. It creates that luscious, smooth texture we all love. For a richer flavor, you can use Japanese Kewpie mayo, or for a tangier twist, swap in Greek yogurt!
- 1 to 1½ tablespoons chili garlic sauce – The star of the show! This is where the magic happens. I use the classic Huy Fong Foods (the one with the rooster on the bottle) for that perfect balance of garlicky punch and vinegary heat. Start with 1 tablespoon and add more to your taste—we’re building confidence, not setting our mouths on fire (unless you want to!).
- Salt, to taste – A chef’s best friend. Salt doesn’t just make things salty; it makes all the other flavors pop and sing. We’ll add this at the end, after we’ve mixed the yolks, so we can season it perfectly.
- ½ teaspoon smoked paprika – For garnish. Don’t you dare skip this! The subtle smokiness is the perfect counterpoint to the bright, sharp heat of the chili sauce. It adds a beautiful color and a whiff of the grill, even if you’re cooking indoors.
- 2 tablespoons crispy fried onions or shallots – The CRUNCH factor! You know those French’s fried onions from the green bean casserole? They are phenomenal here. They add a savory, crunchy texture that takes these eggs to a whole new level. Toasting them in a dry pan for a minute before sprinkling makes them extra incredible.
- 1 tablespoon chopped fresh chives or green onions – A fresh, green finish! Chives add a mild oniony freshness that cuts through the richness, while green onions bring a bit more of a zing. Either one is a winner.
- Optional: a squeeze of lime or splash of rice vinegar – Your secret weapon for brightness! If you feel like the filling needs a little “lift,” a tiny bit of acid from lime juice or rice vinegar can balance the richness and heat beautifully. Add just a teaspoon at a time until it tastes perfect to you.
Let’s Make Some Magic: Step-by-Step
Ready to assemble your masterpiece? Follow these steps, and you’ll have a platter of perfect, spicy deviled eggs in no time. I’ve packed each step with my favorite little chef hacks to make the process smooth and fun.
Step 1: Boil the Eggs to Perfection
Place your eggs in a single layer in a saucepan and cover them with cold water by about an inch. Bring the water to a rolling boil over high heat. As soon as it’s boiling, put a lid on the pot, reduce the heat to low, and let the eggs simmer for exactly 10 minutes. This “bring to a boil then simmer” method is my absolute go-to for perfectly cooked, easy-to-peel eggs with vibrant yellow yolks and no nasty gray ring. While they cook, prepare an ice bath—a big bowl of cold water with plenty of ice. The second the timer goes off, use a slotted spoon to immediately transfer the hot eggs into the ice bath. Let them chill out for at least 5 minutes. This shock stops the cooking process and contracts the egg inside the shell, making your peeling life so much easier.
Step 2: The Great Peel & Halve
Once your eggs are completely cool, it’s time to peel. Gently tap each egg on the counter to crackle the shell all over, then roll it gently between your hands. Start peeling from the wider end, where there’s usually a small air pocket—this gives you a great starting point. Peeling them under a tiny trickle of running water can also help wash away any stubborn shell bits. After the peel, give them a quick rinse and pat them dry. Slice each egg neatly in half lengthwise. Now for the fun part: gently pop the yolks out into a medium-sized bowl. Arrange your beautiful, empty egg white boats on a serving platter. They’re ready for their flavorful cargo!
Step 3: Create the Dreamy, Fiery Filling
To the bowl of yolks, add your 3 tablespoons of mayonnaise and 1 tablespoon of chili garlic sauce. Now, take a fork and mash, mash, mash! Get in there and mix it until it’s completely smooth and creamy. No one wants a lumpy filling! This is your moment to taste and adjust. Want more heat? Go ahead, add that extra half tablespoon of chili sauce! Feel like it needs a little zing? This is when you’d add that optional squeeze of lime or rice vinegar. Finally, add salt to taste. Mix it all up one more time. Look at that gorgeous, creamy, orange-pink filling! You’ve just created the heart of the dish.
Step 4: Fill Those Egg Whites with Flair
You can absolutely use a spoon to dollop the filling back into the egg whites—it’s charming and rustic! But if you want that beautiful, bakery-style swirl, spoon the filling into a plastic zip-top bag, snip off one corner (about a ½-inch cut), and pipe it in. It’s so satisfying and looks incredibly professional. Don’t be shy—pile that filling high!
Step 5: The Grand Finale: Garnish!
This is where we make them look as incredible as they taste. Sprinkle a tiny pinch of that smoked paprika over each one for a pop of color and smoke. Next, take your crispy fried onions and give them a little crush in your hands before sprinkling them on—this helps distribute that crunchy goodness evenly. Finally, scatter the freshly chopped chives or green onions over the top. The combination of red, golden brown, and vibrant green is just stunning.
Step 6: To Chill or Not to Chill?
You can serve these beauties right away, and they will be absolutely delicious. But, if you have a spare 15 minutes, pop the whole platter into the fridge. This brief chill lets the flavors get to know each other and meld together beautifully. It also firms up the filling just a touch, making them the perfect temperature for a party.
How to Serve Your Spicy Masterpiece
Presentation is part of the fun! I love using a simple, rustic wooden board or a beautiful white platter to really make the colors of the eggs pop. Arrange them in a sunburst pattern or in neat rows—whatever makes your heart happy. For a little extra flair, you can scatter a few extra whole chives or a light dusting of paprika around the platter. These eggs are the life of the party, so serve them as a dazzling appetizer at your next gathering, pack them for a standout picnic, or just make a batch for yourself as the most epic snack. They pair wonderfully with a cold beer, a crisp glass of rosé, or even a zesty margarita to cool down the heat!
Make It Your Own: Fun Recipe Variations
Love the base recipe? Let’s get creative! Here are a few of my favorite twists:
- Gochujang Glow-Up: Swap the chili garlic sauce for an equal amount of Korean gochujang paste. You’ll get a deeper, fermented, slightly sweet heat that is absolutely addictive.
- Bacon & Blue Cheese: For a savory, smoky twist, crumble in 2 tablespoons of cooked, crispy bacon and 1 tablespoon of blue cheese into the yolk filling. Omit the crispy onions for this one.
- Everything Bagel Vibe: Skip the paprika and crispy onions, and top your eggs with a generous sprinkle of everything bagel seasoning. It’s a texture and flavor dream!
- Avocado Cream (Dairy-Free): Replace the mayonnaise with the flesh of one very ripe avocado for a super creamy, dairy-free alternative. Add an extra squeeze of lime to keep it bright green.
- Smoked Salmon Sophistication: Top each finished egg with a small, elegant piece of smoked salmon and a tiny sprig of fresh dill. Perfect for a brunch gathering!
Anna’s Chef Notes & Kitchen Stories
This recipe has truly evolved in my kitchen over the years. That first happy accident was just the beginning. I’ve learned that a tiny pinch of sugar can sometimes round out the heat if it becomes too intense for some palates. I’ve also found that letting the filled eggs sit for an hour (covered in the fridge) before serving is the absolute sweet spot for flavor melding.
A funny story: I once brought these to a school potluck, and my daughter came home reporting that her friend, a notoriously picky eater, had eaten three of them before realizing they were “spicy.” His eyes got wide, he took a big gulp of milk, and then he went back for a fourth. That, my friends, is what I call a victory! It just goes to show that a little bit of bold flavor can win over almost anyone. Don’t be afraid to make this recipe your own—that’s where the real joy of cooking lives.
Your Questions, Answered!
Q: My eggs are a nightmare to peel! What am I doing wrong?
A: I feel your pain! We’ve all been there. The two biggest game-changers are 1) Don’t use super fresh eggs. Slightly older eggs peel much more easily. 2) That ice bath is NON-NEGOTIABLE. The rapid cooling creates steam between the egg and the membrane, loosening the shell. If you’re still struggling, try adding a teaspoon of baking soda to the boiling water—it can help raise the pH of the egg, making the shell easier to remove.
Q: Can I make these deviled eggs ahead of time?
A: Absolutely! You can hard-boil the eggs up to 2 days in advance—keep them unpeeled in the fridge. You can also make the filling 1 day ahead, store it in a sealed container, and fill the egg whites the day of your event. For the best texture, I recommend garnishing right before serving so the crispy onions stay crunchy.
Q: My filling is a bit runny. How can I thicken it up?
A: No worries! This can happen if your yolks are still a bit warm or if your mayo is particularly loose. Just pop the filling into the refrigerator for 15-20 minutes to firm up before piping. You can also add a tiny sprinkle of cornstarch or a little more mashed yolk if you have it.
Q: I can’t find chili garlic sauce. What’s a good substitute?
A: You have options! Sriracha is a great substitute, though it’s a bit sweeter and less garlic-forward. For every tablespoon of chili garlic sauce, you can use 1 tablespoon of sriracha mixed with a small, minced garlic clove. Alternatively, you can use a good-quality hot sauce like Frank’s RedHot, but you may want to add a bit more garlic powder to compensate.
A Quick Nutritional Glance
Please note: This is an estimate for informational purposes only.
Per deviled egg half: Calories: ~80 | Protein: 3g | Fat: 6g | Carbohydrates: 1g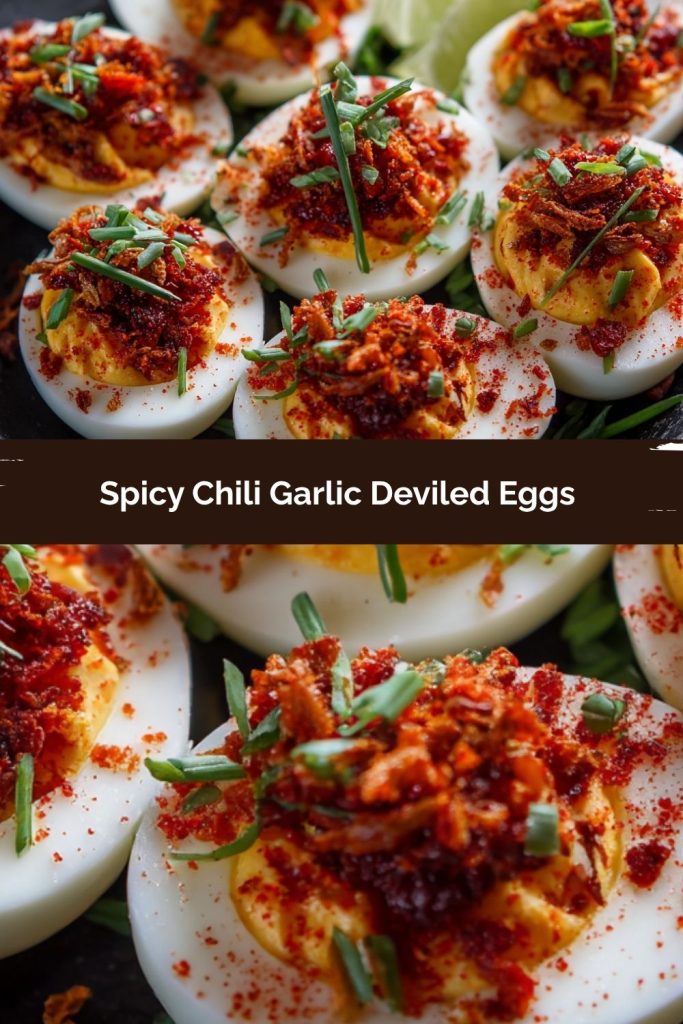
Final Thoughts
There’s something undeniably satisfying about taking a classic like deviled eggs and giving it a little fiery personality. These Spicy Chili Garlic Deviled Eggs do exactly that — creamy, tangy, and kissed with just enough heat to keep you coming back for another bite (or three). They’re elegant enough for a holiday platter but bold enough to steal the show at game day.
What I love most about these is how they strike that perfect balance between familiar and fresh. The smooth, velvety filling meets a crunchy topping of crispy onions and chives — and that chili-garlic kick? Absolute perfection. Whether you’re serving them warm, chilled, or straight off the tray because you couldn’t wait, these deviled eggs prove that comfort food can have a little spice and a whole lot of character.