Let’s Make a Frozen Summer Dream Come True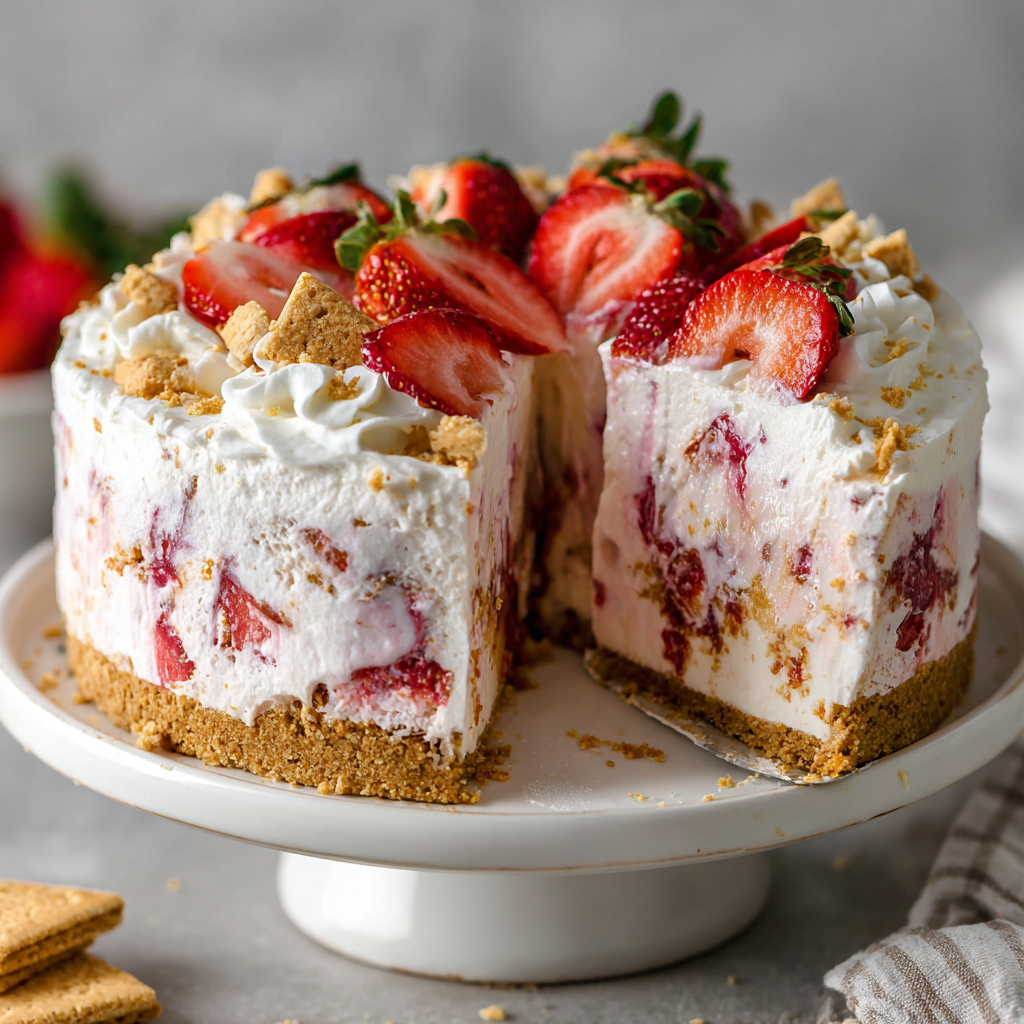
Hey there, friend! Anna here. Is it just me, or does summer have a certain… taste? It’s the sweet burst of a sun-warmed strawberry, the creamy chill of ice cream straight from the carton, and the pure, unadulterated joy of a dessert that feels like a celebration all on its own. And if there’s one dessert that screams summer louder than a kid on the last day of school, it’s an ice cream cake.
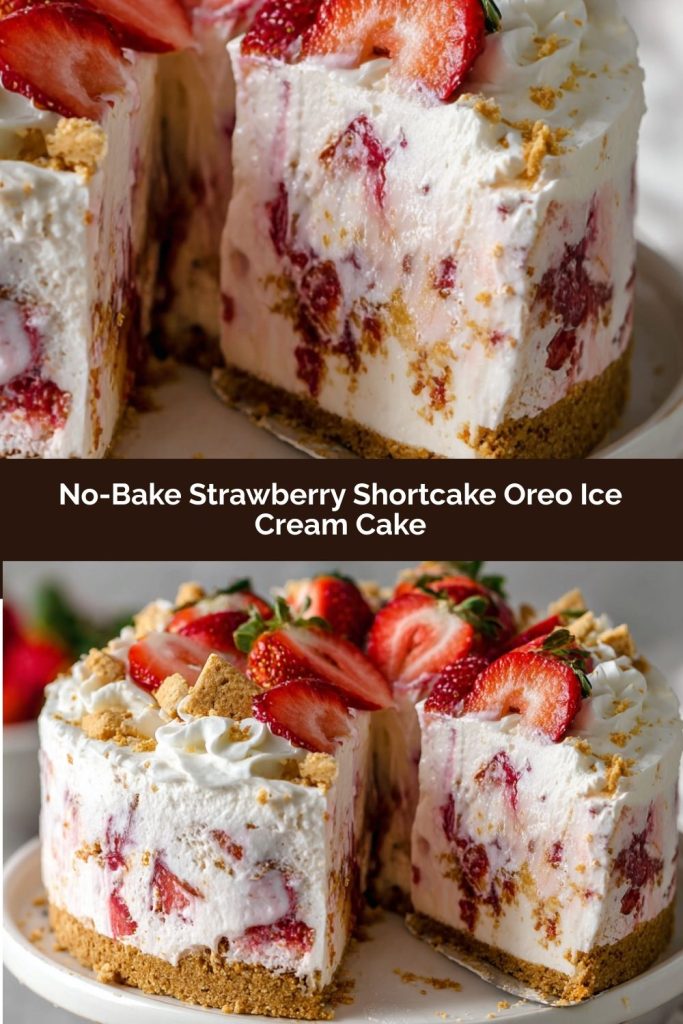
But let’s be real—sometimes the classic versions can feel a little… expected. That’s why I’m utterly obsessed with the mashup we’re making today. We’re taking everything magical about old-fashioned strawberry shortcake—the berries, the cream, the tender crumb—and giving it a frozen, fun, and fabulously easy twist. Introducing the Strawberry Shortcake Oreo Ice Cream Cake. No oven, no fuss, just layers of creamy strawberry and vanilla ice cream, fresh berries, and a Golden Oreo crust that brings the perfect buttery crunch.
This is the dessert you make when you want to be the hero of the picnic, the birthday party, or just your own Tuesday night. It’s nostalgic, it’s stunningly pretty (hello, pink layers!), and it comes together with more joy than effort. So, grab your favorite 9×13 pan and let’s turn that summer heat into the coolest, most delicious treat on the block. Trust me, your inner child (and your actual children, neighbors, and friends) will thank you.
A Birthday Cake & a Beautiful Mess
PrintStrawberry Shortcake Oreo Ice Cream Cake : No-Bake, Creamy & Perfect for Summer Birthdays
This Strawberry Shortcake Oreo Ice Cream Cake is everything you loved as a kid — frozen layers of strawberry and vanilla ice cream, fresh berries, and crunchy Golden Oreos, all stacked into one dreamy no-bake dessert. Perfect for hot days, birthdays, or whenever you’re feeling nostalgic and need something sweet, pink, and delicious!
- Prep Time: 20 minutes
- freeze time: 4+ hours
- Total Time: 4.5 hours
Ingredients
1 package Golden Oreos (about 36 cookies), crushed
1/2 cup melted butter
1.5 quarts strawberry ice cream (softened)
1.5 quarts vanilla ice cream (softened)
1 1/2 cups chopped fresh strawberries
Whipped topping or frosting (optional)
Extra crushed Oreos & strawberries for topping
Instructions
Make the Crust: Combine crushed Oreos and melted butter. Press firmly into the bottom of a 9×13” pan or springform pan. Freeze for 10 minutes.
First Layer: Spread softened strawberry ice cream evenly over the crust. Top with half the chopped strawberries. Freeze for 30 minutes.
Second Layer: Spread vanilla ice cream on top, followed by the remaining strawberries. Freeze at least 4 hours or until solid.
Decorate: Before serving, top with whipped topping, extra crushed Oreos, and whole or sliced strawberries for that classic strawberry shortcake look.
Slice and serve frozen!
Nutrition
- Calories: 420 kcal
- Fat: 24g
- Carbohydrates: 42g
- Protein: 5g
This recipe is my edible love letter to summer birthdays. My youngest, Lily, has a mid-July birthday, and for years, the saga of the melting birthday cake was real. I’d slave over a layer cake, only to watch the frosting weep as we sang “Happy Birthday” on the patio. One particularly sweltering year, in a moment of sweaty desperation, I grabbed the ice cream, some cookies, and a bowl of strawberries we’d just picked. What emerged from the freezer a few hours later wasn’t just a solution; it was a new tradition.
I’ll never forget the look on her face—smeared with pink and vanilla, holding a slightly messy slice—when she declared, “This is the BEST cake ever, Mom.” It was messy, it was melting, and it was absolutely perfect. That’s the spirit of this cake. It’s not about fussy perfection; it’s about cold, sweet joy on a hot day. It’s the taste of celebration, simplicity, and the beautiful mess of making memories. Every time I layer it up now, I think of that sunshiney day and smile.
Your Building Blocks for Bliss
Here’s everything you’ll need to build this frozen masterpiece. I’ve added my little chef notes next to each one because knowledge is power (and tastier cake)!
- 1 package Golden Oreos (about 36 cookies), crushed – This is our “shortcake” base! Golden Oreos have that perfect vanilla-buttery flavor that mimics shortcake biscuits so well. Chef’s Tip: Leave the filling in! It adds to the flavor and texture. For a gluten-free twist, use your favorite gluten-free vanilla sandwich cookie.
- 1/2 cup melted butter – This is the glue for our crust. It binds the cookie crumbs into a solid, sliceable foundation. Salted butter adds a nice flavor contrast, but unsalted works perfectly too.
- 1.5 quarts strawberry ice cream, softened – One of our star layers! The key word here is softened. You want it spreadable, not soupy. Chef’s Insight: Go for a classic, berry-packed strawberry ice cream over a neon-pink one for the best flavor. A high-quality store brand is totally fine here!
- 1.5 quarts vanilla ice cream, softened – The creamy counterpart. A rich, custard-style vanilla is dreamy, but any good-quality vanilla works. This is our blank canvas for the strawberry goodness.
- 1 1/2 cups chopped fresh strawberries – The fresh fruit pop! Chopping them ensures you get berry in every bite and prevents big frozen chunks. If strawberries aren’t peak season, frozen (thawed and well-drained) berries are a great backup.
- Whipped topping or frosting (optional) – For that classic “shortcake” finish. A light whipped topping keeps it airy, or use a vanilla buttercream for decadence. This is your crown, so make it yours!
- Extra crushed Oreos & strawberries for topping – This isn’t just garnish; it’s a flavor and texture promise! It tells everyone exactly what deliciousness awaits inside.
Let’s Layer Up the Magic: Step-by-Step
Okay, team! Here’s the fun part. We’re building layers of frozen goodness. Put on some happy music, clear a space in your freezer, and let’s do this.
- Make the Crust: In a medium bowl, combine your finely crushed Golden Oreos and the melted butter. Stir until every last crumb is gleaming and looks like wet sand. Pour this glorious mixture into your 9×13” pan (or springform for a pretty round cake!). Using the bottom of a measuring cup or a glass, press the crumbs firmly and evenly into the bottom. This firm press is the secret to a crust that holds together when you slice. Pop the pan into the freezer for a solid 10 minutes. This sets the butter and gives us a stable foundation.
- First Layer – The Berry Bomb: Take your softened strawberry ice cream. I let mine sit on the counter for 15-20 minutes. You should be able to scoop and spread it easily. Dollop big spoonfuls all over the frozen crust, then use an offset spatula or the back of a spoon to spread it into a smooth, even layer. Work relatively quickly! Now, sprinkle all of those gorgeous chopped strawberries evenly over the pink ice cream. Gently press them in just a tad. Back into the freezer it goes for 30 minutes. This sets the strawberry layer so our next one goes on cleanly.
- Second Layer – The Vanilla Dream: Repeat the softening and spreading process with the vanilla ice cream, creating a beautiful white blanket over the strawberry layer and berries. For an extra-fun look, you can leave some swirls and peaks—it looks homemade and wonderful. Sprinkle the remaining chopped strawberries over the top and press lightly. Now, the hardest part: patience. Cover the pan tightly with plastic wrap or foil and freeze for at least 4 hours, but overnight is ideal. We need this completely solid for clean slices.
- Decorate & Serve: The grand finale! Take the cake out of the freezer about 5-10 minutes before serving to make slicing easier. If you’re using whipped topping or frosting, spread or pipe it on now. Then, go to town with the extra crushed Oreos and fresh strawberry slices or halves. Slice with a sharp knife dipped in hot water (wipe it dry between cuts for super clean slices). Serve immediately on chilled plates for maximum frozen fabulousness.
How to Serve This Showstopper
Presentation is part of the fun! For a backyard party, I serve it right from the pan with a big stack of plates. For a birthday, I’ll transfer a round springform cake to a pedestal for a real “wow” moment. No matter what, add a little extra flair: a sprig of mint, a tiny dollop of whipped cream on the side, or even a drizzle of strawberry sauce for the ultimate indulgence. Serve it on those warm summer evenings when the fireflies are just starting to come out—it’s pure magic.
Make It Your Own: Fun Variations
Love the idea but want to switch it up? Here are some delicious spins:
- Cookies & Cream Twist: Use chocolate Oreos for the crust and chocolate ice cream for the bottom layer. Keep the vanilla and strawberries on top!
- Triple Berry Blast: Swap the strawberry ice cream for a mixed berry sorbet or ice cream, and use a mix of raspberries, blueberries, and chopped strawberries.
- Lemon Berry Sunshine: Use a tangy lemon sorbet or sherbet for the bottom layer with the strawberries. It’s incredibly refreshing!
- “Neapolitan” Style: Add a third layer! Do chocolate ice cream on the crust, then strawberry, then vanilla on top.
- Dairy-Free Delight: Use your favorite dairy-free ice creams (oat milk or coconut milk-based work beautifully) and vegan butter for the crust.
Anna’s Chef Notes & Kitchen Stories
This recipe has seen some hilarious kitchen experiments over the years. One time, I was in a hurry and tried to spread rock-hard ice cream. Let’s just say I nearly launched the whole crust across the kitchen—softening is non-negotiable, friends! Another time, my husband “helped” by using chocolate sandwich cookies, and you know what? It was delicious. That’s the beauty of this cake; it’s forgiving and adaptable.
My biggest evolution? The fresh strawberries. I used to just use ice cream, but adding those juicy berry chunks in the middle creates little pockets of intense flavor and keeps it from being one-note. It truly makes it taste like a strawberry shortcake. Don’t skip ’em!
Your Questions, Answered!
Q: My crust is soggy/crumbly! What happened?
A: A soggy crust usually means the butter wasn’t mixed in evenly, or the ice cream was too soft/melted when added. A crumbly crust means you needed a bit more butter or didn’t press it firmly enough. For next time, ensure your crumbs are like wet sand and press, press, press!
Q: Can I make this ahead of time?
A> Absolutely! That’s one of its best features. Make it up to 3 days in advance. Just hold off on the final whipped topping and garnish until an hour or two before serving so they look fresh.
Q: My ice cream is melting too fast as I spread it. Help!
A> Work in a cool kitchen and work quickly! If it starts to get soupy, just pop the whole pan back in the freezer for 10 minutes to firm up, then continue. It’s all about layering and re-freezing.
Q: Can I use a different pan?
A> Of course! A 9-inch springform pan makes a gorgeous tall, round cake. Two 8×8 pans make great smaller cakes for gifting. Just adjust the freezing time as needed.
Nutritional Information*
*Please note: This is an estimated nutritional breakdown based on the specific ingredients listed. Your values may vary.
- Prep Time: 20 minutes
- Freeze Time: 4+ hours
- Total Time: ~4.5 hours
- Calories per slice (1/12 of cake): ~420 kcal
- Carbohydrates: 42g
- Protein: 5g
- Fat: 24g
- Sugar: 30g
Dietary Notes: A perfect no-bake, kid-approved summer treat!
Final Thoughts
If summer ever needed a signature dessert, I’m convinced this Strawberry Shortcake Oreo Ice Cream Cake would be it. It’s joyful, it’s nostalgic, it’s beautifully imperfect in all the best ways—and it turns even the hottest, stickiest days into something worth celebrating. Every slice feels like a little love letter to sunshine, and every messy drip down the side of the pan reminds you that the best summer memories are the ones we don’t overthink.
I hope this cake becomes part of your warm-weather traditions the way it has ours—whether it’s for a birthday, a backyard potluck, or a completely ordinary night that deserves something extra sweet. Keep it simple, keep it fun, and embrace every frozen, fruity, golden-crunchy bite. Here’s to ice cream cakes that don’t need perfection to be unforgettable… and to the kind of desserts that make summer taste exactly the way it should. Enjoy, friend!