***
Let’s Build a Sweet Little Snowman Squad!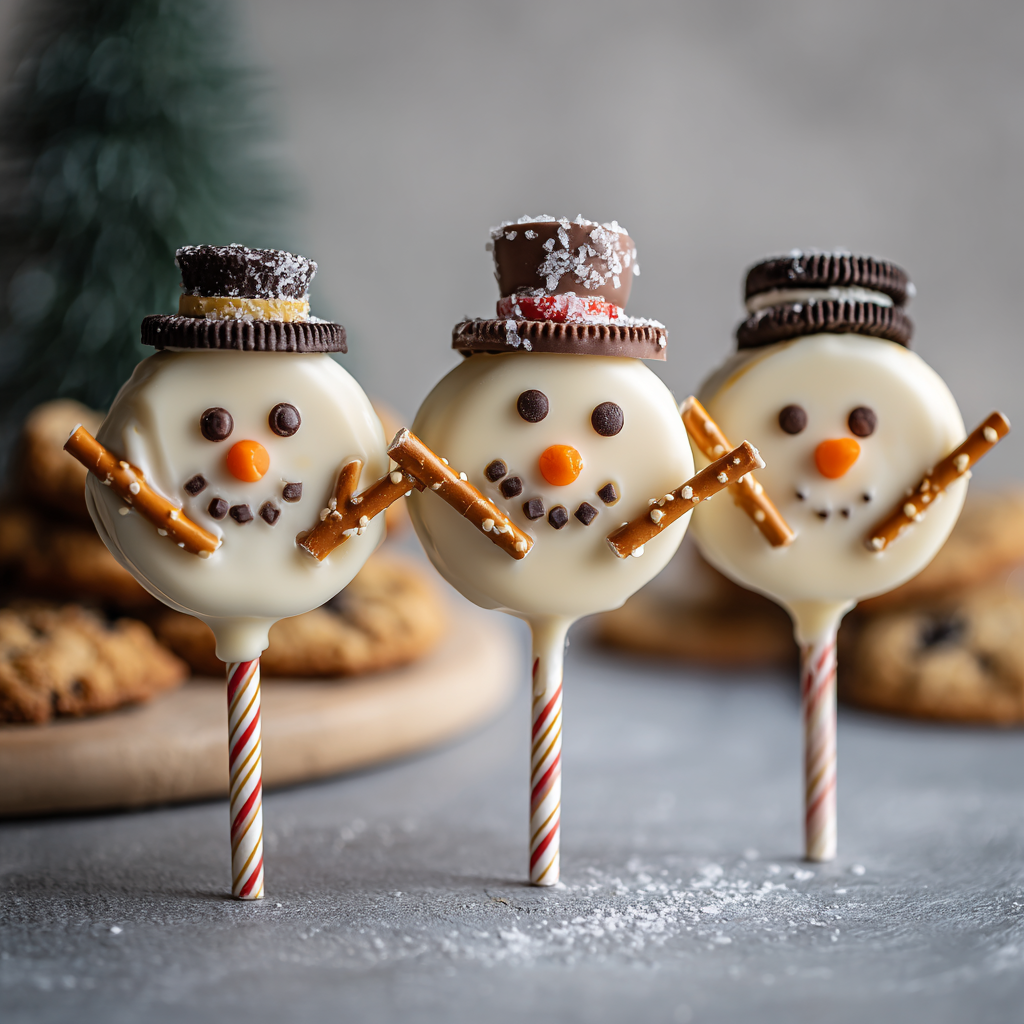
Hello, my wonderful friend! Is there anything that captures the pure, unadulterated joy of the holiday season quite like building a snowman? That feeling of rolling up the perfect snowballs, finding just the right sticks for arms, and the triumphant moment you place that final button just so… it’s pure magic. But what if I told you we could capture all that whimsical, frosty fun right here in our cozy kitchens, without ever needing to put on a winter coat?
Today, we’re trading snow for sprinkles and creating the most adorable, utterly irresistible Vegan No-Bake Snowman Oreo Pops! These little guys are not just a treat; they’re a tiny, edible celebration. Imagine rich Oreo cookies transformed into plump snowman bodies, dipped in a luxurious coat of vegan white chocolate, and dressed up with the cutest pretzel arms and peanut butter cup hats you ever did see. They’re the perfect project for a festive afternoon, a huge hit at cookie exchanges, and an absolutely legendary treat for kids (and let’s be real, adults too!) to help make.
The best part? This is a no-stress, all-joy kind of recipe. We’re not turning on the oven, we’re not dealing with finicky dough—we’re just having a blast being creative. So, whether you’re a seasoned dessert decorator or someone who thinks their artistic talent begins and ends with stick figures, I promise you can do this. I’ll be right here with you, cheering you on every step of the way. So, put on your favorite holiday playlist, clear a little counter space, and let’s cook up some delicious, magical memories together!
A Kitchen Full of Laughter & (Vegan) Chocolate
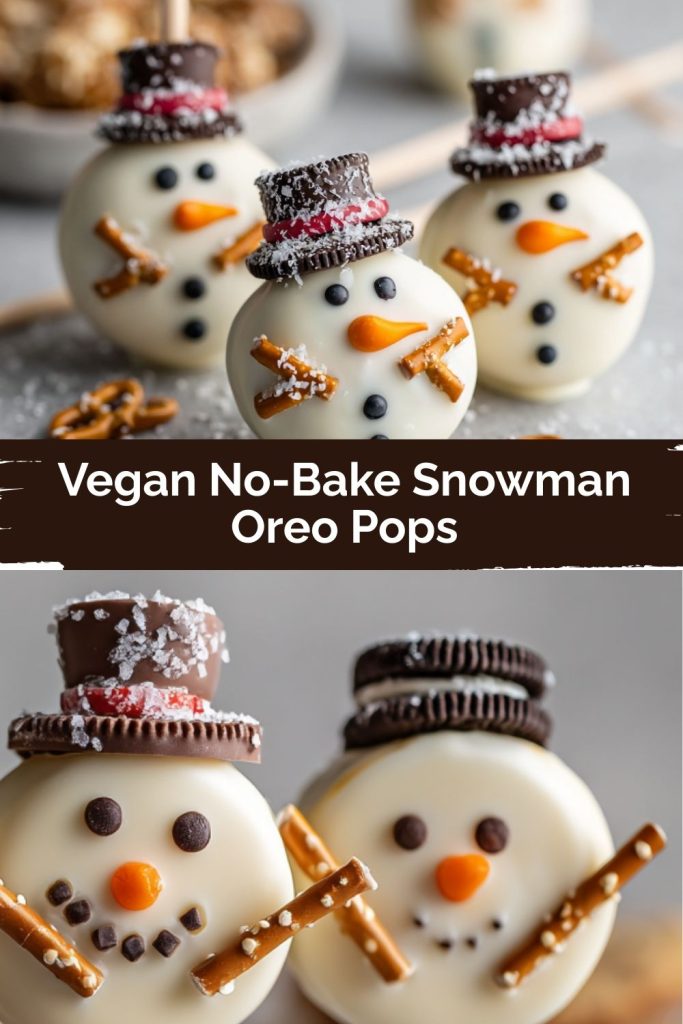
PrintVegan No-Bake Snowman Oreo Pops

These fun little snowmen are built from Oreos, dipped in vegan white chocolate, and decorated with pretzels, peanut butter cups, and playful details. They’re a joy to make, gift, and eat—no oven required!
- Prep Time: 30 minutes
- chill: 15 minutes
- Total Time: 45 minutes
Ingredients
2 packs Oreo cookies (classic or double-stuffed)
250g vegan white chocolate, melted
20g vegan dark chocolate, melted (for eyes/buttons)
Pretzel sticks (halved for arms)
Vegan mini peanut butter cups (for hats – e.g., Doisy & Dam)
Orange food gel (for carrot noses – e.g., Rainbow Dust Pro Gel)
Lollipop sticks or paper straws
Instructions
Insert sticks into Oreos carefully—go slow to avoid cracking.
Melt white chocolate in 20-second microwave bursts, stirring until smooth.
Dip each Oreo fully in white chocolate. Tap off excess and place on parchment-lined tray.
While still wet, decorate:
Place mini peanut butter cup on top as a hat
Add pretzel arms on either side
Use dark chocolate to dot on eyes, smiles, and buttons (use a toothpick or piping bag)
Add a tiny dab of orange gel for the nose
Let set at room temperature or chill for 10–15 minutes in the fridge.
Package in clear bags with ribbon or arrange on a festive tray for gifting.
Nutrition
- Calories: 150
- Fat: 8g
- Carbohydrates: 18g
- Protein: 1g
This recipe always takes me right back to one particularly chaotic, flour-dusted, and utterly perfect Christmas Eve a few years ago. My niece and nephew, then just five and seven, were bouncing off the walls with anticipation for Santa’s arrival. In a moment of inspired (or desperate!) genius, I herded them into the kitchen with a box of Oreos and a bag of vegan chocolate chips, determined to channel that boundless energy into something creative.
What unfolded was pure chaos and comedy. There were more chocolate fingerprints on faces than on the parchment paper, a serious debate about whether snowmen should have top hats or baseball caps, and one particularly ambitious snowman who ended up with about ten eyes. But you know what? We laughed until our sides hurt. We created a whole family of wonky, wonderful, and completely unique snowman pops. And when we finally presented them to the rest of the family, the looks of pure delight were better than any perfectly wrapped present. It was a powerful reminder that the messiest, most imperfect moments in the kitchen often create the most cherished memories. These pops aren’t just a dessert; they’re a ticket to that kind of joyful, connected, and wonderfully messy fun.
Gathering Your Snowman Building Crew (The Ingredients!)
Here’s your shopping list for creating a whole village of delicious snowmen. I’ve included my best tips and tricks for each ingredient to set you up for success!
- 2 packs Oreo cookies (classic or double-stuffed): This is the foundation of our snowman! Classic Oreos are perfect, but if you’re feeling extra indulgent, Double-Stuffed Oreos make for a particularly plump and satisfying snowman body. Chef’s Insight: Did you know classic Oreos are accidentally vegan? It’s true! Always double-check the label, but you’re usually good to go.
- 250g vegan white chocolate, melted: This is our fresh snowfall! Look for baking bars or chips labeled vegan. I love the brands iChoc or No Whey! for their great melting quality and flavor. Substitution Tip: If you can’t find vegan white chocolate, you can use a simple powdered sugar glaze (mix powdered sugar with a little non-dairy milk), but the chocolate coating will set harder and be less messy.
- 20g vegan dark chocolate, melted (for eyes/buttons): Just a small amount for adding those classic details. You can use chocolate chips or a baking bar. Chef’s Hack: Melt this in a small, deep cup—it makes dipping a toothpick much easier for detailing!
- Pretzel sticks (halved for arms): The classic twig arms! Any thin pretzel stick will work. Snap them in half carefully to avoid too many crumbs.
- Vegan mini peanut butter cups (for hats – e.g., Doisy & Dam or Justin’s): These are the perfect top hat! Unwrap them before you start so they’re ready to go. Substitution Tip: If you have a nut allergy, a small vegan chocolate mint or a round chocolate-covered peppermint patty would make a adorable alternative hat!
- Orange food gel (for carrot noses – e.g., Rainbow Dust Pro Gel): A tiny dot of this is all you need for the perfect carrot nose. Chef’s Insight: I highly recommend a gel food color over a liquid one. The gel is more concentrated and won’t alter the consistency of your icing or chocolate if you mix it in. You can also use a tiny piece of an orange candy like a Starburst (check for vegan status) or even a sliver of dried apricot.
- Lollipop sticks or paper straws: This is what turns our Oreo into a pop! Lollipop sticks are sturdy and classic. For an extra cute, eco-friendly twist, I love using paper straws—they add such a fun, festive look!
Let’s Build Our Frosty Friends! (Step-by-Step)
Okay, team! It’s assembly time. Read through all the steps first, and remember: perfection is not the goal. Charm is! Let’s do this.
- Prep Your Station: Before you touch a single Oreo, line a large baking sheet with parchment paper. This is your snowman parking lot where they’ll set. Have all your decorations (halved pretzels, unwrapped peanut butter cups, etc.) laid out within easy reach. This “mise en place” (everything in its place) is the ultimate chef hack for a smooth, enjoyable process!
- Insert the Sticks: Take your first Oreo. Gently but firmly push a lollipop stick or paper straw into the creamy filling, right in the center. Go slow and use a slight twisting motion to avoid cracking the cookie. You want it to go about halfway through. If a cookie cracks, don’t panic! It will be covered in chocolate. Consider it a snowman with a little character. Repeat with all Oreos.
- Melt the White Chocolate: Place your vegan white chocolate in a microwave-safe bowl. Heat in 20-second bursts at 50% power, stirring vigorously between each burst. Why 50% power? It prevents the chocolate from scorching and seizing up! Stop heating when there are just a few small lumps left—the residual heat will melt them as you stir. Stir until it’s completely smooth and gorgeous. Pro Tip: You can also melt the chocolate using a double boiler on the stove if you prefer!
- The Big Dip: Hold an Oreo pop by the stick and fully submerge it into the melted white chocolate. Use a spoon to help coat the sides and back if needed. Gently lift it out and let the excess chocolate drip off. Give it a few gentle taps on the side of the bowl—this is the secret to a smooth, even coating without big drips! Place it carefully on your parchment-lined tray.
- Decorate While Wet! This is the most important step! You have a brief window before the chocolate sets to attach your decorations. Work on one pop at a time after dipping. Here’s your order of operations:
- Immediately place a mini peanut butter cup on top for the hat. Gently press it down so it sticks.
- Add two halved pretzel sticks on either side for the arms. Push them gently into the soft chocolate.
- Now, use your melted dark chocolate and a toothpick (or a piping bag with a tiny tip) to dot on two eyes, a cheerful smile, and two or three buttons down the front. The toothpick method gives you great control!
- Finally, use a clean toothpick to place a tiny, tiny dab of orange food gel for the carrot nose. A little goes a long way!
- Let Them Set: Once your whole tray is decorated, you can let the pops set at room temperature for about 30-45 minutes, or for a quicker set, pop the entire tray into the refrigerator for 10-15 minutes. The chocolate will become firm to the touch.
How to Serve Your Snowman Squad
Presentation is part of the fun! For a party, arrange your standing snowman pops in a tall vase or glass filled with sugar (to look like snow) or festive sprinkles. They make an incredible edible centerpiece! For gifting, slide each pop into a clear cellophane treat bag, tie it shut with a beautiful ribbon or baker’s twine, and watch them become the most sought-after gift at the exchange. You can also simply lay them flat on a beautiful festive platter for everyone to admire (and then devour!).
Get Creative! Fun Flavor Twists
Feel free to customize your snowmen family! Here are a few ideas:
- Peppermint Party: Add a drop of peppermint extract to your melted white chocolate and crush some vegan candy canes to sprinkle on as “snow” right after dipping.
- The Scarfed Snowman: Use a pull-apart red licorice lace (like Twizzlers) to tie a tiny scarf around your snowman’s neck before the chocolate fully sets.
- Gluten-Free Frosty: Use gluten-free Oreo-style cookies and ensure your pretzels and other ingredients are certified gluten-free.
- Colorful Hats: Use different colored melts for the hats! Vegan milk or dark chocolate peanut butter cups, or even dip the peanut butter cup itself in colored chocolate.
Anna’s Extra Kitchen Notes
Over the years, I’ve made hundreds of these little guys, and let me tell you, not all of them were magazine-worthy! I once tried to use liquid food coloring mixed directly into the white chocolate for the noses… and ended up with a bowl of grainy, seized chocolate and a fleet of noseless snowmen. Lesson learned: gel color for the win! I’ve also learned that embracing the “unique” ones is the best policy. The snowman with one eye slightly higher than the other? He’s just winking. The one with a slightly droopy hat? He’s just relaxed. It all adds to their charm. This recipe is meant to be fun, not perfect. So put on some music, pour yourself a warm drink, and enjoy the process of creation.
Your Snowman Questions, Answered!
Q: My white chocolate is thick and clumpy after melting! What happened?
A: Ah, seized chocolate! This usually happens if a tiny bit of steam or water gets into the chocolate, or if it got too hot. Unfortunately, it’s hard to come back from. To prevent it, always make sure your bowl and utensils are completely dry, and melt at a low power (50%) in short bursts. If it seizes, you can try adding a tiny amount of neutral oil (like coconut) and stirring vigorously, but it’s often best to start fresh.
Q: My Oreos keep cracking when I insert the stick. Help!
A> This is the most common issue! First, make sure you’re using a gentle twisting motion, not just pushing straight down. If it’s still happening, try this genius hack: briefly microwave 3-4 Oreos at a time for about 5-8 seconds. This slightly softens the cookie and the cream, making it much more pliable and less likely to crack. It works like a charm!
Q: Can I make these ahead of time?
A> Absolutely! These are a great make-ahead treat. Once fully set, store them in a single layer in an airtight container in the refrigerator for up to 5 days. You can also freeze them for up to a month! Just thaw in the fridge before serving.
Q: The decorations won’t stick! What am I doing wrong?
A> Timing is everything. You have to attach the heavier decorations (hats, arms) while the white chocolate coating is still wet and tacky. If it’s starting to set, those pieces won’t adhere well. Work on one pop at a time to ensure the chocolate is still perfectly wet for decorating.
Nutritional Information (Per Pop, Estimate)
Calories: ~150 | Fat: 8g | Carbohydrates: 18g | Sugar: 12g | Protein: 1g
Allergy Info: This recipe is vegan; however, it contains gluten and soy. Always check the labels of your specific ingredients to accommodate allergies.
Vegan No-Bake Snowman Oreo Pops Recipe Card
Prep Time: 30 minutes | Chill Time: 15 minutes | Total Time: 45 minutes | Makes: ~20 pops
Ingredients
- 2 packs Oreo cookies (classic or double-stuffed)
- 250g vegan white chocolate, melted
- 20g vegan dark chocolate, melted (for eyes/buttons)
- Pretzel sticks (halved for arms)
- Vegan mini peanut butter cups (for hats)
- Orange food gel (for carrot noses)
- Lollipop sticks or paper straws
Instructions
- Line a baking sheet with parchment paper.
- Carefully insert lollipop sticks into the center of each Oreo using a gentle twisting motion.
- Melt vegan white chocolate in 20-second bursts in the microwave at 50% power, stirring until smooth.
- Dip each Oreo pop fully into the white chocolate, tap off excess, and place on the prepared tray.
- While the chocolate is still wet, decorate each pop: add a peanut butter cup hat, pretzel stick arms, dark chocolate eyes/buttons (using a toothpick), and an orange gel nose.
- Allow to set at room temperature or chill in the fridge for 10-15 minutes until firm.
Final Thoughts: A Sweet Snow Day, No Mittens Required
At the end of the day, these Vegan No-Bake Snowman Oreo Pops are more than just adorable holiday treats—they’re little bundles of joy you get to build, share, and laugh over. Each snowman is a reminder that the best holiday moments are made in the kitchen, surrounded by sprinkles, giggles, and just a little bit of chocolatey chaos.
Whether you’re gifting them in ribbon-tied bags, serving them as a festive party centerpiece, or making them with little helpers on a snowy afternoon, these pops bring the magic of snowman-building indoors. No mittens, no frostbite—just pure, sweet fun. So gather your crew, queue up your favorite carols, and let’s make some edible memories that will warm hearts all season long.