Ditch the Takeout Line: Let’s Make Magically Easy Protein Bagels
Hey friend! Come on in, the kitchen’s warm, and I’ve got the best little secret to share with you today. Ever had one of those mornings where you’re craving a chewy, satisfying bagel but the thought of a long, floury project (not to mention the carb coma) just doesn’t fit the vibe? Or maybe you’re looking for a powerhouse snack that actually tastes like a treat? I’ve been there more times than I can count. That’s why I practically did a happy dance when I first stumbled upon the magic of these 3-Ingredient Protein Bagels.
Yes, you read that right: three main ingredients, no yeast, no proofing, and definitely no boiling a giant pot of water. It sounds like kitchen wizardry, but I promise you, it’s just smart, joyful cooking. The hero here? Plain Greek yogurt. It works its magic to create a dough that’s tender, slightly tangy, and packed with protein, while a simple flour gives it that classic, comforting structure. The result is a bagel that’s soft, chewy, golden, and ready to be schmeared, stacked, or simply devoured plain.
Whether you’re a busy parent needing a quick breakfast win, a home cook looking for a weekend project that won’t eat up your whole day, or someone just curious about the hype, this recipe is your new best friend. It’s forgiving, fast, and fantastically delicious. So, let’s tie on our aprons, push any baking anxiety aside, and cook up something truly amazing together. Your future self, happily munching on a warm, homemade bagel, will thank you.
The Bagel That Changed My Morning Routine
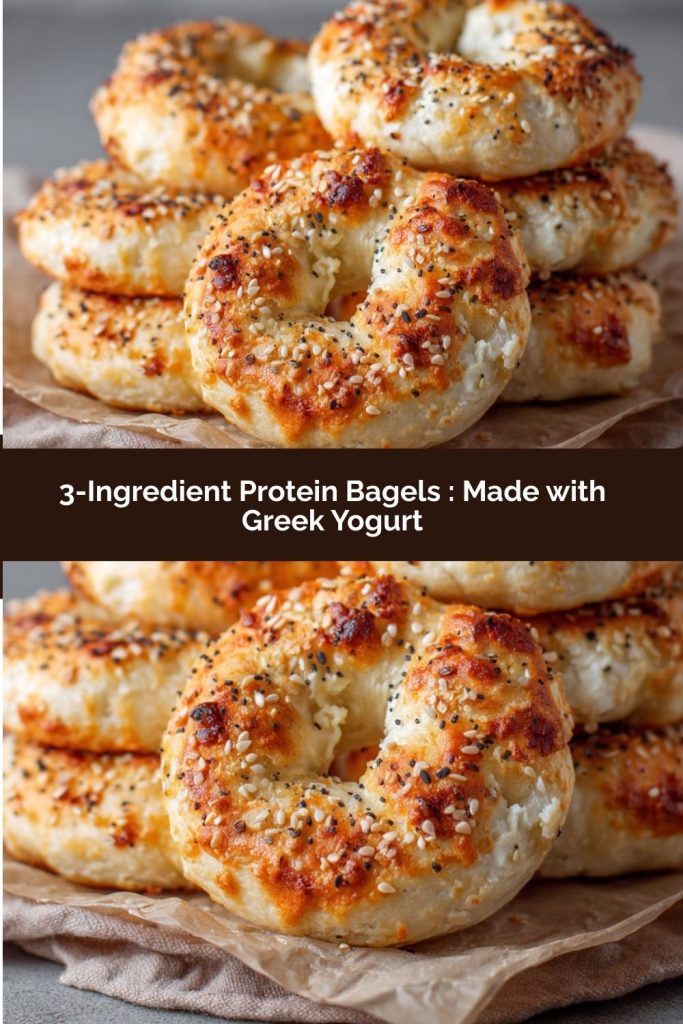
Print3-Ingredient Protein Bagels : Made with Greek Yogurt

These protein-packed bagels are soft, chewy, and ridiculously easy to make—no yeast, no boiling, just 3 main ingredients. Greek yogurt adds a protein boost while keeping the inside tender and the outside golden. Perfect for a high-protein breakfast, snack, or sandwich base that fits into your routine without fuss.
- Prep Time: 10 minutes
- Cook Time: 25 minutes
- Total Time: 35 minutes
- Yield: 4 bagels 1x
Ingredients
1 cup self-rising flour (or 1 cup all-purpose flour + 1 ½ tsp baking powder + ¼ tsp salt)
1 cup plain Greek yogurt (non-fat or full-fat)
1 egg (for egg wash, optional)
Optional toppings: everything bagel seasoning, sesame seeds, poppy seeds
Instructions
Preheat oven to 375°F (190°C). Line a baking sheet with parchment paper.
In a bowl, mix flour and Greek yogurt until a dough forms. Knead briefly until smooth.
Divide dough into 4 equal pieces. Roll each into a rope and shape into a bagel.
Optional: brush with beaten egg and sprinkle with toppings.
Bake for 25–30 minutes, or until golden brown and cooked through.
Let cool slightly before slicing.
Nutrition
- Calories: 150
- Carbohydrates: 20g
- Protein: 10–12g
My love affair with bagels started young, on trips to visit family up north. I’d be wide-eyed in a proper deli, mesmerized by the towering bins of everything-spiced, poppy-seed-studded rounds. That first bite—the crackly exterior giving way to a dense, chewy, warm interior—was pure bliss. But back home, making them from scratch felt like a daunting, day-long commitment reserved for expert bakers.
Flash forward to my own busy kitchen, trying to juggle recipe testing, writing, and getting a decent breakfast into everyone (including myself!). I wanted that nostalgic bagel satisfaction without the time investment or the heavy feeling. When I first saw the concept of a yogurt-based dough, I was skeptical. Could something so simple really deliver? I remember gathering my then-toddler around the counter, letting her “help” mix the shaggy dough with her little hands. The simplicity was shocking. In what felt like minutes, we had shaped little rings and popped them in the oven. The smell that filled the kitchen was unmistakably bagel. That first experimental batch wasn’t just a recipe success; it was a lifestyle win. It turned a cherished, complex bakery item into an accessible, nourishing everyday joy. Now, these bagels are a weekly staple in our house—a little piece of magic we can create anytime the mood strikes.
Gathering Your Bagel-Making Magic: Just 3 Things!
Here’s the beautiful part: your shopping list is tiny. The power of this recipe is in the simplicity and quality of these staples. Let’s break them down.
- 1 cup self-rising flour – This is the convenient star that does the heavy lifting! Self-rising flour already has baking powder and salt blended in, which gives our bagels their rise and flavor. Chef’s Insight: No self-rising flour? No panic! Simply mix 1 cup of all-purpose flour with 1 ½ teaspoons of baking powder and ¼ teaspoon of fine salt. Give it a good whisk to distribute evenly.
- 1 cup plain Greek yogurt – The secret weapon! The thick, protein-rich yogurt adds moisture, tenderness, and that fantastic protein boost. Substitution Tip: You can use non-fat, low-fat, or full-fat yogurt. Full-fat will yield a slightly richer, more tender crumb. For a dairy-free version, a thick, plain plant-based yogurt (like coconut or almond-based) can work, but results may vary slightly in texture.
- 1 egg (optional, for egg wash) – This isn’t for the dough, but for that gorgeous, bakery-style glossy finish and to help our toppings stick! Chef’s Insight: Simply beat it with a splash of water or milk. Don’t have an egg or want to skip it? A light brush of milk, melted butter, or even a bit of the yogurt thinned with water will still help toppings adhere.
- Optional toppings: Everything Bagel Seasoning, sesame seeds, poppy seeds, dried garlic/onion, coarse salt. – This is where your personality shines! Raid your spice drawer. I’m a devoted everything-bagel-seasoning fan, but a simple sprinkle of flaky sea salt is also divine.
Let’s Make Some Bagels: Your Step-by-Step Cheer Squad
Ready? This is where the fun happens. I’ll walk you through each step with all my favorite little hacks to ensure bagel perfection.
- Preheat & Prep. Fire up your oven to 375°F (190°C). This ensures it’s perfectly hot when your shaped bagels are ready to go. Line a baking sheet with parchment paper or a silicone baking mat. Trust me, this prevents any sticking and makes cleanup a dream.
- Mix the Dough. In a medium-sized bowl, add your self-rising flour and Greek yogurt. Using a fork or a sturdy spatula, start mixing. It will look crumbly at first, but keep going! Once it starts coming together, I like to use my clean hands to gently knead it right in the bowl for about 30-45 seconds. Chef’s Hack: You want a smooth, slightly sticky dough. If it’s wildly sticky, add a tiny sprinkle of flour. If it’s dry and cracking, add a teaspoon of yogurt. The key is not to over-knead—we’re not making sourdough!
- Shape Your Bagels. Turn the dough out onto a lightly floured surface (or a clean counter). Divide it into 4 equal pieces. I use a kitchen scale for precision, but eyeballing is totally fine! Roll each piece into a ball. Now, take one ball and gently roll it back and forth under your palms to form a rope about 8 inches long. Fun Tip: If the dough snaps back, let it rest for 2 minutes—it’s just being shy! Bring the two ends of the rope together, overlap them slightly, and press and roll the connection point on the counter to seal it into a ring. Repeat with the remaining dough. Place them on your prepared baking sheet.
- Top & Shine (The Fun Part!). If using the egg wash, beat your egg with a teaspoon of water or milk in a small bowl. Using a pastry brush (or your fingers in a pinch!), gently brush the top and sides of each bagel. This is what gives them that beautiful golden color! Now, sprinkle your chosen toppings generously over the top. Don’t be shy—this is the flavor layer!
- Bake to Golden Perfection. Slide your baking sheet into the preheated oven. Bake for 25 to 30 minutes. You’re looking for a deep, beautiful golden brown color and a firm top. Chef’s Note: Ovens can vary! Start checking at 25 minutes. If they look pale, give them a few more minutes. The smell will be incredible.
- The Most Important Step: Cool! I know, the temptation is real! But let the bagels cool on the sheet for at least 10-15 minutes before slicing. This allows the structure to set, so you get a perfect slice instead of a squished one. Your patience will be rewarded.
How to Serve Your Homemade Masterpieces
The beauty of these bagels is their versatility! For a classic treat, slice them in half and toast until just crisp. Schmear generously with cream cheese, goat cheese, or mashed avocado. Turn them into the ultimate breakfast sandwich with a fried egg, cheese, and a slice of ham. For a protein-packed snack, I love them simply sliced and eaten with a drizzle of honey or a swipe of almond butter. They’re sturdy enough to hold up to hearty sandwich fillings for lunch, too! Get creative and make them your own.
Get Creative: 5 Flavor Twists to Try
Once you’ve mastered the basic recipe, the playground is open! Here are a few of my favorite ways to mix it up:
- Sweet Cinnamon Raisin: Mix 1 tsp of cinnamon into the flour. After shaping the rope, press a line of raisins into it before forming the ring. A sprinkle of cinnamon-sugar on the egg wash is divine.
- Everything-but-the-Bagel: My go-to! Add 1 tbsp of everything bagel seasoning right into the dough, plus more on top.
- Cheesy Garlic: Fold ½ cup of shredded sharp cheddar into the dough. Mix ¼ tsp garlic powder into the egg wash before brushing.
- Whole Wheat: Substitute half of the self-rising flour with whole wheat flour. Add 1 tbsp of honey or maple syrup to the yogurt for a hint of sweetness to balance the nutty flavor.
- “Everything” Vegan: Use a thick plant-based yogurt and skip the egg wash. Brush with a bit of plant-based milk and press toppings on generously.
Anna’s Kitchen Notes & Stories
This recipe has become such a staple in my home that it’s evolved with us. My daughter now claims she’s the “official bagel shaper,” and I’m not arguing—her little hands make the cutest, slightly lopsided rings! Over time, I’ve learned a few things: first, brand of yogurt can matter. Some are thicker than others, so if your dough feels too wet, add that tiny bit of flour without fear. Second, these bagels are best eaten the day they’re made, but they freeze like a dream. I often double the batch, let them cool completely, and pop them in a freezer bag. A quick toast straight from the freezer brings them right back to life. It’s a little act of kindness for my future, busier self.
Your Questions, Answered!
Q: Why were my bagels dense or tough?
A: The most common culprit is over-kneading the dough. We’re just bringing it together until it’s smooth—think 30-45 seconds, not 5 minutes of vigorous kneading. Also, make sure your baking powder is fresh! If you made your own self-rising flour with old baking powder, it won’t give the proper lift.
Q: Can I make these gluten-free?
A: You can experiment with a 1:1 gluten-free all-purpose flour blend that contains xanthan gum. You may also need to add 1 ½ tsp of baking powder and ¼ tsp salt per cup of GF flour, as blends vary. The texture will be different but can still be delicious!
Q: How do I store them?
A: Store cooled bagels in an airtight container or bag at room temperature for 1-2 days. For longer storage, freeze them! Slice them first before freezing if you like, so you can pop a frozen half straight into the toaster.
Q: Can I make mini bagels or bagel bites?
A: Absolutely! Divide the dough into 6 or 8 pieces for mini bagels, or into small balls for “bagel bites.” Just reduce the baking time—start checking at 15-18 minutes for minis.
Nutritional Information (Per Bagel, Estimated)
Note: This is an estimate based on using non-fat Greek yogurt and without toppings. Values will vary with substitutions.
- Calories: ~150
- Protein: 10-12g
- Carbohydrates: 20g
- Fat: 2g
- Fiber: 1g
Prep Time: 10 mins | Cook Time: 25 mins | Total Time: 35 mins | Servings: 4 bagels
Final Thoughts
These 3-Ingredient Protein Bagels are one of those recipes that quietly changes the rhythm of your kitchen. They take something that once felt like a special-occasion treat and turn it into an everyday win—simple, nourishing, and deeply satisfying. No intimidation, no long timelines, just warm, chewy bagels made with your own hands and a little bit of kitchen magic.
Whether you’re toasting one on a rushed weekday morning, building the ultimate breakfast sandwich, or pulling a batch from the freezer on a day when you really need an easy victory, these bagels show up for you. They’re proof that good food doesn’t have to be complicated to be meaningful. Sometimes, all it takes is a bowl, a few humble ingredients, and the joy of knowing you made something wonderful yourself. 🥯✨