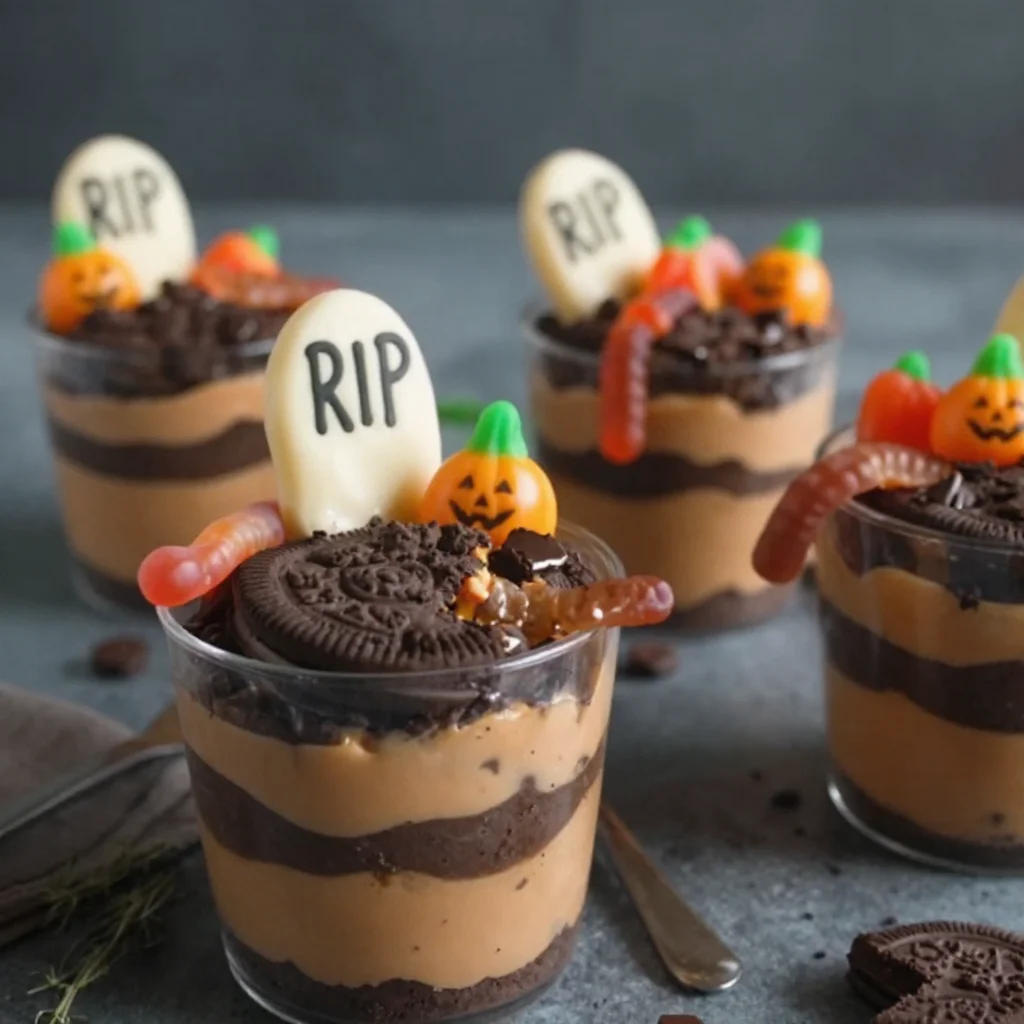
Graveyard Pudding Cookie Cups: A Spooktacular Treat
Introduction
Hey there, culinary pals! It’s Anna Reynolds, and today I’m bubbling with excitement to share a delightfully eerie dessert that will make your Halloween gathering a hit. Welcome to the world of Graveyard Pudding Cookie Cups! Picture this: mini cookie cups, rich chocolate pudding, and a sprinkle of whimsical toppings that will transport your guests straight to a haunted graveyard. The best part? This fun and easy treat is perfect for any age—young or young at heart!
Why are these cookie cups special? Aside from their playful presentation, they bring back memories of my childhood. I remember gathering around the dining room table with family as we made festive treats for Halloween. There were always giggles, a sprinkle of mischief, and, of course, a heck of a lot of chocolate! These Graveyard Pudding Cookie Cups embody that spirit of nostalgia and make cooking together a joyful experience.
Let’s dive into this recipe that combines straightforward techniques with a dash of creativity—perfect for encouraging new cooks while delighting seasoned kitchen pros. Get ready to swap your aprons and roll up your sleeves, because it’s time to create something magical that might just make you the coolest cook in your circle!
Personal Story
Growing up, Halloween was always a big deal in my house. My mom went above and beyond to create a spooky atmosphere—think fake cobwebs, pumpkin decorations, and a playlist of classic horror movie soundtracks. But what truly made our celebrations memorable were the treats.
One year, we decided to host a Halloween party for my friends. My mom suggested we make cookie cups filled with chocolate pudding and topped them with all sorts of ghastly goodies. I remember meticulously placing gummy worms wriggling out of the pudding and using candy pumpkins to create tiny grave markers! The kids’ reactions were priceless and inspired me to carry on this tradition. Every Halloween since, I’ve made these delightful Graveyard Pudding Cookie Cups, adding my own twists along the way. It’s such a joy to create special moments around food—especially when it involves chocolate!
Ingredients
To create these delicious Graveyard Pudding Cookie Cups, you’ll need the following ingredients:
-
Chocolate Sandwich Cookies (like Oreos): These cookies form the base of your dessert. Their chocolatey goodness packs a punch! If you prefer, use vanilla sandwich cookies for a lighter version.
-
Instant Chocolate or Vanilla Pudding Mix: This is the creamy filling that makes our cups a treat to remember. Go for chocolate for that rich flavor, or vanilla if you want a classic touch.
-
Milk: Essential for mixing with the pudding mix! Whole milk provides the creamiest texture, but almond milk or oat milk work beautifully too.
-
Gummy Worms: The spooky topping that brings the graveyard theme to life! Feel free to swap them with gummy bats or candy spiders for a different vibe.
-
Candy Pumpkins: These little gems add a festive touch! If you’re looking for a substitute, consider chocolate-covered almonds for a nutty twist or even small chocolate candies.
-
Whipped Cream (optional): For a final flourish, whipped cream adds a delightful creaminess and makes the dish oh-so-indulgent! You can easily use a dairy-free whipped cream if you need a substitute.
Step-by-Step Instructions
Ready to get into the kitchen and whip up these adorable cookie cups? Let’s go step by step:
-
Prepare Your Cookie Cups:
- Start by preheating your oven to 350°F (175°C).
- While that’s heating up, grab your chocolate sandwich cookies. Using a food processor, crush the cookies until they reach a fine crumb consistency. (Tip: If you don’t have a food processor, you can put the cookies in a zip-top bag and smash them with a rolling pin—great for getting out some kitchen stress!)
-
Shape Your Cups:
- In a mixing bowl, combine the cookie crumbs with a couple of tablespoons of melted butter. Mix until the crumbs look like wet sand.
- Generously press the mixture into the muffin tin cups. Make sure to create a well in the center for the pudding (this is crucial!).
- Pop your muffin tin into the oven and bake for about 8-10 minutes. Let them cool completely before removing them; patience here pays off!
-
Mix the Pudding:
- Now, let’s whip up that pudding! In a mixing bowl, combine your pudding mix with the milk. Beat it with a whisk until it thickens up—about 2 minutes. (Chef hack: If you’re in a hurry, use a hand mixer for quicker results!)
- Once thickened, set the pudding aside and let it chill in the refrigerator for about 10 minutes while the cookie cups cool—this also helps enhance the flavors.
-
Assemble the Cups:
- Once your cookie cups are cool and your pudding is ready, it’s time to assemble! Spoon the pudding into each cookie cup, filling them generously.
- To really bring the graveyard to life, top each cup with whipped cream (if using) and then let your creativity shine! Place gummy worms “escaping” from the pudding, and add a cute candy pumpkin on the side.
-
Get Creative:
- You don’t have to stop there—using some crushed cookies to sprinkle over the top mimics dirt for an even spookier touch!
-
Chill and Serve:
- For the best results, let your assembled Graveyard Pudding Cookie Cups chill in the refrigerator for at least 30 minutes. This will set the pudding and help meld the flavors.
Serving Suggestions
Present your Graveyard Pudding Cookie Cups on a black or orange platter for a festive flair! You can add some faux spider webs or tiny faux tombstones as decor around the cups to enhance the Halloween vibe. For serving, consider giving guests a tiny spoon to dig into these delectable cups—it’s all about creating an experience!
Recipe Variations
Want to switch things up? Here are some nifty variations you can try:
-
Pumpkin Spice Pudding: Use pumpkin spice pudding mix (available in stores) for a seasonal twist on flavor.
-
Nutty Flavors: Incorporate a layer of crushed nuts or nut butter for an added depth of flavor and texture.
-
Dairy-Free Delight: Substitute the milk with coconut milk and use dairy-free whipped cream for a vegan option.
-
Cookie Crust Varieties: Experiment with different cookie bases, like ginger snaps or peanut butter cookies for unique flavor profiles.
-
Fruit Toppings: Add fun fruit toppings like blueberries or strawberries for an unexpected burst of flavor and color.
Chef’s Notes
I love how easy it is to adapt this recipe—there’s no wrong way to build these cookie cups! Each time I make them, I’m reminded to embrace creativity in the kitchen. One Halloween, I even made a “graveyard cake” inspired by these treats, featuring layers of chocolate cake, frosted tombstones, and cookie crumbs as dirt. There’s just something about food that sparks inspiration and invites laughter.
FAQs and Troubleshooting
1. My cookie cups are too crumbly; what did I do wrong?
- You may need to add a bit more melted butter to make the cookie crumb mixture hold together. Aim for a wet sand-like consistency!
2. How do I store leftovers?
- These treats are best enjoyed fresh, but you can keep them in an airtight container in the fridge for up to 2 days. Just know that the cookies might get a tad soggy over time.
3. Can I prepare these ahead of time?
- Absolutely! You can make the cookie cups a day in advance and assemble them with pudding a few hours before your event.
4. What if I can’t find gummy worms?
- No worries! Any gummy candy can do the trick. Try gummy bats or even chocolate-covered pretzels!
Nutritional Info
(Please note that this is customizable based on ingredient variations and portion sizes.)
- Calories per cookie cup: Approximately 150-200 calories
- Fat: 7-10 grams
- Carbohydrates: 22-25 grams
- Protein: 2-3 grams
Final Thoughts
Cooking should always be a fun, uplifting experience, and this spooky dessert is every bit of that! Remember, it’s not just about the food—it’s about the memories made in the kitchen, the laughter shared, and the delicious joy that comes from satisfying our sweet tooth. So, gather your loved ones, roll up your sleeves, and dive into this Graveyard Pudding Cookie Cups adventure. They’re sure to be a hit at your next Halloween party or just a cozy night in. Happy cooking, friends!
PrintGraveyard Pudding Cookie Cups

Delightfully eerie dessert featuring mini cookie cups filled with rich chocolate pudding and whimsical toppings, perfect for Halloween!
- Prep Time: 15 minutes
- Cook Time: 10 minutes
- Total Time: 55 minutes
- Yield: 12 servings
- Category: Dessert
- Method: Baking
- Cuisine: American
- Diet: Vegetarian
Ingredients
- Chocolate Sandwich Cookies (like Oreos)
- Instant Chocolate or Vanilla Pudding Mix
- Milk (whole, almond, or oat)
- Gummy Worms
- Candy Pumpkins
- Whipped Cream (optional)
Instructions
- Preheat your oven to 350°F (175°C).
- Crush the chocolate sandwich cookies in a food processor until fine.
- Combine cookie crumbs with melted butter until resembling wet sand.
- Press the mixture into muffin tin cups, creating a well in each.
- Bake for about 8-10 minutes and let cool completely.
- Mix pudding mix with milk in a bowl and whisk until thickened (about 2 minutes).
- Chill the pudding in the refrigerator for about 10 minutes.
- Assemble by spooning pudding into cooled cookie cups.
- Top with whipped cream (if using), gummy worms, and candy pumpkins.
- Chill assembled cups in the refrigerator for at least 30 minutes before serving.
Notes
Customize with different toppings or pudding flavors for a fun twist. Perfect for Halloween gatherings!
Nutrition
- Serving Size: 1 cup
- Calories: 175
- Sugar: 15g
- Sodium: 200mg
- Fat: 8g
- Saturated Fat: 4g
- Unsaturated Fat: 3g
- Trans Fat: 0g
- Carbohydrates: 25g
- Fiber: 1g
- Protein: 2g
- Cholesterol: 10mg
Keywords: Halloween dessert, spooky treats, cookie cups, pudding cups