Cherry Breakfast Bars: A Delicious Morning Treat
Hey there, food lovers! I’m so excited to share a delightful recipe with you today: Cherry Breakfast Bars. These delicious treats are not just for breakfast; they’re perfect for snacks, brunches, or even dessert! Picture biting into a chewy, fruity bar bursting with the sweet, tangy flavors of Northwest cherries, all while enjoying the cozy comfort of rolled oats and nuts.
The beauty of these breakfast bars is that they combine healthy ingredients with a touch of sweetness, making them a guilt-free indulgence. Plus, they’re super easy to whip up! Whether you’re gearing up for a busy week ahead or simply want to treat yourself, these bars are an absolute win. So, grab your apron, and let’s make some magic in the kitchen!
A Slice of Nostalgia
I’ll never forget the summer when I was about eight years old, and my grandma decided to take me cherry picking at a local orchard. The sun was shining, and the excitement buzzed in the air. There were rows upon rows of cherry trees, and I felt like I had entered a treasure trove of juicy delights. We filled our buckets with bright red cherries, and I think I ate more than I picked!
Back at her kitchen, we spent the afternoon pitting those cherries and making all sorts of treats. But one recipe stood out and was a staple during cherry season: her scrumptious cherry bars. She always said, "You don’t need a lot to make something wonderful," and that lesson stuck with me. I can still hear her laughter as we enjoyed the warm bars fresh from the oven, a dollop of whipped cream on the side.
These Cherry Breakfast Bars are my homage to those cherished moments spent with my grandma. They’re filled with juicy cherries and wholesome ingredients that remind me that breakfast can be fun, flavorful, and oh-so-memorable!
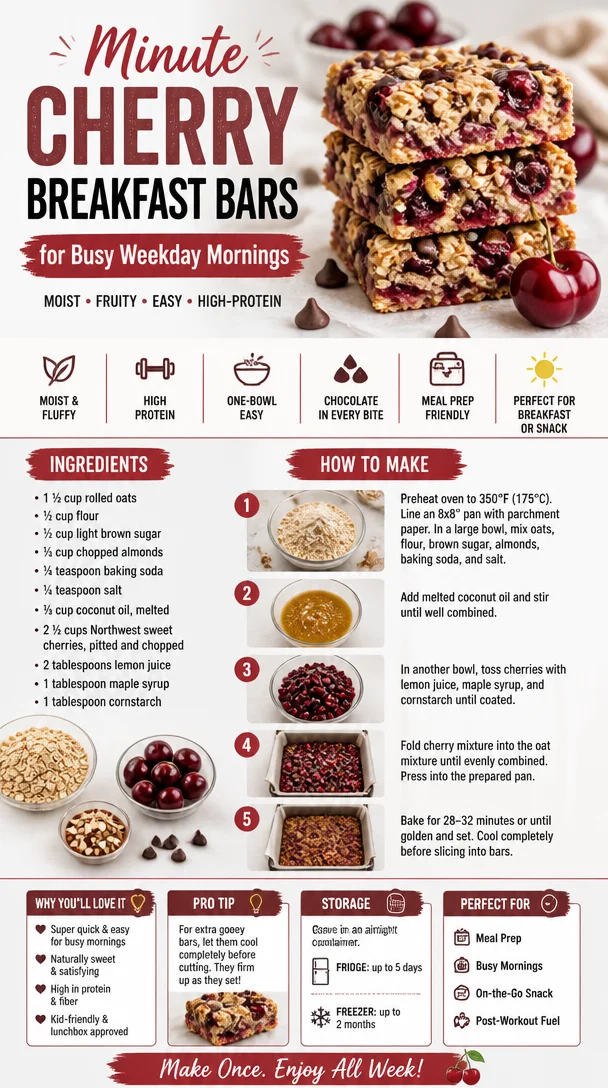
Ingredients
Here’s what you’ll need to make these irresistible Cherry Breakfast Bars:
-
1 ½ cups rolled oats
The base of our bars, rolled oats provide a hearty, chewy texture while offering fiber and nutrients. If you need a gluten-free option, choose certified gluten-free oats! -
½ cup flour
All-purpose flour is traditional, but whole wheat flour can add extra fiber, while almond flour can make it gluten-free. -
½ cup light brown sugar
This lends a lovely depth and molasses-like flavor to the bars. If you’re looking for less sweetness, feel free to reduce it or use coconut sugar as a substitute. -
⅓ cup chopped almonds
These add crunch and a nutty flavor. You can switch them out for your favorite nuts or seeds, like walnuts or sunflower seeds, to personalize your bars. -
¼ teaspoon baking soda
This helps our bars rise and stay fluffy, giving that wonderful texture. -
¼ teaspoon salt
A pinch of salt enhances all the flavors and balances sweetness. -
⅓ cup coconut oil, melted
This gives moisture and a subtle flavor. If you’re not a fan of coconut oil, unsalted butter or even applesauce can work as substitutes. -
2 ½ cups Northwest sweet cherries, pitted and chopped
The star ingredient! If cherries aren’t in season, frozen or dried cherries will work too. Just adjust the quantity of sugar to your preference, as dried cherries can be sweeter. -
2 tablespoons lemon juice
This brightens up the cherry flavor. You can swap it for lime juice if you prefer a different zest. -
1 tablespoon maple syrup
Adds a touch of natural sweetness. You can omit it for less sweetness or use agave nectar as a substitute. -
1 tablespoon cornstarch
This helps thicken the cherry filling and gives a nice texture. If you don’t have cornstarch, you can use tapioca starch or make a slurry with flour.
Step-by-Step Instructions
Ready to get started? Let’s cook some deliciousness! Follow these easy steps to create your Cherry Breakfast Bars.
-
Preheat Your Oven:
Preheat your oven to 350°F (175°C). This ensures it’s at the perfect temperature for baking once we’re ready to pop those bars in. -
Prepare the Baking Dish:
Grease an 8×8-inch baking dish or line it with parchment paper for easy removal. This little hack will make cleanup a breeze! -
Mix Dry Ingredients:
In a large mixing bowl, combine the rolled oats, flour, light brown sugar, baking soda, and salt. Stir well until everything is nicely incorporated. This step not only mixes the ingredients but also ensures there are no clumps of brown sugar! -
Add the Wet Ingredients:
In a separate bowl, whisk together the melted coconut oil, lemon juice, and maple syrup. Once combined, pour this mixture into your dry ingredients. Stir until well combined—this batter will be a bit crumbly, and that’s okay! -
Form the Bar Base:
Press about two-thirds of the oat mixture into the bottom of your prepared pan. Use your hands or the back of a measuring cup to ensure it’s nicely packed down. Think of it as creating a cozy little nest for our cherry filling! -
Prepare the Cherry Filling:
In a medium bowl, mix together the chopped cherries, cornstarch, and a sprinkle of additional maple syrup if you prefer. This will create a thick, luscious filling that contrasts beautifully against the oat base. -
Assemble the Bars:
Spread the cherry mixture evenly over the oat base. Then sprinkle the remaining oat mixture gently on top of the cherries. It doesn’t have to cover everything completely—some cherry peeking through adds a deliciously rustic look! -
Bake to Perfection:
Pop your baking dish into the preheated oven and let it bake for about 30-35 minutes, or until the top is golden brown and the cherries are bubbling. The aroma will be heavenly, trust me! -
Cool and Slice:
Once it’s out of the oven, give it some time to cool completely in the pan. This is essential because it helps the bars set, making them easier to cut. Once cool, slice into squares or rectangles. -
Serve and Enjoy:
Serve these delicious breakfast bars warm or at room temperature. They’re amazing on their own but even better with a dollop of yogurt or a drizzle of honey for an extra touch of sweetness!
Serving Suggestions
When it comes to serving these Cherry Breakfast Bars, keep it simple! Stack them on a pretty plate and dust with powdered sugar for a little flair. Pair them with fresh yogurt and a sprinkle of granola for an added crunch. They also make great grab-and-go snacks for those busy mornings. Just wrap them up in parchment paper, and you’re set for the day!
Recipe Variations
Looking to shake things up? Here are a few creative twists you can try with this recipe:
-
Berry Blast: Swap out the cherries for a mix of your favorite berries, like blueberries, raspberries, or strawberries.
-
Nutty Delight: Add some chopped walnuts or pecans for an extra crunch.
-
Spiced Up: Sprinkle cinnamon or ginger into the oat mixture for a warm, fragrant spice.
-
Chocolate Lovers: Fold in some dark chocolate chips or cocoa powder into the cherry mixture for a sweet treat that satisfies chocolate cravings.
-
Vegan Option: Replace the eggs (not included here) with flax eggs, use maple syrup instead of honey, and opt for a plant-based option for coconut oil.
Chef’s Notes
Over the years, I’ve adapted this recipe quite a bit. I initially started with just cherries, but surrounding seasons have inspired me to mix in berries, spices, and nuts — each adding a unique twist! Every batch comes with a sprinkle of nostalgia and a dash of love.
One of my funniest kitchen stories involves accidentally using cayenne pepper instead of cinnamon one sleepy morning. Let’s just say those bars turned out to be a spicy surprise! So, always double-check your spice jars, or you might discover some culinary surprises — and not the kind you want!
FAQs and Troubleshooting
Q: Can I make these bars ahead of time?
Absolutely! These Cherry Breakfast Bars are perfect for meal prepping. Store them in an airtight container in the refrigerator for up to a week. You can also freeze them for longer storage. Just wrap each bar individually in plastic wrap, then place them in a sealable freezer bag.
Q: Why did my bars crumble apart?
If your bars crumble, they might not have been pressed firmly enough into the pan or required a little more binding. Make sure to pack the mixture well and consider adding a bit more coconut oil or maple syrup next time to help them hold together better.
Q: Can I use frozen cherries?
Yes, frozen cherries work great! Just make sure to thaw and drain any excess liquid before mixing them into the filling.
Q: How can I get a more chewy texture?
If you prefer chewier bars, consider reducing the flour slightly and adding a bit more oats. Also, keeping them slightly underbaked can add to that wonderful texture!
Nutritional Info
(Consider displaying calories, carbs, protein, and fats per serving for helpful references. Optional, but useful!)
Final Thoughts
I hope you enjoy making and munching on these Cherry Breakfast Bars as much as I do! They are not just a recipe; they’re a way to share a little piece of my heart and my cherished memories. Remember, cooking is all about joy, creativity, and making moments special – whether it’s breakfast, brunch, or just a sweet snack. So grab those cherries, put on your favorite playlist, and let’s make some magic in the kitchen together! Happy cooking! 🍒✨
PrintCherry Breakfast Bars
Delicious and chewy Cherry Breakfast Bars made with wholesome ingredients, perfect for breakfast or a snack.
- Prep Time: 15 minutes
- Cook Time: 30 minutes
- Total Time: 45 minutes
- Yield: 12 servings 1x
- Category: Snack
- Method: Baking
- Cuisine: American
- Diet: Vegetarian
Ingredients
- 1 ½ cups rolled oats
- ½ cup flour
- ½ cup light brown sugar
- ⅓ cup chopped almonds
- ¼ teaspoon baking soda
- ¼ teaspoon salt
- ⅓ cup coconut oil, melted
- 2 ½ cups Northwest sweet cherries, pitted and chopped
- 2 tablespoons lemon juice
- 1 tablespoon maple syrup
- 1 tablespoon cornstarch
Instructions
- Preheat your oven to 350°F (175°C).
- Prepare an 8×8-inch baking dish by greasing or lining it with parchment paper.
- Mix the rolled oats, flour, light brown sugar, baking soda, and salt in a large mixing bowl.
- Add the melted coconut oil, lemon juice, and maple syrup to the dry ingredients and stir until well combined.
- Press about two-thirds of the oat mixture into the bottom of the prepared pan.
- Mix the chopped cherries with cornstarch and additional maple syrup in a medium bowl.
- Spread the cherry mixture evenly over the oat base and sprinkle the remaining oat mixture on top.
- Bake for 30-35 minutes, or until golden brown.
- Cool completely in the pan before slicing into squares.
- Serve warm or at room temperature, optionally with yogurt or honey.
Notes
These bars are great for meal prepping and can be stored in an airtight container for up to a week.
Nutrition
- Serving Size: 1 bar
- Calories: 225
- Sugar: 10g
- Sodium: 125mg
- Fat: 9g
- Saturated Fat: 4g
- Unsaturated Fat: 5g
- Trans Fat: 0g
- Carbohydrates: 29g
- Fiber: 3g
- Protein: 3g
- Cholesterol: 0mg
Keywords: Cherry Breakfast Bars, healthy snack, vegetarian, breakfast recipe, baking