Homemade Fig Preserves: A Sweet Journey into Flavor and Nostalgia
When the summer sun warms the earth just right, and the trees rustle gently in the breeze, it’s that time of year when fresh figs peek through the leaves, ready to share their sweetness with the world. For me, fig season is more than just a culinary occasion; it’s a heartfelt reminder of my grandmother’s kitchen, where the aromas of her preserves would drift through the air like sweet whispers of love and family. Join me as we dive into the delightful process of making homemade fig preserves—a recipe that’s not just about the ingredients; it’s about embracing the moment, creating memories, and enjoying the magic of cooking.
Growing up, visits to my grandparents’ house were filled with warmth, laughter, and an abundance of delicious homemade goodies. My grandma had this knack for transforming simple ingredients from her garden into something extraordinary. Fig preserves were her masterpiece—their rich, velvety texture, and natural sweetness could brighten even the rainiest of days. I can vividly recall the way she would pluck the figs from their branches in the backyard, her weathered hands moving gracefully as if choreographed. Over the years, I’ve tried to capture that same joy and love in my kitchen, and I’m excited to share this fig preserves recipe with you so you can create your own sweet memories.
Prepare to transform your fresh figs into luscious preserves that you can slather on toast, pair with cheese, or simply savor by the spoonful. Trust me, this is one of those recipes where the journey is just as delightful as the destination. So, grab your apron, and let’s create something magical together!
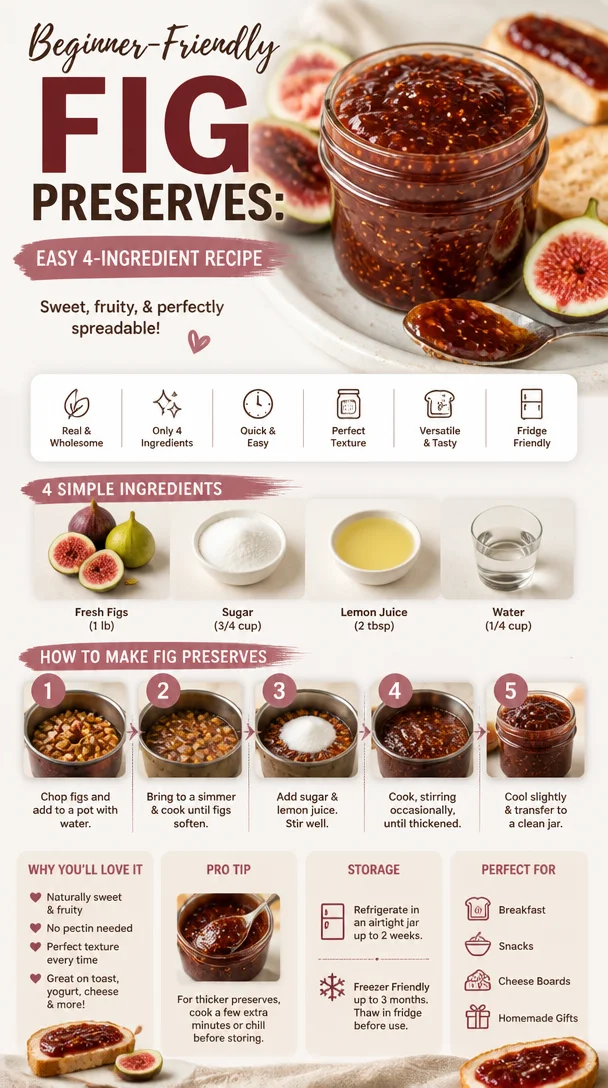
Ingredients
To make your homemade fig preserves, gather these simple ingredients:
-
Fresh Figs (about 2 pounds)
- These sweet gems are the star of the show! Look for figs that are plump, ripe, and slightly soft to the touch. If figs are out of season, you can substitute with dried figs—just remember they’ll have a different texture and sweetness.
-
Sugar (2 cups)
- Sugar is the magic ingredient that helps to gel the preserves. You can use granulated white sugar, but feel free to experiment with brown sugar or coconut sugar for a richer flavor profile. If you’re looking to reduce sugar, consider using a sugar substitute like agave nectar—but be mindful that this may alter the consistency.
-
Lemon Juice (2 tablespoons)
- Fresh lemon juice adds brightness and balances the sweetness of the figs. If you don’t have fresh lemons on hand, bottled lemon juice will work, but fresh truly makes a difference.
-
Water (1 cup)
- A simple ingredient that helps create the right consistency. If you’re in a pinch, you can substitute with fruit juice, like apple or white grape juice, for an added layer of flavor.
Step-by-Step Instructions
Now that we have our ingredients, let’s walk through the steps of making your fig preserves. Don’t worry if you’ve never done this before—I’ll guide you every step of the way!
Step 1: Prepare the Figs
First, rinse your figs under cold water to remove any dirt or residue. Gently pat them dry with a kitchen towel. Next, slice the figs into quarters to help them break down faster when cooking. At this point, you can sneak a taste; they are simply delicious fresh!
Step 2: Combine Ingredients
In a large pot, combine the sliced figs, sugar, lemon juice, and water. Give everything a gentle stir to combine. Let this mixture sit for about 20-30 minutes. This waiting period allows the figs to start releasing their natural juices, making the cooking process more efficient.
Step 3: Cooking Time
Place the pot over medium heat, and bring the mixture to a gentle boil. This will take about 5-10 minutes. Once boiling, reduce the heat to a simmer—this is where the magic starts to happen. Keep an eye on the pot and stir occasionally to prevent sticking. As it simmers, you’ll notice the figs breaking down and the sugar dissolving, creating a lovely syrup. It’s like watching a transformation unfold!
Step 4: Check the Consistency
After about 30-40 minutes, you’ll want to check the preserves for the right consistency. To do this, place a small spoonful on a chilled plate and let it sit for a minute. Swipe your finger through the middle; if the line holds, your preserves are ready! If it’s too runny, continue to simmer for another 10-15 minutes, stirring regularly.
Step 5: Jarring the Preserves
Once you’re happy with the consistency, it’s time to jar your fig preserves. Sterilize your jars and lids by boiling them in water for 10 minutes. Carefully fill the warm jars with your preserves, leaving about half an inch of space at the top. Wipe the rims with a clean cloth to ensure a good seal, then screw on the lids.
Step 6: Process for Long-Term Storage (Optional)
If you plan to store your fig preserves for a while, you can process them in a water bath. Bring a large pot of water to a boil, and place the sealed jars inside, making sure they are covered with water. Processor for about 10-15 minutes. This step is optional, but it helps preserve your delicious creation for months to come!
Serving Suggestions
Your homemade fig preserves are versatile and can elevate many dishes! Serve them on warm toast topped with a layer of cream cheese, or pair them with a cheese platter featuring sharp cheddar or goat cheese for a delightful contrast. Love breakfast? Add a dollop over pancakes or waffles for a fruity twist. Don’t forget to enjoy a spoonful straight from the jar while reminiscing about your own sweet memories!
Recipe Variations
Let’s get creative! Here are a few fun twists you can try with your fig preserves:
-
Spiced Fig Preserves: Add a pinch of cinnamon or nutmeg during cooking for a cozy, warming flavor.
-
Champagne Infusion: Substituting part of the water with champagne or prosecco can add an elegant touch—perfect for a special brunch.
-
Herb-Infused: Toss in a few sprigs of fresh rosemary or thyme during cooking for a unique herbal note.
-
Nutty Addition: Stir in some chopped walnuts or almonds once removed from the heat for a lovely crunch.
-
Vanilla Bliss: A splash of vanilla extract can enhance the flavor, giving your preserves a dreamy taste.
Chef’s Notes
Over the years, my fig preserve recipe has evolved, and with every batch, I uncover new stories and flavors. One memory that stands out is an afternoon spent in the kitchen with my daughter. She was just learning to taste and explore different flavors, and her eyes lit up as she sampled the warm concoction. The kitchen was filled with laughter as we mixed, tasted, and created together. Those simple moments remind me that cooking is not just about food; it’s about the connections we forge and the love we share.
FAQs and Troubleshooting
1. My fig preserves are too runny! What can I do?
If your fig preserves are too runny, don’t fret! Simply return them to the pot and simmer for a little longer, stirring frequently. This will help reduce the moisture and thicken the preserves.
2. Can I double the recipe?
Absolutely! Doubling the recipe is a great way to make a larger batch. Just be mindful of the cooking time—large quantities may take a bit longer to reach that perfect consistency.
3. What if my figs are not sweet enough?
If your figs are a tad on the tart side, you can add a little more sugar to taste while cooking. Always taste as you go!
4. Do I need to refrigerate the preserves?
If you’ve processed your jars correctly, you can store them in a cool, dark place for several months. Once opened, keep the preserves in the fridge.
Nutritional Info
While the nutritional info can vary based on the ingredients used, here’s a rough estimate per tablespoon:
- Calories: 50
- Total Fat: 0g
- Sodium: 1mg
- Total Carbohydrates: 13g
- Sugars: 12g
- Protein: 0g
Final Thoughts
There’s truly something special about making homemade fig preserves. It’s a delightful blend of flavors, nostalgia, and the joy of creating something delicious from scratch. As you make your batch, I hope you find moments to share with family and friends—because good food is always better when shared with loved ones. So, go ahead and indulge in a jar (or two) of your homemade fig preserves. With every spoonful, remember that cooking isn’t just about sustenance; it’s about weaving stories and savoring life’s sweetest moments.
Now, it’s your turn! Get in that kitchen and let’s create magic!
PrintHomemade Fig Preserves
A heartfelt recipe for homemade fig preserves that brings nostalgia and sweetness to your kitchen.
- Prep Time: 15 minutes
- Cook Time: 60 minutes
- Total Time: 75 minutes
- Yield: 4 servings
- Category: Condiment
- Method: Canning
- Cuisine: American
- Diet: Vegetarian
Ingredients
- Fresh Figs (about 2 pounds)
- Sugar (2 cups)
- Lemon Juice (2 tablespoons)
- Water (1 cup)
Instructions
- Prepare the figs by rinsing them under cold water and slicing them into quarters.
- Combine the sliced figs, sugar, lemon juice, and water in a large pot and let it sit for 20-30 minutes.
- Place the pot over medium heat and bring the mixture to a gentle boil.
- Check the preserves for consistency after 30-40 minutes using a chilled plate.
- Jar the preserves into sterilized jars, leaving half an inch of space at the top.
- Process in a water bath for 10-15 minutes if storing for long-term use (optional).
Notes
Pair your fig preserves with cheese, over pancakes, or enjoy straight from the jar!
Nutrition
- Serving Size: 1 tablespoon
- Calories: 50
- Sugar: 12g
- Sodium: 1mg
- Fat: 0g
- Saturated Fat: 0g
- Unsaturated Fat: 0g
- Trans Fat: 0g
- Carbohydrates: 13g
- Fiber: 0g
- Protein: 0g
- Cholesterol: 0mg
Keywords: fig preserves, homemade, canning, sweet, nostalgic