Spooky Skeleton Oreos: A Fun Halloween Treat!
Hello, my lovely foodies! As the crisp air settles in, and the leaves begin to swirl in a majestic dance of orange and yellow, we all know what’s just around the corner—Halloween! It’s that magical time of year when the veil between the ordinary and the extraordinary seems thin, and the kitchen becomes a haunt for treats that ooze fun and creativity.
Today, I’m thrilled to share with you a delightful recipe that will turn your Halloween celebrations into a spooky masterpiece: Spooky Skeleton Oreos! These ghoulishly adorable treats are perfect for parties, school treats, or just an evening of fabulous fun with the family. Plus, they’re incredibly easy to make, which means you can whip them up in no time, allowing more moments for ghost stories and pumpkin carving!
Imagine this: It’s a chilly Halloween night, and you’re surrounded by your loved ones, giggling as you dip and decorate your Oreos. The spooky music is playing in the background, and the air is filled with the sweet aroma of melting chocolate. Not only will these creepy concoctions impress your friends and family, but they will also become a cherished memory that you yearn to recreate every year. Now, let’s get cooking; grab your apron, and let’s conjure up some magic in the kitchen!
A Sweet Memory from My Childhood
Oh, how I adore the memories that certain foods bring! I can’t think of Halloween without reminiscing about the year I decided to host a spooky movie night for my friends. We had everything planned down to the tiniest detail—jack-o’-lanterns glowing brightly, scary stories to share, and, of course, a spread of treats that would make even the bravest souls shiver in delight.
In the midst of our preparations, I had the idea to create Halloween-themed snacks that would enchant everyone, and there I was, in my kitchen, surrounded by colorful sprinkles, gooey caramel, and candy galore. It was pure chaos! But amid the clattering of the bowls and laughter echoing off the walls, I stumbled upon using Oreos as a base for spooky designs. That night, my friends and I created delicious ghouls, mummies, and, of course, skeletons, all while sharing stories and crafting lasting memories. Those spooky skeleton Oreos became the star of the evening and still hold a special place in my heart!
Ready to recreate some of that magic? Let’s dive into the ingredients you’ll need for these delicious treats!
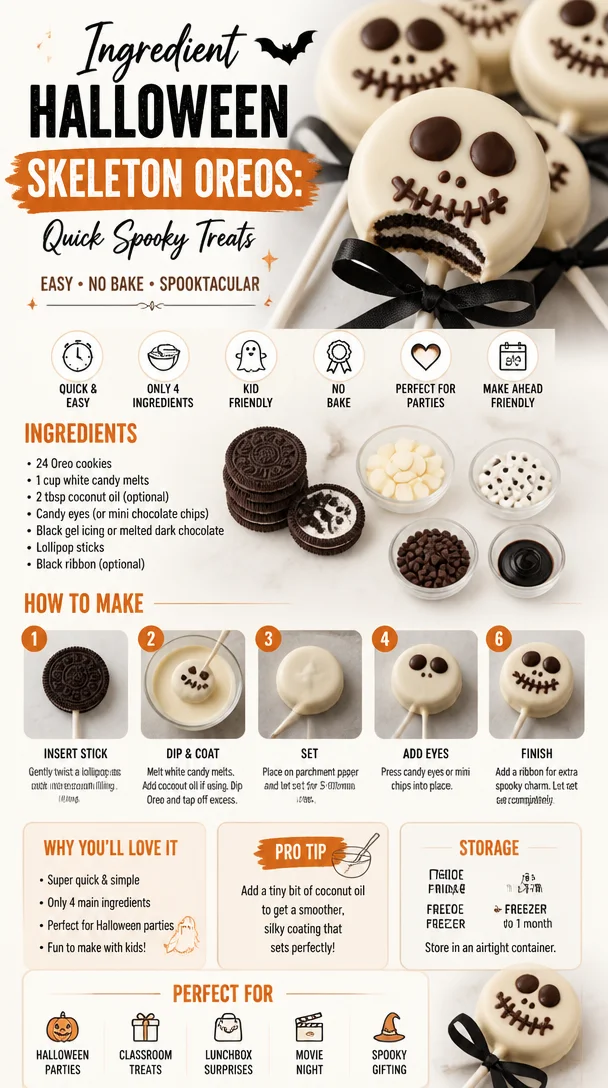
Ingredients
-
Oreo Cookies
The yummy base of our spooky skeletons! These iconic cookies bring a delightful crunch that complements the smooth melting chocolate. If you’re feeling adventurous, try using gluten-free Oreos or even the seasonal pumpkin spice Oreos for a fun twist. -
Melting Chocolate
This is your paint! Melting chocolate will create a smooth and shiny coating for your Oreos. You can use dark, milk, or even white melting chocolate. If you’re looking for dairy-free options, many brands offer vegan melting chocolate. -
Candy Eyes
Every skeleton needs a personality! These little candy eyes will give your spooky Oreos life. You can find various sizes and colors to jazz things up. Don’t have any? You can use mini chocolate chips, or white chocolate chips, with dark chocolate dots for pupils. -
White Chocolate (for decoration)
This will take our spooky skeletons to the next level! You can drizzle it on to create bones and other spooky designs. Feel free to use colored candy melts if you want to add a splash of color to your skeletons!
Step-by-Step Instructions
Now that we have our ingredients ready, let’s jump into the fun part—making these frighteningly fun treats!
Step 1: Melt the Chocolate
In a medium microwave-safe bowl, add your melting chocolate. Microwave it in 30-second intervals until it’s completely smooth. Stir each time to ensure it melts evenly. This is my sneaky little tip—be patient! Chocolate can scorch quickly if not monitored.
Step 2: Coat the Oreos
Once the chocolate is melted, grab your Oreo cookie and dip it into the bowl of chocolate. Make sure it’s completely covered. Use a fork to lift it out gently, letting the excess chocolate drip off. This part is so much fun! Don’t worry about perfection; it’s all about the spooky charm!
Step 3: Set the Coated Oreos
Place your dipped Oreos on a parchment-lined baking sheet. This keeps them from sticking and makes clean-up a breeze! While they’re still wet with chocolate, immediately sprinkle some candy eyes on top to give them that eerie effect.
Step 4: Drizzle with White Chocolate
Melt your white chocolate using the same method as before. Once melted, use a fork or a piping bag to drizzle it over the Oreos in a bone or skeletal shape. It can be as elaborate or as simple as you like—just embrace the creativity!
Step 5: Let Set
Allow your spooky skeleton Oreos to set at room temperature or pop them into the fridge for about 15 minutes. Nothing’s better than waiting for your creations to harden and thrill your senses!
Step 6: Enjoy!
Once set, these spooky delights are ready for their close-up! Gather your family or friends, and share these creepy little treats while sharing laughs and spooky stories!
Serving Suggestions
To serve these delightful treats, arrange your spooky skeleton Oreos on a skeleton-themed platter to add a fun visual. Add props like faux cobwebs or little plastic spiders for an extra touch of whimsy. These can also double as a centerpiece for your Halloween gathering!
Recipe Variations
If you’re looking to spice things up, here are a few creative twists you can try with these spooky skeleton Oreos:
-
Ghostly Oreo Pops: Insert a lollipop stick into the Oreos before dipping. After drizzling, you’ll have adorable ghost pops!
-
Pumpkin Skeletons: Use chocolate orange melts to create a pumpkin-themed version, perfect for those who adore fall flavors.
-
Spooky Mummy Oreos: Instead of skeletons, drizzle white chocolate in zigzag patterns to create mummy designs. Add two eyes for that spooky vibe!
-
Nutty Skeletons: Dip in the chocolate and dust with crushed nuts for a delightful crunch!
-
Boozy Skeletons: For an adult twist, add a splash of flavored liqueur to the melted chocolate to give it a fun kick!
Chef’s Notes
This recipe has become a staple in my Halloween repertoire. I can’t tell you how many versions I’ve tried over the years—from swirls of colored chocolate to experimenting with spices in the chocolate mix. The joy of creating and sharing these with my loved ones is what it’s all about! Plus, the laughter that erupts while decorating is truly priceless.
One Halloween, I accidentally grabbed a bag of pink melting chocolate instead of white—it turned into a fabulous disaster that led to some surprisingly cute creations. So, don’t be afraid to experiment and let your inner artist shine!
FAQs and Troubleshooting
-
Q: My chocolate is too thick to dip the Oreos. What do I do?
A: If your chocolate is too thick, try adding a tiny bit of vegetable oil to thin it out. Just a teaspoon at a time until you get that smooth, consistent texture. -
Q: Can I use regular chocolate instead of melting chocolate?
A: Yes! Just chop the chocolate into small pieces and melt it carefully. However, it might be a bit trickier to coat the Oreos since regular chocolate can be temperamental. -
Q: What can I do with leftover chocolate?
A: Don’t let it go to waste! Pour the leftover chocolate into silicone molds to create your very own Halloween-themed chocolates. -
Q: How do I store these treats?
A: Store them in an airtight container at room temperature for up to a week. You can also refrigerate them for extra crunchiness; just let them come back to room temperature for optimal flavor!
Nutritional Info
Note: Nutritional values will vary based on the brands and ingredients used. It is always best to check the packaging for exact information.
Final Thoughts
There you have it, my spooky baking friends! Spooky Skeleton Oreos are not just a treat; they are an experience filled with laughter, creativity, and scrumptious flavors. I hope you find as much joy in making and sharing them as I have. Embrace the fun of Halloween with this delightful treat and let your imagination run wild in the kitchen.
So, roll up your sleeves, gather your loved ones, and dive headfirst into the magical world of spooky treats. May your Halloween be filled with love, laughter, and the sweetest moments. Happy haunting, and until next time, keep cooking up some magic in the kitchen!
PrintSpooky Skeleton Oreos

A fun and easy Halloween treat that brings creativity and sweetness together with adorable skeleton designs.
- Prep Time: 10 minutes
- Cook Time: 15 minutes
- Total Time: 25 minutes
- Yield: 24 servings
- Category: Dessert
- Method: Dipping
- Cuisine: American
- Diet: Vegetarian
Ingredients
- Oreo Cookies
- Melting Chocolate (dark, milk, or white)
- Candy Eyes
- White Chocolate (for decoration)
Instructions
- Melt the Chocolate: In a medium microwave-safe bowl, add your melting chocolate. Microwave it in 30-second intervals until it’s smooth.
- Coat the Oreos: Dip the Oreo cookie into the melted chocolate and ensure it’s fully covered.
- Set the Coated Oreos: Place dipped Oreos on a parchment-lined baking sheet and immediately sprinkle candy eyes on top.
- Drizzle with White Chocolate: Melt white chocolate and drizzle it over the Oreos in skeletal shapes.
- Let Set: Allow the Oreos to set at room temperature or refrigerate for about 15 minutes.
- Enjoy: Share these spooky skeleton treats with friends and family!
Notes
Try different variations such as Ghostly Oreo Pops or Pumpkin Skeletons for added fun!
Nutrition
- Serving Size: 1 cookie
- Calories: 150
- Sugar: 10g
- Sodium: 50mg
- Fat: 8g
- Saturated Fat: 4g
- Unsaturated Fat: 3g
- Trans Fat: 0g
- Carbohydrates: 20g
- Fiber: 1g
- Protein: 1g
- Cholesterol: 0mg
Keywords: Halloween, treats, spooky, Oreos, dessert