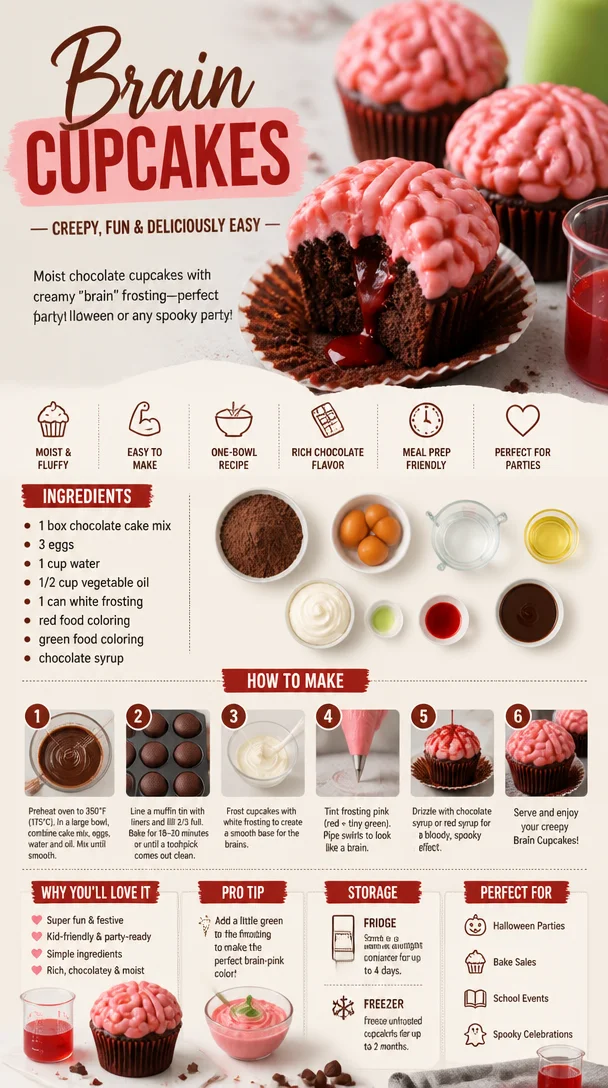
Brain Cupcakes: A Fun and Spooky Treat
Hello, my fellow kitchen adventurers! Today, we’re diving into a delightfully spooky treat that’s perfect for Halloween gatherings, school parties, or just a fun day in the kitchen with loved ones. I’m excited to share with you my recipe for Brain Cupcakes—a whimsical creation that’s sure to raise some eyebrows (and maybe a few smiles!). These cupcakes, adorned with gooey frosting and a splash of color, are as delicious as they are eye-catching.
Why Brain Cupcakes, you ask? Well, let me take you on a nostalgic journey before we start gathering our ingredients!
A Bit of Nostalgia
Growing up, Halloween was one of my favorite seasons. I can still vividly remember the excitement in the air as my mom transformed our cozy kitchen into a space buzzing with the scent of baked goodies and seasonal spices. One year, she decided to take our cupcake game to a whole new level and created what she dubbed “Brain Cupcakes.”
It was a hit! The way those cute little cakes could bring out laughter and squeals of delight from friends was something special. We would cheerfully decorate them with different frosting colors and toppings, giggling as we made them look as spooky (and silly) as possible. Every bite was paired with a story, a giggle, and a whole lot of love.
Now, it’s my turn to carry on that tradition and share that joy with you! So, grab your apron, because we’re about to create something magical together!
Ingredients
Here’s what you’ll need to whip up these fabulous Brain Cupcakes:
-
1 Box Chocolate Cake Mix
Opt for your favorite brand! Most of them require minimal ingredients and deliver fantastic results. If you’re feeling adventurous, you could try a homemade chocolate cake mix for an extra touch! -
3 Eggs
These are essential for giving your cupcakes structure and moisture. For a vegan option, you can substitute each egg with a flaxseed egg (1 tablespoon ground flaxseed mixed with 2.5 tablespoons of water, let it sit for 5 minutes). -
1 Cup Water
This adds moisture and helps achieve the perfect batter consistency. You can swap this for milk or even coffee for a deeper flavor. -
1/2 Cup Vegetable Oil
Oil keeps your cupcakes tender and adds richness. You could also use melted coconut oil or melted unsalted butter for a different flavor profile. -
1 Can White Frosting
Any store-bought frosting works well! However, if you’re adventurous, homemade frosting—a simple buttercream or cream cheese frosting—is an excellent way to go! -
Red Food Coloring
This will help you create that gooey, “bloody” look we’re going for. Depending on your preference, gel food coloring is more concentrated, so a little goes a long way! -
Green Food Coloring
A splash of green adds a fantastic pop of color. It’s optional, but I recommend it; it enhances the spooky effect beautifully! -
Chocolate Syrup
Drizzle this on top for that shiny, rich finish that mimics the shiny texture of, well, brains! You can use homemade chocolate sauce too!
Step-by-Step Instructions
Alright, let’s get to the fun part—baking those cupcakes!
-
Preheat the Oven
Start by preheating your oven to 350°F (175°C). This step is crucial; a properly preheated oven takes your cupcakes from good to great! -
Mix the Batter
In a large mixing bowl, combine the chocolate cake mix, eggs, water, and vegetable oil. Whisk gently until everything is well combined; you don’t want it overmixed—just mix until no dry spots remain. Remember, it’s okay if there are a few lumps! -
Prepare the Cupcake Tin
Line your cupcake tin with paper liners. This is purely aesthetic, but those colorful liners add a pop to your spooky theme. Plus, they’ll make cleanup a breeze! -
Fill the Cups
Using a spoon (or an ice cream scoop for consistency), fill each cupcake liner about two-thirds full. This is the sweet spot for rising cupcakes; too full, and they’ll overflow! -
Bake Time!
Pop those cupcakes in the oven and let them bake for about 18-20 minutes. You’ll know they’re done when a toothpick inserted into the center comes out clean. I love to set a timer—I’ve gotten distracted more times than I’d like to admit! -
Cooling Off
Once baked, remove the cupcakes from the oven and let them cool in the tin for 5-10 minutes before transferring them to a wire rack. It’s essential to let them cool fully; warm cupcakes can melt the frosting! -
Frosting Magic
Once the cupcakes are cool, it’s time for the fun! Take your white frosting and divide it into two bowls. Add red food coloring to one bowl and green to the other. Use a spatula or piping bag to frost the cupcakes. For a spookier effect, you can create a “brain” pattern using the back of your spoon! -
Drizzle the Chocolate Syrup
Finally, drizzle chocolate syrup over the frosted cupcakes. Think of it as the finishing touch—like a magical sauce that brings everything together. You could skip this part, but it adds a wonderful color contrast! -
Optional Decorations
If you’re feeling extra crafty, add candy eyeballs or gummy worms for that spooky, creepy factor!
Serving Suggestions
When it comes to serving these Brain Cupcakes, presentation is key! Arrange them on a dark platter to create a dramatic effect, or place them in Halloween-themed cupcake boxes. You can even pair them with some spooky drinks—think green punch or colorful smoothies! The important thing is to make it festive and fun!
Recipe Variations
- Change up the Cake Flavor: Swap the chocolate cake mix for red velvet or vanilla for a different spin!
- Fill Them Up: Consider filling the cupcakes with a delicious raspberry or cherry jam for a delightful surprise when you bite in.
- Dairy-Free: Choose a dairy-free cake mix and use almond or coconut milk to keep things delicious yet accommodating to dietary preferences.
- Spice it Up: Incorporate a dash of cinnamon or nutmeg for a warm flavor that pairs beautifully with chocolate!
- Decorate Differently: Use different colors of frosting to create a rainbow effect; it’s fun for any occasion!
Chef’s Notes
The beauty of these Brain Cupcakes is their adaptability! Every year, I evolve the recipe a little, trying out new colors, flavors, or simply creating fun themes. One year, I even involved my kids and turned the whole day into a cupcake-decorating festival! It reminded me that baking is not just about making delicious food; it’s also about creating memories and bringing people together. After all, a kitchen filled with laughter and frosting-covered smiles is a magical place.
FAQs and Troubleshooting
Q: Why did my cupcakes sink in the middle?
A: That might be due to underbaking, overmixing, or an oven that’s too cool. Always trust your toothpick test for doneness!
Q: My frosting is too runny! What can I do?
A: If your frosting ends up too runny, try adding powdered sugar gradually until you reach your desired consistency. Cold frosting can also help!
Q: How can I store leftover cupcakes?
A: Once frosted, keep the cupcakes in an airtight container at room temperature for up to 3 days. If you haven’t frosted them yet, you can freeze the plain cupcakes for up to 3 months!
Q: Can I use a different icing technique?
A: Absolutely! Use a piping bag with a round tip to create fun peaks or swirls. Or try a spatula for a rustic look!
Nutritional Information
While I usually focus on the joy of cooking rather than its caloric implications, here’s a rough estimate per cupcake:
- Calories: 230
- Fat: 10g
- Carbs: 34g
- Protein: 2g
(Nutrition may vary based on specific ingredients and serving sizes used.)
Final Thoughts
And there you have it! Delicious, whimsical, and oh-so-spooky Brain Cupcakes that are bound to elevate your sweet treat game. I hope this recipe inspires you to not only create but also to share those kitchen stories that bind us together. Remember, cooking should always be filled with joy and creativity. So, roll up those sleeves, put on some fun music, and let’s make this kitchen a place of laughter, love, and the occasional icing mishap!
Happy baking, my friends! Can’t wait to hear about your spooky creations! 🍰💖
PrintBrain Cupcakes
Enjoy a fun and spooky treat with these delightful Brain Cupcakes, perfect for Halloween gatherings!
- Prep Time: 15 minutes
- Cook Time: 20 minutes
- Total Time: 35 minutes
- Yield: 12 servings 1x
- Category: Dessert
- Method: Baking
- Cuisine: American
- Diet: Vegetarian
Ingredients
- 1 Box Chocolate Cake Mix
- 3 Eggs
- 1 Cup Water
- 1/2 Cup Vegetable Oil
- 1 Can White Frosting
- Red Food Coloring
- Green Food Coloring
- Chocolate Syrup
Instructions
- Preheat the oven to 350°F (175°C).
- Mix in a large bowl the chocolate cake mix, eggs, water, and vegetable oil until well combined.
- Prepare the cupcake tin with paper liners.
- Fill each cupcake liner about two-thirds full with batter.
- Bake for 18-20 minutes until a toothpick comes out clean.
- Cool for 5-10 minutes in the tin, then transfer to a wire rack to cool completely.
- Frost with white frosting mixed with red and green food coloring to create a spooky effect.
- Drizzle chocolate syrup over the frosted cupcakes.
Notes
For added fun, consider using candy eyeballs or gummy worms for decoration.
Nutrition
- Serving Size: 1 cupcake
- Calories: 230
- Sugar: 20g
- Sodium: 300mg
- Fat: 10g
- Saturated Fat: 1g
- Unsaturated Fat: 4g
- Trans Fat: 0g
- Carbohydrates: 34g
- Fiber: 1g
- Protein: 2g
- Cholesterol: 30mg
Keywords: Halloween cupcakes, spooky treats, brain cupcakes, dessert, festive baking