***
No-Bake Protein Balls: Your New Go-To Snack for Busy, Magical Days
Hey friend! Let’s talk about that 3 PM slump. You know the one. Your energy is dipping, your focus is wandering, and your stomach is starting to stage a full-blown protest for something—anything—to keep it going until dinner. Or maybe you’re rushing out the door, needing a quick burst of fuel before the gym, school pick-up, or that next big meeting. We’ve all been there, reaching for a bag of chips or a sugary bar that leaves us feeling more drained than before.
What if I told you the solution is waiting in your pantry, requires exactly zero oven time, and comes in a delicious, bite-sized package of pure joy? That’s right, we’re making No-Bake Protein Balls today! This isn’t just any recipe; it’s my power-packed, double-batch version, designed to keep your snack drawer stocked and your energy levels soaring. We’re talking a satisfying chew, little pockets of melty chocolate, and the kind of wholesome, protein-powered goodness that makes you feel like you’ve truly won the day.
I’ve added a couple of my favorite tasty twists to the classic formula—a hint of warm cinnamon and a splash of almond extract—to make them feel a little more special. They are the ultimate kitchen magic trick: incredibly simple to make but delivering a seriously memorable flavor punch. So, let’s ditch the store-bought stuff and cook up something amazing together. Your future self will thank you!
A Story of Snack-Time Salvation
This recipe takes me right back to my early blogging days. My kitchen was a constant whirlwind of testing complicated cakes, simmering sauces, and photographing elaborate dinners. The problem? I was so busy creating recipes for everyone else that I’d completely forget to feed myself! I’d look up from a photoshoot at 4 PM, realizing my only “meal” had been a handful of broken cookie scraps and a spoonful of frosting. Not exactly sustainable.
One particularly chaotic afternoon, my best friend Sarah stopped by, took one look at my frazzled state, and laughed. She marched to my pantry, pulled out a jar of peanut butter, some oats, and honey, and declared, “We are fixing this, right now.” In about ten minutes, we had a batch of the most rudimentary energy balls mixed up. We rolled them, popped them in the fridge, and by the time we were done cleaning up, we had the perfect little snack. That simple act of making something nourishing for myself, with a friend by my side, was a game-changer. It was a reminder that food is fuel and joy, especially when shared. This recipe is that original concept, but all grown up and refined with love. Every time I make them, I smile, remembering that day and the power of a good friend—and a good snack.
Gathering Your Magical Ingredients
PrintNo-Bake Protein Balls
When snack time meets meal-prep magic—you get these upgraded No-Bake Protein Balls. Doubled up for more servings, and with a couple of tasty twists, they deliver a satisfying chew, a hit of chocolate, and the staying power of a protein-packed treat. Great for busy days, gym fuel, or healthy dessert cravings!
- Prep Time: 15 mins
- chill: 30 mins
- Total Time: 45 mins
- Yield: 24 balls 1x
Ingredients
3 cups no-stir creamy peanut butter
1 cup honey
2 2/3 cups rolled oats
1 cup vanilla protein powder
1/4 tsp salt
1 cup mini chocolate chips
1/2 tsp cinnamon (optional for warmth)
2 tbsp chia seeds or ground flaxseed (optional for fiber boost)
1/2 tsp almond extract (optional for a nutty twist)
Instructions
In a large bowl, mix peanut butter and honey until smooth.
Stir in oats, protein powder, salt, cinnamon, chia/flax, and almond extract.
Fold in mini chocolate chips.
Roll into 1-inch balls and place on a parchment-lined tray.
Chill in the fridge for 30 minutes to firm up.
Store in an airtight container in the fridge (1 week) or freezer (1 month).
Nutrition
- Calories: 160
- Sugar: 7g
- Fat: 9g
- Carbohydrates: 14g
- Protein: 6g
The beauty of this recipe is its flexibility! Here’s what you’ll need for our double-batch of goodness. I’ve included all my favorite chef insights and swaps so you can make it your own.
- 3 cups no-stir creamy peanut butter: Using a “no-stir” or already homogenized brand is my top tip here! It ensures the right, creamy consistency every time without the fuss of stirring a separated natural butter. Substitution: Feel free to use almond butter, cashew butter, or even sunflower seed butter for a nut-free version. Just make sure they are well-stirred and drippy!
- 1 cup honey: Our natural sweetener and binder. Honey adds a lovely floral sweetness and helps hold everything together. Substitution: Pure maple syrup works beautifully for a vegan option. Agave nectar is another great alternative.
- 2 2/3 cups rolled oats: Also known as old-fashioned oats. They provide the heartiness, chew, and fiber that make these balls so satisfying. Chef Insight: Do not use quick oats! They absorb moisture differently and can make the texture a bit gummy.
- 1 cup vanilla protein powder: The star of the show for that power-packed protein hit! Vanilla adds a lovely background flavor. Substitution: Any flavor you love will work—chocolate, birthday cake, or unflavored. If using unflavored, you might want to add an extra 1/2 tsp of vanilla extract.
- 1/4 tsp salt: Never underestimate the power of salt! It balances the sweetness and enhances all the other flavors. If your nut butter is unsalted, you can bump this up to 1/2 tsp.
- 1 cup mini chocolate chips: Because every great snack needs a little chocolate! The minis distribute perfectly in every bite. Substitution: Chopped dried fruit (cranberries, raisins, apricots), cacao nibs, or even chopped nuts would be delicious here.
- 1/2 tsp cinnamon (optional for warmth): My secret weapon! It adds a subtle, cozy depth that makes these taste like a real treat.
- 2 tbsp chia seeds or ground flaxseed (optional for fiber boost): An easy, undetectable way to add extra nutrients and fiber. I always add them!
- 1/2 tsp almond extract (optional for a nutty twist): This is the “twist” I adore. It amplifies the nutty flavor and makes the whole thing taste more complex and bakery-style.
Let’s Make Some Magic: Step-by-Step
Ready to see how easy this is? Let’s get rolling! Literally.
Step 1: The Foundation
Grab your largest mixing bowl. Seriously, go bigger than you think you need—it makes stirring so much easier. Plop in the peanut butter and honey. Now, take a moment to appreciate this beautiful, sticky, glorious combination. Using a sturdy wooden spoon or a spatula, mix them together until they are completely smooth and well-combined. You’ll see the color lighten just a tad as they become one cohesive mixture. Chef Hack: If your peanut butter and honey are super thick or cold from the pantry, you can pop the bowl in the microwave for 20-30 seconds to gently warm them. This makes mixing a total breeze!
Step 2: The Dry Team Assembles
Now, let’s add the bulk! Dump in the rolled oats, protein powder, salt, and your optional power-ups: cinnamon, chia/flax seeds, and almond extract. It might look like a lot of dry ingredients, but don’t panic. Start stirring slowly, incorporating the dry into the wet. It will seem crumbly at first, but keep going! As you press and stir, the oils from the peanut butter will eventually hydrate everything, and you’ll end up with a thick, slightly sticky, and totally mixable dough. Chef Tip: If, after a full minute of vigorous stirring, it still seems too dry and isn’t coming together, add a teaspoon of water or milk at a time until it reaches the right consistency. Different protein powders and nut butters have varying absorption rates!
Step 3: The Fun Part
Time for chocolate! Pour in those beautiful mini chocolate chips and fold them gently into the dough. You want them evenly distributed so every single ball gets its fair share of chocolatey goodness.
Step 4: Roll, Roll, Roll!
Line a baking sheet or large plate with parchment paper. Using a tablespoon cookie scoop or your hands, portion out the dough. I like to scoop a heaping tablespoon and then roll it firmly between my palms to form a tight, smooth 1-inch ball. If the dough is sticking to your hands, a little pro tip: lightly wet your palms with water. It creates a non-stick barrier and makes the rolling process clean and easy. Place each finished ball on the parchment-lined tray.
Step 5: The Big Chill
This is the hardest part—waiting! Pop the entire tray into the refrigerator for at least 30 minutes. This crucial step allows the oats to soften slightly, the fats to firm up, and all the flavors to meld together beautifully. It transforms them from a sticky dough into a perfect, portable, firm-yet-chewy snack.
Step 6: Storage for Success
Once they’re firm, transfer your beautiful protein balls into an airtight container. They will keep happily in the fridge for up to a week, or you can freeze them for up to a month! They are perfect straight from the freezer; they thaw in minutes but stay delightfully cool.
How to Serve & Savor
There’s no wrong way to enjoy these! I love grabbing two for a quick afternoon pick-me-up with a cup of coffee or tea. They are the perfect pre-workout fuel or post-run recovery snack. For my kids, I pack them in lunchboxes—they’re a way more exciting treat than a standard granola bar. Feeling fancy? Arrange a few on a nice plate for a healthy-ish dessert option after dinner. They’re delicious cold from the fridge or at room temperature after a few minutes out of the container.
Get Creative: Endless Flavor Twists!
The fun doesn’t stop here! This recipe is a blank canvas. Here are a few of my favorite variations to keep things exciting:
- Cookie Dough Delight: Use cashew butter instead of peanut butter, and swap the chocolate chips for white chocolate chips. Add a handful of mini dark chocolate chunks for that true cookie dough experience.
- Tropical Escape: Substitute the peanut butter with coconut butter (manna), use vanilla protein powder, and fold in chopped dried pineapple, mango, and coconut flakes instead of chocolate chips.
- Everything but the Kitchen Sink: Go truly trail-mix style! Use almond butter, and fold in a mix of dark chocolate chips, chopped almonds, dried cranberries, and a tablespoon of pumpkin seeds.
- Double Chocolate Decadence: Use chocolate protein powder and swap the peanut butter for hazelnut butter. Fold in cacao nibs along with the mini chips for an intense chocolate experience.
- Nut-Free & Seed-tastic: For school-safe or allergy-friendly balls, use sunflower seed butter and swap the optional add-ins for pumpkin seeds and raisins.
From My Kitchen to Yours: Chef’s Notes
This recipe has truly evolved over the years. That first batch with Sarah was just peanut butter, honey, and oats—no protein powder, no fancy extras! Over time, I started adding what I had on hand: a scoop of protein powder after a workout, some flaxseed for extra nutrition, a dash of cinnamon because it just felt right. The almond extract was a happy accident; I grabbed the wrong bottle while making cookies and ended up adding a splash to the protein ball mixture. Best mistake ever! It’s now my non-negotiable secret ingredient.
One funny kitchen story: I once decided to “healthify” them even more by using a very dry, natural peanut butter I had to stir for five minutes. I didn’t adjust the liquid, and the mixture was so crumbly it looked like sand! I ended up adding nearly a quarter cup of maple syrup to save it, turning them into super-sweet, albeit delicious, hockey pucks. Lesson learned: stick with no-stir or adjust your liquids accordingly! Cooking is all about learning and laughing, even when things get a little messy.
Your Questions, Answered!
Q: My mixture is too dry and crumbly and won’t stick together. What did I do wrong?
A: This is the most common issue, and it’s almost always due to the type of nut butter used. If you’re using a very thick, natural, or “drippy” brand that separates, it may have less oil. The fix is simple! Just add a liquid a teaspoon at a time. Water, milk (dairy or non-dairy), or even a little more honey/maple syrup will work. Mix thoroughly after each addition until the dough holds together when you press it.
Q: My mixture is too wet and sticky! How can I fix it?
A> If your nut butter was particularly oily or you accidentally added too much liquid, don’t worry. The easy solution is to add more dry ingredients to balance it out. Add an extra tablespoon or two of protein powder or oats until the mixture is firm enough to roll.
Q: Can I make these vegan?
A> Absolutely! It’s an easy swap. Ensure your protein powder is a plant-based vegan powder, and use maple syrup instead of honey. Also, double-check that your chocolate chips are vegan-friendly (many dark chocolate chips are).
Q: Why do I have to chill them? Can’t I eat them right away?
A> You can absolutely sneak one before chilling—I won’t tell! But the chilling step is important for the final texture. It allows the oats to absorb the moisture and soften, giving them that perfect chewy consistency instead of a gritty one. It also helps them hold their round shape perfectly.
Nutritional Information*
*This is an estimate provided for informational purposes only. Actual values will vary based on the specific brands of ingredients you use.
Per ball (based on a yield of 24 balls):
Calories: ~160 | Fat: 9g | Saturated Fat: 2g | Carbohydrates: 14g | Fiber: 2g | Sugar: 7g | Protein: 6g
Prep Time: 15 mins | Chill Time: 30 mins | Total Time: 45 mins | Servings: 24 balls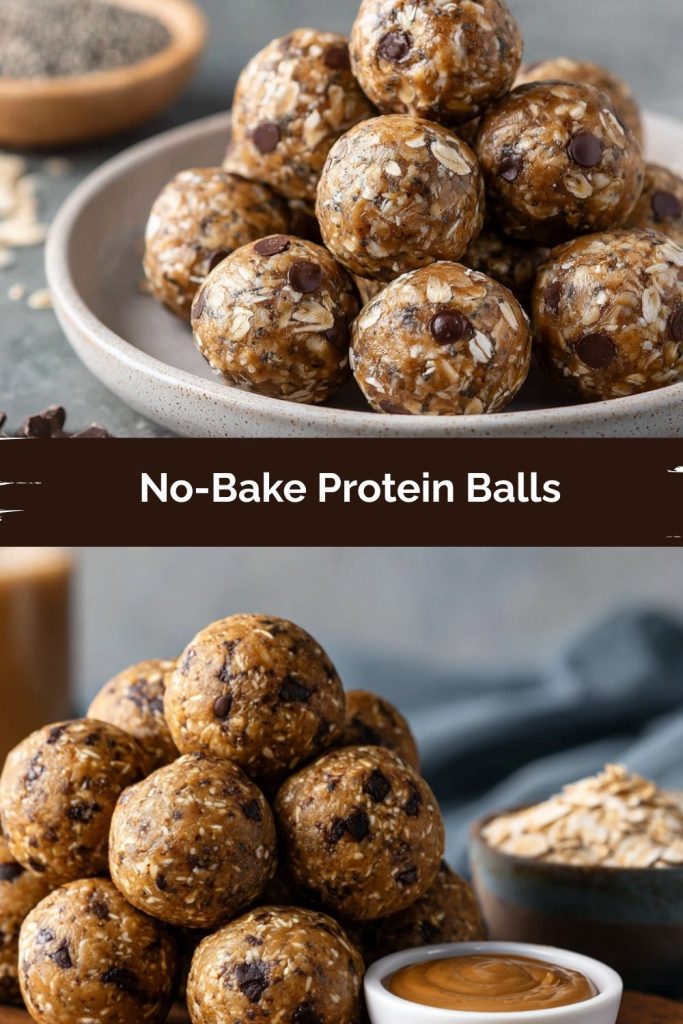
Final Thoughts
These No-Bake Protein Balls prove that the best snacks are the ones that combine simplicity, flavor, and a little bit of magic. In under an hour (most of it hands-off!), you can stock your fridge or freezer with wholesome bites that fight off the afternoon slump, power you through a workout, or keep hungry kids happy.
The real joy of this recipe is its adaptability—you can swap flavors, mix-ins, and nut butters to suit your cravings or pantry staples. Whether you keep them classic with peanut butter and chocolate chips or venture into tropical or double-chocolate territory, they’ll quickly become a snack-time ritual in your home.
Here’s to saying goodbye to boring, store-bought bars and hello to snacks that actually fuel your busy, magical days. Roll a batch, stash them in your fridge, and enjoy the confidence that comes from always having a nourishing little boost within arm’s reach.