***
Spiced Apple Thumbprint Cookies: Your New Favorite Taste of Fall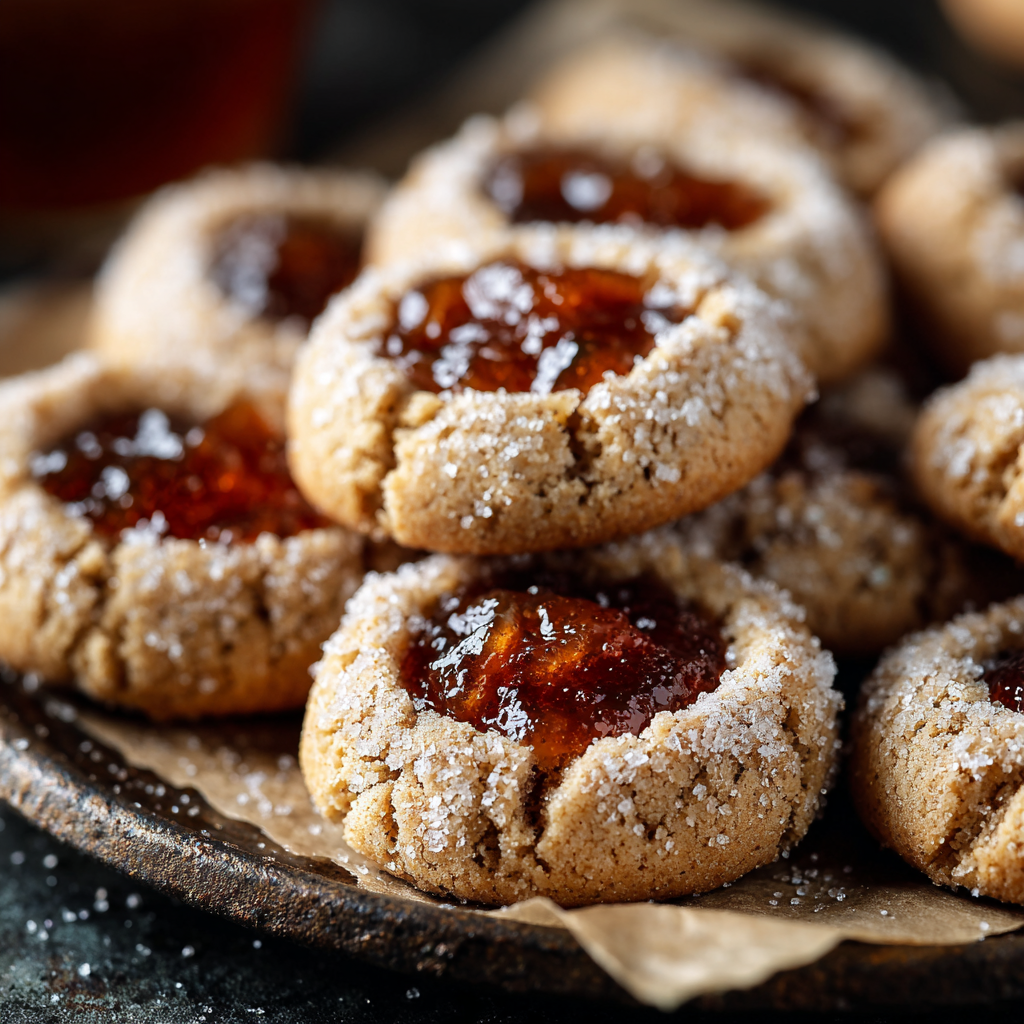
Hey there, friend! Is there anything quite like the feeling of a crisp autumn afternoon? The air is cool and sharp, the leaves are putting on their final, spectacular show, and there’s this undeniable, almost magical pull towards the kitchen. It’s the season of cozy sweaters, warm drinks, and of course, the incredible, heartwarming aroma of something delicious baking in the oven.
And if you ask me, that something should absolutely be these Spiced Apple Thumbprint Cookies. Imagine this: a melt-in-your-mouth, buttery shortbread cookie, warmly spiced with cinnamon and nutmeg. Now, picture a sweet, deeply flavorful dollop of spiced apple butter nestled right in the center, like a hidden treasure. One bite and you’re transported—it’s the essence of fall, captured in a perfect, two-bite cookie.
These aren’t just cookies; they’re little edible hugs. They’re perfect for your holiday cookie trays, fantastic with a cup of tea on a lazy Sunday, and absolutely irresistible for snatching straight from the cooling rack (I won’t tell!). The best part? They are wonderfully simple to make. No fancy equipment, no complicated techniques—just honest, joyful baking that fills your home with the best scent imaginable. So, are you ready to bake up a little bit of magic? Let’s get started!
A Cookie Jar Full of Memories
PrintSpiced Apple Thumbprint Cookies

Soft, buttery thumbprint cookies filled with spiced apple butter or jam — these are the definition of cozy baking. The warm cinnamon and apple flavors make them perfect for fall gatherings, afternoon tea, or snacking straight from the tray.
- Prep Time: 15 mins
- Cook Time: 12–14 mins
- Total Time: 30 mins
- Yield: 24 cookies 1x
Ingredients
1 cup unsalted butter, softened
½ cup powdered sugar
1 tsp vanilla extract
2 cups all-purpose flour
¼ tsp salt
½ tsp ground cinnamon
½ tsp ground nutmeg
½ cup apple butter or spiced apple jam (for filling)
Optional: extra cinnamon sugar for dusting
Instructions
Preheat oven to 350°F (175°C). Line baking sheets with parchment paper.
Cream butter and powdered sugar until light and fluffy. Add vanilla and mix well.
In a separate bowl, whisk flour, salt, cinnamon, and nutmeg.
Mix dry into wet until a soft dough forms. Chill for 15–20 minutes if needed.
Scoop dough into 1-inch balls. Place on baking sheet and use your thumb or spoon to press a deep well in the center of each.
Fill each center with about ½ tsp apple butter.
Bake 12–14 minutes, until edges are lightly golden. Let cool on pan.
Optional: Dust with cinnamon sugar once cooled for an extra cozy finish.
Nutrition
- Calories: 120
- Sugar: 6g
- Fat: 7g
- Carbohydrates: 14g
This recipe always takes me right back to my grandma’s kitchen. Every fall, without fail, we’d take a trip to a local orchard. We’d come home with bushels of apples, our cheeks wind-chapped and our hearts full. The next day, her tiny kitchen would transform into a bustling apple-processing plant. The air would be thick with the steam from simmering applesauce and the warm sugar scent of her famous apple butter, which she’d cook low and slow for what felt like an entire day.
While the apple butter bubbled away, we’d make these thumbprint cookies. My job, even when I was barely tall enough to see over the counter, was to press the “thumbprints” into each dough ball. My prints were always a little wonky and uneven, but Grandma never cared. She’d carefully spoon the still-warm apple butter into each little well, her hands steady and sure. Pulling that first tray out of the oven felt like a grand reveal. That first bite, with the cookie still slightly warm and the filling luxuriously soft, is a core memory for me. It wasn’t just about the cookie; it was about the shared effort, the anticipation, and the overwhelming love that went into them. That’s the feeling I hope these cookies bring to your kitchen, too.
Gathering Your Cozy Cookie Ingredients
One of the things I love most about this recipe is its beautiful simplicity. You likely have most of these ingredients in your pantry right now! Here’s what you’ll need to make about two dozen little bites of heaven:
- 1 cup (2 sticks) unsalted butter, softened: This is the foundation of our cookie! Using unsalted butter lets us control the salt level perfectly. Make sure it’s truly softened at room temperature—this is key for getting that light, fluffy texture when we cream it. If you forget to take it out, you can quickly soften butter by cubing it and letting it sit for 15-20 minutes.
- ½ cup powdered sugar: Powdered sugar, also called confectioner’s sugar, gives these cookies their signature tender, melt-in-your-mouth crumb. It dissolves effortlessly into the butter, avoiding any graininess. Don’t be tempted to swap it for granulated sugar here—it makes all the difference!
- 1 tsp pure vanilla extract: A dash of vanilla adds a beautiful warmth and depth that complements the spices and apple perfectly. Always opt for pure vanilla extract over imitation for the best flavor.
- 2 cups all-purpose flour: The structure of our cookie! I use regular all-purpose flour. For a slightly more tender cookie, you can swap one cup for cake flour, but it’s truly wonderful as-is.
- ¼ tsp salt: Never skip the salt! It’s not there to make things salty; it’s a flavor enhancer that makes the butter and spices truly sing.
- ½ tsp ground cinnamon & ½ tsp ground nutmeg: Our dynamic spice duo! The cinnamon provides that classic warm hug, while the nutmeg adds a subtle, nutty complexity. For the absolute best flavor, try grating a whole nutmeg yourself—it’s a game-changer!
- ½ cup apple butter or spiced apple jam: The star of the show! You can find jars of apple butter near the jams at most grocery stores. Look for one with no high-fructose corn syrup for the best taste. If you can’t find apple butter, a good-quality spiced apple jam works beautifully too.
- Optional: Extra cinnamon sugar for dusting: This is our “little more magic” finishing touch. It adds a pretty sparkle and an extra burst of cozy flavor.
Let’s Bake! Your Step-by-Step Guide to Perfect Cookies
Ready to create some magic? Follow these steps, and you’ll have perfect cookies in no time. I’ve packed this section with all my favorite chef hacks to set you up for success!
Step 1: Preheat and Prep. Start by preheating your oven to 350°F (175°C). This is so important for even baking! While it’s heating, line your baking sheets with parchment paper. Not only does this prevent sticking, but it makes cleanup an absolute dream. I always keep a roll of parchment paper right next to my oven—it’s a true kitchen hero.
Step 2: Creaming is Key. In a large mixing bowl, beat the softened butter and powdered sugar together on medium speed. Now, here’s my pro tip: don’t rush this! We’re not just mixing them together; we’re “creaming” them. Beat for a good 2-3 minutes, until the mixture becomes noticeably lighter in color and fluffy. This process incorporates air, which is what gives us that delightful, tender cookie texture. Scrape down the sides of the bowl with a spatula to make sure everything is evenly incorporated. Then, add the vanilla extract and mix until just combined.
Step 3: Whisk the Dry Goods. In a separate, medium-sized bowl, whisk together the all-purpose flour, salt, cinnamon, and nutmeg. Whisking them first does two great things: it ensures the spices and salt are evenly distributed throughout the flour, so every single cookie gets a perfect amount of flavor, and it aerates the flour a bit, making for a lighter cookie.
Step 4: Bring It All Together. Now, with your mixer on low speed, gradually add the dry ingredients to the wet butter mixture. Mix just until the flour disappears and a soft dough forms. Be careful not to overmix! Overworking the dough can lead to tough cookies. As soon as you don’t see any more dry flour, stop the mixer. The dough might be a bit soft—that’s perfect. If it feels overly sticky, you can pop the whole bowl into the refrigerator for 15-20 minutes to firm up slightly, making it easier to handle.
Step 5: Shape and Press. Using a small cookie scoop (about 1 tablespoon size) or a spoon, portion the dough and roll it into smooth, 1-inch balls. Place them about 2 inches apart on your prepared baking sheets. Now, for the “thumbprint”! You can use your actual thumb, but I find the end of a wooden spoon handle or the back of a ½ teaspoon measure creates a perfect, neat well. Press a deep, clear indentation into the center of each ball. Don’t be shy! If you don’t press deep enough, the filling can bubble over during baking.
Step 6: Fill ‘Em Up! Spoon about ½ teaspoon of your apple butter into each well. Try to keep the filling contained within the indentation for the prettiest results.
Step 7: Bake to Golden Perfection. Slide your baking sheets into the preheated oven and bake for 12-14 minutes. You’ll know they’re done when the edges are just starting to turn a very light golden brown. The centers might still look a little soft—that’s okay! They will continue to set as they cool. Remember, ovens can vary, so keep an eye on them after the 10-minute mark.
Step 8: Cool and (Optionally) Dust. Let the cookies cool on the baking sheet for at least 10 minutes. This allows them to firm up enough to be moved without breaking. Then, transfer them to a wire rack to cool completely. Once they are completely cool, if you’re feeling fancy, give them a light dusting with that cinnamon sugar mixture for that final, cozy, bakery-style finish.
How to Serve These Autumnal Delights
These cookies are stars all on their own, but presentation is part of the fun! For a simple afternoon treat, pile them high on a rustic wooden board or a vintage plate. They’re an absolute must on any holiday cookie tray—their unique look and flavor always stand out. For the ultimate cozy experience, serve them slightly warm alongside a hot mug of coffee, chai tea, or even a mug of mulled cider. The warmth makes the apple butter filling extra luscious. They also make a incredibly thoughtful homemade gift! Tuck a few into a cellophane bag tied with a pretty ribbon, and you’ve just made someone’s day.
Make It Your Own: Delicious Recipe Variations
Love the base recipe? Let’s get creative! Here are a few of my favorite ways to mix it up:
- Pecan Shortbread Twist: Before baking, roll the dough balls in finely chopped pecans for a lovely crunchy exterior and nutty flavor.
- Maple Kissed: Add 2 tablespoons of real maple syrup to the wet ingredients and reduce the powdered sugar to ⅓ cup. Use a maple-infused apple butter if you can find it!
- Ginger-Spiced: Love ginger? Add ½ teaspoon of ground ginger to the dry ingredients for an extra spicy kick.
- Other Fruit Fillings: While apple is classic, don’t feel limited! Fig jam, pear butter, or even a tart raspberry jam work wonderfully here.
- Gluten-Free Swap: You can easily use a 1:1 gluten-free all-purpose flour blend in place of the regular flour. I’ve had great success with brands like Bob’s Red Mill.
Anna’s Chef Notes & Kitchen Stories
This recipe has been a living, evolving thing in my kitchen for years. The original version came from a tattered community cookbook and was a very basic shortbread. Over time, I started adding the spices, playing with different fillings, and perfecting the method. I once, in a hilarious kitchen disaster, tried to use a piping bag to fill the thumbprints. It seemed like a genius idea for neatness… until the warm apple butter decided to burst out both ends of the bag, covering me and my kitchen cabinets in a sticky shower. Lesson learned: a simple spoon is your best friend here!
Another fun fact: my daughter now loves to be the official “thumbprint presser,” just like I was for my grandma. It’s our little tradition, and her small fingers are actually perfect for the job. It just goes to show that the best recipes are the ones that create connections and memories, not just delicious food.
Your Questions, Answered!
Q: My filling sank into the cookie during baking! What happened?
A: This usually means the indentation wasn’t quite deep or wide enough. The walls of the well need to be sturdy enough to hold the filling. Next time, press your thumb or spoon a little deeper and ensure the well has defined edges. Also, make sure your dough is properly chilled if it was very soft—a firmer dough holds its shape better.
Q: Can I make the dough ahead of time?
A: Absolutely! You can prepare the dough, shape it into balls, and press the thumbprints. Then, instead of filling them, place the baking sheet in the freezer for about an hour until the dough balls are solid. Transfer them to a freezer-safe bag or container. They’ll keep for up to 3 months! When you’re ready to bake, place them on a parchment-lined sheet, let them thaw just enough to press the wells again (if they’ve filled in), add your filling, and bake. You might need to add a minute or two to the baking time.
Q: My cookies spread too much and lost their shape. How can I prevent this?
A: Cookies spreading is almost always a temperature issue. The most common culprit is butter that is too warm. If your dough seemed overly soft or greasy, make sure to chill it for 15-20 minutes before shaping. Also, double-check that your oven is fully preheated before the cookies go in. A too-cool oven causes the butter to melt before the structure sets.
Q: I can’t find apple butter. What’s the best substitute?
A: No problem! A good-quality spiced apple jam is a perfect substitute. You could also use homemade applesauce, but be aware it’s runnier. If using applesauce, try cooking it down in a small saucepan for a few minutes to thicken it up and concentrate the flavor before using it as a filling.
Nutritional Information (Per Cookie)
This is a rough estimate provided for informational purposes. Values may vary based on specific ingredients used.
- Calories: ~120
- Fat: 7g
- Carbohydrates: 14g
- Sugar: 6g
- Protein: 1g
Prep Time: 15 mins | Bake Time: 12-14 mins | Total Time: ~30 mins | Servings: 24 cookies
Final Thoughts: Cookies That Taste Like Fall Memories
These Spiced Apple Thumbprint Cookies are more than a treat—they’re a bite-sized reminder of everything we love about fall. From the buttery, tender cookie to the cozy cinnamon and nutmeg spices to that jewel-like center of apple butter, each one is a tiny taste of orchard season and kitchen traditions.
Whether you’re baking them for a holiday tray, gifting them to friends, or just enjoying one with a mug of cider by the window, these cookies bring comfort, joy, and a sprinkle of nostalgia to every bite. So dust off your apron, grab a spoonful of apple butter, and let your kitchen smell like the best kind of autumn afternoon.