***
Bring a Little North Pole Magic to Your Kitchen
Hey there, friend! Is there anything that quite captures the spirit of the holiday season like the scent of freshly baked cookies wafting from the kitchen? It’s a special kind of magic, one that wraps you up in a cozy blanket of nostalgia and joy. And if you’re looking for a recipe that’s equal parts festive, fun, and downright delicious, you’ve absolutely come to the right place.
Today, we’re making my all-time favorite holiday showstopper: Candy Cane Christmas Cookies. These aren’t just any cookies; they’re buttery, sweet, and have that gorgeous, iconic twisted red-and-white swirl that just screams Christmas cheer. They have a light vanilla flavor and a melt-in-your-mouth texture that makes them impossible to eat just one. They’re perfect for stacking high on a festive platter, wrapping up as a heartfelt homemade gift, or leaving out for Santa (with a tall glass of cold milk, of course!).
The best part? They’re a joy to make. This is a fantastic recipe to get the whole family involved in. There’s something so wonderfully tactile about rolling the dough into ropes and twisting them into their classic cane shape. It’s a moment to slow down, put on some holiday tunes, and create something beautiful together. So, grab your favorite mixing bowl and let’s turn this ordinary day into a delicious, flour-dusted, memory-making one. I’m so excited to cook up this magic with you!
A Sweet Memory: My Grandma’s Festive Kitchen
PrintCandy Cane Christmas Cookies

Bring a little North Pole magic to your kitchen with these buttery, sweet candy cane cookies. Twisted with red and white dough, they’re festive, fun to make, and perfect for cookie exchanges or Santa’s plate. Light vanilla flavor and a melt-in-your-mouth texture make them a holiday must-bake.
- Prep Time: 30 min
- chill time: 20 min
- Cook Time: 10–12 min
- Total Time: 1 hr
Ingredients
330 g All-Purpose Flour
1 Egg
150 g Sugar
200 g Unsalted Butter, softened
1 tsp Baking Powder
1 tbsp Powdered Sugar (for smooth texture)
½ tsp Salt
1 tsp Vanilla Extract
Red Food Coloring (gel or liquid)
Instructions
Cream It: In a large bowl, beat softened butter and granulated sugar until light and fluffy (about 3 minutes).
Mix Wet Ingredients: Add the egg, vanilla extract, and powdered sugar. Beat until combined.
Combine Dry Ingredients: In a separate bowl, whisk together flour, baking powder, and salt.
Form Dough: Gradually add dry ingredients to the wet mixture until a soft dough forms.
Divide & Color: Split dough in half. Leave one half plain; color the other half red.
Shape the Canes: Roll small pieces of each dough into ropes. Twist one red and one plain rope together and curve the top to form a cane shape.
Chill: Place shaped cookies on a lined baking sheet and chill for 15–20 minutes to prevent spreading.
Bake: Bake at 175°C (350°F) for 10–12 minutes or until edges are just turning golden. Cool on rack
Nutrition
- Calories: 130
- Sugar: 7g
- Fat: 7g
- Carbohydrates: 15g
- Protein: 1g
Every time I twist a red and white rope of dough together, I’m instantly transported back to my Grandma Eleanor’s warm, tiny kitchen. The counters would be dusted with a permanent layer of flour from December 1st onward, and the air was always thick with the scent of ginger, cinnamon, and butter. I was her official “dough roller and twister,” a title I wore with immense pride.
One particular year, I was maybe seven years old, and I was determined to make a candy cane cookie so big it would be fit for a giant. I rolled and rolled, my little hands working furiously, creating a red and white rope that was nearly as long as my arm. As I went to twist it, it promptly broke in half. My face fell, but Grandma just chuckled, her eyes twinkling. She showed me how to gently press it back together, whispering, “The magic is in the mess, Anna Banana. The love patches it all up.” We baked my giant, slightly lumpy candy cane, and it was the first cookie we ate that year. It tasted like pure, unadulterated joy. That’s the spirit I want to bring to your kitchen today—perfection is overrated, but joy and a little bit of messy fun are absolutely essential.
Gathering Your Cookie Crew: The Ingredients
This is a simple, classic shortbread-like dough that lets the butter and vanilla really shine. Here’s what you’ll need to create your own batch of holiday magic. I’ve included my best chef insights and substitutions so you can bake with confidence!
- 330 g (about 2 ¾ cups) All-Purpose Flour: The backbone of our cookie! I like to weigh my flour for absolute accuracy, which prevents dense cookies. If you’re using cups, fluff your flour with a spoon, spoon it into the measuring cup, and level it off. No packing!
- 200 g (1 cup) Unsalted Butter, softened: This is non-negotiable for that melt-in-your-mouth texture. Pro Tip: “Softened” means cool to the touch but your finger can leave a gentle indent. Too warm and your dough will be greasy; too cold and it won’t cream properly. Take it out of the fridge about an hour before you start.
- 150 g (¾ cup) Granulated Sugar: Sweetens the dough and helps create a tender crumb.
- 1 large Egg: Our binding agent! It brings the dough together and adds structure. Make sure it’s at room temperature to blend seamlessly with the butter.
- 1 tbsp Powdered Sugar: My little secret weapon! A tablespoon of powdered sugar gives the baked cookies an incredibly smooth, tender texture. Don’t skip it!
- 1 tsp Baking Powder: Just a bit gives our cookies a slight lift, so they’re not too dense.
- ½ tsp Salt: Crucial for balancing the sweetness and enhancing all the other flavors. If you only have salted butter, just reduce this to a scant ¼ tsp.
- 1 tsp Pure Vanilla Extract: The flavor star! Use the good stuff—it makes a world of difference.
- Red Food Coloring: I highly recommend gel food coloring over liquid. The gel is more concentrated, so you need less of it, which means you get a vibrant red color without altering the consistency of your dough. Liquid coloring can make the dough sticky.
Let’s Get Twisting: The Step-by-Step Fun
Ready to create? Follow these steps, and you’ll have a tray of gorgeous candy canes in no time. I’ve packed this section with all my best tips and hacks to ensure your baking success!
Step 1: Cream It Like You Mean It!
In a large bowl, beat the softened butter and granulated sugar together on medium-high speed for a full 2-3 minutes. We’re not just mixing here; we’re creaming. This incorporates air into the dough, which is the first secret to a light, tender cookie. You’ll know it’s ready when the mixture turns pale yellow and looks fluffy. Scrape down the sides of the bowl to make sure everything is evenly incorporated.
Step 2: Bring in the Wet Team
Add the room-temperature egg, vanilla extract, and that secret weapon—the tablespoon of powdered sugar. Beat on medium speed until everything is beautifully combined and smooth. It might look a little curdled at first, but just keep beating; it will come together.
Step 3: Whisk the Dry Crew
In a separate, medium-sized bowl, whisk together the flour, baking powder, and salt. This isn’t just busywork! Whisking ensures the baking powder and salt are evenly distributed throughout the flour, so every single bite is perfectly seasoned and baked.
Step 4: Form the Dough
With your mixer on low speed, gradually add the dry ingredients to the wet ingredients. Mix just until the flour disappears and a soft, pliable dough forms. Chef’s Hack: Overmixing at this stage can lead to tough cookies. As soon as you don’t see any more dry flour pockets, stop the mixer! You can even finish mixing by hand with a spatula to be safe.
Step 5: Divide and Color
Split the dough right down the middle into two equal halves. Leave one half plain in its beautiful, buttery state. To the other half, add your red gel food coloring. I start with a few drops, then knead it in with my hands (lightly floured if it’s sticky) until I get a uniform, vibrant red. Don’t be afraid to get your hands in there! It’s the best part.
Step 6: Shape the Canes
Now for the main event! Pinch off a small piece of each color dough (about 2 teaspoons worth of each). Roll each piece on a clean surface into a rope about 4-5 inches long. If the dough is cracking, your hands might be too dry; just moisten them very slightly with water. Place one red and one white rope side-by-side. Now, gently twist them together. They might not stick perfectly at first, but a gentle press along the length will help them adhere. Finally, curve the top down to form the classic candy cane hook.
Step 7: The Chill Factor
This is the step that ensures your cookies keep their beautiful shape! Place the shaped cookies on a baking sheet lined with parchment paper and pop the entire tray into the refrigerator for 15-20 minutes. This re-chills the butter, preventing the cookies from spreading too much in the oven.
Step 8: Bake to Perfection
While the cookies are chilling, preheat your oven to 175°C (350°F). Bake the chilled cookies for 10-12 minutes. You’re looking for the edges to be just barely starting to turn a light golden brown. The centers should still look soft. They will continue to set as they cool. Let them cool on the baking sheet for 5 minutes before transferring them to a wire rack to cool completely.
Sharing the Holiday Joy: Serving Suggestions
These cookies are a celebration all on their own! For a truly stunning presentation, pile them high on a vintage cake stand or a simple rustic wooden board. They look absolutely magical when arranged in a wreath shape on a large platter. Tuck in a few sprigs of fresh rosemary or mint for a pop of green. For gifting, stack a few in a clear cellophane bag, tie it with a gorgeous ribbon, and attach a handwritten tag. They’re the sweetest, most heartfelt gift you could give.
Mix It Up! Delicious Recipe Variations
Feel like playing? Here are a few fun twists on this classic:
- Peppermint Twist: Add ½ teaspoon of peppermint extract to the dough along with the vanilla for a cool, minty kick that pairs perfectly with the theme.
- Chocolate Dip: Once the cookies are completely cool, dip the ends (or even half the cookie!) in melted dark or white chocolate and sprinkle with crushed candy canes.
- Almond Joy: Swap the vanilla extract for almond extract for a wonderfully nutty, marzipan-like flavor.
- Gluten-Free Friendly: Use a 1:1 gluten-free all-purpose flour blend. The texture might be slightly more delicate, but they’ll be just as delicious.
Anna’s Chef Notes & Kitchen Stories
This recipe has been a labor of love in my kitchen for years. The first time I made them, I used liquid food coloring and ended up with sticky, pink dough that stained my hands for days! That’s how I learned the gel coloring trick the hard way. I also used to skip the chilling step, wondering why my beautiful canes turned into festive blobs. Trust me, that 20-minute chill is your best friend!
These cookies have evolved into our family’s official Christmas Eve baking project. My kids now fight over who gets to twist the dough, and there’s always a “reject” cookie made from all the leftover scraps that we eat warm from the oven. Those imperfect, messy cookies, patched together with love, always taste the best. Remember what my grandma said: the magic is in the mess.
Your Questions, Answered! FAQs & Troubleshooting
Q: My dough is too sticky to roll! What did I do wrong?
A: This usually happens if the butter was too warm or if you used liquid food coloring. Don’t panic! Just pop the sticky dough (both colors) into the refrigerator for 20-30 minutes to firm up. You can also lightly flour your hands and the surface you’re rolling on.
Q: Why did my cookies spread and lose their shape?
A: The number one culprit is not chilling the shaped cookies before baking. The butter was too warm when it hit the oven. Another reason could be over-measuring the flour. Always ensure your dough is properly chilled, and if you don’t have a kitchen scale, use the spoon-and-level method for flour.
Q: My red dough is bleeding into my white dough. How do I prevent that?
A: A little color transfer is natural, but to minimize it, make sure your doughs are well-chilled before you twist them. Also, handle them as little as possible once twisted. If you’re really concerned, you can chill the ropes for 5 minutes before twisting.
Q: Can I make the dough ahead of time?
A: Absolutely! You can make the dough (before coloring), wrap it tightly in plastic wrap, and keep it in the fridge for up to 2 days. Let it sit at room temperature for 15-20 minutes to become pliable before dividing, coloring, and shaping. You can also freeze the shaped, unbaked cookies on a tray, then transfer them to a freezer bag. Bake straight from frozen, adding 1-2 minutes to the baking time.
Nutritional Information (Per Cookie)
This is just a general estimate and will vary based on specific ingredients used.
- Calories: ~130
- Fat: 7g
- Carbohydrates: 15g
- Sugar: 7g
- Protein: 1g
Prep Time: 30 min | Chill Time: 20 min | Bake Time: 10-12 min | Total Time: ~1 h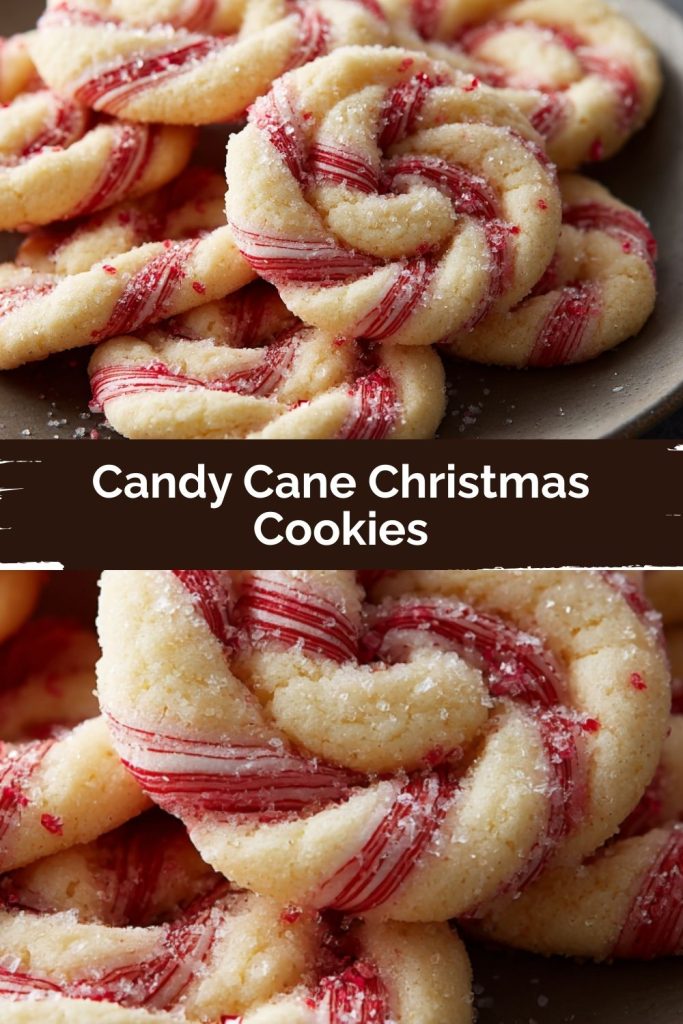
Final Thoughts: Cookies with Heart
At the end of the day, Candy Cane Christmas Cookies are more than just a treat—they’re a memory in the making. They bring the kind of joy that comes from flour-dusted counters, giggles while twisting ropes of dough, and that first warm bite fresh from the oven.
For me, these cookies will forever taste like my grandma’s kitchen and the reminder that “the magic is in the mess.” For you, they might be the gift you tie up with ribbon, the plate you leave out for Santa, or the recipe that sparks a new tradition in your home. However you bake them, they’re sure to bring smiles, laughter, and a little North Pole sparkle to your holidays.
So roll, twist, and bake with love—because the most beautiful cookies are the ones made with heart.