***
Let’s Make Some Holiday Magic: Candy Cane Oreo Pops!
Hello, my friend! Anna here, welcoming you back to my cozy kitchen corner. Is there anything better than the feeling of the holiday season starting to twinkle all around us? The lights are going up, the cozy sweaters are coming out, and my brain is officially switching into full-on festive recipe mode. And let me tell you, I have the *perfect* treat to kick things off with a dose of pure, unadulterated joy.
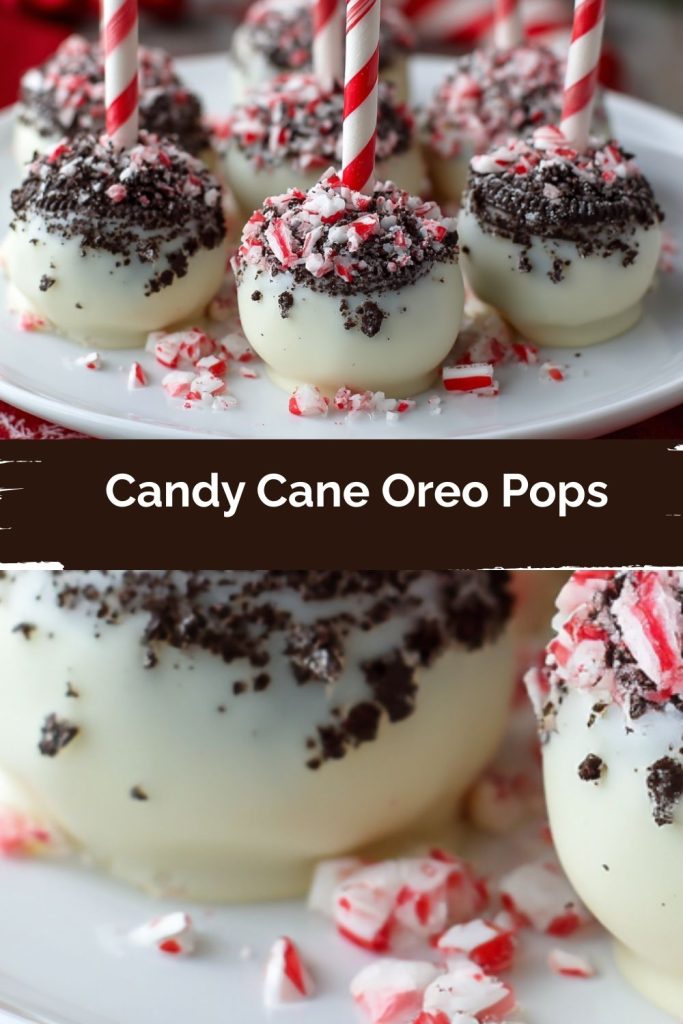
Today, we’re making Candy Cane Oreo Pops. Now, if you’re feeling a little intimidated by the idea of elaborate holiday baking, let me stop you right there. This is our secret weapon. These pops are a no-bake, incredibly simple, and wildly fun project that yields the most impressive results. We’re talking about the creamy, chocolatey goodness of Oreos, hugged by a sweet, crisp layer of chocolate and a festive crunch of peppermint. They’re like little edible holiday ornaments, and they are guaranteed to bring smiles to every face that sees them.
Whether you’re whipping them up for a cookie exchange, setting out a stunning dessert tray for your holiday party, or packing them up as the most adorable edible gifts for neighbors and teachers, these pops are your new best friend. They require minimal ingredients, zero oven time, and a whole lot of heart. So, put on your favorite holiday playlist, maybe light a peppermint-scented candle, and let’s dive into creating something truly magical together. Trust me, this is the kind of kitchen fun that creates its own special kind of holiday nostalgia.
A Sweet Start to a Family Tradition
PrintCandy Cane Oreo Pops

A festive no-bake treat that combines the creamy crunch of Oreos with the holiday sparkle of peppermint. These Candy Cane Oreo Pops are incredibly simple to make and even more fun to share. Perfect for parties, dessert trays, or holiday gifting—get ready to impress with minimal effort!
- Prep Time: 15 minutes
- chill time: 30 minutes
- Total Time: 45 minutes
- Yield: About 24 pops 1x
Ingredients
1 package Oreo cookies (about 36 cookies)
1 (8 oz) block cream cheese, softened
Lollipop sticks
1 cup white or dark chocolate chips, melted
1/2 cup crushed candy canes
Instructions
Crush Oreo cookies into fine crumbs using a food processor or by hand in a sealed bag.
Mix crumbs with cream cheese until fully combined into a smooth dough.
Roll mixture into 1-inch balls and chill in the fridge for 30 minutes.
Insert lollipop sticks into each chilled ball.
Dip each pop into melted chocolate, coating completely.
Immediately roll in crushed candy canes before the chocolate sets.
Place on parchment paper and let sit until the coating hardens.
Nutrition
- Calories: 140
- Sugar: 12g
- Fat: 8g
- Carbohydrates: 15g
- Protein: 1g
I have to share a little story about how these pops became a non-negotiable part of our December. It was my son Leo’s first Christmas where he was really old enough to “help” in the kitchen. I’m talking barely three years old, standing on a chair, covered in more flour than the countertop, and possessing an unwavering determination to be involved. I knew I needed a recipe that was basically foolproof, forgiving of little hands, and, let’s be honest, involved a lot of tasting.
Enter the Candy Cane Oreo Pop. Leo’s job was the very important task of “squishing” the Oreo and cream cheese mixture. I’ll never forget the look of pure, concentrated joy on his flour-dusted face as he squeezed that dough between his fingers. The whole kitchen was a glorious mess, with bits of Oreo crumbs and sparkling candy cane sprinkles everywhere. But the sound of his giggles as we dipped and decorated was better than any Christmas carol. Now, every year, it’s our official “kick-off to Christmas” baking day activity. It’s less about perfection and more about the joy of creating something delicious together. And that, my friend, is the real magic of the season.
Gathering Your Magical Ingredients
One of the best things about this recipe is the short and sweet ingredient list! You likely have most of these in your pantry already. Here’s everything you’ll need to make about two dozen delightful pops.
- 1 package (about 36 cookies) Oreo Cookies: The star of the show! I use the classic original Oreos for that perfect chocolate-cream balance. Chef’s Insight: Don’t even think about removing the cream filling—it’s essential for flavor and texture! For a fun twist, you could use the regular Mint Oreos to double down on the minty flavor.
- 1 (8 oz) block Full-Fat Cream Cheese, softened: This is our magic binder that turns the crumbs into a pliable dough. Substitution Tip: For best results, use the full-fat block-style cream cheese. The whipped or low-fat varieties can make the mixture too soft. Crucial step: Make sure it’s softened to room temperature! This ensures a smooth, lump-free mixture that’s easy to roll.
- Lollipop Sticks: You can find these at any craft store or in the baking aisle of most supermarkets. They give our pops their signature look and make them easy to hold and eat.
- 2 cups White or Dark Chocolate Chips, melted: This is our beautiful, tasty coating. Chef’s Insight: I personally love the visual contrast of dark chocolate against the red and white candy canes, but white chocolate makes them look like a winter wonderland! Using high-quality chocolate chips (like Ghirardelli or Guittard) will give you a smoother melt and a better tasting shell.
- 1/2 cup (or more!) Crushed Candy Canes: This is where the festive crunch and classic peppermint flavor comes in. Pro-Tip: Crush them finely, but leave a few slightly larger pieces for beautiful texture and sparkle.
Let’s Create Our Festive Pops: A Step-by-Step Guide
Okay, friends, apron ties on! Let’s walk through this process together. It’s simple, but I’ve got a few little hacks for you at each step to make it even smoother.
Step 1: The Great Oreo Crush
First, we need to turn those beautiful Oreos into fine, uniform crumbs. You have two great options here. The easiest way is to toss all the cookies (creams and all!) into a food processor and pulse until you have a fine, sandy texture. No food processor? No problem! Place the cookies in a large, sturdy zip-top bag, press out the air, seal it tightly, and grab your rolling pin. Channel any holiday stress into some good, therapeutic crushing until you have fine crumbs. Chef’s Hack: A few larger crumbs are okay, but try to get it as fine as possible—this helps the balls hold their shape better.
Step 2: The Magical Dough Merge
In a large mixing bowl, combine your Oreo crumbs with the softened block of cream cheese. Now, get ready to get your hands in there! Using your hands (or a sturdy spatula if you prefer), mix and knead until the two are fully incorporated and you have a uniform, dark, and slightly sticky dough. It should hold together when you pinch it. Chef’s Tip: If the mixture seems too dry and crumbly, your cream cheese might not have been soft enough. Add another tablespoon of softened cream cheese. If it’s too wet and sticky, you can add a tablespoon of cocoa powder to help firm it up.
Step 3: Roll, Roll, Roll Those Balls
Now for the fun part! Using a small cookie scoop or a tablespoon, portion out the dough. Roll each portion between your palms to form a smooth, round ball, about 1 inch in diameter. Place the balls on a baking sheet or plate lined with parchment paper. Chef’s Hack: If the dough is sticking to your hands, lightly dampen your palms with water or a tiny bit of cooking spray. This creates a non-stick barrier and makes rolling a breeze!
Step 4: The Chill Out Session
This step is non-negotiable, but it’s the perfect time for a coffee break! Pop the baking sheet with your Oreo balls into the refrigerator for at least 30 minutes. Why? Chilling firms up the balls, which makes it much easier to insert the lollipop sticks without them cracking or falling apart. It also helps them hold their shape when we dip them into the warm chocolate later.
Step 5: Stick the Landing
Once your balls are nice and firm, take them out of the fridge. Gently press a lollipop stick about halfway into each ball. Give it a little wiggle to secure it, but don’t push so hard that it comes out the other side. If any crack a little, just smooth the dough back over with your finger.
Step 6: The Dipping Dance (The Main Event!)
Time to melt your chocolate! Do this gently to avoid seizing. The best method is a double boiler: place a heatproof bowl over a pot of simmering water (make sure the bottom of the bowl doesn’t touch the water) and stir until melted. Alternatively, microwave in 20-second bursts, stirring well after each burst, until smooth. Chef’s Pro-Move: For an extra-smooth and thin coating that sets beautifully, add a teaspoon of coconut oil to the chocolate chips before melting.
Holding a pop by the stick, dip it into the melted chocolate, swirling it gently to coat completely. Let the excess chocolate drip back into the bowl. This is key for a neat finish!
Step 7: The Peppermint Sparkle
Working quickly before the chocolate sets, hold your coated pop over a bowl of your crushed candy canes and use your other hand to generously sprinkle the candy over the entire surface. You can also gently roll it, but sprinkling gives you more control. Place the finished pop back onto the parchment-lined sheet.
Step 8: The Final Set
Allow the pops to set completely at room temperature, or for a faster set, you can pop the tray back into the fridge for about 15 minutes. The chocolate will become firm and shiny, locking in all that pepperminty goodness.
How to Serve These Holiday Gems
Presentation is half the fun! For a party, stick the pops upright in a vase or a block of styrofoam covered in festive wrapping paper to create a stunning edible centerpiece. For a dessert tray, simply lay them flat on a beautiful platter lined with red or green tissue paper. They also make incredible gifts! Once set, you can wrap each pop individually in clear cellophane treat bags, tie them with a ribbon, and box them up for your favorite people. They’re a gift made with love (and a whole lot of yum).
Get Creative! Fun Flavor Twists
Once you master the basic recipe, the sky’s the limit! Here are a few ways to mix it up:
- Chocolate Peppermint Bark: Use dark chocolate for coating and sprinkle with crushed candy canes and a few mini white chocolate chips.
- Cookies & Cream Dream: Use white chocolate for coating and roll in additional crushed Oreo crumbs instead of candy canes.
- Gingerbread Spice: Add a teaspoon of gingerbread spice to the Oreo/cream cheese mixture and coat in white chocolate.
- Nutty Delight: Roll the pops in finely chopped toasted pecans or peanuts for a non-peppermint option.
- Festive Sprinkle Party: Swap the candy canes for any holiday-themed sprinkles or sanding sugar.
Anna’s Chef’s Notes & Kitchen Stories
This recipe has truly evolved in our kitchen. The first time I made them, I was so worried about the chocolate seizing that I ended up with a slightly lumpy coating. It didn’t matter one bit—they were devoured! The lesson? Don’t strive for bakery-level perfection. A little imperfection is a sign they were made with love (and maybe a little help from a three-year-old).
Over the years, I’ve learned that the secret isn’t just in the ingredients; it’s in the experience. Put on some music, pour yourself a mug of hot cocoa, and enjoy the process. These pops are also a fantastic recipe to make with kids or friends. Assign jobs: one person rolls, one person dips, one person sprinkles. It turns kitchen time into party time, and that’s what the holidays are all about.
Your Questions, Answered!
Q: My chocolate coating is thick and clumpy. What happened?
A: This sounds like seized chocolate! Chocolate is very sensitive to moisture. Even a single drop of water in your melting bowl can cause it to tighten up. Always ensure all your tools are completely dry. If it seizes, you can sometimes save it by stirring in a teaspoon of coconut oil or vegetable shortening, but prevention is best!
Q: My Oreo balls are too soft and falling off the stick when I dip them. Help!
A: The most common culprit here is not chilling them long enough. That 30-minute chill is crucial for firming up the fat in the cream cheese. If your kitchen is warm, you might even need to chill them for 45 minutes to an hour. Also, make sure you’re using block cream cheese, not the spreadable kind in a tub.
Q: Can I make these ahead of time?
A: Absolutely! They are a fantastic make-ahead treat. Once fully set, store them in a single layer in an airtight container in the refrigerator for up to a week. You can also freeze them for up to 2 months! Just thaw in the fridge overnight.
Q: Is there a trick to getting a smooth, thin chocolate coating?
A: Yes! First, make sure your chocolate is fully melted and smooth. Adding that teaspoon of coconut oil will thin it out perfectly. Second, when you dip, let the excess chocolate drip off for a good 10-15 seconds. This prevents a thick, globby bottom on your pops.
Nutritional Information*
*Please note: This is an estimated nutritional breakdown based on the specific ingredients used. Values may vary.
Per Pop (approx.): Calories: ~140 | Carbohydrates: 15g | Sugar: 12g | Fat: 8g | Protein: 1g
Prep Time: 15 minutes | Chill Time: 30 minutes | Servings: About 24 pops
🌟 Final Thoughts
Candy Cane Oreo Pops are everything the holidays should be—fun, festive, and full of sweet little moments you’ll want to repeat year after year. They’re simple enough for tiny hands to help with, yet impressive enough to shine on a dessert tray or wrapped up as gifts. Whether you’re making them with kids, friends, or just for yourself while the holiday playlist is cranked up, these pops are pure Christmas cheer on a stick. So go ahead—dip, sprinkle, and share the magic.