Your New Go-To Party Hero: Cheeseburger Sliders
Hey there, friend! Anna here. Can we talk about that universal, almost primal craving for a really, really good cheeseburger? That perfect combo of juicy beef, melty cheese, tangy pickles, and a soft, yielding bun is basically a hug for your soul. But let’s be real—when you’re feeding a crowd (or just a very hungry family), standing over the stove flipping a dozen individual burgers can feel less like joy and more like a short-order cook’s dinner rush.
That’s exactly why I’m so utterly obsessed with these Cheeseburger Sliders. We’re taking everything we adore about a classic burger—every single glorious component—and transforming it into a tray-baked, incredibly easy, and wildly delicious masterpiece. Imagine: no more juggling pans, no more burgers getting cold while others finish cooking. Just one beautiful, unified tray of mini burger bliss, where every bite is as perfect as the last.
This recipe is my secret weapon for game day, busy weeknights, potlucks, and pretty much any gathering where you want to be the person who brought the dish. The one that disappears in minutes, followed by a chorus of “Oh my gosh, can I get the recipe?” They’re mini in size, but I promise you, the flavor is absolutely massive. So, grab your favorite baking dish and let’s turn a simple craving into a simple, spectacular meal together.
The Slider That Started It All
PrintCheeseburger Sliders: Tray-Baked, Juicy & Crowd-Pleasing
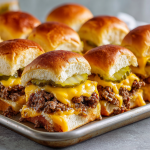
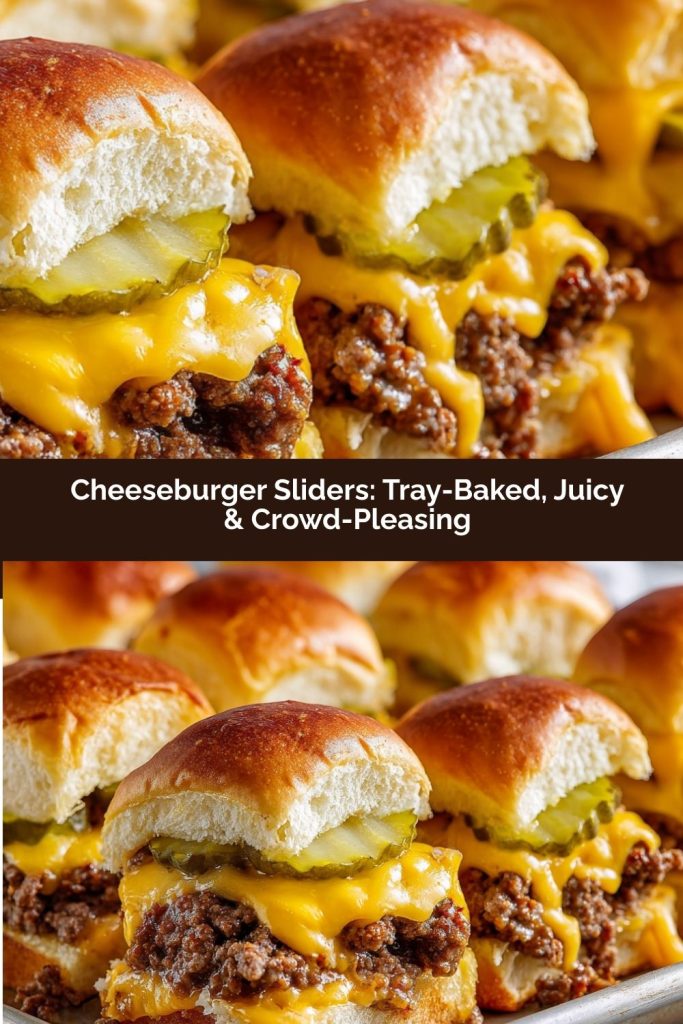
Craving a burger but want something party-friendly? These Cheeseburger Sliders are mini in size but massive in flavor. Juicy beef, melty American cheese, crisp pickles, and a zesty secret sauce—all layered on soft slider buns and baked together in one easy tray. Perfect for game day, family dinners, or anytime you want the taste of a classic burger in just a few bites.
- Prep Time: 10 mins
- Cook Time: 15 mins
- Total Time: 25 minutes
- Yield: 6 (2 sliders each) 1x
Ingredients
1 lb ground beef
Salt & pepper, to taste
½ tsp garlic powder
12 slider buns or Hawaiian rolls
6 slices American cheese, halved
12 pickle slices
2 tbsp melted butter (for brushing tops)
Secret Sauce:
¼ cup mayo
1 tbsp ketchup
1 tsp mustard
1 tsp relish
Dash of garlic powder
Instructions
Preheat oven to 375°F (190°C).
In a skillet, cook ground beef with salt, pepper, and garlic powder until browned. Drain excess fat.
Mix together secret sauce ingredients.
Slice slider buns in half horizontally. Place bottoms in a baking dish.
Spread sauce on the buns, layer on beef, cheese, and pickles.
Add top buns, brush with melted butter.
Cover with foil and bake for 10 minutes, then uncover and bake 5 more minutes until golden.
Nutrition
- Calories: 320
- Fat: 18g
- Carbohydrates: 22g
- Protein: 17g
This recipe has a special little origin story, as the best ones often do. It was a chaotic, wonderful, and slightly overwhelming first Super Bowl party my husband and I hosted in our new home. I had grand plans: an elaborate spread, fancy appetizers, the works. But about an hour before guests were due to arrive, I realized my timeline was a fantasy. I was in a panic, staring into the abyss of an under-stocked fridge.
Then, I remembered a bag of slider buns tucked away in the freezer, some ground beef in the fridge, and the ever-present jar of pickles. In a moment of “what do I have to lose?” inspiration, I threw this concept together. I layered it all haphazardly in a tray, crossed my fingers, and popped it in the oven. The result? A golden, cheesy, aromatic pan of sliders that were an absolute sensation. They were the first thing to vanish. Friends were huddled around the tray, swapping stories and reaching for seconds and thirds. That stressful party prep turned into a core memory of laughter, community, and the powerful lesson that the best food isn’t fussy—it’s food that brings people together. This tray of sliders has been a staple ever since.
Gathering Your Slider Squad: The Ingredients
One of the best parts about this recipe is its beautiful simplicity. You likely have most of this in your kitchen already! Here’s your shopping list, complete with my little chef-y insights to help you understand the “why” behind each item.
- 1 lb Ground Beef (80/20 blend is ideal): This is your slider superstar! I highly recommend an 80/20 blend (80% lean, 20% fat). That fat is pure flavor gold, and it keeps the beef incredibly juicy and not at all dry. If you only have leaner beef, no worries! Just add a tablespoon of olive oil to the pan when browning.
- Salt & Pepper, to taste: The fundamental building blocks of flavor. Don’t be shy here! Season your beef generously.
- ½ tsp Garlic Powder: We’re adding a subtle, savory depth to the beef. It’s a quick flavor boost that makes a big difference.
- 12 Slider Buns or Hawaiian Rolls: This is a game-changer! Hawaiian Rolls are my personal favorite—their slight sweetness is a magical contrast to the savory beef and salty cheese. But any soft, packable slider buns will work beautifully.
- 6 slices American Cheese, halved: I know, I know, it’s not fancy. But for that classic, melt-in-your-mouth, nostalgic cheeseburger experience, American cheese is undefeated. It melts into a creamy, smooth blanket that no other cheese can quite replicate.
- 12 Pickle Slices: The crucial tangy, crunchy element! Dill pickles are the classic choice, but bread and butter pickles add a fun sweet-and-sour twist.
- 2 tbsp Melted Butter (for brushing tops): This is our secret for that gorgeous, golden-brown, slightly crisp top. It adds a rich, buttery flavor that takes these from great to “can’t-stop-eating-them” status.
For the Zippy Secret Sauce:
- ¼ cup Mayo: The creamy, luxurious base of our sauce.
- 1 tbsp Ketchup: Adds a touch of sweetness and tomato-y flavor.
- 1 tsp Mustard (yellow or Dijon): A little sharpness and tang. Dijon will give it a more sophisticated kick.
- 1 tsp Relish: This is my little hack for adding pickle flavor and a bit of texture throughout the sauce.
- Dash of Garlic Powder: Tying the sauce and the beef together seamlessly.
Let’s Build Some Slider Magic: Step-by-Step
Okay, team! Aprons on? Let’s do this. It’s a simple process, but I’ve got some key tips and hacks for each step to ensure slider perfection.
- Preheat & Prep: First things first, get that oven preheating to a cozy 375°F (190°C). This is the perfect temperature to melt the cheese, warm everything through, and toast the buns to golden perfection without burning them. While it’s warming up, grab your trusty skillet.
- Brown the Beef: Place your ground beef in the skillet over medium-high heat. As it cooks, use a wooden spoon or spatula to break it up into small, crumbly pieces—this is key for getting that perfect “burger” texture in every bite. Season it generously with salt, pepper, and that ½ teaspoon of garlic powder. Chef’s Hack: I like to add my seasonings once the beef is partially cooked. This helps the flavors bloom without burning the garlic powder. Cook until it’s no longer pink, then drain off any excess fat. (A little fat is fine for flavor, but we don’t want a greasy slider!)
- Whisk the Secret Sauce: While the beef is cooling slightly, let’s make the magic sauce! In a small bowl, combine the mayo, ketchup, mustard, relish, and a dash of garlic powder. Whisk it all together until it’s smooth and beautifully pink. Give it a taste—this is your moment to adjust! Want it tangier? Add a bit more mustard. A little sweeter? A tiny pinch of brown sugar works wonders.
- Assemble the Slider Tower: This is the fun part! Take your whole pack of slider buns or Hawaiian rolls and, without separating them, slice the entire block in half horizontally, creating a giant top and a giant bottom. Place the bottom half snugly into your baking dish. Now, let’s layer:
- Layer 1: Spread a generous amount of your secret sauce evenly over the bottom buns.
- Layer 2: Spoon all of that beautifully seasoned ground beef over the sauce, pressing it down gently into an even layer.
- Layer 3: Artfully arrange your halved slices of American cheese over the beef, creating a cheesy quilt of melty goodness.
- Layer 4: Top it all off with your pickle slices, spaced out so every slider will get one.
Carefully place the top half of the buns back on, like putting a lid on a treasure chest.
- The Buttery Finish & Bake: Brush the tops of the buns liberally with the melted butter. This will give them that irresistible color and flavor. Now, cover the entire dish tightly with aluminum foil. This initial covered bake is a steaming session—it melts the cheese perfectly and heats everything through without over-browning the tops. Bake covered for 10 minutes.
- The Golden Touch: After 10 minutes, take the tray out (careful, it’s hot!) and remove the foil. Pop it back into the oven, uncovered, for another 5 minutes, or until the tops of the buns are a gorgeous golden brown and your kitchen smells like heaven.
- Slice and Serve! Pull the tray from the oven and let it rest for just a minute or two—this makes slicing cleaner. Then, using a sharp knife, slice along the bun lines to separate them into individual sliders. Watch as that cheesy, saucy, beefy goodness stretches with every pull. Serve them warm and get ready for the compliments!
How to Serve These Crowd-Pleasing Beauties
Presentation is part of the fun! I love serving these sliders right in the baking dish for a rustic, family-style feel. It encourages everyone to dig in! For a full-on burger bar experience, set out small bowls of extra secret sauce, ketchup, mustard, and even some crispy bacon bits or sautéed onions for folks to customize their sliders. Pair them with a big, crisp green salad to balance the richness, or go all-in on the comfort food vibe with a side of crispy potato wedges or sweet potato fries. They’re also the ultimate companion to a big pot of tomato soup for the ultimate cozy night in.
Get Creative! Slider Variations
The basic recipe is a flawless classic, but it’s also a fantastic canvas for your own creations! Here are a few of my favorite twists:
- BBQ Bacon Sliders: Swap the secret sauce for your favorite BBQ sauce. Top the beef with a layer of crispy, crumbled bacon and a smoky cheddar or gouda cheese.
- Pizza Sliders: Replace the beef with pepperoni slices and use marinara sauce instead of the secret sauce. Top with shredded mozzarella and a sprinkle of Italian seasoning before baking.
- Breakfast Sliders: Layer cooked scrambled eggs, crumbled breakfast sausage, and a slice of cheddar cheese. Perfect for a brunch crowd!
- Turkey Club Sliders: Use sliced deli turkey and Swiss cheese. Mix the secret sauce with a little honey mustard for the spread.
- Spicy Jalapeño Popper: Add a layer of thin jalapeño slices and use a pepper jack cheese. Mix a bit of hot sauce into the secret sauce for an extra kick.
Anna’s Kitchen Notes & Stories
This recipe has truly evolved in my kitchen over the years. The first time I made it, I meticulously separated each roll and built each slider individually—what a waste of time! I quickly learned that the “one big slab” method is not only easier, it’s better. The edges get a little more toasty, the center stays supremely soft, and it holds everything together beautifully.
One of my favorite kitchen fails-turned-wins was the time I accidentally used Cinnamon Swirl Hawaiian Rolls. I was mortified for a second, but I baked them anyway. And you know what? The sweet and savory combo was a weirdly delicious hit with my kids! It just goes to show that sometimes the best recipes come from happy accidents. Don’t be afraid to play around and make this recipe your own. That’s where the real kitchen magic happens.
Your Slider Questions, Answered!
I’ve made these a million times, and I’ve heard all your wonderful questions. Here are the answers to the most common ones!
Q: Can I make these sliders ahead of time?
A: Absolutely! You are a party-planning genius. Assemble the entire tray up to the point of brushing with butter and baking. Cover it tightly with plastic wrap or foil and refrigerate for up to 24 hours. When you’re ready, just remove the plastic, brush with the melted butter, and bake as directed. You might need to add 2-3 extra minutes to the baking time since you’re starting with a cold tray.
Q: My sliders turned out a bit soggy on the bottom. What happened?
A: The most common culprit is not draining the beef well enough after browning. Make sure you really get in there with a spoon and press out that excess fat. Another pro-tip: if your beef mixture is very juicy, you can even spread a very thin layer of mayo or the secret sauce on the bottom bun before adding the beef—it creates a slight barrier that helps protect the bun from moisture.
Q: Can I use a different type of cheese?
A: Of course! While American is the melt-master, you can use others. Provolone, cheddar, or Swiss are great choices. For pre-shredded cheese, be aware it often contains anti-caking agents that can make it less melty. For the best results, shred your own cheese from a block—it makes a world of difference!
Q: The tops aren’t getting golden brown. Help!
A: No problem! First, make sure you’re brushing with enough butter—don’t be shy. If they’re still pale after the final 5 minutes uncovered, just switch your oven to broil for the last 60-90 seconds. Watch them like a hawk! Broilers can go from perfectly golden to completely charred in a flash.
Nutritional Information*
*Please note: This is an estimate for informational purposes only. Calculations will vary based on the specific brands and ingredients you use.
Per Serving (2 sliders): Calories: 320 | Fat: 18g | Saturated Fat: 7g | Carbohydrates: 22g | Fiber: 1g | Sugar: 5g | Protein: 17g