Mini Turkey & Cheese Sandwiches: Your New Go-To for Joyful Gatherings!
Hey there, friend! Can you smell it? That crisp, clean air mixed with the scent of freshly cut grass? Or maybe you’re feeling the buzz of your kitchen before friends come pouring in, laughter already echoing in the hallway. Whether it’s a sun-drenched picnic, a game-day spread, or just a Tuesday lunchbox that needs a little love, I believe the best moments are often built around simple, delicious food shared with people we care about. And that’s exactly where these Mini Turkey & Cheese Sandwiches come in.
Think of them as the ultimate edible hug. They’re not just sandwiches; they’re tiny, delightful packages of nostalgia and flavor. We’re talking impossibly soft dinner rolls cradling savory slices of turkey, creamy cheese, and that perfect, satisfying crunch. They’re easy to make, incredibly versatile, and have this magical ability to make both kids and adults light up with delight. I’ve lost count of how many times a platter of these has vanished in minutes, with requests for the recipe following close behind.
Today, I’m so excited to walk you through my foolproof, picnic-perfect version. We’ll chat ingredients, share my favorite little chef hacks to avoid soggy bread (a true tragedy!), and explore fun ways to make this recipe your own. My goal is for you to feel confident, inspired, and ready to create your own delicious memories. So, tie on your favorite apron, put on some good music, and let’s turn these ordinary ingredients into something extraordinarily fun together. You’ve got this!
A Slice of Nostalgia: My Picnic Basket Memories
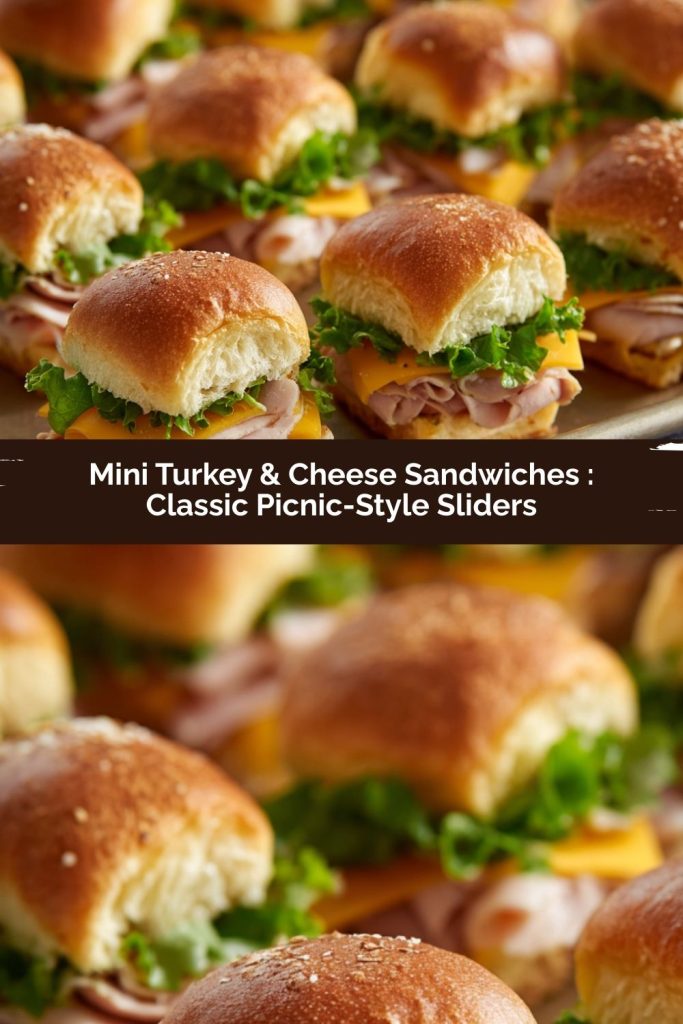
PrintMini Turkey & Cheese Sandwiches : Classic Picnic-Style Sliders

These Mini Turkey & Cheese Sandwiches are the ultimate picnic or party snack—easy to assemble, kid-friendly, and packed with flavor. Made with soft dinner rolls, savory turkey, creamy cheese, and crisp lettuce, they’re a nostalgic nod to the classic deli sandwich but in a fun, bite-sized form. Perfect for school lunches, road trips, or backyard gatherings!
- Prep Time: 10 mins
- Cook Time: 0 mins
- Total Time: 10 mins
- Yield: 12 mini sandwiches 1x
Ingredients
12 small dinner rolls or slider buns
12 slices deli turkey (oven-roasted or smoked)
6 slices cheddar or provolone, halved
2 tbsp mayonnaise
1 tbsp Dijon mustard
Lettuce leaves (butter or romaine)
Thin tomato slices (optional)
Salt & black pepper
Instructions
Prep Rolls: Slice each roll in half horizontally.
Make Spread: Stir together mayo and Dijon mustard. Spread a thin layer on both sides of the roll.
Assemble: Layer turkey, a half slice of cheese, lettuce, and tomato (if using). Season lightly with salt and pepper.
Finish: Close the sandwiches and gently press down. Wrap tightly in parchment or foil if packing for later.
Make-Ahead Tip
Add the lettuce beneath the turkey to keep moisture away from the bread—no soggy sandwiches!
Nutrition
- Calories: 180
- Fat: 9g
- Carbohydrates: 14g
- Protein: 10g
For me, the smell of damp earth and the taste of a simple sandwich will always be intertwined. Some of my fondest childhood memories are of sprawling on a worn-out quilt with my grandma, a giant wicker picnic basket between us. She wasn’t a fussy cook, but she was a thoughtful one. Her secret weapon? Mini sandwiches, meticulously wrapped in wax paper.
My job was the “official assembly assistant,” which mostly meant taste-testing the turkey and sneaking an extra olive. But I watched her. I saw how she’d spread the mustard with the back of a spoon, layer the lettuce just so, and press the top bun down gently with a smile. To her, it wasn’t a chore; it was an act of love, a way to prepare for a joyful afternoon. That feeling—of anticipation, of simple pleasure, of connection—is what I want to bottle up and bring to your kitchen every time you make these. It’s more than fuel; it’s a feeling. And it all starts with a few good ingredients and a happy heart.
Gathering Your Happy Ingredients (Makes 12 Perfect Sliders)
Here’s the beautiful part: this is about quality, not complexity. Each component plays a starring role, and with a few smart choices, you’re guaranteed a home run. Let’s break it down!
- 12 small dinner rolls or slider buns: The foundation! I look for soft, pillowy rolls like Hawaiian sweet rolls or potato buns for that irresistible texture. Chef’s Insight: If you can only find larger rolls, just slice them into smaller squares—no rules here!
- 12 slices deli turkey: Go for oven-roasted for a classic, savory flavor or smoked for a deeper note. Pro-Tip: Ask your deli counter to slice it “medium-thick” so it holds up beautifully and doesn’t get lost in the sandwich.
- 6 slices cheddar or provolone, halved: Cheddar gives a sharp, familiar tang, while provolone is mellower and melts dreamily if you warm the sandwiches. Substitution: Swiss, Gouda, or even pepper jack for a kick!
- 2 tbsp mayonnaise: Our creamy glue. It adds richness and moisture. Dietary Swap: Use a high-quality avocado oil mayo or even mashed avocado for a dairy-free, whole-food twist.
- 1 tbsp Dijon mustard: The flavor booster! Dijon has a gentle heat and complexity that cuts through the richness. Substitution: Whole-grain mustard for texture, or yellow mustard for a kid-friendly classic.
- Lettuce leaves (butter or romaine): The CRUNCH factor. Butter lettuce is tender, while romaine gives a heartier snap. Chef’s Hack: Pat your lettuce very dry after washing. This is the #1 trick to prevent sogginess!
- Thin tomato slices (optional): Adds a juicy, acidic pop. Important: If using, layer them between the turkey and cheese, not directly on the bread, and season with a tiny pinch of salt to wake up their flavor.
- Salt & black pepper: Don’t you dare forget these! A light seasoning on the tomato or turkey takes everything from “good” to “WOW.”
Let’s Build Some Bite-Sized Magic: Step-by-Step
Ready to assemble? This is the fun, almost meditative part. Follow these steps, and you’ll have a platter of perfect sliders in no time.
- Prep Your Stage: Clear a big, clean workspace. Take your rolls and, using a long serrated bread knife, slice the entire package in half horizontally, keeping the tops and bottoms connected as two intact sheets. This “slider hack” makes assembly lightning-fast and super neat. See? You’re already a pro.
- Whip Up the Secret Sauce: In a small bowl, stir together the mayonnaise and Dijon mustard until smooth and happy. This combo is my favorite—creamy with just enough zing. Now, using a butter knife or the back of a spoon, spread a thin, even layer of this magic potion on the cut sides of both the top and bottom bun sheets. This creates a moisture barrier and packs every bite with flavor.
- The Art of Layering: On the bottom sheet of rolls, start building. First, lay down your dry lettuce leaves. Next, fold your turkey slices gently over each roll. Then, place a half-slice of cheese on each one. If you’re using tomato, add it now, on top of the cheese. Give the tomatoes that tiny sprinkle of salt and pepper I mentioned. This order (bread, spread, lettuce, turkey, cheese, tomato) is your armor against soggy bread!
- The Grand Finale: Gently place the top sheet of rolls (spread-side down, of course) over your beautiful creation. Press down lightly with your palms to help everything cozy up together.
- Slice & Serve (or Pack!): Using that same serrated knife, carefully slice along the perforations to separate the individual sliders. If you’re serving immediately, arrange them on a platter and watch them disappear. If you’re packing for a picnic or lunchbox, wrap each sandwich tightly in parchment paper or stack them in a container with a layer of parchment between layers. They’ll stay fresh and perfect for hours.
How to Serve These Mini Marvels
Presentation is part of the joy! For a party, pile these sliders high on a rustic wooden board or a cheerful platter. Tuck in some pickles, olives, and cherry tomatoes around the edges for color and crunch. For a picnic, the individual parchment wraps are not only practical but look adorable peeking out of the basket. Stack them in a bento box for a lunch that feels special, or line them up on a baking sheet for a cozy movie night at home. However you serve them, do it with a smile—it’s the best garnish of all.
Make It Your Own: 5 Flavorful Twists
The classic is perfect, but playing with flavors is where kitchen confidence grows! Here are a few of my favorite riffs:
- The Italian Job: Swap turkey for thinly sliced salami or mortadella, use provolone, and add a drizzle of Italian dressing or a smear of sun-dried tomato pesto to the spread.
- Thanksgiving Leftover Style: Use leftover roasted turkey, a swipe of cranberry sauce, and a slice of brie or havarti. Incredible.
- California Veggie: Skip the meat! Layer smashed avocado, cucumber ribbons, sprouts, and a sharp white cheddar.
- Hot & Melty Party Version: Assemble as directed, then brush the tops of the rolls with melted garlic butter. Bake at 350°F for 10-12 minutes until the cheese is gooey and the buns are golden. A total crowd-pleaser.
- Gluten-Free/Dairy-Free Friendly: Use your favorite gluten-free slider buns, dairy-free cheese slices, and ensure your deli meat is certified gluten-free if needed. The method stays exactly the same!
Anna’s Kitchen Notes & Stories
This recipe has been a living, evolving thing in my kitchen. The first time I made a big batch for my son’s soccer team, I learned a valuable lesson: label the “spicy mustard” batch! Let’s just say ten-year-olds have strong opinions about horseradish.
Over the years, I’ve made these for baby showers, road trips, and countless “I don’t feel like cooking” nights. The core idea remains—simple, joyful, communal food. But don’t be afraid to adapt it to your life. Sometimes I add a thin layer of apple slices in the fall. Sometimes I use leftover grilled chicken. The recipe is your roadmap, but you’re the driver. The most important ingredient is always the love and fun you stir into it.
Your Questions, Answered!
Q: How far in advance can I make these? Any tips to keep them fresh?
A: You can assemble them up to 24 hours ahead if you follow the moisture-barrier rule! Keep the wet ingredients (tomato, spread) away from the bread by using the lettuce as a shield. Store them wrapped tightly in the fridge. For the absolute best texture, add the tomato just before serving if you can.
Q: My rolls always get soggy by lunchtime. What am I doing wrong?
A> The usual culprit is condensation! Make sure all your ingredients (lettuce, tomato) are patted bone-dry. Assembling with a dry lettuce layer next to the spread-covered bread is key. Also, avoid over-spreading the mayo mixture—a thin layer is plenty.
Q: Can I use different meats and cheeses?
A> Absolutely! This is your canvas. Ham and Swiss, roast beef and horseradish cheddar, chicken and pepper jack… the combinations are endless. Just keep the slicing thin for easy biting.
Q: Any ideas for a lower-carb version?
A> For sure! Skip the rolls and make them into “sandwich skewers.” Thread cubes of cheese, folded turkey, a cherry tomato, and a fold of lettuce onto a toothpick. Serve with the mayo-Dijon mix as a dip on the side. Easy, fun, and delicious.
Nutritional Information*
*Approximate values per 1 mini sandwich, based on standard ingredients.
- Calories: ~180
- Protein: ~10g
- Carbohydrates: ~14g
- Fat: ~9g
Prep Time: 10 mins | Cook Time: 0 mins | Total Time: 10 mins | Serves: 12 mini sandwiches
Final Thoughts
These Mini Turkey & Cheese Sandwiches are proof that the simplest bites often bring the most joy. Soft, pillowy rolls, savory turkey, creamy cheese, and that perfectly balanced mayo-Dijon spread—it’s a combination that delights every age and makes any gathering feel special. They’re nostalgic, approachable, and downright fun to make, whether you’re preparing for a picnic, a game-day spread, or a cozy lunch at home.
What I love most is how versatile they are. Swap meats, cheeses, or toppings; bake them for a warm, melty version; or even turn them into bite-sized skewers for a lighter, low-carb option. The method stays the same, and the result is always a platter of happiness that disappears almost as fast as you make it.
At the heart of it, these sandwiches are more than food—they’re about connection, shared moments, and the little bursts of joy that come from homemade, thoughtful treats. Each bite is a tiny hug, a memory in the making, and a reminder that good food doesn’t have to be complicated to feel special.