No-Bake Vanilla Bean Cheesecake Jars: Your Ticket to Creamy, Dreamy Bliss
Hey friend! Let’s talk about magic. Not the wand-waving kind (though that would be handy for doing the dishes), but the kind that happens right in your kitchen, with just a few simple ingredients and zero oven required. I’m talking about the magic of transforming cream cheese, a splash of cream, and the intoxicating scent of real vanilla into a dessert that feels both decadently special and wonderfully simple.
These No-Bake Vanilla Bean Cheesecake Jars are my current obsession, and I have a feeling they’re about to become yours, too. They capture everything we love about a classic cheesecake—the rich, tangy filling, the buttery crumb crust, the sheer indulgence—but they ditch the fuss of a springform pan, the water bath, and the nervous peeking into the oven. Instead, we layer everything into cute little jars, creating individual portions of pure joy that are ready to chill out until you’re ready to dive in.
They’re perfect for so many moments: the “I deserve a treat” Tuesday, the last-minute dinner party where you want to impress without stress, or the sunny picnic that calls for something special. They feel elegant but are utterly approachable. So, if you’ve ever felt intimidated by traditional cheesecake, consider this your golden ticket. Grab your favorite mixing bowl and your cutest jars—we’re about to make something amazing together.
A Spoonful of Sunshine & Nostalgia
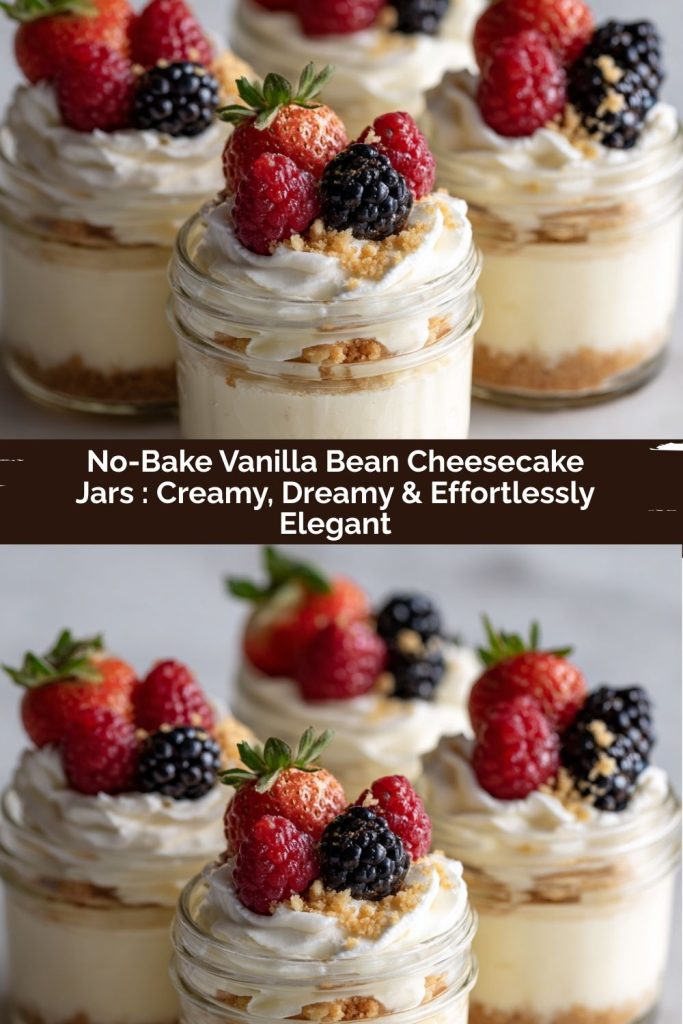
PrintNo-Bake Vanilla Bean Cheesecake Jars : Creamy, Dreamy & Effortlessly Elegant

These No-Bake Vanilla Bean Cheesecake Jars are everything you love about cheesecake—rich, creamy, and perfectly sweet—layered into individual jars for a fun and fuss-free dessert. Infused with real vanilla bean and topped with fresh fruit or a drizzle of honey, they’re ideal for dinner parties, picnics, or anytime you want an elegant treat without turning on the oven.
- Prep Time: 20 mins
- chill time: 2 hrs
- Total Time: 2 hrs 20 mins
- Yield: 4–6 jars 1x
Ingredients
For the crust:
¾ cup graham cracker crumbs
2 tbsp melted butter
1 tbsp sugar
For the vanilla bean cheesecake filling:
8 oz cream cheese, softened
⅓ cup powdered sugar
Seeds from 1 vanilla bean (or 1 tsp vanilla bean paste)
½ tsp vanilla extract
½ cup heavy cream
Optional toppings:
Fresh berries
Fruit compote
Crushed cookies
Honey or lemon zest
Instructions
Make the crust: Mix graham cracker crumbs, melted butter, and sugar until combined. Press about 2 tablespoons into the bottom of each small jar or glass. Chill while you make the filling.
Prepare the filling: In a bowl, beat cream cheese until smooth. Add powdered sugar, vanilla bean seeds, and vanilla extract. Mix until creamy.
Whip cream: In a separate bowl, whip heavy cream until soft peaks form. Gently fold into the cream cheese mixture until light and fluffy.
Assemble: Spoon or pipe cheesecake filling over the chilled crusts. Smooth the tops. Chill for at least 2 hours or overnight.
Top & serve: Add fresh fruit, compote, or any toppings just before serving.
Nutrition
- Calories: 320
- Sugar: 14g
- Fat: 24g
- Carbohydrates: 20g
- Protein: 4g
This recipe always takes me back to my grandma’s porch on a hazy summer afternoon. She wasn’t a “fancy dessert” person; her magic was in simplicity. Her version was a “cheesecake fluff” she’d whip up in her big sunflower-yellow bowl, using a hand mixer that hummed like a contented bee. She’d fold in whatever fruit was bursting from the garden—usually sun-warmed raspberries that would bleed their jewel-toned juice into the creamy white filling.
We’d eat it straight from that big bowl, sitting on the porch swing, legs sticky from the heat. It was pure, unadulterated happiness on a spoon. My jarred version is a love letter to that memory. It’s that same effortless spirit, just gussied up a little with the fleck-speckled beauty of a real vanilla bean. It’s my way of bottling that feeling of sunny, carefree comfort and sharing it with you. Every time I scrape those tiny black seeds from the pod, I’m right back on that swing, and I hope making these creates a sweet little memory of your own.
Your Blueprint for Deliciousness: What You’ll Need
Here’s the beautiful part: the ingredient list is short, sweet, and to the point. Quality truly shines here, so let’s break it down.
For the Buttery Crust:
- ¾ cup graham cracker crumbs: The classic! That hint of honey and cinnamon is pure comfort. Chef’s Insight: You can buy crumbs or crush whole crackers in a bag with a rolling pin—super therapeutic! For a nuttier twist, try Biscoff or gingersnap crumbs.
- 2 tbsp melted butter: This is the glue that holds our crunchy foundation together. Use unsalted so we control the salt. Substitution Tip: For a dairy-free version, coconut oil works wonderfully and adds a subtle tropical note.
- 1 tbsp sugar: Just a little to sweeten the deal and help the crust crisp up slightly as it chills.
For the Star of the Show: The Vanilla Bean Filling
- 8 oz (one block) full-fat cream cheese, softened: This is non-negotiable for the right rich, sturdy texture. Take it out of the fridge at least 30 minutes ahead. Chef’s Warning: Cold cream cheese will leave little lumps—softening is your secret weapon for silkiness!
- ⅓ cup powdered sugar: I prefer powdered (icing) sugar here over granulated. It dissolves instantly, giving us a flawlessly smooth filling without any graininess.
- Seeds from 1 vanilla bean OR 1 tsp vanilla bean paste: This is where the magic gets real. Those tiny black seeds promise incredible flavor and those beautiful speckles. Chef’s Secret: If using a pod, slice it lengthwise and scrape the seeds out with the back of your knife. Don’t toss the pod! Bury it in your sugar jar to make vanilla sugar.
- ½ tsp pure vanilla extract: A double vanilla punch! The extract rounds out the flavor from the bean, creating a more complex, well-rounded vanilla profile.
- ½ cup heavy cream (also called whipping cream, min 36% fat): This is what gives our filling its dreamy, cloud-like lift. We’ll whip it first to glorious soft peaks before folding it in.
For the Fun Part: Toppings!
This is your playground. I’ll list ideas later, but the world is your oyster (or, more deliciously, your berry bush).
Let’s Build Some Magic: Step-by-Step
Ready? Aprons optional, enthusiasm required. This comes together so quickly you’ll be amazed.
Step 1: Craft the Crust
In a medium bowl, mix your graham cracker crumbs, melted butter, and that tablespoon of sugar. Stir until it looks like wet sand and holds together when you pinch it. Chef’s Hack: I sometimes add a tiny pinch of salt here—it makes the sweet crumbs taste even more buttery and delicious.
Grab your jars or glasses. We’re aiming for 4 larger (8 oz) jars or 6 smaller (4 oz) ones. Spoon about 2 tablespoons of the crumb mixture into each one. Use the bottom of a small glass, a measuring spoon, or your fingers to press it down firmly into an even layer. This compact layer is what gives us that satisfying crunch with every bite. Pop all the jars into the fridge to set while we make the filling.
Step 2: Create the Creamy Vanilla Filling
In a large bowl, beat your softened cream cheese with a hand mixer or stand mixer fitted with the paddle attachment. Beat it for a good minute on medium speed until it’s completely smooth, scraping down the sides of the bowl. No lumps allowed! This is the foundation of our filling, so take your time.
Add the powdered sugar, the gorgeous scraped vanilla bean seeds (or paste), and the vanilla extract. Beat again on medium-low until everything is fully incorporated and the mixture is creamy and luxurious. Set this bowl aside for a moment.
Step 3: Whip It Good
Now, in a separate, clean, cool bowl, pour in your heavy cream. Using your mixer’s whisk attachment or clean beaters, whip the cream on medium-high speed. Watch it transform from liquid to frothy to billowy peaks. We want soft peaks—this means when you lift the whisk, the peak of cream should gently curl over at the top. Chef’s Pro-Tip: Don’t walk away! Over-whipped cream turns grainy and buttery. If you accidentally go too far, you can rescue it by gently whisking in another tablespoon of liquid cream.
Step 4: The Gentle Fold
This is the most important step for a light, fluffy texture. Add about one-third of your whipped cream to the cream cheese mixture. Use a rubber spatula and fold gently—that means cutting down through the center, scooping along the bottom, and turning the mixture over itself. Rotate the bowl as you go. This first addition lightens the dense cream cheese. Once incorporated, gently fold in the remaining whipped cream until no white streaks remain. Be patient and gentle; we want to keep all that lovely air we just whipped in.
Step 5: Assemble & Chill
Pull your chilled jars from the fridge. Spoon or pipe the vanilla bean filling over the crust, dividing it evenly. Smooth the tops with the back of a spoon or an offset spatula for a polished look. Tap the jars gently on the counter to settle the filling.
Cover the jars with their lids or plastic wrap and refrigerate for at least 2 hours, but ideally overnight. This chilling time is crucial—it allows the flavors to meld beautifully and the filling to set up to that perfect, sliceable-yet-creamy cheesecake consistency. The anticipation is part of the fun!
Step 6: Top & Serve with Flair
Just before serving, unleash your creativity with toppings! This is where each jar becomes its own masterpiece.
How to Serve Your Mini Masterpieces
Presentation is half the joy with these jars! I love setting up a “topping bar” for guests: a few small bowls with different berries, a pile of crushed cookies, a jar of honey, and some mint sprigs. Let everyone customize their own. For a simple, elegant look, I often go with just a few perfect raspberries, a tiny drizzle of honey, and a light grating of lemon zest right over the top. The zest adds a pop of color and a bright aroma that cuts through the richness beautifully. Serve with a long-handled spoon or a small dessert spoon for digging right down to that buttery crust.
Make It Your Own: Fun Flavor Twists
- Lemon Bliss: Add the zest of one lemon and a tablespoon of fresh lemon juice to the filling. Top with a blueberry compote or a fresh blackberry.
- Chocolate Hazelnut Dream: Use crushed chocolate wafer cookies for the crust. Fold 2 tablespoons of Nutella into the cream cheese mixture before adding the whipped cream. Top with chopped, toasted hazelnuts.
- Summer Berry Swirl: Before chilling, dollop a teaspoon of homemade or good-quality raspberry or strawberry jam on top of the filling in each jar. Use a toothpick to swirl it gently for a marbled effect.
- Dairy-Free Delight: Use a high-quality vegan cream cheese, coconut oil in the crust, and full-fat coconut cream (chilled overnight) whipped in place of the heavy cream.
- Salted Caramel Pretzel: Make the crust with crushed salted pretzels! Drizzle the finished jars with salted caramel sauce and sprinkle with a few extra pretzel pieces for a salty-sweet crunch.
Anna’s Kitchen Notes
This recipe has become my go-so-gift for new neighbors, happy occasions, or just because. I’ve lost count of how many times I’ve made it, and it’s evolved in fun ways. I once, in a pre-coffee haze, accidentally used salted butter and left out the sugar in the crust. You know what? It was a happy accident—the salty-sweet contrast was incredible! So don’t be afraid to play.
My family now expects these jars for birthdays instead of cake. We’ve even done a “build-your-own” station for my daughter’s sleepover, and it was a riot. The biggest lesson? The vanilla bean is worth it for special times, but vanilla bean paste is a brilliant, always-ready pantry hero that gives you those same beautiful flecks. This recipe is a friend, not a fussy dictator—it’s here to make your life sweeter and easier.
Your Questions, Answered
Can I make this ahead of time?
Absolutely, and I encourage it! These jars are perfect for making ahead. Assemble them completely (without fresh fruit toppings) and they’ll keep beautifully in the fridge for up to 3 days. The crust might soften slightly by day 3, but it will still be delicious. Add any fresh berry or juicy toppings right before serving so they don’t get soggy.
My filling is too runny! What happened?
This usually has two culprits: 1) The cream cheese wasn’t soft enough, leading to lumps and a thin batter when the whipped cream deflated trying to incorporate. 2) The heavy cream wasn’t whipped enough (or was over-whipped into butter). For soft peaks, your whisk should leave a defined trail that slowly sinks back into the mixture. If it’s still runny after mixing, you can pop the whole bowl of filling into the fridge for 20 minutes to firm up a bit before portioning into jars.
What can I use instead of jars?
Get creative! Any clear glassware works: small tumblers, wine glasses, even pretty teacups or mason jars. You can also make one large version in an 8×8 dish—just press the crust into the bottom and spread the filling on top. The presentation won’t be as cute, but the taste is identical!
Can I freeze these cheesecake jars?
You can, but with a caveat. The texture of the thawed filling will be slightly less creamy and more icy than the original. If you do freeze them, do so without toppings, wrap tightly, and consume within a month. Thaw overnight in the refrigerator. For the best experience, I truly recommend enjoying them chilled, not frozen.
Nutritional Information (Per Jar, Approximate, without toppings)
Please note: This is an estimate provided for informational purposes. Values can vary based on specific ingredients used.
- Calories: 320
- Fat: 24g
- Carbohydrates: 20g
- Sugar: 14g
- Protein: 4g
- Sodium: 150mg
Final Thoughts
These No-Bake Vanilla Bean Cheesecake Jars are proof that indulgence doesn’t have to be complicated. Each jar is a little bite of creamy, dreamy bliss—rich, smooth, and perfectly balanced with the buttery crunch of the crust and the delicate warmth of real vanilla bean. They’re elegant enough to impress guests but simple enough to make any day feel special.
What I love most is how versatile and approachable they are. Make them ahead for a party, prep a few for a week of sweet treats, or let everyone customize their own toppings for a fun, interactive dessert experience. Whether you go classic with raspberries, get playful with chocolate and nuts, or try a seasonal fruit swirl, these jars invite creativity and joy in every layer.
At the end of the day, it’s all about capturing that little moment of happiness—a spoonful of creamy nostalgia, a bite of comfort, and a sweet memory you can share. From my kitchen to yours, may these jars bring a little extra sunshine to your table.