Let’s Cook Up Some Serious Comfort: Chicken Adobo & Coconut Rice
Hey friend! Have you ever had one of those days where you’re craving something that’s like a giant, flavorful hug? Something that feels both incredibly special and totally doable on a Tuesday night? That, my friend, is the magic of Chicken Adobo. This isn’t just a recipe; it’s a one-way ticket to a deeply satisfying, flavor-packed meal that will have everyone at the table asking for seconds before they’ve even finished their firsts.
Imagine this: succulent, fall-off-the-bone chicken that’s been braised in a sauce that’s the perfect balance of savory, tangy, and just a touch sweet. It’s bold, it’s garlicky, and it has this incredible way of making your whole kitchen smell like a professional chef’s domain. And then, we’re pairing it with my not-so-secret weapon: creamy, fragrant coconut rice. This rice is the ultimate sidekick—it soaks up every last drop of that incredible adobo sauce and creates the most heavenly bite.
The best part? This dish is brilliantly simple. It doesn’t demand fancy techniques or a trip to a specialty store. It’s built on humble, pantry-friendly ingredients that, when given a little time and love, transform into something truly extraordinary. It’s the kind of meal that builds confidence in new cooks and reminds seasoned kitchen pros why they fell in love with cooking in the first place. So, tie on your favorite apron, grab your trusty skillet, and let’s turn an ordinary evening into a mini-celebration. This Chicken Adobo with Coconut Rice is about to become your new comfort food champion.
The Story Behind My Love for Adobo
PrintChicken Adobo with Coconut Rice : Bold, Comforting & Flavor-Packed
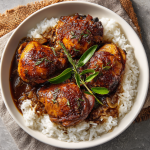
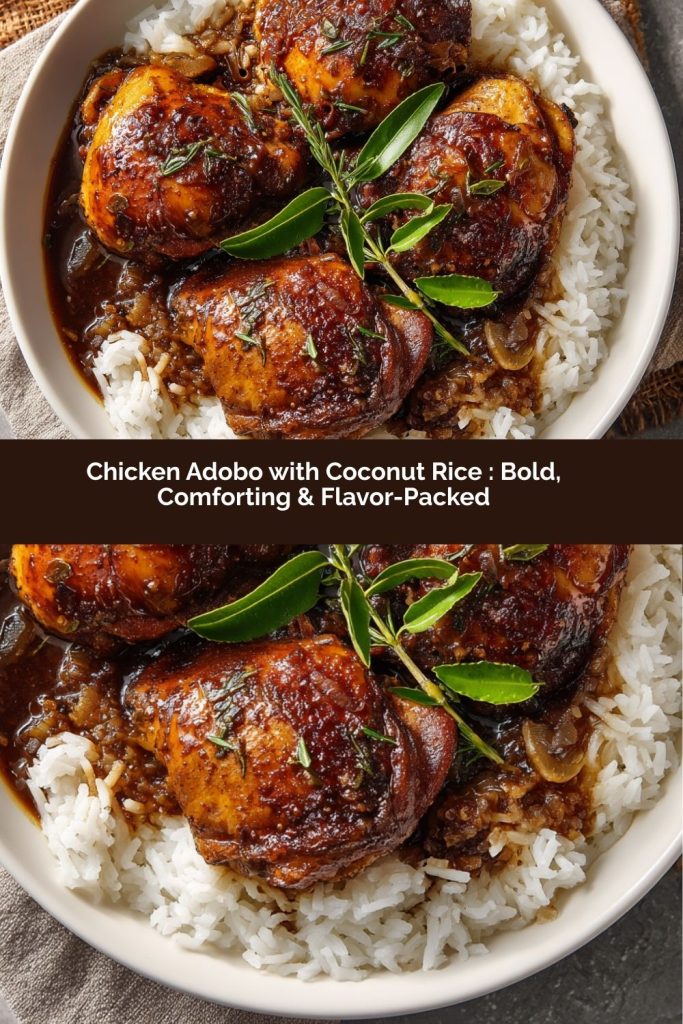
Chicken Adobo with Coconut Rice is the ultimate sweet-and-savory comfort meal. Tender chicken simmers in a rich garlic-soy-vinegar sauce until deeply flavorful and perfectly caramelized. Paired with fragrant coconut rice, every bite is bold, slightly tangy, and irresistibly satisfying.
- Prep Time: 10 minutes
- marinate time: 30 minutes
- Cook Time: 35 minutes
- Total Time: 1 hour 15 minutes
- Yield: 4 1x
Ingredients
Chicken Adobo
2 lbs bone-in, skin-on chicken thighs (or boneless)
½ cup low-sodium soy sauce
⅓ cup white vinegar
1 tbsp brown sugar
6 cloves garlic, smashed
2 bay leaves
1 tsp whole black peppercorns
1 tbsp olive oil
½ cup water
Coconut Rice
2 cups jasmine rice
1 cup canned coconut milk
1¼ cups water
½ tsp salt
Instructions
In a bowl, combine soy sauce, vinegar, brown sugar, garlic, bay leaves, and peppercorns. Add chicken and marinate for at least 30 minutes (or overnight for deeper flavor).
Heat olive oil in a large skillet over medium heat. Remove chicken from marinade (reserve marinade) and sear skin-side down until golden brown, about 5–7 minutes. Flip and cook 2–3 minutes more.
Pour reserved marinade and water into the skillet. Bring to a simmer, cover, and cook 20–25 minutes until chicken is tender and internal temperature reaches 165°F.
Uncover and simmer an additional 5–8 minutes until sauce thickens and slightly reduces.
For coconut rice, rinse rice until water runs clear. Combine rice, coconut milk, water, and salt in a pot. Bring to a boil, reduce heat to low, cover, and cook 15 minutes. Let rest 5 minutes, then fluff with a fork.
Serve chicken over coconut rice with extra sauce spooned on top.
Nutrition
- Calories: Approximately 620 per serving
- Protein: 42g
My love affair with adobo didn’t start in a fancy restaurant or during a far-flung trip. It started in my college best friend’s tiny apartment kitchen, with the windows fogged up and reggae music playing a little too loudly. Her Lola (grandmother) was visiting from the Philippines, and she decided the best way to spend a rainy Sunday was to teach two clueless 20-year-olds how to make her “real” chicken adobo.
I remember watching, utterly fascinated, as she didn’t measure a single thing. A glug of soy sauce here, a pour of vinegar there, a whole head of garlic smashed with the side of a knife. “You taste, you adjust,” she’d say with a wink. The scent of garlic and vinegar simmering together was sharp at first, then it mellowed and deepened into the most incredible, mouthwatering aroma. We ate it straight from the pot, standing around the stove, mopping up the sauce with fluffy white rice. It was messy, it was perfect, and it was one of the first times I understood that the soul of a dish isn’t in precise measurements, but in the joy and history you cook into it. Every time I make adobo now, I think of Lola’s confident hands and that feeling of shared, delicious discovery.
Your Flavor-Packed Shopping List
Gathering your ingredients is the first step to success! Here’s exactly what you’ll need, along with my favorite tips and swaps to make this dish your own.
For the Chicken Adobo:
- 2 lbs bone-in, skin-on chicken thighs: This is my gold standard for adobo. The bones add immense flavor to the sauce during the long simmer, and the skin gets gorgeously crispy when we sear it. Chef’s Insight: If you’re short on time, boneless, skinless thighs work perfectly well—just reduce the simmering time by about 5-7 minutes.
- ½ cup low-sodium soy sauce: Using low-sodium gives you control over the saltiness. We can always reduce the sauce more at the end to concentrate flavor without over-salting.
- ⅓ cup white vinegar: The tangy backbone of the dish! Plain white vinegar is traditional and perfect. Fun Twist: For a slightly fruitier note, try cane vinegar or even apple cider vinegar.
- 1 tbsp brown sugar: Just a touch to round out the sharp edges of the vinegar and soy. It helps with that beautiful caramelization later.
- 6 cloves garlic, smashed: Don’t you dare mince it! Smashing the cloves with the flat of your knife releases their oils and lets them infuse the sauce with a mellow, pervasive garlic flavor that’s just dreamy.
- 2 bay leaves: These little leaves are the secret whisperers of depth. They add an earthy, almost floral note that makes the sauce complex. Don’t skip them!
- 1 tsp whole black peppercorns: They perfume the sauce as it simmers. If you only have ground pepper, use about ½ teaspoon.
- 1 tbsp olive oil (or any neutral oil): For that all-important sear.
- ½ cup water: This helps create enough braising liquid to cook the chicken through and make plenty of sauce.
For the Coconut Rice:
- 2 cups jasmine rice: Its lovely floral scent pairs magically with coconut. Pro Tip: Rinsing it until the water runs clear removes excess starch for perfectly fluffy, not gummy, rice.
- 1 cup canned coconut milk: Go for full-fat for the richest, creamiest result. It’s the key to the rice’s luxurious texture.
- 1¼ cups water: Combined with the coconut milk, it’s the perfect liquid-to-rice ratio.
- ½ tsp salt: A must to season the rice and make the coconut flavor pop.
Let’s Get Cooking: Your Step-by-Step Roadmap to Deliciousness
Ready? Let’s break this down into simple, foolproof phases. I’ll be with you every step of the way with my best chef hacks!
Phase 1: The Flavor Foundation (Marinating)
Step 1: In a large bowl, whisk together the soy sauce, vinegar, brown sugar, smashed garlic cloves, bay leaves, and peppercorns. This is your powerhouse marinade! Give it a little taste—it will be strong and sharp, but trust the process. My Hack: No time to marinate? Don’t stress. Just let it sit while you prep everything else (even 15 minutes helps). The simmering time does most of the flavor-building work.
Step 2: Add your chicken thighs to the bowl, making sure they’re submerged. Cover and pop it in the fridge. You can do this 30 minutes before cooking, or for maximum flavor, let it hang out overnight. The longer it marinates, the deeper the flavor penetration.
Phase 2: Sear & Sizzle (Building Layers of Flavor)
Step 3: Heat the olive oil in a large, heavy-bottomed skillet or Dutch oven over medium-high heat. This is crucial: Remove the chicken from the marinade, letting the excess drip off, but SAVE THAT MARINADE! It’s liquid gold. Pat the chicken thighs dry with a paper towel—this helps get that crispy, golden-brown skin we’re after.
Step 4: Place the chicken in the hot oil skin-side down. Don’t crowd the pan; work in batches if needed. Let them sear, without moving them, for a good 5-7 minutes until the skin is deeply golden and crispy. Flip and cook for another 2-3 minutes on the other side. This isn’t to cook them through, just to build beautiful color and flavor. Remove the chicken to a plate.
Phase 3: The Simmer & Transform (Where the Magic Happens)
Step 5: Here’s where we use that reserved marinade. Carefully pour it into the hot skillet—it will sizzle and steam gloriously. Add the ½ cup of water and use a wooden spoon to scrape up any delicious browned bits from the bottom of the pan. Those bits are pure flavor!
Step 6: Bring the liquid to a gentle simmer, then return the chicken to the pan, skin-side up. Cover, reduce the heat to low, and let it braise for 20-25 minutes. The chicken is done when it’s tender and reaches an internal temperature of 165°F.
Phase 4: The Grand Finale (Saucifying!)
Step 7: Once the chicken is cooked, uncover the skillet. Now we reduce and thicken that sauce. Let it simmer uncovered for another 5-8 minutes. You’ll see it start to darken, gloss over, and coat the back of a spoon. Watch it closely! This is when it transforms from a thin braising liquid to a sticky, luxurious glaze.
Phase 5: The Coconut Rice (Do This While the Chicken Simmers)
Step 8: While the chicken is braising (covered), make your rice. Rinse your jasmine rice in a fine-mesh strainer under cold water until the water runs mostly clear. This is the secret to non-clumpy rice!
Step 9: In a medium saucepan, combine the rinsed rice, coconut milk, water, and salt. Give it a quick stir. Bring to a boil over high heat, then immediately reduce the heat to the lowest possible setting, cover tightly with a lid, and cook for 15 minutes. Do not peek! After 15 minutes, take it off the heat and let it sit, still covered, for 5-10 minutes. Then, fluff with a fork and behold the creamy, fragrant perfection.
Plating Your Masterpiece
This is the fun part! Spoon a generous heap of that fluffy coconut rice onto a warm plate or shallow bowl. Place a piece (or two!) of the glossy chicken right on top. Now, take a big spoon and ladle that reduced, incredible sauce all over everything—don’t be shy. The rice is there to soak it all up. A simple garnish of sliced green onions or a sprinkle of sesame seeds adds a lovely fresh pop of color and texture. That’s it! You’ve created a restaurant-worthy plate that’s begging to be devoured.
Make It Your Own: Fun Twists & Swaps
- Pork Belly or Pork Shoulder: Swap the chicken for cubed pork belly or shoulder for an even richer, melt-in-your-mouth version. Increase the simmering time to 45-60 minutes.
- Vegetarian “Adobo” Mushrooms: Use meaty king oyster or portobello mushrooms. Sear them well, then proceed with the sauce. They soak up the flavor like a dream!
- Spicy Kick: Add 1-2 sliced Thai bird’s eye chilies or a teaspoon of chili flakes to the marinade for a warming heat.
- Crispy Finish: After reducing the sauce, place the chicken on a baking sheet and broil for 2-3 minutes for an extra-crispy skin.
- Instant Pot Speed Run: Use the sauté function to sear the chicken. Add marinade and water, seal, and cook on high pressure for 10 minutes. Quick release, then use sauté again to reduce the sauce.
Anna’s Kitchen Notes
This recipe has been a living, evolving thing in my kitchen for years. I’ve made it for frantic weeknights, for comforting friends, and for huge, hungry family gatherings. The version you see here is the sweet spot—the one that’s been tested, tweaked, and loved into its current form. One funny story: I once accidentally used balsamic vinegar instead of white vinegar (similar bottle, dim kitchen light!). It was… different. Very sweet and dark! We still ate it, but it taught me to always label my decanted vinegar bottles. Lesson learned! The beauty of adobo is its flexibility. Once you master this base, feel free to play. Add a splash of pineapple juice for sweetness, throw in some hard-boiled eggs to simmer in the sauce (a classic addition!), or use coconut aminos for a gluten-free version. It’s your kitchen, your rules.
Your Questions, Answered
Q: My sauce is too thin! What did I do wrong?
A: No worries! This usually means it just needs more reduction time. Simply remove the chicken, increase the heat to medium, and let the sauce bubble away, stirring occasionally, until it reaches your desired thickness. It will thicken more as it cools, too.
Q: Is it safe to cook with the marinade that had raw chicken in it?
A> Yes, absolutely—because we bring it to a full, rolling simmer for a good 20+ minutes. That boiling temperature kills any bacteria, making it perfectly safe and incredibly flavorful. This is a key braising technique!
Q: Can I use chicken breasts?
A> You can, but be cautious. Boneless, skinless breasts can dry out with the long simmer. If you use them, reduce the covered simmer time to 10-12 minutes, just until cooked through, then proceed with reducing the sauce.
Q: My sauce tastes too sharp/vinegary. Help!
A> The vinegar mellows dramatically as it cooks. If it’s still too strong for your taste at the end, stir in another half tablespoon of brown sugar or a tiny drizzle of honey or maple syrup to balance it. Taste as you go!
Nutritional Information*
*This is an estimate provided for informational purposes. Values can vary based on specific ingredients used.
Per Serving (1/4 of recipe): Calories: ~620 | Protein: 42g | Carbohydrates: 55g | Fat: 26g (Saturated Fat: 12g) | Sodium: ~1100mg | Fiber: 1g | Sugar: 4g
 Final Thoughts
Chicken Adobo with Coconut Rice is more than just a meal—it’s a hug on a plate. The tender, savory-sweet chicken, infused with garlic, vinegar, and a touch of sugar, paired with creamy, fragrant coconut rice, creates a combination that’s comforting, satisfying, and endlessly versatile. It’s perfect for a cozy weeknight, a casual dinner with friends, or even meal prep that elevates your lunches.
What makes this recipe truly special is its simplicity and adaptability. Whether you stick to the classic chicken thighs, try pork, or even a mushroom-based vegetarian version, the technique stays the same and the results are always deeply flavorful. Once you master this base, you can adjust sweetness, heat, or protein to make it entirely your own.
At the end of the day, this dish is about more than just food—it’s about the joy of cooking, sharing, and savoring every bite. Give yourself permission to enjoy the process, make it your own, and watch as this humble, pantry-friendly recipe becomes a treasured staple in your kitchen.