
No-Bake Cheesecake Cups: A Slice of Joy Without the Fuss
Introduction
Hey there, friend! Today, I’m excited to share one of my favorite go-to desserts that brings a little magic to my kitchen and a huge smile to everyone’s faces: No-Bake Cheesecake Cups! This delightful treat is not just a sweet ending to a meal; it’s a mini celebration in a cup. Picture this: creamy, luscious cheesecake filling layered in adorable cups, topped with fresh fruit or a sprinkle of chocolate shavings. It’s the perfect dessert for any occasion, whether it’s a casual family dinner, a festive gathering, or a cozy night in with your favorite movie.
Back when I was a budding home chef, I would often find myself overwhelmed by the idea of making desserts. It seemed like a magical world filled with precise measurements, heated ovens, and a risk of kitchen disasters. But then I stumbled upon no-bake desserts—a revelation! They allowed me to create wonderful treats without the complexity of traditional baking. And that’s how these No-Bake Cheesecake Cups became a beloved staple in my kitchen.
What I love most about this recipe is how easy it is to whip up with just a handful of ingredients, and the little joy it brings when served. There’s something so inviting about digging into your very own cup of cheesecake—especially when it’s topped with fresh seasonal fruit or a rich drizzle of chocolate. Furthermore, since it requires no baking, it’s a great way to keep your kitchen cool in the summer months! So, let’s roll up our sleeves, grab those spatulas, and dive into creating these tempting cheesecake cups that are sure to impress!
Personal Story
I can still vividly remember the first time I made no-bake cheesecake cups for a family picnic. It was a warm summer afternoon, the kind where everything feels a little more vibrant, and laughter mingled effortlessly with the breeze. Armed with a trusty picnic basket, I wanted to bring along something sweet that would dazzle my family but wouldn’t require hours of fussing in the kitchen.
After some flipping through my trusted recipe book, I stumbled upon a simple no-bake cheesecake recipe. It was a perfect fit! Not only was it quick to assemble, but it also allowed me to personalize each cup with my family’s favorite toppings. I prepared them the night before, letting them set beautifully in the fridge, and the anticipation of serving them at our picnic made my heart flutter.
Once I unveiled the cups, the smiles on my family’s faces were priceless. We savored every simple bite, laughing and reminiscing as we enjoyed this cool, creamy treat. That day, I realized that the joy of cooking isn’t just about the food—it’s about the moments we create and the happiness we share. Ever since, these no-bake cheesecake cups have found their way into many gatherings and celebrations, each batch evoking love and laughter, one delicious cup at a time.
Ingredients
Here’s what you’ll need to create your own batch of these delightful no-bake cheesecake cups:
- 8 oz cream cheese, softened
- A must-have for any cheesecake! Ensure it’s well-softened to make mixing easy and to achieve that creamy texture. If you need a dairy-free option, try using vegan cream cheese!
- 1/2 cup powdered sugar
- This fine sugar dissolves easily for a smooth filling. If you prefer less sweetness or need a sugar alternative, you can use a sugar substitute, like stevia or monk fruit sweetener, though adjustments may be needed for consistency.
- 1 cup heavy cream
- Heavy cream works its magic, making the cheesecake fluffy and creamy. For a lighter version, you can use whipped coconut cream or half-and-half, but keep in mind it may change the texture slightly.
- 1 tsp vanilla extract
- Pure vanilla extract adds a lovely depth of flavor that complements the cream cheese. If you’re looking for an alternative, almond extract can offer a distinct and delicious twist!
- Graham cracker crumbs (for garnish)
- The quintessential cheesecake pairing! They add a lovely crunch and nostalgic flavor. If you’re looking for a gluten-free option, crushed gluten-free cookies or nuts can work brilliantly.
- Fresh fruit or chocolate shavings (optional, for topping)
- Dress up your cheesecake cups with a pop of color and flavor! Seasonal berries, caramelized peaches, or dark chocolate shavings are all wonderful options. Make it your own!
Step-by-Step Instructions
Now that you’ve gathered your ingredients, let’s get started on crafting these dreamy no-bake cheesecake cups! The process is as delightful as the treat itself—let’s dive in!
Step 1: Prepare Your Cream Cheese Mixture
1. Softening the Cream Cheese
First off, make sure your cream cheese is softened. You can leave it out at room temperature for about 30 minutes before you start. Trust me; this little step makes a huge difference in achieving that velvety smooth filling.
2. Beat the Cream Cheese
In a mixing bowl, add the softened cream cheese and start beating it with an electric mixer on medium speed. You want it to be creamy and free of lumps—about 1-2 minutes will do! If you don’t have an electric mixer, a whisk will work in a pinch, but it might take a bit longer!
Step 2: Add Sweetness & Flavor
3. Sweeten
Once your cream cheese is looking fabulous, it’s time to add in that powdered sugar. Gradually sprinkle it in while continuing to mix on low speed. This prevents any sugar explosions! Mix until everything is completely combined and smooth.
4. Vanilla Magic
Next, drizzle in that fragrant vanilla extract and beat it just long enough for it to incorporate. Your mixture should be so tantalizing that you’ll want to dive right in… but don’t!
Step 3: Whip the Cream
5. Whipping the Heavy Cream
In a separate mixing bowl, pour in your heavy cream. Using clean beaters, whip it on high speed until stiff peaks form. This usually takes about 3-5 minutes. You’ll know it’s perfect when you can lift the beaters, and the cream stands tall—kind of like an excited puppy waiting for a treat!
Step 4: Fold & Combine
6. Fold It Together
Now, the magic happens! Take one cup of the whipped cream and gently fold it into the cream cheese mixture. Be careful not to over-mix—this part is all about keeping that light and airy texture! Once well combined, add in the remaining whipped cream and fold it again until the mixture is creamy and uniform.
Step 5: Fill Those Cups!
7. Assembly Time
Grab your decoratively cute cups or jars—whatever you have on hand will do, and let’s fill ’em up! You can use a spoon or a piping bag for a fun presentation, layering the cheesecake filling to create beautiful swirls. This part is where you can get creative!
Step 6: Chill to Perfection
8. Refrigerate
Once your cups are filled, pop them in the fridge for at least 4 hours (or overnight, if you can resist!). This allows the flavors to meld beautifully and the cheesecake to set. As you wait, you can ponder on what toppings you’re going to use!
Serving Suggestions
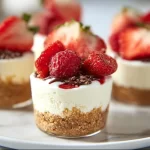
When you’re ready to serve these delightful cheesecake cups, take them out of the fridge and sprinkle with graham cracker crumbs for an added crunch. For an extra pop, top with fresh berries or chocolate shavings right before serving—they’ll make your cups look stunning and taste even better! Grab a spoon, gather your friends or family around, and enjoy the love that went into making these sweet treats!
Recipe Variations
Feeling adventurous in the kitchen? Here are some fun variations to inspire your inner chef:
- Chocolate Cheesecake Cups: Melt some chocolate and fold it into the cream cheese mixture for a rich twist. Top with chocolate ganache for extra indulgence.
- Fruit-Infused Cups: Blend fresh fruits like strawberries or blueberries into the cream cheese mixture for a burst of flavor. Toss the mixed fruits on top for a colorful finish!
- Coffee Lovers’ Delight: Add a tablespoon of instant coffee or espresso powder to the cream cheese mixture for a deliciously caffeinated version. Perfect for a pick-me-up!
- Lemon Zest: Mix in the zest of a lemon for a zesty, refreshing flavor. This brightens up the dessert beautifully and pairs wonderfully with berries.
- Almond Joy Cups: Stir in some shredded coconut and chopped almonds for that classic chocolate bar flavor. Top with chocolate sprinkles for a nostalgic kick!
Chef’s Notes
As I’ve whipped up countless batches of these no-bake cheesecake cups, I’ve had my share of kitchen giggles and adventures. One particularly memorable time, I decided to experiment with adding too much lemon juice—let’s just say, that batch ended up being a tart adventure instead of sweet bliss! It reminded me that cooking is a journey filled with learning—sometimes, you hit the jackpot, and other times, it’s a funny story for the kitchen reunion!
Over the years, I’ve seen this recipe evolve too. What started as a simple cream cheese and sugar creation has taken on many flavors and styles. They’ve become a canvas for creativity and a beloved way to bring family and friends together around the table.
FAQs and Troubleshooting
1. My cheesecake filling turned out too runny—what happened? Don’t fret! This can happen if the heavy cream wasn’t whipped enough. Make sure to whip until you get those stiff peaks! Also, check that your cream cheese was fully softened.
2. Can I make the cheesecake cups ahead of time? Absolutely! These cheesecake cups store beautifully in the fridge for up to 3-5 days. Just keep the toppings separate if you want to add them later to prevent sogginess.
3. What can I use if I don’t have graham crackers? No problem! You can use crushed Oreos, vanilla wafers, or even nuts for that delightful crunch. Get creative with what you have on hand!
4. How can I make these gluten-free? For a gluten-free version, simply substitute the graham cracker crumbs with gluten-free crust alternatives like almond flour or store-bought gluten-free cookies.
Nutritional Info (Optional)
- Serving Size: 1 cup
- Calories: Approximately 350 calories
- Fat: 26g
- Carbohydrates: 22g
- Protein: 4g
(Note: Nutritional values are estimates and can vary based on specific ingredients used.)
Final Thoughts
And there you have it, my friend—easy, delightful, and absolutely scrumptious No-Bake Cheesecake Cups! This recipe is a testament to the joy and love that can be stirred up in the kitchen, transforming simple ingredients into something magical. I hope you find as much joy in making and sharing these cups as I do.
So, get those cups ready, let your creativity flow, and enjoy the sweet moments spent with your loved ones. If you try this recipe, I’d love to hear how yours turned out! Don’t forget to share your own kitchen stories—after all, we’re all in this cooking journey together. Happy cooking! 🍰❤️
PrintNo-Bake Cheesecake Cups
Delightful no-bake cheesecake cups that are easy to prepare and perfect for any occasion.
- Prep Time: 15 minutes
- Cook Time: 0 minutes
- Total Time: 240 minutes
- Yield: 4 servings 1x
- Category: Dessert
- Method: No-Bake
- Cuisine: American
- Diet: Vegetarian
Ingredients
- 8 oz cream cheese, softened
- 1/2 cup powdered sugar
- 1 cup heavy cream
- 1 tsp vanilla extract
- Graham cracker crumbs (for garnish)
- Fresh fruit or chocolate shavings (optional, for topping)
Instructions
- Prepare your cream cheese mixture by softening the cream cheese at room temperature for 30 minutes.
- Beat the cream cheese with an electric mixer until creamy and lump-free.
- Add powdered sugar gradually while mixing on low speed until smooth.
- Drizzle in vanilla extract and mix briefly to incorporate.
- Whip the heavy cream in a separate bowl until stiff peaks form.
- Fold one cup of whipped cream into the cream cheese mixture, then fold in the remaining whipped cream.
- Fill cups or jars with the cheesecake filling using a spoon or piping bag.
- Refrigerate for at least 4 hours or overnight to set.
Notes
Feel free to personalize with fresh seasonal fruits or chocolate shavings on top before serving.
Nutrition
- Serving Size: 1 cup
- Calories: 350
- Sugar: 10g
- Sodium: 350mg
- Fat: 26g
- Saturated Fat: 16g
- Unsaturated Fat: 10g
- Trans Fat: 0g
- Carbohydrates: 22g
- Fiber: 0g
- Protein: 4g
- Cholesterol: 65mg
Keywords: no-bake cheesecake, dessert, easy recipe, cheesecake cups, creamy dessert