
Preserved Figs: A Sweet Journey Into the World of Flavor
Hello, lovely foodies! Today, I’m inviting you on a delightful trip that celebrates one of the most charming fruits you’ll ever meet — the fig! If you’ve ever wondered how to preserve those luscious figs that seem to appear out of nowhere at the end of summer, you’re in for a treat. This delightful process captures not just the fruit but the essence of sunny days, turning figs into a sweet, sticky treasure you can enjoy throughout the year. Let’s dive into the warm and cozy world of preserved figs!
A Cozy Memory with Figs
I remember the first time I ever tasted preserved figs. I was at my grandmother’s kitchen, surrounded by the comforting aroma of spices and sugar wafting through the air. It was a classic late summer day, and our family was gathered around, sharing stories while she busily prepared her famous preserved figs. I had never seen such magical transformation happen right before my eyes: plump, fresh figs simmering in a sweet syrup, filling the kitchen with a sweetness that felt like a warm hug.
After hours of patience, the jars finally came out of the water bath, glistening under the sunlight. When I finally got to taste them, the flavor was beyond my expectations: sweet, earthy, with a hint of nostalgia. That first bite transported me back to my childhood, reminding me of the warmth of seasons past and the joy of gathering with family. This simple dish became a cherished recipe in our home, a representation of love, family, and memories found in every spoonful. Now, I want to share that warmth with you through this guide on how to preserve figs at home!
Ingredients to Sweeten Your Day
Here’s what you’ll need to get started on this delicious journey:
- Fresh Figs (2 pounds): Choose ripe, plump figs for the best flavor. If fresh figs are out of season, try dried figs, but keep in mind the taste and texture will be different.
- Sugar (2 cups): This will sweeten and help preserve the figs. You can adjust the amount based on your sweetness preference or use honey as a natural substitute.
- Lemon Juice (1/4 cup): A splash of acidity brightens the flavor and helps balance the sweetness. If you’re out of lemon, lime juice works in a pinch!
- Water (1 cup): Used to dissolve the sugar. Feel free to replace some of the water with fruit juice for an added zing.
- Vanilla Extract (1 teaspoon, optional): It adds a lovely warmth to the flavor. For a twist, try almond extract to enhance the nuttiness of the figs.
Step-by-Step Instructions for Preserved Figs
Now that you have your ingredients gathered, let’s get into the heart of the matter: the cooking process. Grab your apron, and let’s make some magic happen!
-
Preparation: Start by washing the figs under cool running water. Gently pat them dry with a clean kitchen towel. You want to keep them intact, so handle them with care!
-
Cutting the Figs: With a sharp knife, make a small cross incision on the top of each fig. This not only makes them visually appealing but allows the syrup to soak in beautifully. No need to go deep — just enough to let the sweetness in!
-
Making the Syrup: In a large saucepan, combine the water and sugar over medium heat. Stir gently until the sugar is fully dissolved. This is also where the magic begins! As the syrup heats, it will begin to bubble slightly (don’t worry, that’s normal).
-
Adding the Figs: Once your syrup is ready, carefully add the prepared figs to the pot. You’ll want to let them simmer gently for about 20 to 25 minutes. Stir occasionally, and during this time, feel free to savor the growing aroma. Pro tip: if your syrup reduces too much and looks too thick, don’t hesitate to add a little water!
-
Finishing Touches: After the figs have softened but still hold their shape, stir in the lemon juice and vanilla extract (if using). Let the mixture simmer for another 5 minutes. You’re looking for a syrupy consistency that coats the figs, so keep an eye on it!
-
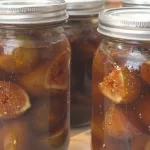
Jarring the Figs: Carefully use a slotted spoon to transfer the figs into sterilized jars (I often place them in boiling water first). Once the figs are in their jars, ladle the syrup over them, ensuring they’re fully submerged. The covers should be on but not sealed tightly to allow steam to escape.
-
Processing the Jars: Fill a large pot with water, and bring it to a boil. Carefully place the jars in the boiling water (you may want to use a canning rack). Process for about 10 minutes to ensure they’re properly sealed.
-
Cooling: Remove the jars with tongs and let them cool on a kitchen towel or cooling rack. You’ll hear a satisfying pop as they seal, which is music to any preserving enthusiast’s ears!
Serving Suggestions
When you’re ready to indulge, there are countless ways to enjoy your preserved figs! Serve them atop creamy brie or goat cheese for a delightful appetizer, or incorporate them into your favorite desserts, like tarts or cakes. You can also spoon them over pancakes or yogurt for a sweet breakfast treat. The possibilities are endless!
Recipe Variations to Spark Your Imagination
Now that you have the basics down, here are some creative twists you can try on this classic:
- Spiced Figs: Add a cinnamon stick and a few cloves during the simmering process to introduce warm, aromatic spices.
- Balsamic Elegance: Replace half of the sugar with balsamic vinegar for a tangy, sophisticated flavor that pairs wonderfully with savory dishes.
- Herbed Delight: Steep fresh herbs like rosemary or thyme in the syrup for a unique savory touch.
- Chunky Style: Chop the figs before preserving them to create a chunky fig spread perfect for toast or as a sandwich filler.
- Dried Figs: If you prefer, dry the figs in a dehydrator or low oven after cooking for a chewy snack that stores well!
Chef’s Notes
Funny enough, the first time I tried this recipe, I was in a rush, adding ingredients without measuring. The result was disastrous, with overly sweet figs that tasted like candy! I learned that precision is important in preserving — balance is key! Over the years, this recipe has evolved, and I’ve tried various twists. Some failed, but others were nothing short of miraculous. Now, every jar of figs I preserve pulls all those memories together, whether it’s the summer sunshine of my grandmother’s kitchen or frosty winter days when I need a taste of that summer sweetness.
FAQs and Troubleshooting
-
Can I use dried figs instead of fresh ones?
Yes, you can use dried figs for a different flavor profile! Just remember they won’t need to simmer as long. -
Why did my figs break apart during cooking?
Overcooking can cause figs to become mushy. Make sure to monitor your cooking time closely, allowing them to soften while keeping their shape intact! -
How long can I store preserved figs?
When properly sealed and stored in a cool, dark place, preserved figs can last up to a year. However, once opened, keep them in the refrigerator and enjoy within a couple of weeks. -
What can I do with extra syrup?
Don’t throw it away! This syrup makes a fantastic addition to cocktails, drizzled over desserts, or even as a sweetener in tea or coffee.
Nutritional Info (optional)
Preserved figs can be nutritious! They’re rich in fiber, calcium, and antioxidants, making them a healthy addition to your diet — but remember, they are also high in natural sugars. Enjoy them in moderation!
Final Thoughts
Preserving figs is not just a method of storing fruit; it’s about capturing moments and memories, about nostalgia, and weaving stories into our cooking. Whether you share them with friends at brunch or keep them all to yourself, these preserved figs will bring a little sparkle to your everyday meals. So grab your apron, and let’s create some kitchen magic together — one fig at a time! 🍽️✨
Happy cooking!
PrintPreserved Figs
A delightful recipe for preserving fresh figs to capture their sweetness and essence, perfect for enjoying throughout the year.
- Prep Time: 15 minutes
- Cook Time: 35 minutes
- Total Time: 50 minutes
- Yield: 4 servings
- Category: Preserves
- Method: Canning
- Cuisine: Mediterranean
- Diet: Vegetarian
Ingredients
- Fresh Figs (2 pounds)
- Sugar (2 cups)
- Lemon Juice (1/4 cup)
- Water (1 cup)
- Vanilla Extract (1 teaspoon, optional)
Instructions
- Start by washing the figs under cool running water. Gently pat them dry with a clean kitchen towel.
- With a sharp knife, make a small cross incision on the top of each fig.
- In a large saucepan, combine the water and sugar over medium heat. Stir gently until the sugar is fully dissolved.
- Once your syrup is ready, carefully add the prepared figs to the pot and let them simmer for about 20 to 25 minutes.
- After the figs have softened, stir in the lemon juice and vanilla extract.
- Carefully use a slotted spoon to transfer the figs into sterilized jars.
- Fill a large pot with water, and bring it to a boil. Process the jars for about 10 minutes.
- Remove the jars with tongs and let them cool on a kitchen towel or cooling rack.
Notes
Use ripe, plump figs for best flavor and adjust sugar based on sweetness preference. Preserved figs can last up to a year when properly sealed.
Nutrition
- Serving Size: 1 serving
- Calories: 250
- Sugar: 45g
- Sodium: 10mg
- Fat: 1g
- Saturated Fat: 0g
- Unsaturated Fat: 1g
- Trans Fat: 0g
- Carbohydrates: 67g
- Fiber: 5g
- Protein: 2g
- Cholesterol: 0mg
Keywords: figs, preserved figs, canning, summer fruits, sweet preserves