Adorable Bunny Oreo Balls: Your New Favorite Easter Tradition
Hey there, friend! Is your kitchen buzzing with that special spring energy yet? You know the one—where pastel colors start calling your name, and you get the sudden, irresistible urge to make everything just a little bit sweeter and a whole lot cuter? I’m right there with you. And today, I’m so excited to share the recipe that has become the absolute star of our Easter dessert table: these hilariously cute, downright delicious Bunny Oreo Balls.
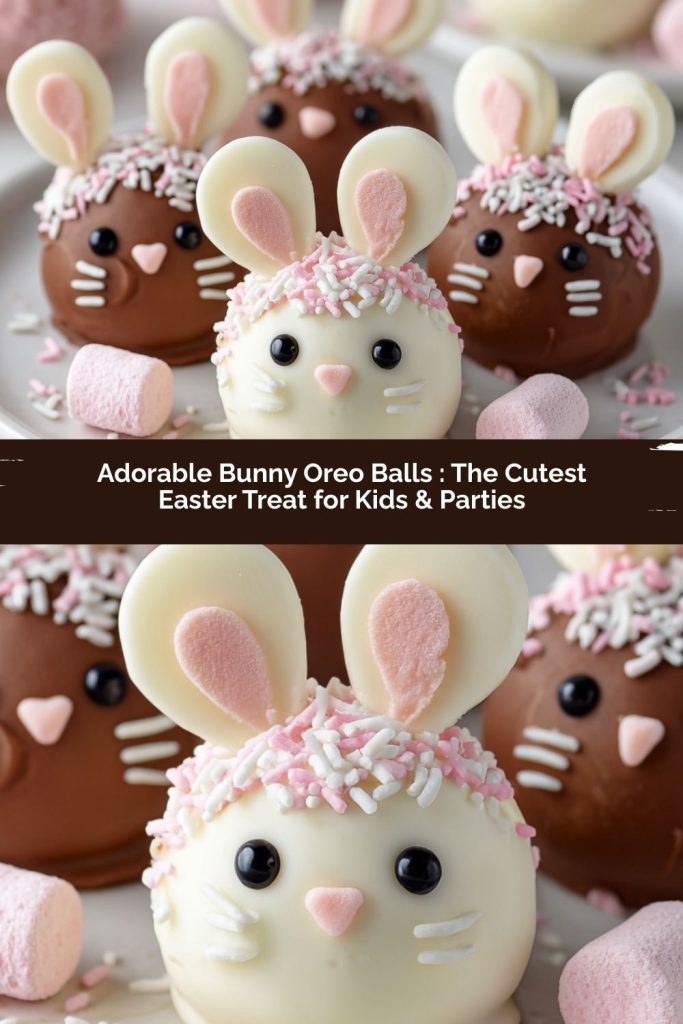
Imagine this: creamy, dreamy Oreo truffle centers, dipped in smooth white chocolate, and transformed with just a few clever touches into a whole family of sweet little bunnies. They’re peeking out from a bed of green coconut “grass,” sporting mischievous candy eyes and fluffy marshmallow tails. The best part? They come together with zero baking required. That’s right—this is a pure, joyful, mix-shape-dip-and-decorate kind of project. It’s the perfect recipe to pull out when you want to create lasting memories with your kids, impress guests at a spring brunch, or simply treat yourself to a moment of kitchen magic that’s guaranteed to spark a smile.
So, if you’ve ever looked at a complicated pastry and thought, “Nope, not for me,” then you’re in the perfect place. This is our kind of cooking—easy, approachable, and packed with personality. Grab your favorite little helpers (or just your favorite podcast), and let’s hop to it. We’re about to create the most adorable, crowd-pleasing Easter treat that proves fantastic food doesn’t have to be fussy to be fabulous.
A Kitchen Full of Laughter & Sprinkles: Why This Recipe Sticks
PrintAdorable Bunny Oreo Balls : The Cutest Easter Treat for Kids & Parties
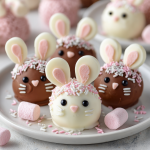
Hop into the Easter spirit with these creamy, chocolatey Bunny Oreo Balls—shaped like sweet little bunnies and almost too cute to eat! They’re super fun to make, especially with kids, and guaranteed to be a hit at any Easter gathering or spring celebration. Add them to your dessert table and watch smiles multiply like… well, bunnies!
- Prep Time: 20 min
- chill time: 30 min
- Total Time: 50 min
Ingredients
1 package (36 cookies) Oreo cookies
8 oz cream cheese, softened
12 oz white chocolate or white candy melts
Pink candy melts (for ears and nose)
Edible candy eyes
Mini marshmallows (for tails)
Optional: pink sprinkles or sanding sugar
Instructions
Crush Oreos: Blend cookies into fine crumbs using a food processor.
Mix with cream cheese: Combine Oreo crumbs and cream cheese until smooth and dough-like.
Shape: Roll mixture into 1-inch balls. Chill in freezer for 15–20 mins.
Dip: Melt white chocolate. Dip each ball and place on a parchment-lined tray.
Decorate:
Attach edible eyes and marshmallow tails while coating is still wet.
Pipe or draw ears and nose with pink candy melts or icing.
Set: Let sit at room temp or refrigerate until coating is firm.
Nutrition
- Calories: 130
- Sugar: 10g
- Fat: 7g
- Carbohydrates: 14g
This recipe will always remind me of my niece, Lily’s, first real “helping” Easter. She was about four, with flour-smudged glasses and a determination to do everything “all by myself, Aunt Anna!” We were making these bunny balls, and her little hands were a whirlwind of action—scooping the Oreo mixture, rolling (what were more like bunny “lumps” than balls), and “testing” the white chocolate with her finger approximately every 30 seconds.
The real chaos—I mean, magic—happened at the decorating station. We had bowls of candy eyes, pink sprinkles, and mini marshmallows. Lily’s artistic vision was… abstract. One bunny had three eyes. Another wore a sprinkle beard. The “tails” went on noses, and the noses sometimes became tails. We were laughing so hard we cried, and the kitchen was a beautiful, sugary disaster zone. But when we lined them all up on a platter, they were perfect. Not because they were uniform, but because each one told a story of our messy, joyful afternoon.
That’s the spirit I want you to bring to this recipe. Don’t stress about perfection. Embrace the lopsided ears and the bunnies who might look a little more “quirky” than classic. Those are the ones you’ll remember. These treats are more than just dessert; they’re a ticket to a fun, shared experience. And trust me, no one at your table will care if a bunny’s eyes are slightly crossed when they’re biting into that creamy, chocolatey goodness.
Gathering Your Bunny Building Crew: Ingredients & Smart Swaps
One of my favorite things about this recipe is its beautiful simplicity. You likely have most of this in your pantry right now! Here’s your shopping list, along with my favorite chef insights and substitution ideas to make this recipe work seamlessly for you.
- 1 package (about 36 cookies) Oreo cookies: The classic, the legend. You’ll use the entire cookie—cream filling and all! This forms the rich, chocolatey base of our bunny bodies. Chef’s Insight: For a fun twist, try Golden Oreos for a “blonde” bunny! If you’re avoiding gluten, many brands make excellent gluten-free sandwich cookies that work perfectly here.
- 8 oz (one brick) full-fat cream cheese, softened: This is our magical binder, turning cookie crumbs into a pliable, rollable “dough.” Pro Tip: Softening is KEY! Leave it on the counter for a good hour. A cold brick won’t mix evenly, leaving you with lumpy bits. For a lighter option, you can use Neufchâtel cheese.
- 12 oz high-quality white chocolate or white candy melts: This is the bunny’s snowy coat. Chef’s Debate: Chocolate purists (like me!) love the taste of real white chocolate. However, candy melts are formulated to set firmer and smoother, which can be easier for beginners. They also come in vibrant colors! Choose based on your priority: flavor (real chocolate) or foolproof decorating (candy melts).
- Pink candy melts or pink icing: For those iconic bunny ears and cute little noses. A small bag is plenty. You can also tint a bit of leftover white coating with a drop of oil-based pink food coloring.
- Edible candy eyes: These bring the bunnies to life! Find them in the baking aisle. In a pinch, you can use mini chocolate chips or even draw eyes with black icing.
- Mini marshmallows: The pièce de résistance—the fluffy tail! Snip them in half with kitchen shears for a flat side to stick on. So simple, so effective.
- Optional: Pink sanding sugar or nonpareil sprinkles: For adding a little blush to the ears or some extra spring sparkle. This is where you can get creative!
Let’s Make Some Magic: Step-by-Step Bunny Crafting
Alright, team! Aprons on, maybe some happy music playing, and let’s dive into the fun part. I’ll walk you through each step with all my favorite hacks to ensure bunny success.
- Crush Those Cookies! Toss your whole Oreos (yes, the whole thing!) into a food processor and pulse until you have fine, even crumbs. No big pieces! No food processor? No panic. Seal the cookies in a heavy-duty zip-top bag and roll them with a rolling pin or even a wine bottle until they’re dust. It’s a great job for eager little helpers (or for working out any pre-holiday stress!).
- Create the “Dough.” In a large bowl, combine the fine Oreo crumbs with your softened cream cheese. Use a hand mixer on low, a sturdy spatula, or just very clean hands to mix until it’s completely uniform and looks like a dark, fudgy dough. Chef’s Hack: Scrape down the sides of the bowl often to catch any stray crumbs or cream cheese bits. The mixture should hold together when pinched.
- Shape & Chill. Scoop out about 1 tablespoon of mixture and roll it into a smooth, tight ball between your palms. Place each ball on a parchment-lined baking sheet. Once all are rolled, pop the tray into the freezer for 15-20 minutes. This is NON-NEGOTIABLE, friends! A firm, cold center is what prevents your bunnies from falling apart during the dipping stage. It’s the secret to a smooth, professional-looking coat.
- The Great Dip. While the balls chill, melt your white coating. Do this gently! For chocolate, use a double boiler or microwave in 30-second bursts, stirring vigorously between each. For candy melts, follow package directions. Key Tip: If your coating seems too thick for dipping, add a teaspoon of coconut oil or shortening (not butter or milk, which can cause seizing) to thin it to a perfect, dip-able consistency.
- Dip & Set. Using a fork, a dipping tool, or even a toothpick, submerge a chilled ball into the melted coating. Tap off the excess gently against the side of the bowl. Use a second fork or toothpick to gently push the coated ball onto a fresh sheet of parchment paper. Act fast for Step 6!
- Decorate with Personality! While the coating is still wet, this is your window to decorate! Gently press on two candy eyes and a mini marshmallow half for the tail. Let the coating set completely (about 10-15 minutes at room temp, or 5 in the fridge) before moving to the final touch.
- Add the Final Features. Melt your pink candy melts or prepare your pink icing. Using a piping bag with a tiny tip, a zip-top bag with the corner snipped off, or even a toothpick, draw on two long, upside-down “V” shapes for ears and a little dot for a nose on each bunny. If you’re using sprinkles, sprinkle them on the wet pink ears immediately. And voilà! You’ve created an entire family of sweet, edible bunnies.
Setting the Stage: How to Serve Your Bunny Brigade
Presentation is half the fun with these guys! Don’t just plop them on a plate. Create a little spring scene. Spread a layer of green-tinted shredded coconut or crushed Oreo “dirt” on a platter or a rustic wooden board. Nestle your bunnies in amongst the “grass.” You can even add a few jelly bean “eggs” or some edible flowers scattered around. They look fantastic piled high on a cake stand for a centerpiece that will have everyone reaching for their phones *before* they reach for a treat. Serve them straight from the fridge for the best texture—they’re cool, firm, and utterly irresistible.
Make It Your Own: Fun Twists & Dietary Swaps
The basic blueprint for these treats is incredibly forgiving. Here are a few ways to mix it up:
- Spring Critter Variety Pack: Use pastel candy melts (yellow, light blue, lavender) to make chicks, robin’s eggs, or even little lambs! Change the shape slightly and use different decorations.
- Peanut Butter Bunny: Use Peanut Butter Oreos for the base. Dip in milk or dark chocolate, and use a peanut butter chip for the nose. Heaven!
- “Carrot Patch” Balls: Shape the mixture into little carrot cones instead of balls. Dip the wider end in orange candy melts and use a fork to make texture lines. Add a tiny sprig of parsley or green icing for the tops.
- Dairy-Free/ Vegan: Use vegan sandwich cookies and a plant-based cream cheese. Opt for dairy-free chocolate or pastel candy melts (many are accidentally vegan!). Check that your marshmallows are vegan too (like Dandies brand).
- Nutty Twist: Add 1/4 cup of very finely chopped toasted pecans or almonds to the Oreo-cream cheese mixture for a delightful crunch.
Anna’s Kitchen Notebook: Extra Thoughts & Stories
Over the years, this recipe has seen it all. I’ve made them for school parties where they disappeared in 2.3 seconds, for elegant adult Easter lunches where they sparked the most delightful conversations, and yes, I’ve even shipped them (very carefully!) to far-away family. The recipe has evolved—I now swear by the freezer chill, and I’m a total convert to using a piping bag for the ears for more control.
One year, I ran out of candy eyes mid-project. We used tiny dots of black icing, and you know what? They had so much character—some winky, some surprised. It was a happy accident. So please, if you hit a “snag,” just roll with it. The goal is joy, not perfection. These bunnies are meant to be fun, a little goofy, and deeply delicious. Store any leftovers (ha!) in an airtight container in the fridge for up to a week. The flavor actually gets better after a day!
Your Questions, Answered: Bunny Ball FAQs
Q: My coating is cracking after it sets! What did I do wrong?
A: This usually means the Oreo ball centers were too cold or the coating was too hot/thick, creating tension as they set. Next time, let the chilled balls sit out for just 2-3 minutes before dipping, and ensure your coating is fluid but not piping hot. A tiny bit of coconut oil in the melt helps too!
Q: Can I make these ahead of time?
A: Absolutely! They are the perfect make-ahead treat. You can prepare the undipped balls and keep them in the freezer, well-wrapped, for up to a month. Thaw slightly before dipping. Fully decorated bunnies last beautifully in the fridge for 5-7 days.
Q: The mixture is too sticky to roll! Help!
A: Two fixes: 1) Chill the mixture in the bowl for 15-20 minutes before rolling. 2) Lightly dampen your hands with water or grease them with a tiny bit of butter or oil while rolling. It creates a non-stick barrier.
Q: My white chocolate got clumpy and grainy when I melted it.
A: That’s “seizing,” usually caused by a single drop of water or overheating. White chocolate is delicate! Always melt slowly. If it seizes, you can sometimes save it by immediately stirring in a tablespoon of solid vegetable shortening until smooth, but prevention is best.
Just the Facts: Nutritional Information*
*Estimated per bunny ball, assuming a yield of 20. For exact calculations, use a specific recipe calculator with your chosen brands.
- Calories: ~130
- Total Fat: 7g
- Carbohydrates: 14g
- Sugars: 10g
- Protein: 1g
 Final Thoughts