Cheeseburger Sliders: Your Secret Weapon for the Best Party Ever
Hey there, friend! Picture this: you’ve got a house full of hungry people. The game is on, the music’s playing, and the energy is buzzing. The last thing you want is to be stuck at the stove, missing all the fun. Enter the hero of the hour – the humble, glorious, downright irresistible Cheeseburger Slider.
These aren’t just mini burgers. Oh no. This is a whole juicy, cheesy, flavor-packed experience baked right into one glorious pan. We’re talking tender ground beef, melty cheese, that perfect tangy crunch from a pickle, all hugged by a soft, buttery bun. The best part? You make them once, bake them once, and feed a crowd with zero fuss. They are the ultimate proof that the most magical meals are often the simplest ones to share.
I’m a firm believer that great hosting isn’t about showing off—it’s about creating warmth and connection. And nothing says “welcome, let’s eat and be merry” quite like a platter of these golden, cheesy sliders being passed around. So, tie on your favorite apron (the one with the fun print, obviously), and let’s turn a classic into a legendary party snack together. I promise, these will be the first thing to vanish from your table!
The Slider That Saved Game Day
PrintCheeseburger Sliders : The Ultimate Party Pleaser
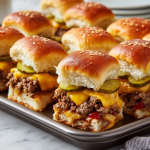
These baked cheeseburger sliders are juicy, cheesy, and perfect for feeding a hungry crowd. Layered with ground beef, gooey cheese, tangy pickles, and soft slider buns, they’re quick to assemble and even quicker to disappear.
Ingredients
1½ lbs ground beef
1 tsp salt
½ tsp black pepper
½ tsp garlic powder
½ small onion, finely diced (optional)
12 slider buns (Hawaiian rolls or dinner rolls work great)
6–8 slices cheddar or American cheese
Dill pickle chips
2 tbsp ketchup (optional)
2 tbsp mustard (optional)
2 tbsp melted butter
½ tsp sesame seeds (optional topping)
Instructions
Preheat oven to 350°F (175°C).
Cook the beef in a skillet with salt, pepper, garlic powder, and onion until browned and fully cooked. Drain excess fat.
Slice buns horizontally (keep the bottoms and tops connected). Place the bottom half in a greased 9×13 baking dish.
Layer:
Evenly spread cooked beef over the buns
Add cheese slices to cover
Top with pickles (and condiments if using)
Add the bun tops
Brush tops with melted butter and sprinkle sesame seeds if desired.
Bake uncovered for 10–15 minutes, until cheese is melted and tops are golden.
Nutrition
- Calories: 280
- Carbohydrates: 20g
- Protein: 17g
This recipe holds a special place in my heart, born from a near-catastrophe that turned into a kitchen win. A few years back, my husband invited what felt like his entire fantasy football league over with a very casual, “Oh, just a few guys.” A “few guys” turned into fifteen very tall, very hungry humans. My plan? Grill up a bunch of full-sized burgers. My reality? A sudden, torrential downpour that turned our patio into a lake.
Panic mode set in. I had all the burger fixings but no way to cook them for a crowd indoors without being a short-order cook all night. Then, I remembered a trick my mom used with party sandwiches. In a flash of inspiration (and slight desperation), I browned all the beef with onions and seasoning, grabbed the soft Hawaiian rolls I had for breakfast, and assembled everything in a baking dish like a savory, meaty layer cake. Twenty minutes later, I pulled out a pan of gorgeous, golden, unified sliders. The cheese was perfectly oozy, the buns were warm and soft, and the hungry crowd descended. They were gone in minutes, with requests for the recipe scribbled on napkins. That day, these sliders didn’t just save my party; they earned a permanent spot in my “emergency deliciousness” file.
Gathering Your Flavor Crew
Here’s everything you need to assemble your slider dream team. Don’t stress about exact brands—this is about flavor and joy, not precision!
- 1½ lbs ground beef: I like an 80/20 blend here. That bit of fat equals big flavor and juiciness. For a leaner option, go for 90/10, but know they might be a touch drier. Ground turkey or chicken work beautifully too for a lighter twist!
- 1 tsp salt, ½ tsp black pepper, ½ tsp garlic powder: Our simple yet mighty seasoning trio. This is your foundation. Feel free to add a pinch of onion powder or paprika if you’re feeling fancy.
- ½ small onion, finely diced (optional but recommended!): This little addition adds a sweet, aromatic depth. Cook it right with the beef so it turns soft and delicious. No fresh onion? A teaspoon of onion powder mixed with the other spices is a great backup.
- 12 slider buns: The vessel! Hawaiian rolls are my absolute favorite—their slight sweetness is magic with the salty beef and cheese. Classic dinner rolls or potato rolls are also stellar. The key is to get them connected so you have one solid top and bottom sheet.
- 6–8 slices cheddar or American cheese: Melty is the mission. Sharp cheddar gives a tangy punch, while American cheese delivers that classic, nostalgic, ultra-gooey melt. Why not use both? No one will stop you. I certainly won’t.
- Dill pickle chips: The essential crunch and tang! They cut through the richness perfectly. If you’re not a pickle person (we can still be friends), try thin slices of tomato or even a spoonful of coleslaw for that fresh contrast.
- 2 tbsp ketchup & 2 tbsp mustard (optional): I list these as optional because you can serve them on the side. But brushing a thin layer right onto the buns before adding the beef is a chef’s secret for an extra flavor boost in every bite.
- 2 tbsp melted butter: This is what gives our bun tops that gorgeous, golden, irresistible sheen and flavor. Use salted butter for a little extra oomph.
- ½ tsp sesame seeds (optional topping): Purely for that professional, “I absolutely nailed this” look. They add a cute texture and nutty hint.
Let’s Build Some Slider Magic: Step-by-Step
Ready to see how easy this is? Follow these steps and you’re golden—literally!
Step 1: Fire Up the Oven & Skillet. First, preheat your oven to a cozy 350°F (175°C). This gives it time to get perfectly hot while we cook the beef. Now, grab a large skillet and place it over medium-high heat. No oil needed if you’re using 80/20 beef—it’ll render its own.
Step 2: Brown the Beef to Perfection. Add your ground beef, breaking it up with a wooden spoon or spatula. Toss in the diced onion (if using), salt, pepper, and garlic powder. Here’s a pro tip: Don’t just gray the meat—let it get some good, dark brown crusty bits in the skillet. That’s called fond, and it’s pure flavor gold. Cook until no pink remains, about 7-10 minutes. Once cooked, drain off any excess fat. This step is crucial for preventing soggy slider bottoms!
Step 3: Assemble Your Slider “Cake.” Grab a 9×13 inch baking dish and give it a quick spritz of non-stick spray. Take your package of slider buns. Without separating them, use a long serrated bread knife to slice the entire block in half horizontally, so you have one large bottom “slab” and one large top “slab.” Place the bottom slab snugly in your baking dish.
Step 4: The Layering Party. This is the fun part! Spread the warm, drained beef evenly over the bottom buns. Immediately layer the cheese slices over the hot beef so they start to melt ever so slightly. Now, artfully arrange your pickle chips over the cheese. If you’re using the ketchup and mustard, you can spread a thin layer on the cut side of the top bun slab before placing it on. Then, cap it all off by placing the top bun slab on like a lid.
Step 5: The Golden Butter Shower. Melt your butter and, using a pastry brush, generously paint it all over the top bun surfaces. Get into every nook and cranny! This is what gives you that beautiful color and rich taste. Sprinkle sesame seeds over the top now, if you’re using them.
Step 6: Bake to Gooey, Golden Bliss. Slide your masterpiece into the preheated oven, uncovered, for 10-15 minutes. You’re looking for the cheese to be fully melted (peek inside with a small pull-apart) and the bun tops to be a perfect golden brown.
Step 7: The Grand Finale – Slice and Serve! Take the pan out of the oven (careful, it’s hot!). Let it rest for just 2-3 minutes—this makes slicing cleaner. Then, use a sharp knife to slice along the bun lines, creating your individual sliders. Transfer to a platter, watch them disappear, and accept the compliments!
How to Serve These Party Stars
Presentation is part of the fun! I love piling the warm, sliced sliders high on a big wooden cutting board or a colorful platter. Tuck a few extra pickles and some cherry tomatoes around the edges for a pop of color. Put little bowls of extra ketchup, mustard, and maybe a zesty burger sauce or some spicy mayo on the side for dipping. These are the ultimate finger food, so have plenty of napkins ready! They pair perfectly with a simple green salad, a big bowl of crispy potato chips, or some roasted veggie sticks.
Make Them Your Own: Delicious Twists
The basic recipe is a dream, but the canvas is yours to play with! Here are a few of my favorite riffs:
- BBQ Bacon Cheddar: Mix ¼ cup of BBQ sauce into the cooked beef. Layer with cheddar cheese and sprinkle with ½ cup of cooked, crumbled bacon before adding the top bun.
- Pizza Sliders: Use ground Italian sausage. Layer with pepperoni slices, mozzarella cheese, and a brush of marinara sauce on the buns.
- Turkey & Swiss: Swap the beef for ground turkey and use sliced Swiss cheese. Add a layer of thinly sliced ham or deli turkey for a “Thanksgiving leftover” vibe.
- Breakfast Sliders: Scramble some eggs with the beef (or use just eggs and sausage). Use American cheese and add a drizzle of maple syrup in your butter brush for a sweet-savory kick.
- Veggie Lover’s: Use a plant-based ground “meat” alternative or a mix of sautéed mushrooms and lentils. Provolone cheese and a layer of roasted red peppers are amazing here.
Anna’s Kitchen Notes
This recipe is a living, breathing thing in my kitchen! Over the years, I’ve learned a few things. My family now insists I make a “double decker” version sometimes, where I add a second, thinner layer of buns and beef in the middle—it’s a beast, but a delicious one. I’ve also started adding a tiny sprinkle of everything bagel seasoning to the butter brush instead of sesame seeds for an extra flavor punch. The true evolution, though, has been in my confidence. The first time, I measured everything nervously. Now? I eyeball the cheese, add a glug of Worcestershire to the beef just because, and know that as long as there’s joy in the making, there will be joy in the eating. That’s the real secret ingredient.
Your Slider Questions, Answered!
Q: Can I make these ahead of time?
A: Absolutely! You can assemble the entire pan (up through the butter brush) cover it tightly with foil or plastic wrap, and refrigerate for up to 24 hours. When you’re ready, let the dish sit on the counter for 20-30 minutes while the oven preheats, then bake as directed. You may need to add 3-5 extra minutes since it’s starting from cold.
Q: My bottoms got soggy. What happened?
A: The most common culprit is not draining the beef fat well enough after browning. Make sure to drain it in a colander! Also, assembling with warm (not piping hot) beef helps. Lastly, don’t let the assembled, unbaked sliders sit for too long before going in the oven.
Q: Can I use different cheese?
A: Please do! Pepper jack for spice, gouda for smokiness, provolone for a mild melt—all fantastic. For best results, use pre-sliced cheese from the deli counter or block cheese you slice yourself. Pre-shredded bagged cheese contains anti-caking agents that can make the melt less smooth.
Q: How do I reheat leftovers?
A: Leftovers? I’m impressed! The best way is to wrap them in foil and warm in a 300°F oven for 10-15 minutes, or air fry for 3-4 minutes until crispy. The microwave works in a pinch but can make the buns a bit rubbery.
Nutritional Information*
*This is an approximate estimate per slider, based on the recipe as written and will vary with specific ingredients and substitutions used.
Calories: 280 | Protein: 17g | Carbohydrates: 20g | Fat: 16g | Saturated Fat: 7g | Sodium: 400mg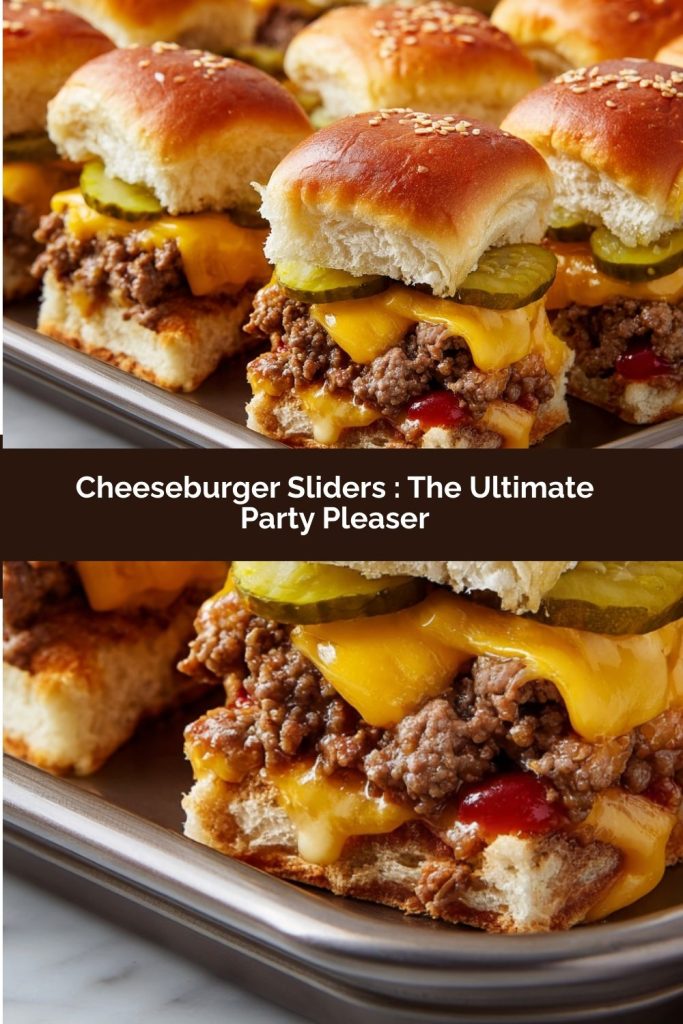
Final Thoughts
This Loaded 7-Layer Dip isn’t just a recipe—it’s a party in a bowl. Quick to assemble, endlessly adaptable, and always a crowd-pleaser, it turns any gathering into a memorable moment. Whether you stick to the classic layers or add your own fun twists, the key is to enjoy the process and share it with the people you love. Keep it in your arsenal for game days, impromptu get-togethers, or even just a Tuesday night that needs a little extra flavor. Trust me—once you try it, it’ll be your go-to dip for years to come. 🥑🧀🌶️