Chicken Cordon Bleu Crunchwrap – Crispy, Cheesy Gourmet Wrap
Hey friend! Anna here. Can I let you in on a little secret? Sometimes, the most magical meals aren’t the ones that take all day or use every pot in your kitchen. Sometimes, magic happens when you take a beloved classic, give it a playful spin, and turn it into something you can hold in your hands. That’s exactly the kind of joyful, no-stress cooking I live for, and it’s what’s on the menu today.
We’re taking a trip down memory lane, but we’re driving a seriously cool convertible. Say hello to the Chicken Cordon Bleu Crunchwrap. Imagine everything you adore about the elegant, old-school dish—the juicy chicken, the salty-sweet ham, the perfectly melty Swiss cheese—all wrapped up in a golden, crispy, handheld package. It’s the comforting soul of a classic dinner, reborn as the most fun, satisfying, and yes, *crunchy* lunch or dinner you’ll make this week.
This isn’t about fussy techniques or hard-to-find ingredients. It’s about creating that “wow” moment with simple steps and a whole lot of flavor. It’s for busy weeknights, for satisfying a serious comfort food craving, or for impressing your friends with your culinary cleverness. So, tie on that apron, clear a spot on your counter, and let’s cook up something crispy, cheesy, and absolutely amazing together.
The Leftover That Started It All
PrintChicken Cordon Bleu Crunchwrap : Crispy, Cheesy Gourmet Wrap
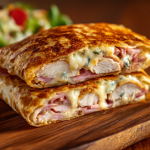
This Chicken Cordon Bleu Crunchwrap combines everything you love about the classic dish—juicy chicken, savory ham, and melty Swiss cheese—wrapped inside a golden, toasted tortilla. Crisp on the outside and creamy on the inside, this handheld version is perfect for lunch, dinner, or an elevated comfort-food craving. Easy to make and packed with flavor, it’s a fun twist that feels both indulgent and simple.
- Prep Time: 10 minutes
- Cook Time: 8 minutes
- Total Time: 18 minutes
- Yield: 4 servings 1x
Ingredients
2 cups cooked chicken breast, diced or shredded
8 slices deli ham, chopped
1 ½ cups shredded Swiss cheese
½ cup shredded mozzarella (optional for extra melt)
½ cup creamy Dijon sauce (see below)
4 large flour tortillas (burrito size)
1 tbsp butter or oil for toasting
½ tsp dried thyme (optional)
Quick Dijon Cream Sauce:
¼ cup mayonnaise
1 tbsp Dijon mustard
1 tsp lemon juice
Pinch black pepper
Instructions
. Make the Sauce (2 minutes)
Whisk together mayonnaise, Dijon mustard, lemon juice, and pepper until smooth.
2. Assemble the Crunchwrap
Lay a tortilla flat. In the center layer:
Chicken → Ham → Swiss cheese → Mozzarella → Spoonful of Dijon sauce → Light sprinkle of thyme.
3. Fold & Seal
Fold edges of tortilla toward the center, pleating to fully enclose the filling.
4. Toast Until Golden (6–8 minutes)
Heat butter or oil in a skillet over medium heat.
Place crunchwrap seam-side down and cook 3–4 minutes per side until golden brown and crispy.
5. Slice & Serve
Rest 1 minute, then slice into triangles and serve warm.
Nutrition
- Calories: 520
- Protein: 38g
This recipe has its roots in one of my favorite kitchen philosophies: the glorious leftover makeover. Years ago, after a big family dinner where I’d made a more traditional baked Chicken Cordon Bleu, I found myself staring at the remnants. A little shredded chicken here, a few slices of ham there, and a lone wedge of Swiss cheese. It was the perfect trifecta, just waiting for a new purpose.
My husband (always my chief taste-tester) was eyeing the tortillas on the counter for taco night part two. A lightbulb went off. What if we folded those delicious flavors *into* a tortilla and gave it a crispy toast? We layered, folded, and sizzled it in a skillet until it was golden and irresistible. That first bite—the crunch giving way to the creamy, savory interior—was a revelation. It was familiar yet entirely new, fancy yet totally approachable. That happy kitchen experiment is now a certified family favorite, and I’m so thrilled to share its evolved, perfected form with you. It’s proof that a little creativity can turn yesterday’s dinner into today’s superstar.
Gathering Your Flavor Party
Here’s your shopping list for four seriously satisfying crunchwraps. I’ve added my little chef notes to help you pick your ingredients and make swaps if needed!
- 2 cups cooked chicken breast, diced or shredded: This is your perfect chance to use up leftover roasted or grilled chicken! A rotisserie chicken from the store is a fabulous, timesaving shortcut. No cooked chicken? No problem. Quickly poach or pan-sear one large breast, then shred it. Chef’s Insight: The shreds hold onto the sauce better than big chunks, creating a creamier filling.
- 8 slices deli ham, chopped: I love a good Black Forest or honey-baked ham here for that touch of sweetness. Feel free to use thicker-cut ham steaks diced up. For a lighter version, turkey ham works beautifully too.
- 1 ½ cups shredded Swiss cheese: The nutty, mild meltiness of Swiss is non-negotiable for true Cordon Bleu vibes. Buy a block and shred it yourself for the best melt (pre-shredded cheese has anti-caking agents that can make it a bit grainy).
- ½ cup shredded mozzarella (optional for extra melt): This is my “insurance policy” for epic cheese pulls. Mozzarella brings incredible stretch and helps bind everything together. It’s optional, but highly recommended for maximum gooeyness.
- 4 large flour tortillas (burrito size): The foundation! Make sure they’re the big 10-inch ones. Let them sit out of the fridge for 10 minutes before using—it makes them more pliable and less likely to crack when you fold.
- 1 tbsp butter or oil for toasting: Butter gives you that gorgeous golden-brown color and rich flavor, but a neutral oil like avocado or olive oil works great too.
- ½ tsp dried thyme (optional): A tiny whisper of herby fragrance that ties everything together. If you have it, use it!
For Your Quick Dijon Cream Sauce:
- ¼ cup mayonnaise: The creamy base. Use your favorite brand—it’s all good.
- 1 tbsp Dijon mustard: This is the flavor spark! It adds tang and depth without being overpowering. Yellow mustard can sub in a pinch, but Dijon is really best here.
- 1 tsp lemon juice: A bright splash to cut through the richness. Fresh is fantastic, but bottled is totally fine.
- Pinch black pepper: Freshly cracked is always a win.
Let’s Build Some Magic: Step-by-Step
Ready to assemble? This is the fun part. I’ll walk you through each step with my best tips to ensure crispy, non-leaky, perfectly golden success.
Step 1: The Two-Minute Flavor Sauce. In a small bowl, whisk together your mayonnaise, Dijon mustard, lemon juice, and black pepper until it’s completely smooth and creamy. Give it a taste—is that good or what? This sauce is the glue and the flavor booster all in one. Chef’s Hack: You can make this ahead and keep it in the fridge for up to 3 days!
Step 2: The Art of Assembly. Lay one of your large tortillas flat on a clean work surface. Think of the center as your flavor stage. Here’s your layering order for maximum structural integrity and even flavor in every bite:
1. Chicken: Scatter about ½ cup in the center.
2. Ham: Add a handful of the chopped ham.
3. Swiss & Mozzarella: Sprinkle a generous mix of both cheeses over the meat.
4. The Sauce: Dollop a heaping tablespoon right on top of the cheese.
5. Thyme: A tiny sprinkle over it all.
Pro Tip: Keep your filling contained within a 5-6 inch circle in the center. This gives you plenty of tortilla real estate for folding!
Step 3: Master the Fold & Seal. This is easier than it looks, I promise! Starting at any point on the tortilla, fold an edge up and over the filling. Move slightly clockwise and fold another section over, pleating it so it overlaps the first fold. Continue all the way around until the filling is completely enclosed and you have a neat, pleated hexagon shape. The weight of the filling and the pleats will hold it together. No toothpicks needed! Chef’s Confidence Boost: If you have a small tear or gap, don’t panic. Just take a tiny piece of spare tortilla, wet it, and patch it over the hole before toasting.
Step 4: The Golden Crisp Toast. Heat a large non-stick or cast-iron skillet over medium heat. Add your butter or oil. Once hot, carefully place your crunchwrap seam-side down first. This is crucial! Cooking it seam-side down first seals the package. Cook for 3-4 minutes, until that side is a beautiful, deep golden brown. Then, using a wide spatula, confidently flip it over. Cook for another 3-4 minutes on the second side until equally golden and crisp. You should hear a gentle sizzle the whole time. Chef’s Note: Don’t be tempted to crank the heat to rush it. Medium heat ensures the inside gets hot and melty while the outside crisps up perfectly without burning.
Step 5: The (Brief) Torture of Resting & The Slice. Transfer your gorgeous, golden crunchwrap to a cutting board. I know it’s hard, but let it rest for just 1 minute. This allows the molten cheese to settle slightly so it doesn’t all rush out when you cut it. Then, using a sharp knife, slice it into triangles—just like you’re cutting a pizza. Reveal that gorgeous, steamy, cheesy interior.
How to Serve Your Masterpiece
Presentation is part of the fun! Place those beautiful triangles on a plate with the points facing out. I love to serve them with a small ramekin of extra Dijon cream sauce or a simple side salad of mixed greens with a tangy vinaigrette to balance the richness. They’re fantastic straight off the cutting board, but a little garnish of fresh chopped parsley or chives makes it feel extra special. These are 100% finger food—no forks required (unless you want one for that salad!).
Get Creative: Your Crunchwrap, Your Rules
Once you’ve mastered the basic fold, the world is your crispy oyster! Here are a few delicious twists:
- “Cordon Bleu-ish” Veggie Style: Swap the chicken for sautéed mushrooms or shredded chickpeas, use a plant-based ham, and your favorite melty vegan cheese.
- Pizza Party: Fill with shredded mozzarella, pepperoni, cooked Italian sausage, and a smear of marinara sauce. Fold, toast, and serve with extra sauce for dipping.
- Thanksgiving Leftover Remix: Use shredded turkey, a spoonful of stuffing, a drizzle of cranberry sauce, and some Swiss or cheddar cheese.
- Breakfast Bonanza: Scrambled eggs, cooked breakfast sausage or bacon, and cheddar cheese. Perfect for brunch!
- Spicy Southwest: Seasoned ground beef or chicken, black beans, corn, pepper jack cheese, and a creamy chipotle sauce.
Anna’s Kitchen Notes & Stories
This recipe has seen a lot of love (and a few hilarious mishaps) in my kitchen. In the early days, I was so eager I’d overstuff them, leading to what we lovingly called “cheese lava flows” in the skillet. Lesson learned: a restrained, even layer is your friend! I’ve also found that letting the assembled crunchwrap sit for just 2-3 minutes before toasting helps the tortilla soften from the sauce, making it even more pliable and less likely to spring open.
The biggest evolution? The sauce. It started as just a squirt of mustard, then became a mustard-mayo mix, and finally landed on this lemon-kissed Dijon cream. It makes all the difference. This recipe is a testament to how home cooking should be: adaptable, forgiving, and always aimed at making you smile with that first crispy, cheesy bite.
Your Questions, Answered!
Q: My tortilla keeps cracking when I fold it. Help!
A: This usually means your tortilla is too cold. Take them out of the fridge at least 10 minutes before using. You can also gently warm them, one at a time, for 10-15 seconds in the microwave draped with a damp paper towel. This makes them super soft and flexible.
Q: Can I make these ahead of time?
A: You can absolutely prep the components ahead! Shred the chicken, chop the ham, make the sauce, and shred the cheese. Store them separately in the fridge. Assemble and cook just before serving for the ultimate crispness. You can also assemble them completely, keep them seam-side down on a plate in the fridge for up to 2 hours, and then toast them when ready.
Q: My cheese is leaking out while cooking. What did I do wrong?
A> A little melt-out is normal, but a major leak usually means 1) the filling was too close to the edges before folding, or 2) the heat was too high, causing the cheese to melt and bubble out before the tortilla sealed. Keep the filling centered and maintain a steady medium heat.
Q: Can I bake or air fry these instead?
A> Yes! For baking: Preheat oven to 400°F (200°C). Place assembled crunchwraps on a parchment-lined baking sheet, seam-side down. Brush lightly with oil or melted butter. Bake for 12-15 minutes, flipping halfway, until golden. For air frying: Spritz with oil and cook at 375°F (190°C) for 8-10 minutes, checking for crispness.
Nutritional Information (Per Serving)
Please note: This is an estimate based on the specific ingredients listed and may vary with substitutions.
Yield: 4 Servings | Prep Time: 10 mins | Cook Time: 8 mins | Total Time: 18 mins
Calories: ~520 | Protein: 38g | Carbohydrates: 32g | Fat: 28g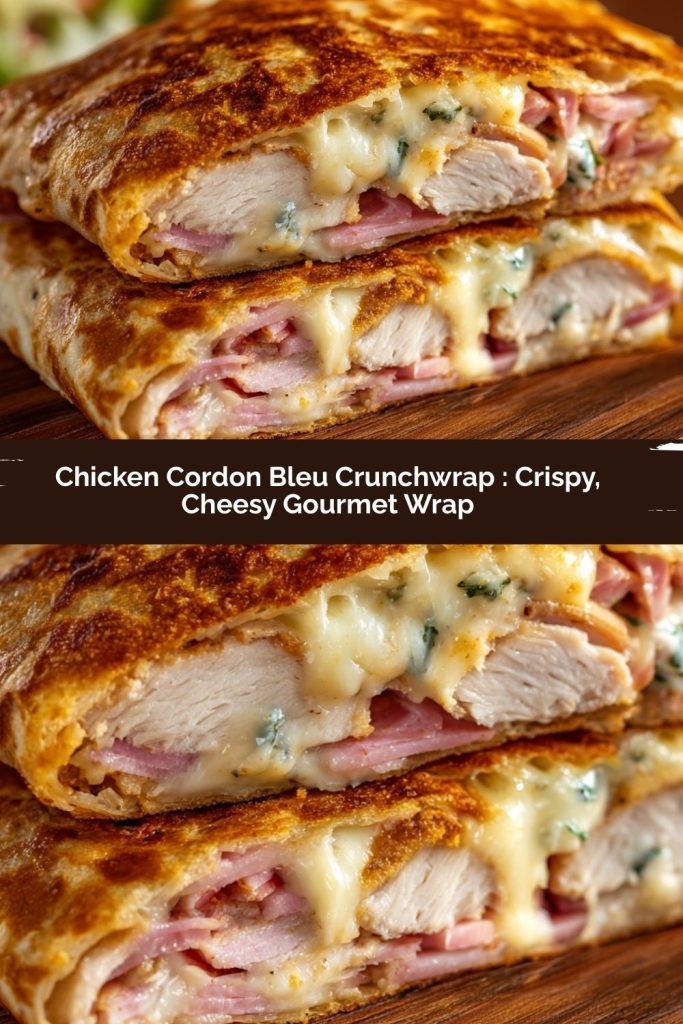
Final Thoughts:
This Chicken Cordon Bleu Crunchwrap is proof that comfort food can be fun, handheld, and ridiculously satisfying. It takes the elegance of a classic dish and transforms it into a crispy, cheesy, flavor-packed meal that’s perfect for busy weeknights, meal prep, or impressing friends and family. With simple ingredients, easy steps, and endless ways to customize, it’s the kind of recipe that makes your kitchen feel a little more joyful and your dinner a lot more memorable. Give it a try—you’ll be folding, flipping, and savoring every bite before you know it!