***
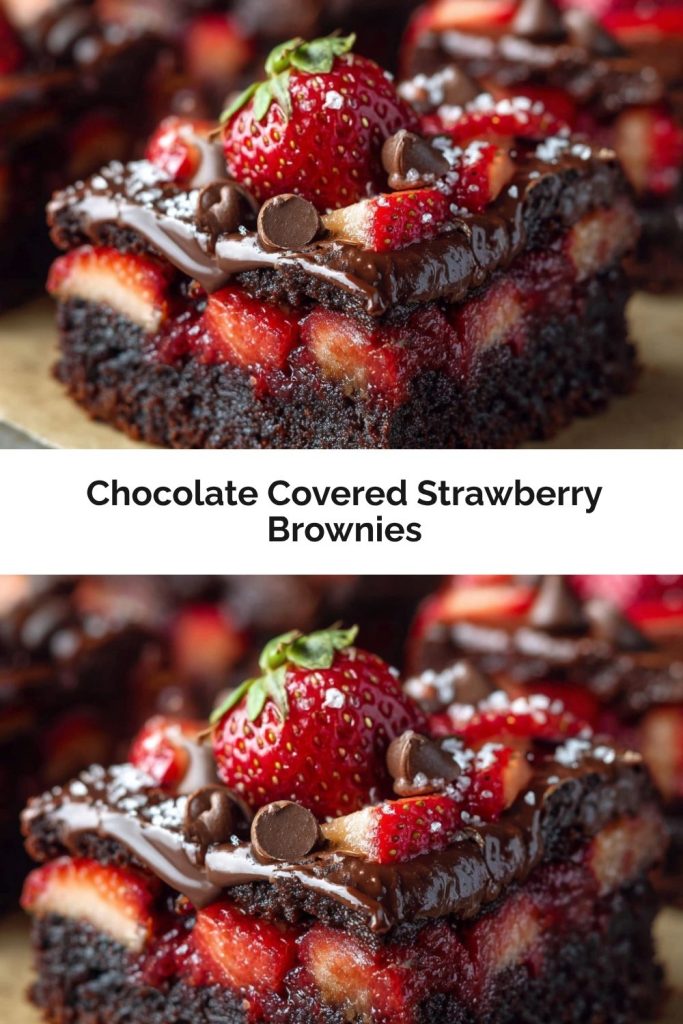
Chocolate Covered Strawberry Brownies: Where Fudgy Brownies Meet Juicy Strawberries
A Dessert Mashup Made in Heaven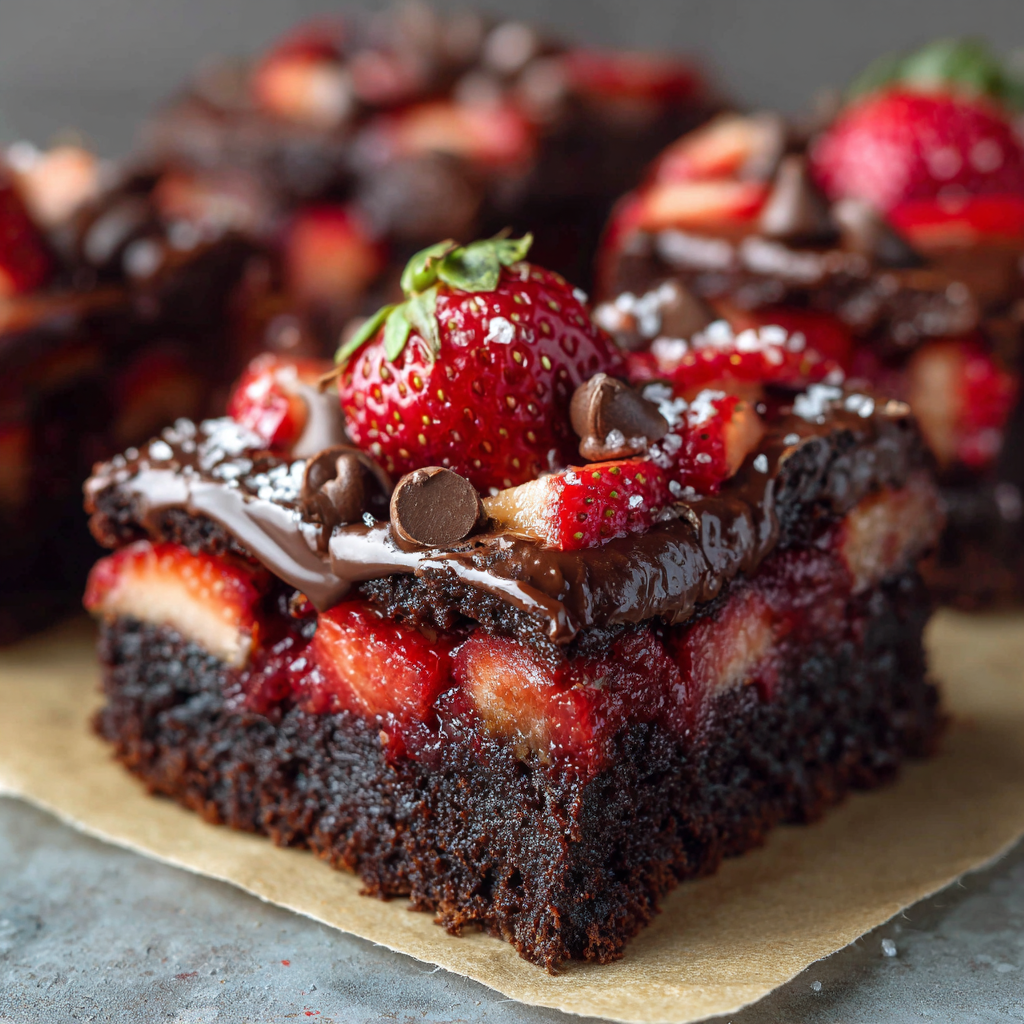
Hey there, friend! Let’s talk about one of life’s greatest, most delicious pairings: the timeless, irresistible duo of chocolate and strawberries. There’s a reason it’s the star of date nights and Valentine’s Day boxes everywhere. That first bite of a juicy, sweet strawberry encased in a snap of rich, dark chocolate? It’s pure, unadulterated joy.
But what if we took that magic and baked it into something even more decadent? What if we created a dessert that combines the fudgy, deeply chocolatey comfort of a perfect brownie with the bright, fruity burst of fresh strawberries, all finished with that signature silky chocolate shell?
My friend, you are in for the treat of a lifetime. These Chocolate Covered Strawberry Brownies are my new obsession, and I have a feeling they’ll be yours, too. They’re the ultimate dessert for when you want to impress without the stress. We’re talking about a one-bowl brownie base (yes, really!), a blanket of fresh berries, and a glossy chocolate topping that turns the whole thing into something truly spectacular. It’s a cozy brownie and an elegant chocolate-covered strawberry, all in one unforgettable bite. So, preheat your oven and let’s make some kitchen magic together!
A Sweet Story: My First Chocolate-Covered Strawberry
PrintChocolate Covered Strawberry Brownies

Indulge in the ultimate dessert mash-up with these Chocolate Covered Strawberry Brownies. Rich, gooey chocolate brownies serve as the decadent base, topped with a layer of sweet strawberries and a silky chocolate shell. It’s the perfect treat for date night, holidays, or anytime you’re craving something sweet and extra special.
- Prep Time: 15 mins
- chill time: 30 mins
- Cook Time: 25 mins
- Total Time: 1 hr 10 mins
- Yield: 9 brownies 1x
Ingredients
For the Brownie Base:
½ cup unsalted butter
1 cup semi-sweet chocolate chips
¾ cup granulated sugar
2 large eggs
1 tsp vanilla extract
½ cup all-purpose flour
¼ tsp salt
For the Topping:
1 cup fresh strawberries, sliced
1 cup dark or semi-sweet chocolate chips
1 tbsp coconut oil or butter (optional, for smoother chocolate)
Instructions
Prep & Bake: Preheat oven to 350°F (175°C). Grease an 8×8-inch pan or line with parchment. Melt butter and 1 cup chocolate chips, stirring until smooth. Whisk in sugar, eggs, and vanilla. Fold in flour and salt. Pour into the pan and bake 20–25 mins until set.
Cool & Top: Let brownies cool completely. Arrange sliced strawberries in a single layer on top.
Melt Chocolate: In a microwave-safe bowl, melt the remaining chocolate chips with coconut oil in 20-second bursts, stirring until glossy.
Pour & Set: Pour melted chocolate over the strawberries to coat. Chill in fridge for at least 30 mins until set.
Slice & Serve: Cut into squares and enjoy the gooey-chocolate, juicy-strawberry magic.
Nutrition
- Calories: 280
- Fat: 17g
- Carbohydrates: 32g
- Protein: 3g
I’ll never forget the first time I truly experienced a chocolate-covered strawberry. I was about seven years old, tagging along with my mom to a fancy holiday party. I was in my frilly dress, trying to be on my best behavior, when I spotted a towering platter of these glistening, red-and-brown gems. They looked like something from a storybook.
I must have been staring, because a kind woman with a warm smile leaned down and said, “Go on, sweetie, take one. They’re meant to be enjoyed.” I carefully picked one up, and with one bite, my little world exploded. The cool, juicy crunch of the berry against the rich, slightly bitter chocolate was a flavor revelation. It felt impossibly luxurious and wonderfully simple all at once. That memory, that feeling of discovering something truly special, is what I try to bake into every batch of these brownies. It’s that same magic, baked into a pan and meant to be shared with someone who needs a little sweet joy in their day.
Gathering Your Ingredients
Part of the beauty of this recipe is its simplicity. We’re using straightforward ingredients to create something extraordinary. Here’s what you’ll need:
For the Fudgy Brownie Base:
- ½ cup unsalted butter: This gives our brownies that rich, melt-in-your-mouth texture. I use unsalted so I can control the salt level. If you only have salted, just skip the added ¼ tsp salt later on.
- 1 cup semi-sweet chocolate chips: The star of the show! Using chocolate chips (instead of bar chocolate) in the batter is a little chef hack—they melt beautifully and help create a wonderfully fudgy crumb.
- ¾ cup granulated sugar: Sweetens the deal without making it overly saccharine. It balances the bitterness of the chocolate perfectly.
- 2 large eggs: Make sure they’re at room temperature! This helps them incorporate smoothly into the batter, creating a lighter texture.
- 1 tsp vanilla extract: The secret weapon that enhances all the other chocolate and strawberry flavors. Don’t skip it!
- ½ cup all-purpose flour: Just enough to give the brownies structure without turning them into cake. We’re going for fudgy, not fluffy!
- ¼ tsp salt: A pinch of salt is non-negotiable in desserts. It makes the chocolate flavor pop and balances the sweetness.
For the Dreamy Topping:
- 1 cup fresh strawberries, sliced: Look for berries that are bright red, fragrant, and firm. We’ll slice them about ¼-inch thick so they nestle perfectly on top of the brownies.
- 1 cup dark or semi-sweet chocolate chips: For the glossy shell on top. I love the deeper flavor of dark chocolate here, but semi-sweet works wonderfully if that’s your preference.
- 1 tbsp coconut oil or butter (optional): This is my pro-tip for a super-shiny, perfectly pourable chocolate shell! The fat helps thin the chocolate just enough, making it easy to spread and giving it that professional-looking snap once set.
Let’s Bake! Your Step-by-Step Guide
Ready to create some magic? Follow these steps, and you’ll have a pan of unforgettable brownies in no time. I’ve packed this section with all my favorite chef hacks to ensure your success!
- Prep & Preheat: Start by preheating your oven to 350°F (175°C). This is crucial for even baking! While it’s warming up, grease an 8×8-inch baking pan or line it with parchment paper, leaving a little overhang on two sides. This “sling” will be your best friend later, making it a breeze to lift the whole slab of brownies out for clean slicing.
- Melt the Butter & Chocolate: In a medium, microwave-safe bowl, combine the ½ cup of butter and 1 cup of chocolate chips. Heat in the microwave in 20-second bursts, stirring vigorously after each one, until the mixture is completely smooth and glossy. Chef’s Tip: Be patient here! Burning chocolate is a real heartbreaker. Short bursts and lots of stirring are the key to a perfectly melted, silky base.
- Whisk in the Wet Ingredients: Let the chocolate mixture cool for a minute or two (we don’t want to scramble the eggs!). Then, whisk in the granulated sugar until it’s fully dissolved. Next, add the eggs one at a time, whisking well after each addition. Finally, whisk in that glorious teaspoon of vanilla extract. You should have a thick, shiny, and beautiful batter at this point.
- Fold in the Dry Ingredients: Now, switch to a spatula. Sprinkle the flour and salt over the chocolate batter. Gently fold them in until just combined and no pockets of dry flour remain. Chef’s Hack: Do NOT overmix! Overworking the flour develops gluten, which can make your brownies tough and cakey. A few streaks of flour are better than a tough brownie.
- Bake to Fudgy Perfection: Pour the batter into your prepared pan and spread it into an even layer. Slide it into your preheated oven and bake for 20-25 minutes. You’ll know they’re done when the top is set and shiny, and the edges are just starting to pull away from the pan. A toothpick inserted into the center should come out with a few moist crumbs attached, but not wet batter. Remember: We’re going for fudgy, so it’s better to slightly underbake than overbake!
- The All-Important Cool Down: This is the hardest part, I know! But you must let the brownies cool completely in the pan on a wire rack. If you top them with strawberries and chocolate while they’re warm, the strawberries will release their juices and make the top soggy, and the chocolate will melt into a mess. I promise, the wait is worth it!
- Arrange the Strawberries: Once the brownies are completely cool, arrange your sliced strawberries in a single, beautiful layer on top. You can get creative here—neat rows, a rustic scatter, whatever makes your heart happy!
- Create the Chocolate Shell: In another microwave-safe bowl, combine the remaining 1 cup of chocolate chips with the tablespoon of coconut oil (or butter). Melt it using the same 20-second burst method, stirring until it’s perfectly smooth and liquid.
- Pour, Spread, and Chill: Slowly pour the melted chocolate over the strawberry-topped brownies. Use an offset spatula or the back of a spoon to gently spread it into an even layer, making sure to cover all the berries. Now, carefully transfer the pan to the refrigerator and let it chill for at least 30 minutes, or until the chocolate topping is firm to the touch.
- Slice and Savor the Magic: Use the parchment paper sling to lift the brownies out of the pan onto a cutting board. Use a sharp knife to slice them into squares. For the cleanest cuts, wipe the knife clean between each slice. Then, all that’s left to do is grab a square, take a bite, and enjoy the incredible combo of fudgy brownie, juicy strawberry, and crisp chocolate shell!
How to Serve These Show-Stopping Brownies
These brownies are a star all on their own, but a little presentation flair never hurts! For a truly elegant touch, place each brownie on a small plate and dust with a light snowfall of powdered sugar. A tiny dollop of freshly whipped cream or a scoop of vanilla bean ice cream on the side takes it to a whole new level of decadence. They’re perfect for a romantic date night at home, a fancy potluck contribution, or just as a special “you did a great job today” treat for yourself with a hot cup of coffee.
Get Creative! Fun Recipe Variations
I love this recipe as-is, but the kitchen is your playground! Here are a few fun twists to make it your own:
- White Chocolate Dream: Swap the dark chocolate topping for white chocolate. The creamy sweetness pairs beautifully with the tart strawberries.
- Nutty Crunch: Sprinkle a handful of chopped pecans, walnuts, or even toasted almonds over the strawberries before you pour on the chocolate topping for a wonderful textural contrast.
- Orange Zest Zing: Add a teaspoon of fresh orange zest to the brownie batter. Chocolate, strawberry, and orange is a classic, sophisticated flavor trio.
- Gluten-Free Friendly: Easily make these gluten-free by using a 1:1 gluten-free all-purpose flour blend in place of the regular flour.
- Raspberry Rendezvous: Swap the strawberries for fresh raspberries for a slightly more tart and equally delicious berry experience.
Anna’s Chef’s Notes & Kitchen Stories
This recipe has become a staple in my house, especially around Valentine’s Day. But I’ll let you in on a little secret: the first time I tested it, I was so impatient that I poured the chocolate on the warm brownies. It was a delicious, melty, messy puddle! A happy accident, for sure, but it taught me the invaluable lesson of patience in baking. Now, I use the cooling time to clean up the kitchen, so there’s no waiting at all!
Over time, I’ve found that letting the brownies chill in the fridge for a full hour makes them even fudgier and gives the chocolate shell the most satisfying snap. I also love using a mix of berry sizes for the top—some larger slices and some smaller ones—for a more rustic, artisanal look. Remember, cooking is an adventure, and sometimes the little “imperfections” are what make your creation uniquely beautiful.
Your Questions, Answered!
I’ve gotten a few questions about this recipe over time, so I’ve gathered the most common ones here to help you out!
Q: My chocolate topping is seizing up or looks grainy. What happened?
A: Ah, the dreaded seized chocolate! This usually happens if a tiny drop of water or steam gets into the melting chocolate. Make sure all your bowls and utensils are completely dry. If it happens, don’t panic! Try stirring in a tiny bit more coconut oil or vegetable oil (about ½ tsp at a time) to help bring it back to a smooth consistency.
Q: Can I use frozen strawberries?
A: I don’t recommend it for the topping. Frozen strawberries release too much water as they thaw, which will make your beautiful chocolate shell wet and sticky, and can sog up the brownies. Stick with fresh, firm berries for the best results.
Q: How should I store these brownies, and how long will they last?
A> Because of the fresh fruit, these are best stored in a single layer in an airtight container in the refrigerator. They’ll be at their absolute best for about 2-3 days. The brownie base will stay fudgy, and the chocolate shell will remain firm.
Q: My brownies turned out cakey, not fudgy. What did I do wrong?
A> This is almost always due to one of two things: overmixing the batter after adding the flour, or overbaking. Remember, fold the flour in *just* until it disappears, and take the brownies out of the oven when a toothpick still has a few moist crumbs clinging to it. They continue to cook a bit as they cool!
Nutritional Information*
*This is an approximate estimate calculated using an online tool and will vary based on your specific ingredients.
Per Serving (1 brownie): Calories: ~280 | Protein: 3g | Carbohydrates: 32g | Fat: 17g
Final Thoughts
These Chocolate Covered Strawberry Brownies are everything we love about dessert — rich, fudgy, fruity, and just a little bit romantic. They bring together the nostalgia of homemade brownies and the elegance of chocolate-dipped strawberries in one unforgettable bite. Perfect for Valentine’s Day, anniversaries, or simply a cozy night in, they strike that magical balance between indulgence and comfort.
So go ahead — pour yourself a cup of coffee (or a glass of wine), grab a fork, and enjoy the sweet, messy, chocolate-streaked joy that comes from baking something made straight from the heart. Because at the end of the day, love — like chocolate — is always better when it’s shared. ❤️