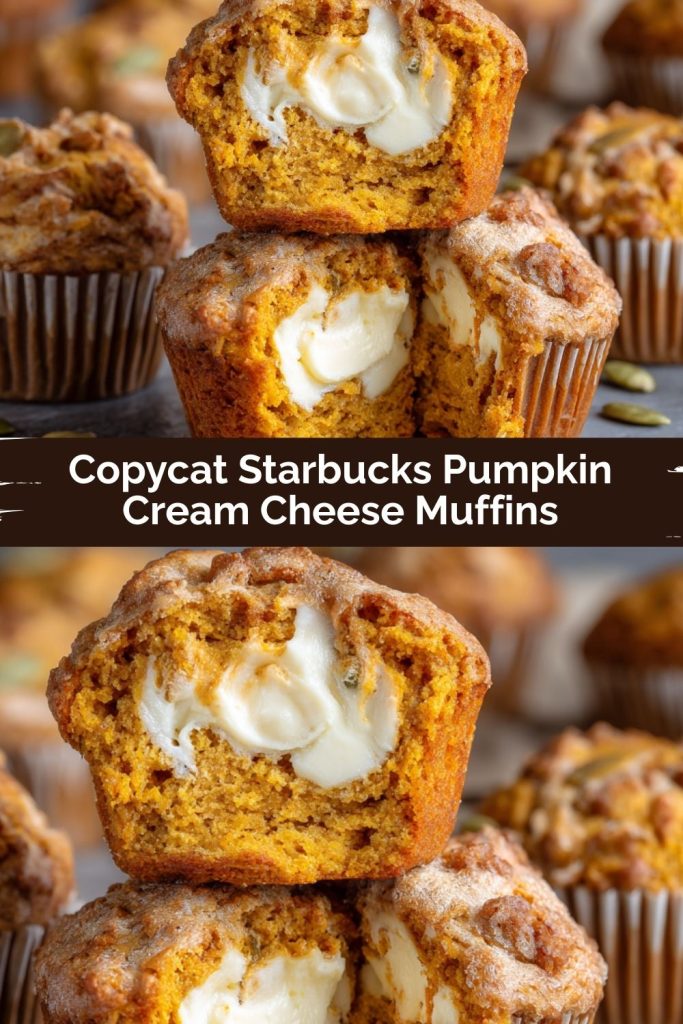
Your New Favorite Autumn Ritual: Homemade Starbucks Pumpkin Cream Cheese Muffins
Hello, my friend! Can you smell it? That crisp, slightly smoky scent in the air? The one that makes you want to pull on your coziest sweater and immediately find something warm to sip on? For me, that smell is intrinsically linked to one of life’s great simple pleasures: the first pumpkin spice treat of the season. And oh, what a treat the Starbucks Pumpkin Cream Cheese Muffin is! That impossibly moist, warmly spiced pumpkin bread wrapped around a surprise pocket of tangy, sweet cream cheese… it’s pure bakery magic.
But let’s be real for a second. As much as I adore that muffin, I don’t always adore the line, the price, or the fact that they’re only available for a limited time. What if I told you that you could create something even better right in your own kitchen? Something that fills your home with the most incredible aroma and lets you enjoy that first warm, crumbly bite without even changing out of your pajamas? That’s the joy we’re creating today.
This copycat recipe is my absolute love letter to autumn baking. We’re going to recreate that iconic muffin, but I’m sharing all my little chef secrets to make it even more moist, more flavorful, and more satisfying than the original. This isn’t just a recipe; it’s an invitation to slow down, to savor the season, and to fill your kitchen with the kind of joy that only comes from pulling a tray of perfect, bakery-style muffins out of your own oven. So, are you ready? Let’s turn this ordinary day into a delicious one, together.
A Muffin, A Memory, and My Mom
PrintCopycat Starbucks Pumpkin Cream Cheese Muffins
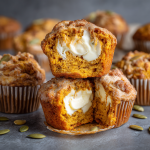
Moist pumpkin muffins filled with a creamy cheesecake center—just like the seasonal favorite, now made at home. Perfectly spiced and bakery-worthy, minus the coffee shop line.
- Total Time: 30 min total
- Yield: 12 1x
Ingredients
Muffins
1½ cups all-purpose flour
¾ cup sugar
1 tsp pumpkin pie spice
1 tsp baking powder
1 tsp baking soda
½ tsp salt
1½ cups pumpkin purée
¼ cup melted butter
1 egg
1 tsp vanilla extract
Cream Cheese Filling
4 oz cream cheese, softened
2 tbsp sugar
1 tsp flour
1 tsp milk
½ tsp vanilla extract
Optional Topping
Pumpkin seeds or coarse sugar
Instructions
Preheat oven to 350°F. Line or grease a 12-cup muffin tin.
Mix flour, sugar, spice, baking powder, baking soda, and salt. In another bowl, whisk pumpkin, butter, egg, and vanilla. Combine wet and dry.
Beat cream cheese, sugar, flour, milk, and vanilla until smooth.
Fill muffin cups ¾ full with batter. Pipe 1 tbsp cream cheese into the center of each.
Top with pumpkin seeds or sugar if desired.
Bake 15–20 min, until a toothpick (avoiding filling) comes out clean. Cool before serving.
Nutrition
- Calories: 360
- Sugar: 30g
- Carbohydrates: 42g
- Protein: 6g
This recipe always takes me right back to my first apartment after college. It was a tiny, charming place with a kitchen just big enough for one person to (carefully) spin around in. That fall, my mom came to visit for the first time. We’d spent the morning exploring a local farmer’s market, our arms loaded with squashes, apples, and a few perfect sugar pumpkins. The mission: recreate the Starbucks muffin we’d always split on our shopping trips when I was a teenager.
We crowded into that little kitchen, elbow-to-elbow, laughing as pumpkin puree somehow ended up on the ceiling. We didn’t have a proper piping bag, so we used a ziplock bag with the corner snipped off for the cream cheese filling, which of course burst spectacularly on the third muffin. We were a mess. The kitchen was a mess. But the smell… oh, the smell was heavenly. When we finally pulled those lopsided, overflowing muffins out of the oven, we didn’t even wait for them to cool. We burned our tongues on the molten cream cheese center, and it was absolutely worth it. It wasn’t just about copying a coffee shop treat; it was about creating a new tradition. That’s the magic of baking, isn’t it? It’s not just the food—it’s the story you bake right into it.
Gathering Your Pumpkin Spice Toolkit
Here’s everything you’ll need to make a dozen of these glorious muffins. I’ve included some of my favorite insights and substitutions to make this recipe work for you!
For the Muffins:
- 1½ cups all-purpose flour: The trusty foundation of our muffin. For a slightly denser, whole-grain vibe, you can swap out up to ½ cup for whole wheat flour.
- ¾ cup sugar: This gives us the perfect level of sweetness. I use regular granulated sugar, but light brown sugar would add a wonderful, deep molasses note that pairs beautifully with pumpkin.
- 1 tsp pumpkin pie spice: The heart and soul of the flavor! No store-bought blend? No problem! Make your own by whisking together 1½ tsp cinnamon, ¾ tsp ginger, ¼ tsp nutmeg, and ¼ tsp allspice or cloves.
- 1 tsp baking powder & ½ tsp baking soda: Our dynamic leavening duo. The baking powder gives initial rise, and the baking soda reacts with the acidic pumpkin to keep the muffins incredibly tender and light. Make sure they’re fresh for the best lift!
- ½ tsp salt: Crucial for balancing all the sweetness and making the spices pop. Don’t skip it!
- 1½ cups pumpkin purée: Not pumpkin pie filling! We want plain, unseasoned pumpkin purée. This is what gives the muffins their incredible moisture and gorgeous color.
- ¼ cup melted butter, slightly cooled: Adds rich flavor and a tender crumb. For a dairy-free version, an equal amount of melted coconut oil works beautifully.
- 1 large egg: Binds everything together. Let it come to room temperature for easier mixing and a smoother batter.
- 1 tsp vanilla extract: The flavor enhancer that makes everything taste more… well, everything! It rounds out the spices perfectly.
For the Cream Cheese Filling:
- 4 oz (½ block) cream cheese, softened: This is non-negotiable—it MUST be softened to room temperature. If it’s cold, you’ll end up with lumpy filling. Full-fat is best for flavor and creaminess, but reduced-fat will work in a pinch.
- 2 tbsp sugar: Just enough to sweeten the tangy cream cheese.
- 1 tsp flour: My little secret weapon! This helps stabilize the filling, preventing it from melting completely into the batter and disappearing during baking. We want a defined, creamy center.
- 1 tsp milk: A tiny splash to loosen the mixture just enough for piping. Any kind you have on hand is fine.
- ½ tsp vanilla extract: Echoing the vanilla in the muffin batter for a harmonious bite.
Optional Topping:
- Pumpkin seeds (pepitas) or coarse sugar: Pumpkin seeds add a lovely crunch and a professional, bakery-style finish. Coarse sugar (like turbinado or sanding sugar) gives a delightful sweet crunch and sparkle.
Let’s Bake Some Magic: Step-by-Step
Follow these steps, and you’ll be a pumpkin muffin pro in no time. I’m walking you through every detail!
Step 1: Preheat and Prep. First things first, get that oven preheating to 350°F (175°C). This is key for an even bake from the moment the muffins go in. Now, grab your standard 12-cup muffin tin. I’m a huge fan of lining it with parchment paper liners—they peel away perfectly without taking half the muffin with them. If you’re using a non-stick pan, a light spray of cooking oil will also do the trick.
Step 2: Whisk the Dry Team. In a medium-sized bowl, grab your whisk and combine the all-purpose flour, sugar, pumpkin pie spice, baking powder, baking soda, and salt. Whisk it all together until it’s one uniform, fragrant mixture. This isn’t just mixing; you’re aerating the flour and ensuring the leaveners and spices are evenly distributed, which means every single bite will be perfect. Set this bowl aside.
Step 3: Unite the Wet Team. In a larger bowl, add your pumpkin purée, slightly cooled melted butter, the room-temperature egg, and that teaspoon of vanilla extract. Whisk it all together until it’s completely smooth and beautifully orange. You shouldn’t see any streaks of egg or butter. Pro Chef Tip: If your butter is too hot, it could start to cook the egg, so letting it cool for a few minutes is a simple but important step.
Step 4: The Big Merge. Here’s where we need a gentle touch. Pour your bowl of dry ingredients into the wet ingredients. Now, put that whisk away! Grab a spatula and gently fold the dry into the wet. Mix just until the last streaks of flour disappear. A few lumps are totally fine—I promise! Overmixing is the enemy of a tender muffin because it develops gluten, leading to a tough, dense texture. We want light and fluffy!
Step 5: Create the Cream Cheese Cloud. In a small bowl, beat your softened cream cheese with a hand mixer (or a vigorous whisk) until it’s smooth. Add the sugar, flour, milk, and vanilla. Beat it again until everything is combined into a luscious, lump-free, pipeable filling. Chef Hack: Scoop this into a small ziplock bag and snip a ½-inch corner off. You’ve just made a DIY piping bag! This makes the next step so much easier and cleaner.
Step 6: The Fill & Swirl. Divide your muffin batter evenly among the 12 prepared cups, filling each one about ¾ of the way full. Now, take your bag of cream cheese filling and pipe a generous tablespoon right into the center of each muffin blob. Try to push the tip down into the batter a little so the filling sinks in. If you’re using pumpkin seeds or coarse sugar, now’s the time to sprinkle it on top!
Step 7: Bake to Perfection. Slide your masterpiece into the preheated oven and bake for 18-22 minutes. You’re looking for the tops of the muffins to be set and spring back lightly when touched. The real test? Insert a toothpick into the muffin part (avoiding the cream cheese center). It should come out with just a moist crumb or two, but not wet batter. Remember, the cream cheese will stay soft, so don’t bake until the toothpick is clean if it goes through that center!
Step 8: The (Hardest Part) Cool Down. Once they’re out of the oven, let the muffins cool in the pan for 5 minutes. This allows them to set up enough to be handled. Then, transfer them to a wire rack to cool completely. I know, I know… the temptation to eat one immediately is powerful. But that cream cheese filling is like molten lava! Letting them cool ensures you get that perfect creamy texture instead of a burnt tongue.
How to Serve Your Masterpiece
These muffins are honestly sublime all on their own, still slightly warm from the oven. For the ultimate cozy morning experience, pair one with a hot cup of coffee or a creamy latte—it’s a match made in heaven! They also make a stunning addition to a brunch spread. Place them on a beautiful cake stand or a rustic wooden board to let them shine. If you’re feeling extra, a light dusting of powdered sugar right before serving adds a lovely snowy effect that just whispers “holidays are coming.” However you serve them, get ready for compliments!
Make It Your Own: Delicious Variations
Love to play with your food? Me too! Here are a few fun ways to mix it up:
- Chocolate Chip Pumpkin: Fold ¾ cup of semi-sweet or dark chocolate chips into the muffin batter before portioning. Chocolate and pumpkin are a dream team.
- Streusel Topping Twist: Skip the cream cheese filling for a simpler, crunchy-top muffin. Make a quick streusel by mixing ¼ cup flour, ¼ cup brown sugar, 2 tbsp cold cubed butter, and a pinch of spice with a fork until crumbly. Sprinkle over the batter before baking.
- Gluten-Free Friendly: Substitute the all-purpose flour with a 1:1 gluten-free baking blend. The recipe works like a charm!
- Extra Spice: For true spice lovers, add an extra ½ teaspoon of pumpkin pie spice to the batter and a pinch of cinnamon to the cream cheese filling.
- Maple Kissed: Replace the granulated sugar in the muffin batter with pure maple syrup. You’ll need to reduce another liquid slightly (maybe the pumpkin by a tbsp or two) as syrup adds more moisture.
From My Kitchen to Yours: Chef’s Notes
This recipe has been through many iterations in my kitchen! The first time I made them, I simply plopped the cream cheese filling on top with a spoon. They were delicious, but the filling mostly melted on the surface. Adding that single teaspoon of flour to the filling was a total game-changer—it helps it hold its shape and stay as a beautiful, creamy pocket right in the middle.
Another lesson learned the hard way: always use room-temperature cream cheese. I’ve been impatient more than once and tried to soften it in the microwave. This almost always leads to a few melted, oily bits that won’t incorporate smoothly, leaving you with a slightly grainy filling. Patience is a virtue, especially in baking! Now, I leave the cream cheese on the counter when I start preheating the oven, and it’s always perfectly soft by the time I need it.
Your Questions, Answered!
Q: Can I make these muffins ahead of time?
A: Absolutely! These muffins are fantastic for make-ahead breakfasts or snacks. Once completely cooled, store them in an airtight container in the refrigerator for up to 5 days. The cream cheese filling means they need to be refrigerated. You can enjoy them cold, or let them come to room temperature for an hour. For a warm muffin, pop one in the microwave for 15-20 seconds.
Q: My cream cheese filling sank to the bottom / melted everywhere! What did I do wrong?
A: The two most common culprits are: 1) The cream cheese wasn’t thick enough. This is why we add that tsp of flour—it acts as a stabilizer. Make sure you’re using it! 2) The filling was placed on top of the batter instead of being piped down into the center. You really want to inject it into the middle of the muffin batter so the batter can cradle it and hold it in place as it bakes.
Q: Can I freeze these pumpkin cream cheese muffins?
A: You can, with one caveat. The texture of the cream cheese filling can become a little grainy after thawing. They’ll still taste great, but the texture might not be as perfectly creamy. For best results, freeze the muffins without the filling. You can thaw them and then inject the filling (which doesn’t need to be baked) just before serving. Alternatively, freeze the baked and filled muffins in a single layer on a baking sheet before transferring to a freezer bag. Thaw in the fridge overnight.
Q: My muffins are dense. How can I make them lighter?
A: This almost always points to overmixing! Remember, when combining the wet and dry ingredients, fold gently until *just* combined. A few lumps are your friend. Also, ensure your baking soda and powder are fresh, as old leaveners won’t provide enough lift.
Nutritional Information
Please note: This is an estimate per muffin and will vary based on specific ingredients used.
- Calories: ~360
- Carbohydrates: ~42g
- Sugar: ~30g
- Protein: ~6g
Final Thoughts
These homemade Pumpkin Cream Cheese Muffins are more than just a Starbucks copycat—they’re a slice of autumn comfort you can bake anytime, anywhere. The spiced pumpkin crumb, the creamy surprise center, the cozy aroma that fills your kitchen… it all adds up to a muffin that’s just as much about the moment as it is about the flavor.
Bake them for a slow Saturday morning, share them at brunch with friends, or tuck one into your afternoon coffee break—you’ll have a little piece of fall with you no matter where you are. And the best part? You don’t need a café line or a seasonal menu to enjoy them. Just your oven, a few simple ingredients, and a love of cozy baking.