***
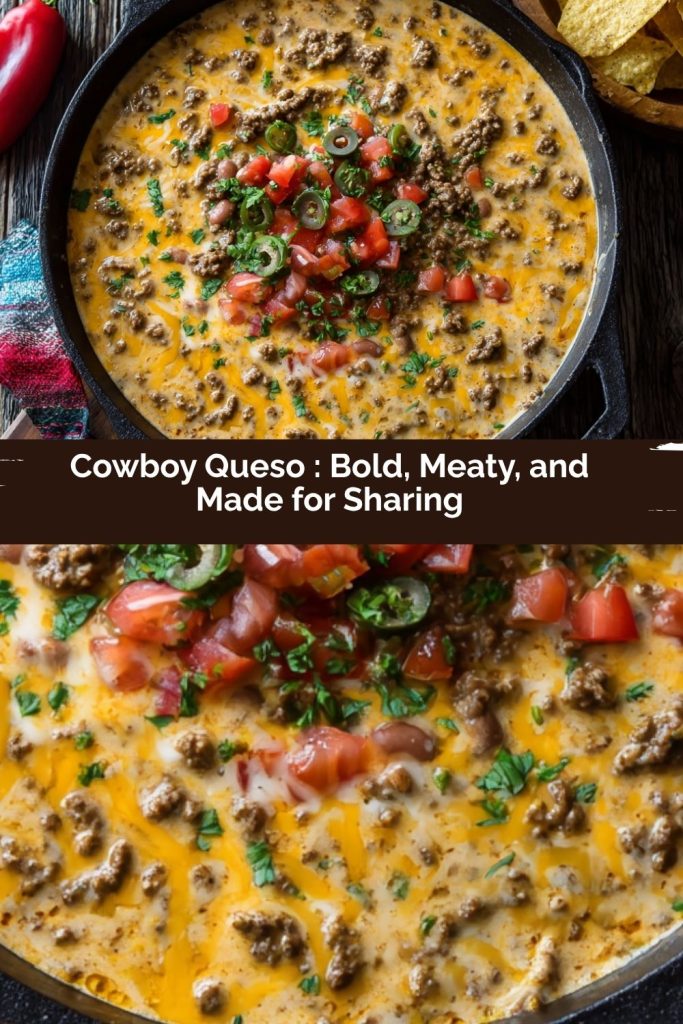
Cowboy Queso Dip – Loaded Cheesy Beef Queso with Beans and Jalapeño
Welcome to the Ultimate Party Dip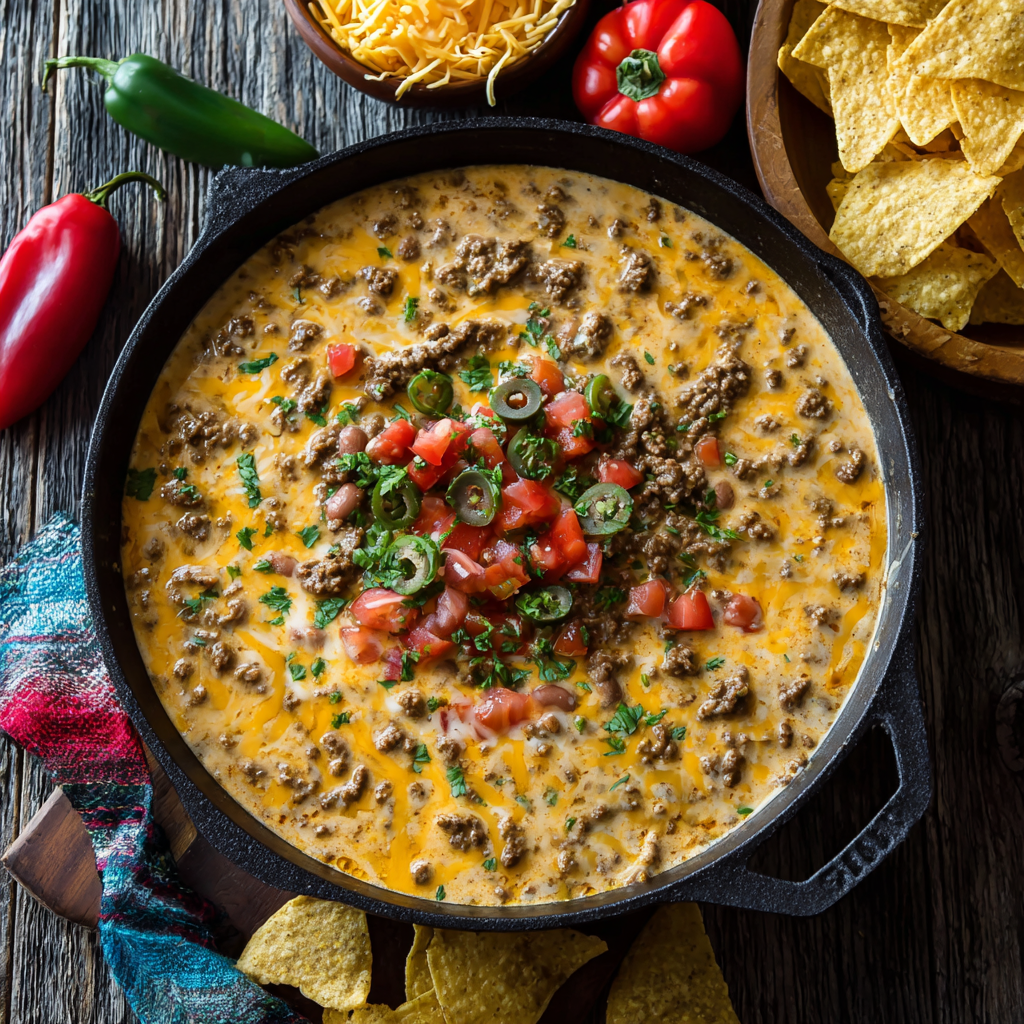
Hey there, friend! Let’s talk about a situation we’ve all faced: you’re hosting a gathering, the game is about to start, or you just need a seriously satisfying snack, and you want to serve something that makes everyone’s eyes light up. You want something warm, welcoming, and downright irresistible. Well, pull up a chair and get ready, because this Cowboy Queso is about to become your new secret weapon.
This isn’t just any queso. This is a hearty, meaty, gloriously cheesy dip that eats like a meal. We’re talking savory ground beef, two kinds of gooey cheese, flavorful beans, and just the right kick of jalapeño, all simmered together into one epic, shareable skillet of joy. It’s the kind of food that brings people together, the kind that has everyone hovering around the coffee table, tortilla chips in hand, laughing and diving in for just one more scoop.
I’m a firm believer that the best recipes are the ones that feel like a warm hug, and this Cowboy Queso is exactly that. It’s unpretentious, incredibly easy to make, and delivers a flavor punch that’s anything but ordinary. So, grab your favorite skillet and let’s turn an ordinary night into a fiesta. Trust me, your crew will thank you for it.
The Story Behind the Skillet
PrintCowboy Queso : Bold, Meaty, and Made for Sharing

This Cowboy Queso is everything a hearty dip should be—melty, meaty, and just the right amount of spicy. It brings together ground beef, melty cheeses, beans, and tomatoes for a loaded queso that’s more like a meal. Perfect for tailgates, backyard hangs, or just a bold snack night at home. And for a fun twist? We finish it off with pepper jack, a splash of beer (or broth), and the option of black olives if you’re feeling nostalgic.
- Prep Time: 10 minutes
- Cook Time: 20 minutes
- Total Time: 30 minutes
- Yield: 8 1x
Ingredients
Cowboy Queso Dip – Loaded Cheesy Beef Queso with Beans and Jalapeño
Ingredients (Serves 8)
1 lb ground beef
1/2 tsp salt
1/4 tsp freshly ground black pepper
1 small jalapeño, diced (remove seeds for less heat)
1 small red onion, diced
6 oz beer (or substitute with chicken or beef broth)
1 lb processed cheese (like Velveeta), cubed
3/4 cup shredded pepper jack cheese
1 (15 oz) can seasoned black beans, drained
1 (10 oz) can diced tomatoes with green chiles (like RO*TEL), undrained
1 (2.25 oz) can sliced black olives, drained (optional)
1/2 cup chopped fresh cilantro (for garnish)
Optional Twist Ideas:
Add 1/2 tsp smoked paprika for a smoky kick
Stir in 1/4 cup crispy bacon bits for added richness
Swap pepper jack for smoked gouda for a deep, creamy flavor
Instructions
In a large skillet, brown the ground beef over medium heat. Season with salt and pepper.
Add diced jalapeño and red onion. Cook until softened, about 3–4 minutes.
Stir in beer (or broth), scraping up any bits from the pan. Simmer 2 minutes.
Lower heat and add processed cheese cubes. Stir until melted and smooth.
Mix in pepper jack cheese, black beans, diced tomatoes with green chiles, and black olives (if using).
Cook for 5–7 more minutes, stirring occasionally, until thick and bubbly.
Garnish with chopped cilantro and serve warm in mini cast iron skillets or a big bowl.
Nutrition
- Calories: 360
- Fat: 24g
- Carbohydrates: 12g
- Protein: 18g
This recipe always takes me right back to my first big tailgate party years ago. I was new to the neighborhood and desperately wanted to impress my new friends, a rowdy, fun-loving bunch who took their football and their food very seriously. I was nervous! I needed a dish that could travel well, feed a crowd, and stand up to the chilly autumn air.
I remember cobbling this queso together from what I had in my pantry and fridge, crossing my fingers that it would be a hit. I transported it in my trusty old cast iron, wrapped in a towel, and the moment I lifted the lid, something magical happened. A small crowd gathered. The rich, meaty aroma of the beef and melted cheese cut through the crisp air. What started as a nervous offering turned into the centerpiece of the party. I spent the afternoon not as the new girl, but as the “queso queen,” sharing stories and laughs with a circle of new friends, all connected by this delicious, communal dip. It was the day I truly learned that great food is the quickest path to friendship.
Gathering Your Queso Crew: The Ingredients
Here’s your shopping list for this flavor fiesta! Don’t be shy about making swaps—cooking is all about making a recipe your own.
- 1 lb ground beef: This is our hearty base. I like an 80/20 blend for the best flavor, but leaner works too! For a twist, you could use ground sausage or even ground turkey.
- 1/2 tsp salt & 1/4 tsp black pepper: The essential seasonings that make all the other ingredients pop. We’ll build more flavor from here!
- 1 small jalapeño, diced: Our star of the heat department! Chef’s Insight: Remember, the seeds and white ribs hold most of the heat. For a milder kick, scrape them out before dicing. For more fire, leave ’em in!
- 1 small red onion, diced: It adds a sharp, slightly sweet crunch that balances the richness of the cheese perfectly.
- 6 oz beer (or broth): This is our secret weapon for deglazing the pan and adding incredible depth. The beer adds a malty, slightly bitter note that cuts the cheese, but chicken or beef broth works wonderfully if you prefer not to cook with alcohol.
- 1 lb processed cheese (like Velveeta), cubed: Before you turn up your nose, hear me out! This is the key to that perfectly smooth, melt-every-time queso texture that never gets grainy. It’s the ultimate queso stabilizer.
- 3/4 cup shredded pepper jack cheese: This brings the *real* cheese flavor and a lovely, peppery kick. It melds into the Velveeta base for the ultimate cheesy experience.
- 1 (15 oz) can seasoned black beans, drained: They add protein, fiber, and a wonderful earthy heartiness. Using pre-seasoned beans gives you an extra flavor boost!
- 1 (10 oz) can diced tomatoes with green chiles (like RO*TEL), undrained: The classic! The tomatoes bring a little acidity, and the green chiles add another layer of mild heat. Don’t drain them—the liquid helps create the perfect saucy consistency.
- 1 (2.25 oz) can sliced black olives, drained (optional): I know, I know, olives can be divisive! But if you’re on Team Olive, they add a fantastic briny, salty note that’s strangely nostalgic. Give them a try!
- 1/2 cup chopped fresh cilantro (for garnish): A non-negotiable fresh finish! It adds a burst of color and a bright, herbal note that lifts the entire dish.
Let’s Get Cooking: Your Step-by-Step Guide
Ready to create some magic? This comes together in under 30 minutes, but I’ll walk you through every step to ensure queso perfection.
- Brown the Beef: Grab a large skillet (I adore my cast iron for this) and place it over medium heat. Add your ground beef, breaking it up with a wooden spoon as it cooks. Season it with that salt and pepper right in the pan. Chef’s Hack: Don’t rush this step! Getting a little bit of a sear on the beef adds tons of flavor. Cook until it’s nicely browned and no pink remains, which should take about 5-7 minutes.
- Sauté the Aromatics: Now, toss in your diced red onion and jalapeño. This is where the amazing smells really start to fill your kitchen! We’re cooking them until they’ve softened just a bit and become fragrant, about 3-4 minutes. You’ll know they’re ready when the onion turns translucent.
- Deglaze with Beer (or Broth): Here’s a pro move: pour in your beer or broth. As you stir, use your spoon to scrape up all those delicious browned bits from the bottom of the skillet. Those little bits are pure flavor gold! Let it simmer for about 2 minutes. This allows the alcohol to cook off (if using beer) and the liquid to reduce slightly, concentrating all that good taste.
- Get Cheesy!: Reduce the heat to low. Now, add all those cubes of processed cheese. Chef’s Tip: Stir almost constantly at this stage. We want the cheese to melt slowly and evenly into a smooth, luscious sauce. If the heat is too high, the cheese can separate or burn, and we don’t want that! Patience is your friend here.
- Load It Up: Once your cheese base is silky smooth, it’s time for the grand additions! Stir in the shredded pepper jack, the drained black beans, the entire can of tomatoes and green chiles (juice and all!), and those optional black olives if you’re using them.
- The Final Simmer: Let everything mingle and get to know each other! Cook for another 5-7 minutes, stirring occasionally, until the entire mixture is heated through, bubbly, and wonderfully thick. You should see lazy bubbles rising to the surface—that’s your cue that it’s ready for its grand debut.
- Garnish and Serve: Take the skillet off the heat. Right before serving, shower the top with that vibrant, fresh chopped cilantro. It makes all the difference, I promise!
How to Serve Your Masterpiece
Presentation is part of the fun! I love serving this queso right in the cast iron skillet I cooked it in—it keeps it warm for ages and looks so rustic and inviting. Place the skillet on a trivet in the middle of the table with a big bowl of sturdy tortilla chips for scooping. For a full-on “Texas Tuesday” spread, surround it with bowls of sour cream, sliced avocado, extra jalapeños, and maybe a fresh pico de gallo. Don’t forget the napkins—this is gloriously messy food!
Make It Your Own: Delicious Twists & Swaps
This recipe is a fantastic canvas for your creativity! Here are a few of my favorite ways to mix it up:
- Smoky Sensation: Stir in 1/2 teaspoon of smoked paprika with the salt and pepper. It adds a campfire-like depth that’s absolutely incredible.
- Bacon Lover’s Dream: Because everything is better with bacon! Fold in 1/4 cup of crispy bacon bits at the very end for a salty, smoky, crunchy surprise.
- Gouda Goodness: Swap the pepper jack for an equal amount of shredded smoked gouda. It creates a deeply creamy, sophisticated flavor that will have people guessing your secret.
- Spicy Upgrade: For a real kick, use a can of “Hot” RO*TEL and add an extra jalapeño (seeds included!).
- Lighter Option: Use ground turkey or chicken and low-fat Velveeta. The flavor will still be fantastic!
Anna’s Chef’s Notes
This recipe has evolved so much since that first tailgate! I’ve learned a few things along the way. For instance, I used to just use cheddar cheese, but it often turned my queso greasy and grainy. The Velveeta and pepper jack combo was a true game-changer for achieving that perfect, velvety texture. Another funny kitchen story? I once, in a pre-coffee haze, accidentally used a chocolate stout for the beer. It was… an interesting experiment! Let’s just say it’s a good thing I had a backup bottle of a light lager. Stick with a lighter beer for the best results, folks! The beauty of this dip is that it reheats like a dream, so feel free to make it ahead of time. Just warm it gently on the stove with a tiny splash of broth to loosen it up.
Your Queso Questions, Answered!
I’ve gotten a lot of questions about this recipe over the years. Here are the most common ones to help you out!
- Q: My queso is too thick! How can I thin it out?
A: No problem! This is an easy fix. Simply stir in a tablespoon or two of additional beer, broth, or even milk, until it reaches your desired consistency. Warm it through gently after adding.
- Q: Can I make this in a slow cooker?
A: Absolutely! It’s a fantastic party trick. Brown the beef and sauté the onions/jalapeño in a skillet first. Then, transfer everything (except the cilantro) to your slow cooker. Cook on LOW for 2-3 hours, stirring occasionally, until hot and bubbly. This keeps it perfectly warm for hours.
- Q: Why did my cheese sauce get grainy or separate?
A: This usually happens if the heat is too high. High heat can cause the fats and proteins in the cheese to separate. The key is to always melt cheese over low heat and stir constantly. Using processed cheese as a base is the best insurance against this!
- Q: How long will leftovers last in the fridge?
A: Stored in an airtight container, your queso will be delicious for 3-4 days. Reheat it slowly on the stovetop over low heat, adding that splash of liquid to bring it back to life.
Nutritional Information (Approximate, Per Serving)
Please note: This is an estimate and can vary based on specific ingredients used.
- Calories: ~360
- Protein: 18g
- Fat: 24g
- Carbohydrates: 12g
Prep Time: 10 minutes | Cook Time: 20 minutes | Total Time: 30 minutes | Servings: 8
Final Thoughts
If you’ve ever needed proof that comfort food can bring people together, Cowboy Queso is it. There’s just something about that bubbling skillet of melty cheese, tender beef, and spicy jalapeño heat that makes any gathering feel like a celebration. It’s hearty enough to stand alone as a meal, yet unfussy enough to fit right into a backyard cookout, tailgate, or Friday movie night.
What I love most is how every bite feels like a little party on its own — the creamy cheese, the savory beef, that pop of freshness from the cilantro. It’s the kind of dish that disappears fast and leaves everyone asking for “just one more scoop.”
So next time you’re looking to wow your crowd (or just yourself), grab that skillet and make this Cowboy Queso. It’s bold, comforting, and guaranteed to earn you the title of queso legend in your circle.