Your New Favorite Snack Is a Golden, Juicy, Flavor-Packed Chinese Meat Pie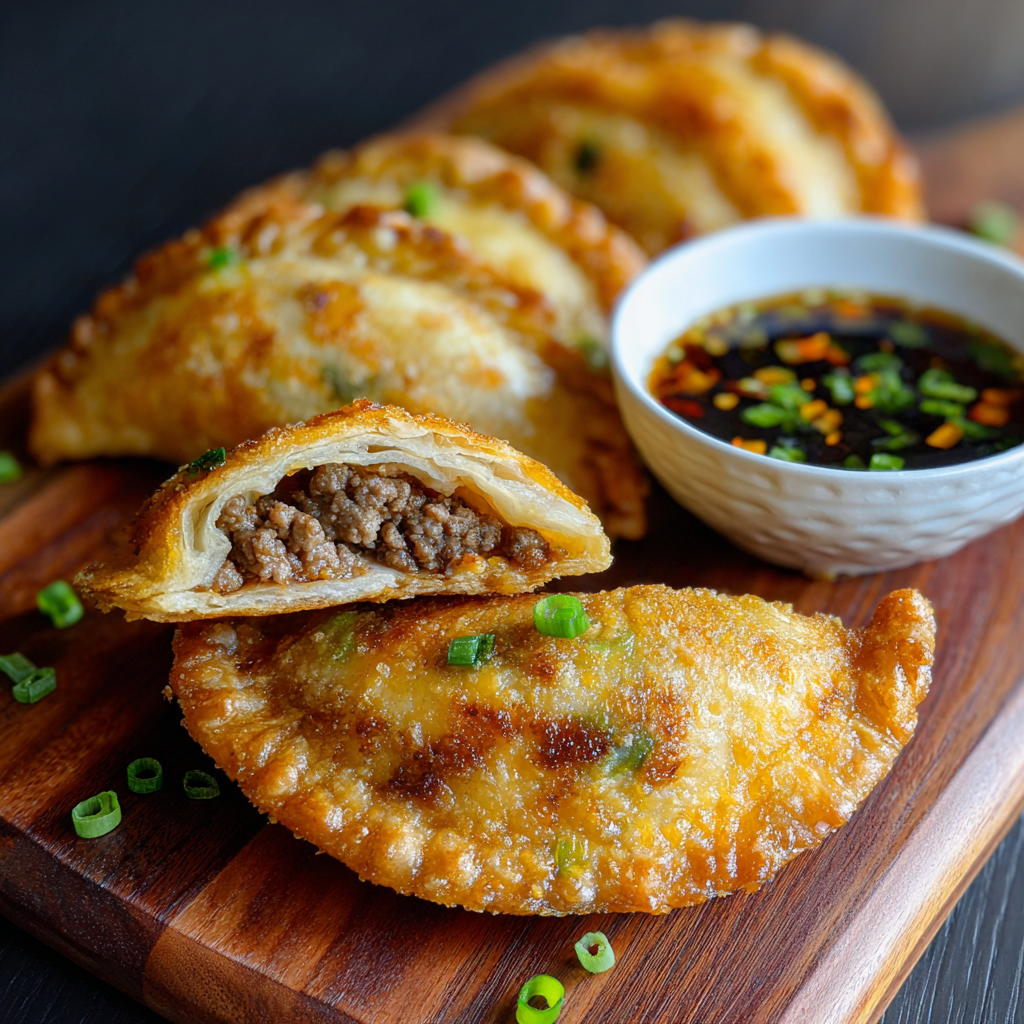
Hey there, friend! Can I let you in on a little secret? Some of the very best food in the world comes wrapped in a simple, golden package. I’m not talking about a fancy gift box, but something even better: a pan-fried, crispy-on-the-outside, explosively-juicy-on-the-inside Chinese Meat Pie, or as they’re wonderfully called, Xian Bing (馅饼).
If you’ve never had one, get ready to have your mind (and your taste buds) completely blown. Imagine the most savory, aromatic, tender filling of pork and spices, hugged by a thin, chewy-yet-crisp dough. Now imagine biting into it and that incredible, hot, flavorful juice just… wow. It’s a moment of pure, unadulterated joy. This isn’t just a snack; it’s an experience. It’s a handheld hug. It’s everything I love about cooking, all wrapped up in one perfect, portable pie.
I know the idea of making something like this from scratch can feel a little intimidating, but I promise you, it’s a joyful, almost therapeutic process. We’re going to walk through every single step together, with plenty of my favorite chef hacks and encouragement along the way. This is the kind of recipe that turns an ordinary Tuesday into a mini-celebration. So, tie on your favorite apron, put on some good music, and let’s create some kitchen magic together. You’ve got this!
The Street Food Memory That Started It All
PrintCrispy Chinese Meat Pies (Xian Bing)
Juicy, savory filling wrapped in golden, pan-fried dough—Chinese meat pies are handheld flavor bombs perfect for lunch, dinner, or anytime snacking. With aromatic spices, tender meat, and a crisp bite, they’re pure comfort in every bite.
- Prep Time: 25 min
- rest time: 30 min
- Cook Time: 15 min per batch
- Total Time: 25 minute
- Yield: 16 meat pies 1x
Ingredients
Dough:
600g all-purpose flour
240g hot water
90g room temp water
4 tbsp neutral oil (plus extra for frying)
Filling:
600g ground pork (or pork + beef blend)
1 cup finely chopped scallions
2 tbsp minced ginger
2 cloves garlic, minced
2 tbsp light soy sauce
2 tbsp dark soy sauce
2 tsp sesame oil
½ tsp ground Sichuan pepper or Chinese five-spice
½ tsp white pepper
½ tsp salt
2 tbsp oyster sauce
1 cup finely chopped napa cabbage or bok choy
8 tbsp cold water or stock
For Frying:
Neutral oil
Instructions
Combine flour and hot water, then add room-temp water. Knead 10 min until smooth. Oil lightly, cover, and rest 30 min.
Mix all filling ingredients in one direction until sticky. Chill until ready to use.
Divide dough into 16 balls. Roll into circles, fill with 2–3 tbsp meat, pinch shut, and flatten.
In a nonstick pan, heat oil over medium. Fry pies seam-side down until golden. Flip, add ¼ cup water, cover to steam 5–6 min. Uncover and crisp both sides.
Nutrition
- Calories: 16 meat pies
- Fat: 14g
- Carbohydrates: 24g
- Protein: 12g
My love affair with Xian Bing began not in a fancy restaurant, but on a bustling, vibrant street in Beijing. I was traveling with my best friend, and we were utterly lost in a maze of alleyways, surrounded by the incredible smells of sizzling oil, roasting chestnuts, and fragrant spices. We were hungry, a little overwhelmed, and completely captivated.
That’s when we saw it: a tiny, unassuming stall with a line of locals snaking down the block. A woman with the kindest smile was deftly rolling, filling, and frying these beautiful golden discs, handing them over in little paper bags. We pointed, smiled, and handed over a few yuan. That first, steaming hot bite was a revelation. The crispy exterior gave way to a burst of juicy, savory pork and scallion that was so incredibly flavorful, we just looked at each other with wide eyes. We stood right there on that busy street, devouring two each, not caring about the juice dribbling down our chins. It was one of those perfect, simple food moments that you never forget—the kind that connects you to a place and its people through a single, incredible bite. This recipe is my attempt to bring a little piece of that magic right into your kitchen.
Gathering Your Flavor Arsenal: The Ingredients
Don’t be fooled by the simple list! Each ingredient here plays a specific role in creating that signature texture and deep, savory flavor. Let’s break it down.
For the Dough:
- 600g All-Purpose Flour: This is our sturdy, reliable base. The high-protein content gives the dough the perfect structure to hold all that juicy filling without breaking. If you only have bread flour, that works too for an even chewier bite!
- 240g Hot Water & 90g Room Temp Water: This is our secret weapon for the perfect texture! The hot water (just off the boil) partially cooks the starch, creating a softer, more pliable dough that’s easy to work with. The room-temp water brings it all together into a smooth, dreamy ball.
- 4 tbsp Neutral Oil (plus extra for frying): A little fat in the dough makes it incredibly soft and supple. For frying, we want a neutral oil with a high smoke point—think avocado, grapeseed, or vegetable oil. They let the other flavors shine!
For the Filling:
- 600g Ground Pork: I love the fat content in pork shoulder for maximum juiciness, but a leaner cut works too. For a deeper flavor, try a 50/50 blend of pork and beef!
- 1 cup Finely Chopped Scallions: They bring a fresh, sharp, oniony kick that cuts through the richness of the meat. Don’t be shy with them!
- 2 tbsp Minced Ginger & 2 cloves Garlic, minced: The aromatic soul of the filling. Fresh is absolutely best here—that bright, pungent fragrance is non-negotiable.
- 2 tbsp Light Soy Sauce & 2 tbsp Dark Soy Sauce: A dynamic duo! Light soy brings the saltiness, while dark soy adds a gorgeous caramel color and a deeper, molasses-like flavor.
- 2 tsp Sesame Oil: Our finishing oil. Stir this in at the end for that incredible, nutty aroma that screams “authentic Chinese cuisine.”
- ½ tsp Ground Sichuan Pepper or Chinese Five-Spice & ½ tsp White Pepper: Sichuan pepper gives a gentle, tingling numbness, while five-spice is a warm, aromatic blend. White pepper is hotter and earthier. Choose your adventure!
- 2 tbsp Oyster Sauce: This is our flavor bomb! It adds a deep, savory, umami richness that ties everything together. (For a vegetarian version, use mushroom stir-fry sauce.)
- 1 cup Finely Chopped Napa Cabbage or Bok Choy: This is a genius trick! The cabbage releases water as it cooks, creating those incredible, steamy juices inside the pie. Just be sure to salt it lightly, let it sit for 10 minutes, and squeeze out the excess water before mixing.
- 8 tbsp Cold Water or Stock: This is the KEY to a juicy filling. Whisking in cold liquid helps the meat protein bind and retain moisture, creating a tender, almost bouncy texture.
Let’s Get Crafting: Step-by-Step Instructions
Ready to have some fun? This is where the magic happens. Follow these steps, and you’ll be a Xian Bing master in no time.
- Make the Dough: In a large bowl, combine your flour and the 240g of hot water. Use chopsticks or a fork to mix quickly—it will look shaggy and piecey. That’s perfect! Now, add the 90g of room-temp water and the oil. Get your hands in there and bring it all together into a rough ball. Chef’s Tip: Don’t worry about it being smooth yet! Just make sure there are no dry bits of flour. Turn it out onto a lightly floured surface and knead for a full 10 minutes. You’re building gluten, which gives the dough its wonderful chew. It should become incredibly smooth and soft. Lightly oil the ball, place it back in the bowl, cover it with a damp cloth, and let it rest for 30 minutes. This relaxes the gluten, making it a dream to roll out later.
- Create the Filling: While the dough rests, let’s make the juicy heart of our pies. In another bowl, combine the ground pork, scallions, ginger, garlic, both soy sauces, sesame oil, your chosen pepper/spice, salt, and oyster sauce. Now, here’s the crucial part: using your hand or a pair of chopsticks, start stirring the mixture vigorously in one direction only (clockwise or counter-clockwise, your choice!). This helps align the protein strands, making the filling sticky and cohesive. Once it’s well-combined and looks a bit pasty, start adding the cold water or stock, one tablespoon at a time, stirring in the same direction until the liquid is fully absorbed. The mixture will become glossy and very sticky—this is exactly what you want! Finally, stir in your finely chopped, squeezed-dry cabbage. Cover and pop the filling in the fridge to chill. A cold filling is much easier to handle.
- Assemble the Pies: Your dough should be beautifully rested. Divide it into 16 equal pieces. Roll each piece into a smooth ball and keep them under a damp cloth to prevent drying. Take one ball and, on a lightly floured surface, roll it out into a circle about 4-5 inches in diameter. The edges should be slightly thinner than the center. Place 2-3 tablespoons of filling right in the middle. Chef’s Hack: I like to use a small ice cream scoop for this—it’s less messy and ensures every pie gets the same amount of goodness! Now, bring the edges of the dough up and over the filling, like you’re making a little drawstring purse. Pinch the top firmly to seal. Gently flatten the sealed bun into a thick patty, being careful not to tear the dough. Repeat with the remaining dough and filling.
- Cook to Golden Perfection: Heat a generous tablespoon of neutral oil in a large non-stick or cast-iron skillet over medium heat. Once the oil is shimmering, place your pies in the pan, seam-side down. Don’t overcrowd them! Let them fry for 2-3 minutes until the bottoms are a beautiful golden brown. Now, carefully flip them. Here comes the steam-power: immediately add about ¼ cup of water to the pan (stand back, it might splatter!) and quickly cover with a lid. Let them steam for 5-6 minutes. This step cooks the filling through and ensures the dough is fully done. Uncover—the water should be evaporated. Let them crisp up again for another minute or two on each side until they’re golden brown and irresistible all over. Transfer to a wire rack (this keeps the bottom crispy) and repeat with the remaining batches, adding more oil as needed.
How to Serve Your Culinary Masterpieces
Honestly, one of these pies, straight from the pan and almost too hot to handle, is a perfect meal in itself. But if you want to make it a feast, I love serving them with a simple dipping sauce of black vinegar and chili oil—the tang and heat are the perfect contrast to the rich, savory pie. A light, refreshing cucumber salad on the side cuts through the richness beautifully. And remember the most important rule: let them cool for just a minute or two before biting in. That filling is like a delicious, savory lava—a moment of patience protects a happy tongue!
Get Creative! Recipe Variations
Once you’ve mastered the classic, the world is your oyster (sauce)! Here are a few fun twists:
- Spicy Szechuan Style: Add 1-2 tbsp of Szechuan chili crisp or doubanjiang (fermented broad bean paste) to the filling for a fiery kick.
- Chicken & Mushroom: Swap the pork for ground chicken or turkey and add a cup of finely chopped shiitake mushrooms for an earthy, umami-packed version.
- Vegetarian Delight: Use crumbled firm tofu or textured vegetable protein (TVP) soaked in soy sauce, and bulk up the filling with shredded carrots, wood ear mushrooms, and glass noodles.
- Beef & Cumin: A fantastic flavor combo! Use ground beef and add a teaspoon of ground cumin to the spice mix.
Anna’s Chef’s Notes & Kitchen Stories
This recipe has truly evolved in my kitchen over the years. The first time I tried to make them, I was so scared of the filling leaking that I used a tiny amount of meat, resulting in what my husband lovingly called “dough balls with a meat surprise.” We’ve come a long way since then! The hot water dough was a game-changer for me—it’s so much more forgiving than a standard dough. I also learned the hard way about the “one-direction stirring” after a batch of filling that was crumbly and dry. Now, I stir with purpose, almost like I’m willing the pies to be juicy. And a funny story: I once had a pie puff up like a little balloon in the pan because my seal was so good it trapped all the steam inside! We just poked it with a knife and it deflated with a happy little sigh. Don’t be afraid of imperfections—they’re just proof that your creation is homemade with love.
Your Questions, Answered! FAQs & Troubleshooting
Q: My filling keeps leaking out during cooking! What am I doing wrong?
A: This is the most common hiccup, and it usually comes down to two things: the seal or the rolling. First, make sure you’re pinching the top firmly and there are no tiny holes. Second, when you flatten the filled bun, be gentle! Roll from the center outwards and avoid putting too much pressure on the seams. A properly rested dough is also less likely to snap back and tear.
Q: Can I make these ahead of time?
A: Absolutely! You can assemble the pies, place them on a parchment-lined baking sheet, and freeze them solid. Once frozen, transfer to a freezer bag. Cook them straight from frozen—just add an extra 2-3 minutes to the steaming time. You can also keep uncooked, assembled pies in the fridge for a few hours before cooking.
Q: The bottom is burning before the inside is cooked. Help!
A: Your heat is too high! We’re using medium heat for a reason. You want a gentle sizzle, not a violent fry. The steam phase is crucial for cooking the interior without incinerating the exterior. If you find they’re browning too fast, reduce the heat slightly and don’t skip adding that water and covering the pan.
Q: My filling isn’t juicy. What happened?
A: The most likely culprit is not enough liquid mixed into the meat, or over-cooking. Be sure to whisk in all 8 tablespoons of that cold water or stock—it seems like a lot, but the meat will absorb it. Also, ensure you’re covering the pan to steam them; this creates a moist environment that keeps everything succulent.
Nutritional Information (Per Pie)
Please note: This is an estimate and can vary based on specific ingredients used.
Calories: ~270 | Protein: 12g | Fat: 14g | Carbohydrates: 24g
Final Thoughts
These Golden Chinese Meat Pies are one of those recipes that stay with you long after the pan is empty. They’re humble, comforting, and deeply satisfying—crispy and golden on the outside, juicy and flavor-packed on the inside, with every bite telling a little story of street stalls, shared moments, and hands warmed around something freshly cooked.
What makes Xian Bing truly special is the balance: simple ingredients transformed by technique, patience, and care. They invite you to slow down, trust the process, and enjoy the rhythm of rolling, filling, and frying. And once you’ve made them once, they become a recipe you carry with you—one you tweak, share, and pass along.
So whether you’re making them for a cozy night in, a gathering of friends, or just because the craving hits, let these meat pies remind you why cooking at home can feel like travel, memory, and comfort all at once. Good food doesn’t always need a passport—sometimes it just needs a hot pan, a little time, and a lot of heart. 🥟💛