Boo-tiful Bites: Let’s Bake Adorable Ghost Sugar Cookies Together!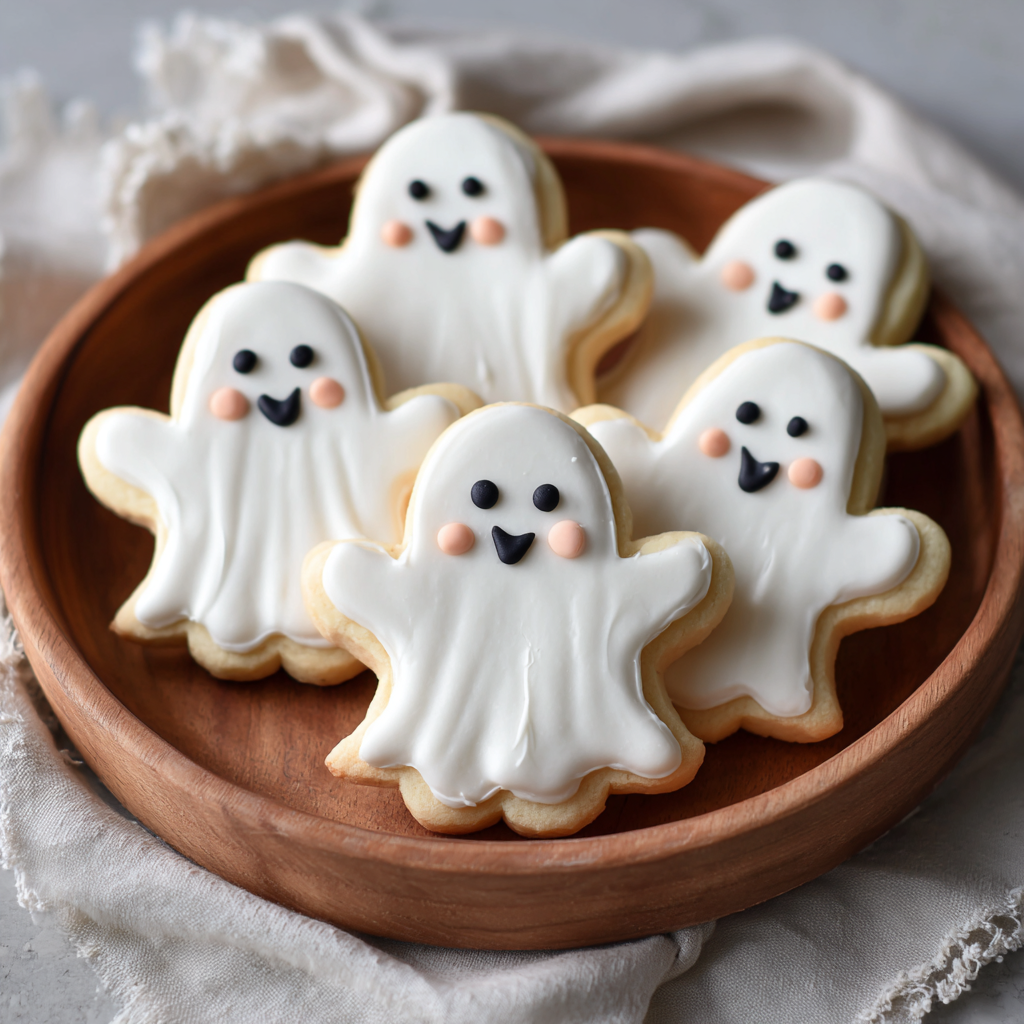
Hey there, cookie friend! Anna here, waving my flour-dusted spatula from my kitchen to yours. Can you feel that crisp October air? Halloween is creeping closer, and you know what that means – it’s officially ghost cookie season! These little spooky sweethearts aren’t just treats; they’re edible happiness wrapped in a buttery, vanilla-kissed hug. Imagine soft sugar cookies with the perfect chew, draped in smooth royal icing and sporting the silliest little faces. They’re the kind of bake that makes kids giggle, adults nostalgic, and party platters disappear faster than a ghost in a haunted hallway!
Now, I know some cookie recipes can feel intimidating – rolling pins flying, icing disasters looming. But fear not! These adorably spooky ghost cookies are designed for joy, not stress. Whether you’re a first-time decorator or a seasoned cookie wizard, we’re keeping things simple, fun, and totally foolproof. No fancy skills needed, just a sprinkle of enthusiasm and maybe a dash of spooky music. We’re talking melt-in-your-mouth cookies that come together with pantry staples, a few simple steps, and a whole lot of love. So, tie on your favorite apron (the one with the questionable stain tells the best stories!), preheat that oven, and let’s turn an ordinary afternoon into a magically delicious Halloween memory. Ready to make some edible cuteness? Let’s haunt that kitchen!
Cookie Capers & Spooky Laughter: My Ghostly Tradition
PrintCute Ghost Sugar Cookies

These ghost cookies are the sweetest way to spook! With buttery vanilla sugar cookie bases and a soft white royal icing finish, they’re easy to make, decorate, and devour. Perfect for kids, party platters, or an afternoon of festive baking fun.
- Prep Time: 20 mins + 30 mins chill
- Cook Time: 10 mins
- Total Time: 29 minute
- Yield: 24 ghost cookies 1x
Ingredients
For the Sugar Cookies:
1 cup unsalted butter, softened
1 cup granulated sugar
1 egg
1½ tsp vanilla extract
½ tsp almond extract (optional)
2¾ cups all-purpose flour
½ tsp baking powder
½ tsp salt
For the Royal Icing:
2 cups powdered sugar
1½ tbsp meringue powder
Instructions
Make the Dough: Cream butter and sugar. Beat in egg, vanilla, and almond extract. Mix in dry ingredients until dough forms.
Chill & Cut: Chill dough 30 mins. Roll to ¼-inch thick. Cut with ghost-shaped cookie cutters.
Bake: Bake at 350°F (175°C) for 8–10 mins until edges are just golden. Cool completely.
Mix Royal Icing: Whisk powdered sugar, meringue powder, and water until smooth and thick but pipeable. Add more water to thin if needed.
Decorate: Outline and flood each cookie with white icing. Use black icing or edible marker for eyes and mouths.
Dry: Let icing set at room temp for 4–6 hours or overnight before stacking or packaging.
Notes
Airtight for up to 1 week
Nutrition
- Calories: 120–140
- Fat: 5g
- Carbohydrates: |1 6g
- Protein: 1g
Picture this: Me, age 10, standing on a wobbly stool in my Nonna’s kitchen, flour smudged on my nose like warpaint. She’d pull out her ancient rolling pin (which felt heavier than I was!) and her one, slightly lopsided ghost cookie cutter. Every Halloween, without fail, we’d make these cookies. Nonna wasn’t much for elaborate costumes or haunted houses, but oh, did she believe in the magic of a homemade spooky cookie. I’d giggle uncontrollably as she’d let me pipe the faces – inevitably giving one ghost three eyes, another a lopsided frown, and one a surprised “O” mouth that looked like it had just seen… well, a ghost!
One year, I got particularly ambitious and tried to make a “ghost king” with a blob of purple icing for a crown. It slid right off, creating a glorious, gooey mess that had us both snorting with laughter. That messy, imperfect cookie became the star of the plate. That’s the thing about these little ghosts – they’re not about perfection. They’re about the flour fights, the lopsided smiles, the shared laughter echoing in a warm kitchen. Nonna’s gone now, but every time I bake these, I feel her beside me, gently guiding my hand, reminding me that the sweetest memories are often the ones dusted in powdered sugar and filled with joy. Now, I get to share that same magic with my kids, and hopefully, you’ll create your own spooky-sweet traditions too!
Gathering Our Ghostly Crew: Ingredients & Insights
Let’s round up our friendly little spooks! These are simple ingredients, but a few chef-y notes make all the difference:
For the Sugar Cookies (The Pillowy-Cloud Base!):
- 1 cup (2 sticks) unsalted butter, softened – This is our flavor foundation! Unsalted lets you control the salt level. Chef’s Tip: Truly softened butter (indents easily but isn’t greasy/melted) is KEY for creaming. Cold butter = tough cookies! Sub: Salted butter works, just reduce the added salt by half.
- 1 cup granulated sugar – Sweetens and helps create that lovely tender crumb. Insight: Don’t pack it down when measuring!
- 1 large egg – Binds everything together and adds richness. Tip: Crack it into a small bowl first to avoid shell surprises!
- 1½ tsp pure vanilla extract – The aromatic superstar! Pure extract makes a noticeable difference. Chef’s Love: This is where that warm, cozy flavor shines.
- ½ tsp almond extract (optional but amazing!) – My secret weapon! It adds a subtle, bakery-like depth that makes people go “What IS that deliciousness?” Sub/Note: Omit if you dislike almond or have allergies. Pure vanilla seeds are a lovely alternative.
- 2¾ cups all-purpose flour – The structure giver. Pro Hack: Fluff the flour in its bag, spoon it into your measuring cup, then level it off. Don’t scoop directly! This prevents dense cookies.
- ½ tsp baking powder – Our leavening friend for a slight lift and soft texture.
- ½ tsp fine salt – Balances the sweetness and enhances all the flavors. Essential!
For the Royal Icing (The Smooth, White Shroud!):
- 2 cups powdered sugar (confectioners’ sugar) – Creates that smooth, hard-drying finish. Must: Sift it! Lumps are the enemy of smooth ghosts.
- 1½ tbsp meringue powder – The magic dust that makes royal icing set firm without raw egg whites. Safe and reliable! Sub (not perfect but works): Use pasteurized egg whites (about 2 large egg whites), but the icing may take longer to dry and won’t get *quite* as hard.
- 3–4 tbsp room temperature water – Start with 3! We want thick but pipeable icing. Insight: Add water literally ½ tsp at a time towards the end. It’s easier to thin than thicken!
- Black gel food coloring (or edible black marker) – For those adorable (or spooky!) faces. Chef’s Secret: Gel color is concentrated and won’t thin your icing like liquid. A tiny dot goes far! Edible markers are foolproof for beginners.
Conjuring Our Cute Spooks: Step-by-Step Magic
Ready to bring these boo-tiful buddies to life? Follow these steps – I’ve packed each one with my favorite tips to ensure ghostly success!
- Cream the Butter & Sugar: In a large bowl, beat the softened butter and granulated sugar together with an electric mixer (handheld or stand) on medium speed for 3-4 minutes. Watch the Magic: Stop when it’s super pale, fluffy, and almost looks like whipped cream. This is CRUCIAL for light, tender cookies! Don’t rush it.
- Incorporate the Wet Goodness: Beat in the egg until fully combined, scraping down the sides of the bowl. Then, add the vanilla and almond extract (if using) and beat for another 30 seconds until fragrant and smooth. Tip: Smell that? That’s the promise of deliciousness!
- Whisk & Combine Dry Ingredients: In a separate bowl, whisk together the flour, baking powder, and salt. Why Whisk? This evenly distributes the baking powder and salt, preventing lumps in your dough.
- Bring the Dough Together: Gradually add the dry ingredients to the wet ingredients, mixing on low speed just until the flour disappears and a soft dough forms. Chef’s Warning: Stop mixing the *second* it looks combined! Overmixing = tough ghosts.
- Chill Out (The Dough, Not You… Yet!): Shape the dough into a flat disk, wrap it tightly in plastic wrap, and refrigerate for at least 30 minutes (up to 2 days). Huge Hack: Chilling firms up the butter, making the dough MUCH easier to roll and preventing cookie spread in the oven. Don’t skip!
- Roll & Cut: Preheat your oven to 350°F (175°C). Line baking sheets with parchment paper. On a lightly floured surface, roll the chilled dough to about ¼-inch thickness. Pro Tip: Roll from the center outwards, turning the dough a quarter turn after each roll to prevent sticking and ensure even thickness. Dip your ghost cookie cutter in flour before each cut. Cut out shapes, placing them about 1-2 inches apart on the prepared sheets. Reroll scraps once (gently!).
- Bake to Perfection: Bake for 8-10 minutes. Watch Like a Ghost Hawk: They’re done when the edges are *just* starting to turn a very light golden brown. The centers will still look soft – that’s perfect! Key Insight: Overbaking is the enemy of soft sugar cookies. They firm up as they cool. Let them cool on the baking sheet for 5 minutes before transferring to a wire rack to cool completely. Must be COMPLETELY cool before icing!
- Whip Up the Royal Icing: In a clean bowl, whisk the sifted powdered sugar and meringue powder together. Add 3 tbsp of water. Beat on low speed to combine, then increase to medium-high and beat for 1-2 minutes until stiff, glossy peaks form. Texture Check: It should be thick enough that a spoon dragged through it leaves a clear path that slowly smooths over (about 10 seconds). If too thick, add water ½ tsp at a time. If too thin, add a little more powdered sugar. Chef’s Trick: Cover the bowl with a damp towel when not using to prevent drying.
- Decorate Your Ghoul Gang: Transfer icing to a piping bag fitted with a small round tip (#2 or #3) or use a zip-top bag with a tiny corner snipped off. Outline the edge of each cookie with white icing. Then, immediately “flood” the inside with more icing, using a toothpick or small offset spatula to gently nudge it to the edges. Decorating Zen: Work on 3-4 cookies at a time. Let the flooded base set for about 30-60 minutes until just firm to the touch before adding faces. Use black gel icing (in a tiny piping bag) or an edible marker to pipe simple dots for eyes and a little “O” or “w” for a mouth. Have Fun! Give them personality!
- Let the Magic Set: Allow the decorated cookies to dry, undisturbed, at room temperature for at least 4-6 hours, or ideally overnight. Patience Pays: This ensures the icing hardens completely so your ghosts don’t smudge when stacked or packaged.
Showtime! Serving Your Spooky Sweethearts
These little ghosts are born to shine! Pile them high on a creepy-cool black platter for maximum spectral impact. Tuck them into a cellophane bag tied with orange and black ribbon for the cutest party favors or classroom treats. Feeling fancy? Layer them in a clear treat box separated by parchment paper. They’re the perfect sweet ending to a Halloween feast, paired with a mug of steaming hot cider or a glass of icy cold milk. For a real showstopper, create a ghostly graveyard scene on your dessert table – crumble chocolate cookies for “dirt,” add some candy pumpkins, and let your ghost cookies float above it all! Watch those smiles appear faster than you can say “Boo!”
Spooky Twists: Ghoulishly Good Variations
Want to mix up your ghostly game? Try these fun spins!
- Chocolate Phantom: Swap ½ cup of the flour in the cookie dough for unsweetened cocoa powder. Decorate with white icing as usual – spooky chocolate ghosts!
- Lemon Spook: Replace the almond extract with 1 tbsp fresh lemon zest + ½ tsp lemon extract in the dough. Add a tiny drop of yellow gel color to the icing for a pale, ghostly glow. So refreshing!
- Sprinkle Specters: After flooding with white icing, immediately add a light shower of black sanding sugar or tiny white nonpareils before it sets for a “sparkly spirit” effect.
- Gluten-Free Ghosts: Use a 1:1 gluten-free all-purpose flour blend (like Bob’s Red Mill or King Arthur). Ensure your baking powder is GF too.
- Dairy-Free Spirits: Replace the butter with a high-quality vegan butter stick (like Miyoko’s or Earth Balance). Use your favorite plant-based milk (a tsp if needed) if the dough seems too crumbly after chilling.
Anna’s Kitchen Ghost Stories: Extra Boo-liefs
Oh, the tales these cookies could tell! Like the year I tripled the recipe for a school bake sale and my mixer decided to impersonate a flour volcano? My kitchen looked like a blizzard hit a haunted house! Or the time my toddler “helped” decorate and we ended up with a ghost family featuring googly eyes and purple mustaches? Pure gold. These cookies have evolved from my Nonna’s simple rounds to the cute cut-outs we make now, but the heart remains the same: joyful, imperfect, shared moments.
A couple of extra nuggets: The dough freezes beautifully! Wrap that disk tightly and freeze for up to 3 months. Thaw overnight in the fridge before rolling. Undecorated baked cookies freeze well too in an airtight container. Icing is best done fresh. If your icing starts to thicken while decorating, just give it a quick stir with a tiny splash of water. Most importantly? Embrace the wonky eyes and lopsided smiles. That’s where the real charm (and the best stories) come from. Happy haunting, my friends!
Ghostly Guidance: Your Questions, Answered!
Let’s tackle those common cookie conundrums:
Q: Help! My cookies spread like ghosts melting in the sun! What happened?
A:</strong
Final Thoughts
These ghost sugar cookies aren’t just a treat—they’re a memory in the making. Whether you’re baking them with kids, honoring an old family tradition, or simply adding a touch of spooky sweetness to your Halloween spread, these little ghosts are guaranteed to bring smiles.
Remember: they don’t have to be perfect to be magical. A crooked smile, a wobbly “boo,” or even a ghost king with a sliding crown can end up being the most loved cookie of the batch. What really counts is the laughter, the flour-dusted aprons, and the joy of sharing something homemade.
So, roll out that dough, pipe those silly faces, and let your creativity haunt the kitchen. Because at the end of the day, the sweetest Halloween magic is baked with love.