The Sweetest Little Secret for Your Easter Table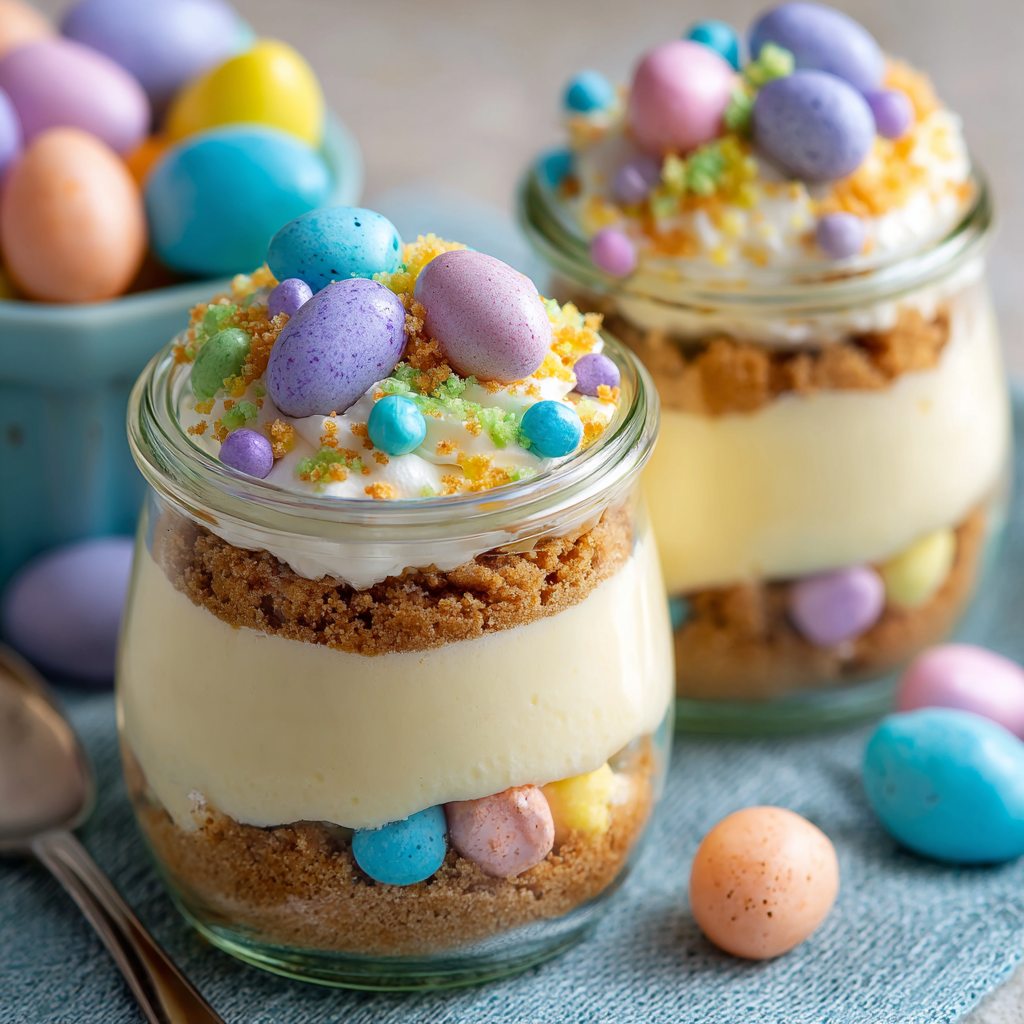
Hey there, friend! Anna here. Can you feel it? That little shift in the air, the daffodils starting to peek through, and the grocery store shelves suddenly awash in every pastel color imaginable. Spring is whispering, and Easter is practically tapping its foot, waiting to be celebrated. And what’s a celebration without a show-stopping dessert that doesn’t have you sweating over a hot oven all day?
Enter my absolute favorite springtime creation: Easter Egg Cheesecake Jars. Imagine the creamiest, dreamiest no-bake cheesecake filling, light as a cloud, layered with a buttery, crunchy graham cracker crust, and crowned with a cheerful pile of pastel chocolate eggs. All of this sunshine is packed into individual jars, making them not just a dessert, but a whole adorable experience.
This recipe is my love letter to joyful, stress-free entertaining. It’s for the busy parent prepping a big brunch, the friend who wants to bring a memorable gift to a gathering, or anyone who believes dessert should be as fun as it is delicious. We’re talking zero baking, minimal mess, and maximum “wow” factor. So, let’s tie on our aprons (the cute ones, obviously), put on some happy music, and create some edible spring magic together. I promise, every spoonful is pure, unadulterated joy.
A Jar Full of Sunshine & Sweet Memories
PrintEaster Egg Cheesecake Jars : No-Bake Mini Spring Dessert Cups

These Easter Egg Cheesecake Jars are the ultimate no-bake spring dessert! Creamy, dreamy cheesecake layered with buttery crumbs and topped with colorful candy eggs makes every spoonful pure Easter magic. Served in cute little jars, they’re perfect for brunch tables, dessert bars, or gifting. Easy to make and even easier to love—these sweet little jars will steal the spotlight at your celebration!
- Prep Time: 20 minutes
- chill time: 2 hours
- Total Time: About 2 hours 20 minutes
- Yield: 6–8 jars 1x
Ingredients
For the Crust:
1 ½ cups graham cracker crumbs
4 tbsp melted butter
2 tbsp granulated sugar
For the Cheesecake Filling:
16 oz cream cheese, softened
¾ cup powdered sugar
1 tsp vanilla extract
1 cup heavy whipping cream (whipped to stiff peaks)
For the Topping:
½ cup pastel mini chocolate eggs
2 tbsp Easter sprinkles
Whipped cream (optional)
Instructions
In a bowl, mix graham cracker crumbs, melted butter, and sugar until combined.
Spoon 2–3 tablespoons of crust mixture into the bottom of each jar and gently press down.
In a separate bowl, beat cream cheese until smooth. Add powdered sugar and vanilla; mix until creamy.
Fold in whipped cream until light and fluffy.
Pipe or spoon cheesecake filling over the crust layer.
Top with whipped cream, pastel chocolate eggs, and festive sprinkles.
Refrigerate at least 2 hours before serving for best texture.
Nutrition
- Calories: 320 calories per jar
This recipe always takes me right back to my Grandma Eleanor’s kitchen, the unofficial headquarters for every family holiday. Easter was her specialty. While the grown-ups handled the glazed ham and scalloped potatoes, my domain was the “kid’s table” for dessert prep. One particularly chaotic (and flour-dusted) Easter, our oven decided to retire mid-bake, leaving a tragic, half-risen coconut cake in its wake.
With a house full of guests arriving soon, panic was not an option for Grandma. She winked, pulled out a tray of her vintage jelly jars, and declared, “We’re building parfaits!” We layered leftover lemon curd, crushed vanilla wafers from the pantry, and clouds of sweetened whipped cream. To top it all off, we raided my Easter basket for those shiny, foil-wrapped chocolate eggs. What felt like a kitchen disaster turned into the hit of the party. Those improvised jars taught me that the best recipes aren’t about perfection—they’re about spirit, creativity, and sharing something made with love. These cheesecake jars are that same spirit, all grown up and dressed in its spring finest.
Gathering Your Springtime Ingredients
Here’s everything you’ll need to whip up this batch of happiness. The beauty of this recipe is in its simplicity and the easy swaps you can make!
For the Buttery Crust:
- 1 ½ cups graham cracker crumbs: The classic! That hint of honey and cinnamon is pure nostalgia. Chef’s Insight: For a super smooth crumb, toss the crackers in a zip-top bag and roll with a rolling pin, or give them a quick pulse in the food processor.
- 4 tbsp melted butter: This is the glue that holds our crust together and gives it that rich, irresistible flavor. Use unsalted so you control the salt level.
- 2 tbsp granulated sugar: A little sweetness to balance the crumbs. You can skip it if you prefer, but I find it just rounds everything out perfectly.
For the Cloud-Like Cheesecake Filling:
- 16 oz (two blocks) cream cheese, softened: This is non-negotiable—full-fat and softened to room temperature are the keys to a silky, lump-free filling. Take it out of the fridge at least an hour ahead. Trust me on this!
- ¾ cup powdered sugar: Also called icing sugar. It dissolves instantly into the cream cheese, unlike granulated sugar which can leave a gritty texture.
- 1 tsp pure vanilla extract: The flavor booster. It adds a warm, aromatic depth that makes the filling taste like it came from a fancy bakery.
- 1 cup heavy whipping cream: This is our magic ingredient for that airy, mousse-like texture. Make sure it’s cold straight from the fridge for the best whip.
For the Festive Topping:
- ½ cup pastel mini chocolate eggs: The star of the show! I love the mini ones for their cute scale. Cadbury Mini Eggs are the classic, but any pastel-coated chocolate candy will do.
- 2 tbsp Easter sprinkles: Go for the fun shapes! Bunnies, chicks, eggs – this is where you can really personalize your jars.
- Extra whipped cream (optional but encouraged): Because more cream is always a good idea. A final dollop makes them look extra decadent.
Let’s Build Some Edible Sunshine: Step-by-Step
Ready to create? Follow these steps, and you’ll have perfect jars in no time. I’ve packed each one with my favorite little kitchen hacks!
- Prep Your Station & Ingredients. First things first: get out all your ingredients, your mixing bowls, electric hand mixer or stand mixer, and 6-8 clean glass jars (4-8 oz size is perfect). Having everything within arm’s reach is the ultimate stress-buster. Chef’s Hack: If you forgot to soften the cream cheese, you can microwave the unwrapped blocks on a plate for 10-15 seconds. Just don’t let it melt!
- Make the Crust. In a medium bowl, combine the graham cracker crumbs, melted butter, and granulated sugar. Stir with a fork until it resembles wet sand and holds together when you pinch it. Chef’s Tip: Taste a pinch! It should be delicious on its own. Want more flavor? Add a pinch of cinnamon or a little lemon zest.
- Build Your Base. Spoon 2-3 tablespoons of the crust mixture into the bottom of each jar. Use the back of a spoon, a small glass, or even your fingers to press it down into a firm, even layer. This is your foundation—packing it well means it won’t get soggy too quickly.
- Whip the Cream (The First Secret). In a clean, cool bowl, whip the cold heavy cream until you have stiff peaks. How to tell? Lift the beaters out—the peaks should stand straight up and not flop over. Set this aside for a moment. Big Tip: A cold bowl helps the cream whip faster. I sometimes pop my metal bowl in the freezer for 10 minutes before I start.
- Create the Cheesecake Heart. In a separate large bowl, beat the softened cream cheese with an electric mixer on medium speed for 1-2 minutes until it’s completely smooth and no lumps remain. Scrape down the sides of the bowl. Add the powdered sugar and vanilla extract, and beat again until creamy and fully combined.
- Fold & Fluff (The Second Secret). This step is crucial for that light texture! Add about one-third of your whipped cream to the cream cheese mixture. Use a rubber spatula to gently fold it in—this means cutting down through the middle, scooping along the bottom, and folding it over on top. You’re incorporating air, not beating it out. Once that’s mixed, gently fold in the remaining whipped cream until you have a uniform, fluffy, cloud-like filling. No white streaks should remain.
- Layer the Magic. Now for the fun part! Spoon or pipe the cheesecake filling over the crust layer in each jar, filling almost to the top. I love using a piping bag with a large star tip for a fancy look, but a spoon works just as beautifully. Gently tap the jars on the counter to settle the filling and remove any air pockets.
- Top It Off & Chill. If using, add a small dollop of extra whipped cream. Then, artfully arrange the pastel chocolate eggs and sprinkles on top. The final, most important step: cover the jars and refrigerate them for at least 2 hours, but ideally 4 or overnight. This chill time allows the flavors to marry and the filling to set up perfectly, giving you that gorgeous, sliceable texture.
How to Serve Your Easter Masterpiece
Presentation is half the fun! Line these little jars up on a wooden board or a pretty tray lined with a pastel napkin or some fresh spring moss. Tuck a few sprigs of fresh mint or edible flowers (like violets or pansies) between the jars for a gorgeous, garden-fresh look. Don’t forget to provide a spoon for each one—these are meant to be dug into with delight. They’re the perfect portable sweet treat for an Easter brunch buffet, a delightful end to a family dinner, or a wonderfully personal gift for friends, neighbors, or teachers. Just tie a ribbon around the lid and you’ve got instant joy in a jar!
Make It Your Own: Fun Flavor Twists
The basic formula is your canvas! Here are a few of my favorite ways to play with this recipe:
- Lemon Berry Bliss: Add 1 tbsp of lemon zest and 2 tbsp of lemon juice to the filling. Layer with a spoonful of fresh raspberry or strawberry jam between the crust and filling.
- Cookie Butter Craze: Swap the graham cracker crumbs for crushed Biscoff or gingersnap cookies. Swirl ¼ cup of smooth cookie butter into the cheesecake filling before layering.
- Chocolate Hazelnut Dream: Use an Oreo cookie crust (swap graham crumbs for Oreo crumbs, no extra sugar needed). Fold ½ cup of Nutella into the cream cheese mixture before adding the whipped cream.
- Carrot Cake Style: Add ½ tsp cinnamon and a pinch of nutmeg to the crust. Fold ½ cup of finely grated carrot and ¼ cup of crushed pineapple (well-drained) into the filling. Top with toasted pecans and a cream cheese frosting dollop.
- Dairy-Free Delight: Use vegan cream cheese and coconut cream (chilled, the solid part only) whipped in place of heavy cream. Choose vegan chocolate eggs.
Anna’s Kitchen Notes & Stories
This recipe has become such a staple in my spring rotation that it’s evolved in the most delightful ways. One year, I was out of graham crackers and used crushed pretzels instead for a salty-sweet situation that was dangerously good. Another time, my then-toddler “helped” with the sprinkles, resulting in what can only be described as a sprinkle avalanche on two of the jars. They were the most popular ones—proof that enthusiasm is the best ingredient.
The biggest lesson I’ve learned? Don’t skimp on the chill time. I know it’s tempting to dig in right away, but letting the jars properly set in the fridge transforms the texture from good to “is this really no-bake?!” incredible. It’s the difference between a filling and a luxurious filling. Make them the day before your event; your future, less-stressed self will thank you as you calmly pull a tray of gorgeous, ready-to-go desserts from the fridge.
Your Questions, Answered!
Q: My filling is a bit runny/soft. What happened?
A: This usually has one of two causes: 1) The cream cheese wasn’t fully softened, leading to lumps that break the emulsion, or 2) The heavy cream wasn’t whipped to stiff enough peaks. Also, ensure you’re using full-fat, brick-style cream cheese, not the spreadable kind from a tub. If it’s too soft after mixing, just pop the whole bowl in the fridge for 20 minutes to firm up a bit before layering.
Q: Can I make these ahead of time?
A> Absolutely! They are the perfect make-ahead dessert. Assemble them completely, cover tightly, and store in the fridge for up to 2 days. I’d wait to add any fresh whipped cream topping until just before serving, but the sprinkles and eggs can go on ahead of time.
Q: What can I use instead of glass jars?
A> Get creative! Clear plastic cups (great for kids’ parties), pretty martini glasses, vintage teacups, or even clean, wide-mouth mason jars all work wonderfully. You just want something that shows off those beautiful layers.
Q: How long do they last in the fridge?
A> They’re best enjoyed within 3 days. The crust will gradually soften the longer it sits, which is still delicious, but if you prefer a firmer crust, eat them within 48 hours.
Nutritional Info (Approximate)
Prep Time: 20 minutes | Chill Time: 2 hours | Total Time: 2 hours 20 minutes | Yield: 6-8 jars
Per jar (based on 8 servings): Calories: ~320 | Fat: 22g | Saturated Fat: 13g | Carbohydrates: 28g | Sugar: 21g | Protein: 4g
Remember, friends, this is a celebratory treat meant to be savored and shared with joy. Enjoy every magical spoonful!

Final Thoughts
These Easter Egg Cheesecake Jars are everything I want a spring dessert to be: bright, cheerful, fuss-free, and utterly delightful. They bring together the nostalgia of childhood holidays, the creamy indulgence of cheesecake, and the playful whimsy of pastel chocolate eggs—all in a single, adorable jar.
The best part? They’re as stress-free as they are impressive. No oven, minimal mess, and totally make-ahead, which means you can spend more time enjoying the celebration instead of stressing over dessert. Whether you’re serving them at a brunch, gifting them to friends, or sneaking one for yourself, these jars are guaranteed to put a smile on every face.
Let this recipe be your springtime secret weapon: a little jar of sunshine, whimsy, and pure joy. And remember—the longer they chill, the more magical they become. So make a batch, step back, and savor the sweet, creamy payoff of your efforts.