The Simple, Soul-Satisfying Magic of Homemade Egg Noodles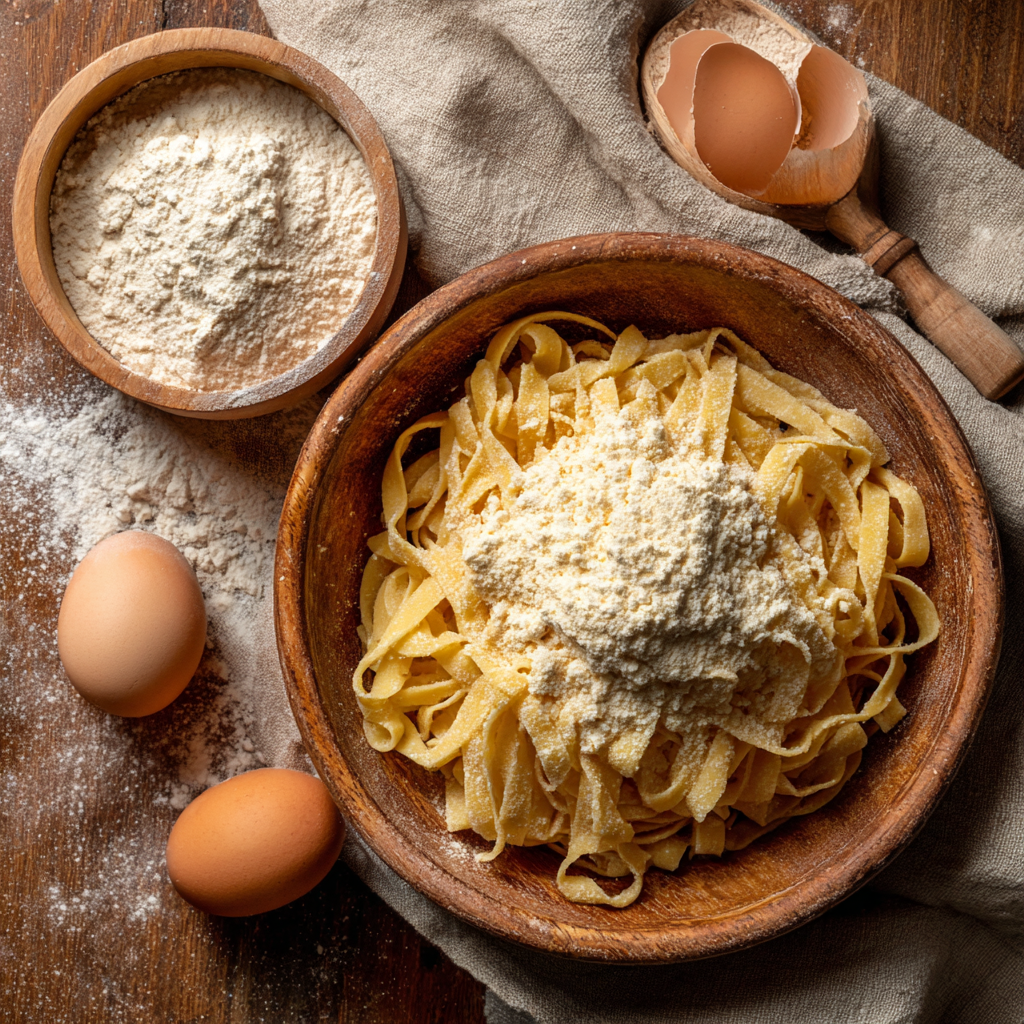
Let me tell you about the quiet magic that happens when you combine flour, eggs, and your own two hands. It’s a feeling I crave—the cool, smooth dough under my palms, the rhythmic sound of a rolling pin on a floured counter, the scent of simple, wholesome ingredients that promises something deeply comforting is on its way. In a world of instant everything, making homemade egg noodles is a delicious act of slowing down, a little kitchen meditation that yields the most glorious reward. And trust me, if you can make a cookie dough, you can absolutely make these noodles.
I’m not talking about fussy, perfectly uniform pasta that requires a fancy machine. I’m talking about rustic, lovingly imperfect, rich egg noodles. The kind that cradle a hearty beef stew like a cozy blanket, that swim in a golden chicken broth and make a simple soup feel like a feast. The kind that, when tossed with a pat of butter and a shower of Parmesan, can turn a Tuesday night into a small celebration. They have a chew, a heartiness, and a flavor that you just cannot find in a cellophane bag at the store. That “alchemy” comes from you.
So today, I’m inviting you to join me in this wonderfully simple ritual. Clear a little space on your counter, dust off your rolling pin (or even a clean wine bottle!), and let’s create something real. This is more than a recipe; it’s a passport to a certain kind of kitchen confidence. You’re about to learn a foundational skill that will fill your home with warmth and your belly with joy for years to come. Ready to feel like a kitchen wizard? Let’s get our hands dusty.
Nana’s Noodle Board: Where My Love for Dough Began
PrintHomemade Egg Noodles : Rustic, Rich & Easy to Make

Nothing beats the comfort of homemade egg noodles—soft, chewy, and rich with flavor. Whether you’re serving them with soup, stew, or a creamy sauce, these rustic noodles are simple to make and way better than store-bought. Just a few ingredients, a little kneading, and you’ve got the ultimate base for hearty, homemade meals.
- Prep Time: 20 minutes
- rest time: 30 minutes
- Cook Time: 3 minutes
- Total Time: ~55 minutes
- Yield: 4 1x
Ingredients
2 cups all-purpose flour
½ tsp salt
2 large eggs
¼ cup milk (whole or 2%)
1 tbsp butter (melted, optional for richness)
Instructions
In a large bowl, mix flour and salt. Make a well in the center.
Add eggs, milk, and melted butter (if using) to the well. Mix together with a fork, gradually pulling in the flour.
Once it forms a shaggy dough, knead on a floured surface for 5–8 minutes until smooth.
Wrap the dough in plastic wrap and let rest for 30 minutes at room temperature.
Roll out dough to about 1/8-inch thickness. Cut into strips or desired noodle shape.
Cook noodles in boiling salted water for 2–4 minutes until tender. Drain and serve with your favorite sauce or broth.
Nutrition
- Calories: 220
- Fat: 5g
- Carbohydrates: 35g
My earliest, most vivid kitchen memory isn’t of cookies or cake—it’s of a cloud of flour and my grandmother’s strong, capable hands. Every Sunday, without fail, Nana would make her famous chicken and noodles. But first, she’d make the noodles. She had a special board, worn smooth and soft in the center from decades of use. I’d perch on a stool, chin in hands, and watch the transformation.
She never measured. It was a “feel” thing. A mound of flour, a well in the center, eggs cracked straight into the crater with a satisfying *thwack*. Her hands would move with a gentle, assured motion, pulling the flour into the wet center until a shaggy ball formed. Then, the kneading—a push, fold, turn rhythm that was hypnotic. “You’re talking to the dough, Anna,” she’d say with a wink. “You’re telling it to come together.” The resting dough would sit under a tea towel like a sleeping pet, and then the real fun began: the rolling. She’d roll that dough so thin I swore I could see the wood grain of the board through it. “Lighter than a feather,” she’d declare. Cutting them into thick, rustic strips was my coveted job. Those noodles, simmering in her rich broth, were the taste of love, patience, and family. It’s that feeling—of connection, of creating something fundamental—that I want to share with you today.
Your Short & Mighty Ingredient List
See? I told you it was simple! Just a handful of pantry staples stand between you and noodle nirvana. Here’s what you need and why each one matters:
- 2 cups (250g) all-purpose flour: This is our noodle’s backbone. I like unbleached all-purpose for its reliable protein (gluten) content, which gives the noodles their lovely chew. Chef’s Insight: For a slightly more tender noodle, you can swap out ¼ cup of the AP flour for “00” pizza flour. Feeling adventurous? Try 1 cup AP and 1 cup semolina for a toothsome, classic pasta texture!
- ½ teaspoon fine sea salt: Don’t skip this! Salt seasons the dough from the inside out, making the flavor of the noodles themselves pop, not just whatever sauce you put on them. Pro Tip: I prefer fine sea salt or table salt here to ensure it dissolves evenly into the dough.
- 2 large eggs, at room temperature: The stars of the show! Eggs provide richness, color, and structure. Room temperature eggs incorporate into the flour more easily. Substitution Tip: For a richer, more yellow noodle (like the classic “egg noodle” color), add an extra yolk. For a lighter noodle, you can use 1 whole egg + 2 egg whites.
- ¼ cup (60ml) whole milk, at room temperature: This is my little secret for supremely tender noodles. The fat and water in the milk tenderizes the gluten just a touch. Substitution Tip: 2% milk works great. For dairy-free, unsweetened plain almond milk or even water will do in a pinch—your noodles will be slightly firmer but still delicious.
- 1 tablespoon unsalted butter, melted (optional but glorious): This is the “luxury” upgrade. It adds a subtle richness and silkiness to the dough that makes it a dream to roll out. It’s totally optional, but if you have it, use it!
Let’s Make Some Noodles: A Step-by-Step Story
This is where the fun begins. Put on some music, tie back your hair, and let’s get hands-on.
Step 1: The Mound & The Well. In a large, wide bowl (or right on your clean counter if you’re feeling bold!), whisk together your flour and salt. Now, use your fingers or a measuring cup to create a wide, volcano-like well in the center. This well is our safety moat, keeping our wet ingredients contained until we’re ready to bring the dough together.
Step 2: The Wet Ingredients Party. Crack your eggs straight into the well. Pour in the milk and add the melted butter, if using. Grab a fork (this is your trusty steed for now) and start whisking the wet ingredients together inside the well.
Step 3: The Gradual Pull. This is the satisfying part. As you whisk the eggs, start slowly, gently pulling tiny amounts of flour from the inner walls of your “volcano” into the wet pool. Take your time here! The goal is to gradually thicken the wet mixture until it’s a thick, pasty batter before it pulls in the entire flour mountain. This prevents a flour explosion and ensures even mixing. When it gets too thick to whisk, ditch the fork and use your hands.
Step 4: The Shaggy Ball & The Knead. Use your hands to bring all the flour and wet bits together. It will be shaggy, messy, and seem a bit dry. This is perfect. Dump it out onto a clean, lightly floured surface. Now, knead. Push the dough away from you with the heel of your hand, fold it back over itself, give it a quarter turn, and repeat. Add only the tiniest sprinkles of flour if it’s sticking badly to your hands or the counter. We want a firm dough. Knead for a full 5-8 minutes. You’ll feel it transform from a ragged mess to a smooth, elastic, slightly firm ball. Chef’s Hack: Set a timer! It’s longer than you think. This kneading develops the gluten, which is what gives your noodles that wonderful chew.
Step 5: The Essential Rest. Wrap your beautiful smooth dough ball tightly in plastic wrap or place it under an overturned bowl. Let it rest at room temperature for 30 minutes. This is non-negotiable! Resting allows the gluten to relax, making the dough infinitely easier to roll out without it springing back like a rubber band.
Step 6: Roll It Out! After its nap, unwrap your dough. Cut it into 2 or 4 equal pieces for easier handling. Keep the pieces you’re not working with covered. On a lightly floured surface, roll one piece out. Aim for about 1/8-inch thickness—think the thickness of a thick cotton bedsheet or a dime. Don’t stress about a perfect shape; rustic is the goal! If you have a pasta machine, you can absolutely use it to roll and cut.
Step 7: Cut Your Shapes. Here’s your creative moment! For wide, pappardelle-style noodles: loosely roll the sheet of dough into a log and use a sharp knife to slice it into ¾-inch strips. Unfurl the ribbons. For fettuccine-width: cut into ¼-inch strips. For soup noodles: cut into random, rustic squares or rectangles. Sprinkle the cut noodles with a little flour to prevent sticking.
Step 8: Cook Fresh or Save for Later. To cook: Bring a large pot of well-salted water to a rolling boil. Add the fresh noodles and cook for 2 to 4 minutes. They cook fast! They’re done when they float and are tender but still have a bite (al dente). Drain and toss immediately with your sauce, butter, or broth. To dry: lay the cut noodles on a drying rack or floured baking sheet for 1-2 days until completely brittle, then store in an airtight container.
How to Serve Your Masterpiece
These noodles are the ultimate supporting actor that can steal the show. For the classic comfort move, toss them straight from the pot into a simmering beef stew or a pot of creamy chicken and broth—they’ll thicken it beautifully. Keep it simple with a giant pat of good butter, a handful of Parmesan, and lots of black pepper. Or, go for a decadent creamy mushroom sauce or a quick brown butter with sage. They’re also phenomenal as a bed for a rich, slow-cooked ragu. However you serve them, do it with pride on a big, warm platter or in deep, inviting bowls.
5 Fun Twists on the Classic
Once you’ve mastered the basic dough, the flavor world is your oyster! Here are a few ways to play:
- Spinach Noodles: Add ¼ cup of finely chopped, cooked, and thoroughly squeezed-dry spinach to the well with the eggs.
- Herb-Infused: Knead in 2 tablespoons of finely chopped fresh herbs (parsley, chives, dill) into the dough just before wrapping to rest.
- Whole Wheat: Substitute 1 cup of all-purpose flour with whole wheat flour for a nuttier, heartier noodle. You may need a touch more liquid.
- Gluten-Free: Use a reputable 1:1 gluten-free all-purpose flour blend. The texture will be more tender but still delightful.
- Flavored with Zest: Add a teaspoon of lemon or orange zest to the well for a bright, aromatic noodle perfect with spring vegetables or creamy sauces.
Anna’s Final Whispers & Kitchen Confessions
This recipe is the direct descendant of my Nana’s “by feel” method, but I’ve added the milk and butter over the years through happy experimentation. They just make the process more forgiving and the result more lush. A funny story? The first time I made these alone, I was so proud of my rolling skills that I didn’t flour the noodles after cutting. I came back 20 minutes later to a single, tragic, noodle-mass fossil glued to my counter. Lesson learned: flour is your friend! This dough is also a fantastic “play dough” for kids (with clean hands!). Let them knead their own little ball and cut wild shapes—they’ll eat anything they make. Remember, perfection is boring. Slightly thick, slightly thin, wobbly edges… that’s the soul of homemade. It’s all love.
Your Questions, Answered!
Q: My dough is too dry and crumbly! What did I do wrong?
A: Don’t panic! This usually means your flour was particularly thirsty or your eggs were small. The fix is easy. Wet your hands lightly with water or a tiny bit of milk and knead it into the dough. Add moisture just a few drops at a time until it comes together.
Q: My dough is a sticky, gluey mess. Help!
A> You might have added a touch too much liquid or not incorporated the flour fully at the beginning. First, try kneading it on the counter for a full minute—sometimes it just needs to come together. If it’s still sticking, lightly flour your hands and the surface, and knead in small sprinkles of flour until it becomes smooth and only slightly tacky.
Q: Can I make this dough in a stand mixer or food processor?
A> Absolutely! For a mixer: use the dough hook. Whisk dry ingredients, then add wet. Mix on low until a shaggy ball forms, then knead with the hook for 3-4 minutes. For a processor: pulse dry ingredients, then add wet ingredients through the feed tube while pulsing until it forms a ball. Process for 30 seconds to knead.
Q: How do I store fresh noodles I’m not cooking right away?
A> You have two great options! 1) To freeze: Lay the cut, floured noodles on a parchment-lined sheet pan. Freeze solid (1-2 hours), then transfer to a freezer bag. Cook from frozen, adding 1-2 minutes to the boil time. 2) To dry: As mentioned, let them air-dry completely on a rack before storing in an airtight container at room temp for up to a month.
Nutritional Information*
*This is an estimate for 1 of 4 servings, using whole milk and optional butter. Values can vary based on specific ingredients and noodle size.
- Calories: ~220
- Protein: 7g
- Carbohydrates: 35g
- Fat: 5g
- Prep Time: 20 min
- Rest Time: 30 min
- Cook Time: 3 min
- Total Time: 55 min
- Servings: 4
 Final Thoughts
There’s something quietly magical about homemade egg noodles. They aren’t just a meal—they’re a ritual, a memory, and a little bit of joy rolled, kneaded, and cut by your own hands. Rustic, imperfect, and full of character, these noodles carry the comfort of tradition while giving you the freedom to make them entirely your own.
Whether they’re cradling a rich beef stew, floating in a fragrant chicken broth, tossed in butter and Parmesan, or served with a lush mushroom cream sauce, these noodles have a way of turning the everyday into something memorable. And the best part? They don’t demand perfection. Wobbly edges, slightly thick here, slightly thin there—that’s where the soul lives.