***
Your New Favorite Lunch Awaits: Honey Sesame Chicken Meal Prep Bowls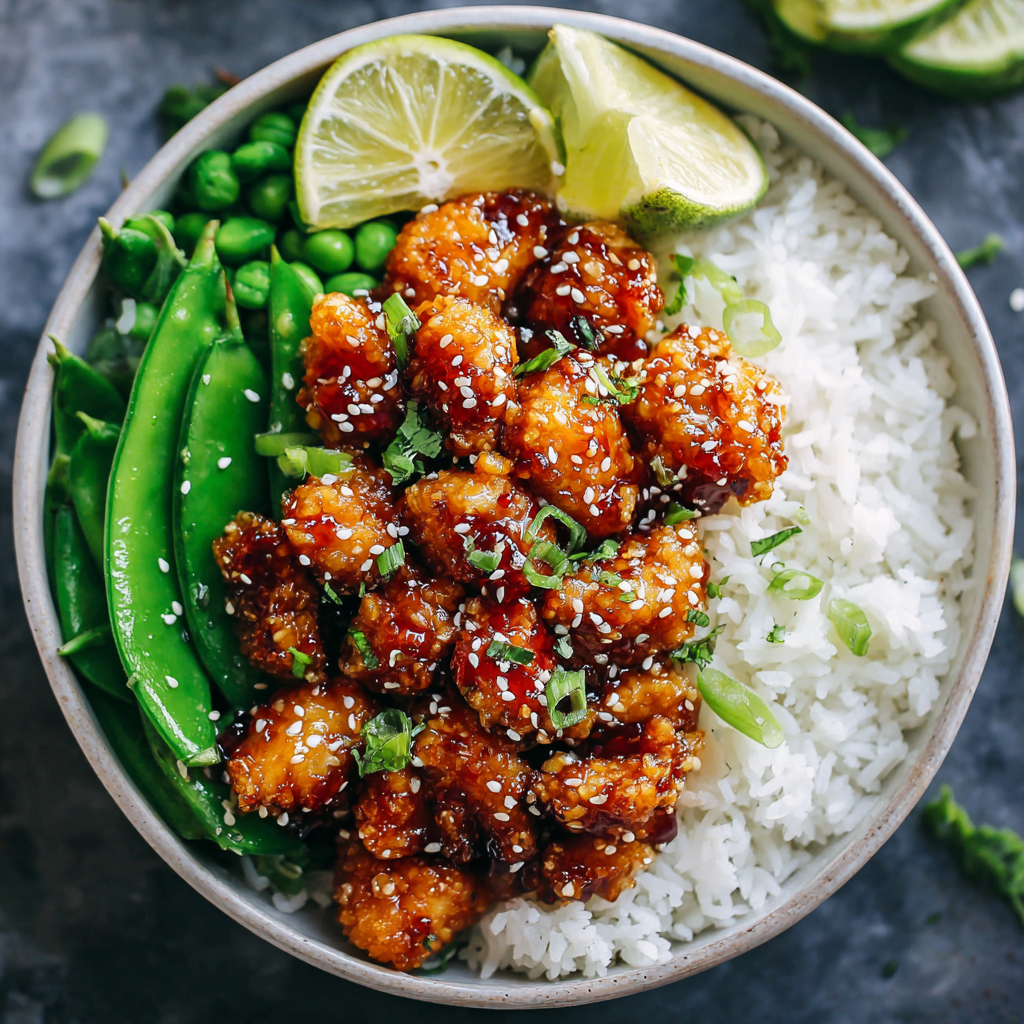
Hey there, friend! Let’s be real for a second. How many times have you stared into the abyss of your refrigerator at lunchtime, willing a delicious, healthy meal to magically appear? You’re torn between the siren song of takeout (so easy, so tempting) and the virtuous but often sad-looking container of plain chicken and broccoli you forced yourself to make on Sunday. I’ve been there more times than I’d like to admit. That exact feeling of “lunchtime limbo” is what inspired me to create a meal prep recipe that feels like a treat, not a chore.
Enter these Honey Sesame Chicken Meal Prep Bowls. Imagine this: tender, bite-sized pieces of chicken, pan-fried to golden, crispy perfection and then tossed in a sticky, sweet, and savory sesame glaze that’s so good, you’ll want to eat it with a spoon. We’re pairing that glorious chicken with a bed of fluffy jasmine rice, zipped up with a hit of fresh lime, and a colorful medley of sautéed veggies that still have a delightful crunch. It’s a symphony of textures and flavors in every single bite.
This isn’t just “meal prep.” This is preparing for a week of wins. It’s about gifting your future self little moments of joy in the middle of a busy day. You’ll save money, you’ll feel amazing, and you’ll actually *look forward* to lunch. So, let’s banish boring lunches together and cook up something that’s truly, delightfully amazing.
The Takeout Box That Started It All
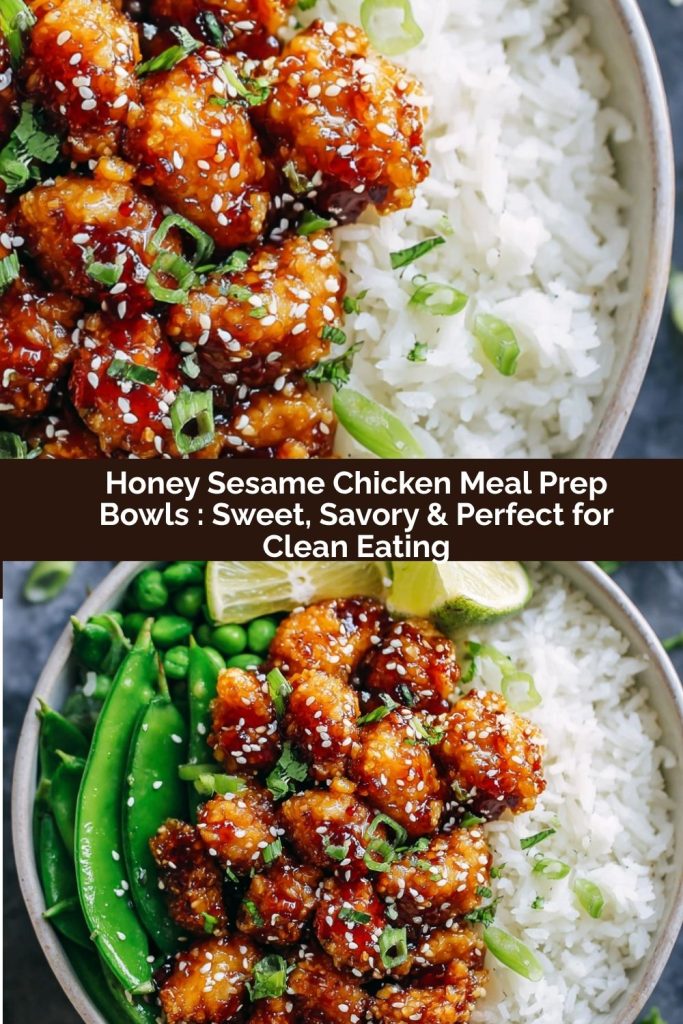
PrintHoney Sesame Chicken Meal Prep Bowls : Sweet, Savory & Perfect for Clean Eating

These Honey Sesame Chicken Meal Prep Bowls are the ultimate balance of comfort and clean eating. Crispy, golden chicken bites coated in a sticky-sweet sesame glaze sit atop fluffy lime rice and vibrant sautéed veggies. It’s a full-flavored, nutrient-packed meal that stays fresh all week long—perfect for powering through busy days with zero compromise on taste.
- Prep Time: 15 mins
- Cook Time: 25 mins
- Total Time: 40 mins
- Yield: 6 1x
Ingredients
For the Chicken:
2 lbs boneless, skinless chicken breast, cut into bite-sized cubes
1/2 cup cornstarch
Salt & pepper to taste
2 tbsp avocado or vegetable oil (for pan-frying)
Honey Sesame Sauce:
1/3 cup honey
1/4 cup low-sodium soy sauce
2 tbsp rice vinegar
1 tbsp sesame oil
2 garlic cloves, minced
1 tsp fresh grated ginger
1 tbsp cornstarch + 2 tbsp water (slurry)
1 tbsp sesame seeds
Veggies & Rice:
1 cup jasmine or basmati rice
Zest and juice of 1 lime
1 tbsp olive oil
1 cup snow peas
1 cup shredded carrots
2 cups Brussels sprouts, halved
Instructions
Cook rice according to package. Fluff with lime zest and juice; set aside.
Toss chicken with cornstarch, salt, and pepper. Pan-fry in hot oil until golden and crispy.
In a small pot, combine sauce ingredients (except slurry) and bring to a simmer. Stir in slurry and cook until thickened. Add sesame seeds.
Toss cooked chicken in the sauce until coated.
Sauté Brussels sprouts, snow peas, and carrots in olive oil for 5–6 minutes until tender-crisp.
Assemble bowls with rice, veggies, and saucy chicken. Garnish with extra sesame seeds or green onions.
Nutrition
- Calories: 500 kcal
- Fat: 18g
- Carbohydrates: 40g
- Protein: 35g
This recipe has its roots in a little red-and-white cardboard box. When I was a kid, my dad would sometimes surprise us on Friday nights by bringing home Chinese takeout. It was a huge deal! The whole house would fill with the most incredible aroma the moment he walked in. My order was always, without fail, the crispy sesame chicken. I’d meticulously pick out every single last sesame seed with my chopsticks (much to my brother’s annoyance) and savor each sticky, sweet piece.
As I got older and started cooking for myself, I wanted to recreate that magical flavor but in a way that felt a bit lighter and that I could enjoy all week long. I played around with sauces for weeks, reducing the sugar, amplifying the ginger and garlic, and finding the perfect balance of honey and soy. This bowl is the happy result—all the nostalgic, cozy comfort of that childhood takeout favorite, but made with wholesome, recognizable ingredients right in my own kitchen. It’s my little way of turning an ordinary Tuesday into a Friday night celebration.
Gathering Your Kitchen Crew: The Ingredients
One of the things I love most about this recipe is that the ingredient list is straightforward and flexible. Let’s break it down. You’ve got your dream team for the chicken, the superstar sauce, and the vibrant veggie and rice base. Here’s everything you’ll need:
For the Crispy Chicken:
- 2 lbs boneless, skinless chicken breast, cut into bite-sized cubes: This is our protein powerhouse! Cutting it into uniform pieces is the #1 secret to ensuring everything cooks evenly and gets that perfect golden crust. Chef’s Insight: You can absolutely use chicken thighs here for an even more tender and juicy result.
- 1/2 cup cornstarch: This is our magic dust! Cornstarch creates a super light, incredibly crispy coating on the chicken without the heaviness of a traditional flour batter. It’s the key to that “did I just fry this?” texture, even though we’re pan-frying.
- Salt & pepper to taste: The fundamental flavor starters. Don’t be shy—seasoning the chicken directly is crucial.
- 2 tbsp avocado or vegetable oil: We need a high-heat oil with a neutral flavor to get a good sear. Avocado oil is my go-to, but any vegetable oil will work perfectly.
For That Irresistible Honey Sesame Sauce:
- 1/3 cup honey: This is our natural sweetener, giving the sauce its beautiful gloss and sticky sweetness. For a vegan version, maple syrup works like a dream!
- 1/4 cup low-sodium soy sauce: This provides the savory, umami backbone. Using low-sodium lets you control the salt level. Substitution Tip: Tamari or coconut aminos are fantastic gluten-free alternatives.
- 2 tbsp rice vinegar: A little tang to balance the sweetness and keep the sauce from being cloying.
- 1 tbsp sesame oil: Do not skip this! Toasted sesame oil is the flavor bomb that gives the sauce its signature, nutty aroma.
- 2 garlic cloves, minced: Fresh is best here for a pungent, aromatic kick.
- 1 tsp fresh grated ginger: The zesty, warm partner to the garlic. I keep a knob of ginger in my freezer and just grate it frozen—it’s a total game-changer!
- 1 tbsp cornstarch + 2 tbsp water (slurry): Our thickening agent. Mixing the cornstarch with cold water first prevents lumps and gives you a silky, glossy sauce.
- 1 tbsp sesame seeds: For that classic look and a little extra crunch.
For the Veggies & Rice Base:
- 1 cup jasmine or basmati rice: I love the fragrant, floral notes of these rices. They pair beautifully with the Asian-inspired flavors.
- Zest and juice of 1 lime: This is my secret weapon! Stirring the zest and juice into the hot rice at the end brightens the entire dish and cuts through the richness of the sauce.
- 1 tbsp olive oil: For sautéing our colorful veggie squad.
- 1 cup snow peas: They stay so bright green and add a wonderful sweet, crisp texture.
- 1 cup shredded carrots: A pop of color and a subtle sweetness. I often buy pre-shredded to save time!
- 2 cups Brussels sprouts, halved: Don’t you dare turn your nose up! When halved and sautéed, they become nutty, slightly sweet, and absolutely delicious. They hold up really well in the fridge all week.
Let’s Get Cooking: Step-by-Step Instructions
Okay, apron on, music playing—let’s do this! I’ll walk you through each step. The process flows really smoothly once you get going. We’ll multitask like pros!
- Start the Rice: Cook your jasmine or basmati rice according to the package directions. Chef’s Hack: I like to cook mine in a rice cooker or Instant Pot for hands-off perfection. Once it’s cooked, fluff it with a fork and immediately stir in the lime zest and lime juice. This not only adds flavor but the acid helps keep the grains separate. Set it aside with the lid slightly ajar to let any extra steam escape.
- Conquer the Chicken: While the rice is cooking, pat your chicken cubes dry with a paper towel—this is crucial for getting a crisp crust! Toss them in a large bowl with the 1/2 cup of cornstarch, salt, and pepper until each piece is lightly and evenly coated. Heat your avocado or vegetable oil in a large skillet or wok over medium-high heat. You’ll know the oil is ready when a flick of water sizzles. Add the chicken in a single layer (you may need to do this in two batches to avoid crowding the pan—trust me on this!). Cook for 5-7 minutes, turning occasionally, until the chicken is cooked through and the coating is golden brown and crispy. Remove the chicken from the skillet and set it on a plate.
- Whip Up the Magic Sauce: In a small saucepan, combine the honey, soy sauce, rice vinegar, sesame oil, minced garlic, and grated ginger. Give it a good whisk and bring it to a gentle simmer over medium heat. In a separate small bowl, make your slurry by mixing the 1 tablespoon of cornstarch with 2 tablespoons of COLD water until it’s smooth. While whisking the simmering sauce continuously, slowly stream in the cornstarch slurry. Almost instantly, you’ll see the sauce begin to thicken and become glossy. Let it bubble for just one more minute, then remove it from the heat and stir in the tablespoon of sesame seeds.
- The Grand Coating: This is the best part! Return all the cooked chicken to the large skillet (you can wipe it out quickly if there are any burnt bits). Pour that beautiful, glossy honey sesame sauce over the top. Gently toss everything together over low heat until every single piece of chicken is lovingly coated in that sticky, sweet, and savory goodness.
- Sauté the Veggie Trio: In a separate large skillet, heat the tablespoon of olive oil over medium-high heat. Add your halved Brussels sprouts and sauté for about 4 minutes to get some color on them. Then, add the snow peas and shredded carrots. Continue to sauté for another 3-4 minutes, until all the veggies are tender-crisp (or “al dente,” as we say in the biz!). You want them to still have a bit of a bite, as they’ll soften a tiny bit more when you reheat your bowls.
- The Joy of Assembly: Now for the fun, assembly-line part! Grab your meal prep containers. I like using glass containers so I can see all the beautiful layers. Start with a generous base of your lime-kissed rice. Next, add a hearty scoop of the vibrant sautéed veggies. Finally, crown it all with a pile of that saucy, crispy honey sesame chicken. For a final flourish, sprinkle on a few extra sesame seeds or some thinly sliced green onions.
Plating with Pizzazz (Because You Deserve It!)
If you’re serving this immediately for dinner, let’s make it pretty! I love using shallow bowls. Create a bed of the fluffy lime rice, artfully arrange the colorful veggies on one side, and pile the glossy chicken right in the center. A final sprinkle of sesame seeds and a scattering of bright green scallions not only adds a fresh flavor but makes it look restaurant-worthy. A lime wedge on the side is the perfect finishing touch for anyone who wants an extra zing!
Make It Your Own: Delicious Recipe Variations
The beauty of this bowl is its versatility! Don’t be afraid to play around and use what you have.
- Spice It Up: Add a teaspoon of sriracha or a pinch of red pepper flakes to the sauce for a gentle, warming heat.
- Go Plant-Based: Swap the chicken for extra-firm tofu or tempeh. Press and cube the tofu, then follow the same cornstarch-dusting and pan-frying method for a fantastic crispy result.
- Veggie Lover’s Dream: Add broccoli florets, thinly sliced bell peppers, or sliced mushrooms to the veggie sauté. The more color, the better!
- Switch the Grain: Brown rice, quinoa, or cauliflower rice are all excellent, nutrient-packed bases that work wonderfully here.
Anna’s Chef Notes & Kitchen Stories
This recipe has been a work in progress for years! The first time I made it, I used flour for the chicken coating and ended up with a pasty, gummy layer—not the crispy dream I was after. A chef friend suggested cornstarch, and it was a total revelation. I also learned the hard way that adding cornstarch directly to the hot sauce is a one-way ticket to Lumpy Town. Hence, the “slurry” step was born out of delicious necessity!
Over time, the lime in the rice became my favorite upgrade. It makes the entire bowl taste fresher and brighter, especially after a day or two in the fridge. This recipe is a testament to the idea that the best dishes evolve with a little experimentation and a lot of love. Don’t be afraid to make it your own!
Your Questions, Answered!
I’ve gotten so many wonderful questions about this recipe over the years. Here are the most common ones to help you out!
Q: My sauce didn’t thicken! What did I do wrong?
A: This usually happens for one of two reasons. First, the sauce might not have been at a strong enough simmer when you added the slurry. It needs that heat to activate the cornstarch. Second, you may not have whisked continuously while adding the slurry. No worries! Just mix another small slurry (½ tbsp cornstarch + 1 tbsp water) and whisk it into the simmering sauce—it should thicken right up.
Q: How long do these meal prep bowls last in the fridge?
A: In airtight containers, they stay fresh and delicious for up to 4 days. The veggies will soften a bit, but the flavors meld together beautifully. I don’t recommend freezing them, as the crispy chicken coating and the veggies can become mushy upon thawing.
Q: My chicken got soggy after I tossed it in the sauce. How can I prevent this?
A> For the crispiest results, I have two tips! 1) Make sure your chicken is really golden and crispy straight out of the pan before saucing. 2) If you know you prefer maximum crispness, you can pack the sauce separately in little containers or condiment cups and drizzle it over your bowl just before eating. This is a foolproof method for keeping that perfect texture.
Q: Can I bake the chicken instead of pan-frying it?
A> Absolutely! For a lighter option, toss the cornstarch-coated chicken cubes with a tablespoon or two of oil and spread them in a single layer on a parchment-lined baking sheet. Bake at 400°F (200°C) for 15-20 minutes, flipping halfway, until cooked through and crispy. Then, toss them in the sauce as directed.
Nutritional Information*
*Please note: This is an approximate estimate calculated using an online tool and will vary based on your specific ingredients and portion sizes.
- Prep Time: 15 mins
- Cook Time: 25 mins
- Total Time: 40 mins
- Servings: 6
- Calories: ~500 kcal
- Protein: 35g
- Carbs: 40g
- Fat: 18g
Final Thoughts
At the end of the day, this Honey Sesame Chicken Meal Prep Bowl is everything I want in a weekday dinner: bold flavor, minimal fuss, and a fridge full of meals that actually make me excited to open the containers. It’s the kind of recipe that proves meal prep doesn’t have to taste like… well, meal prep. With that sweet-sticky sauce, the tender chicken, and those bright, crunchy veggies, every bite feels like a little takeout treat you made yourself.
Make it once, and I promise—it’ll earn a permanent spot in your weekly rotation. Here’s to easier evenings, happier lunches, and food that feels just as good as it tastes. Enjoy, friend.