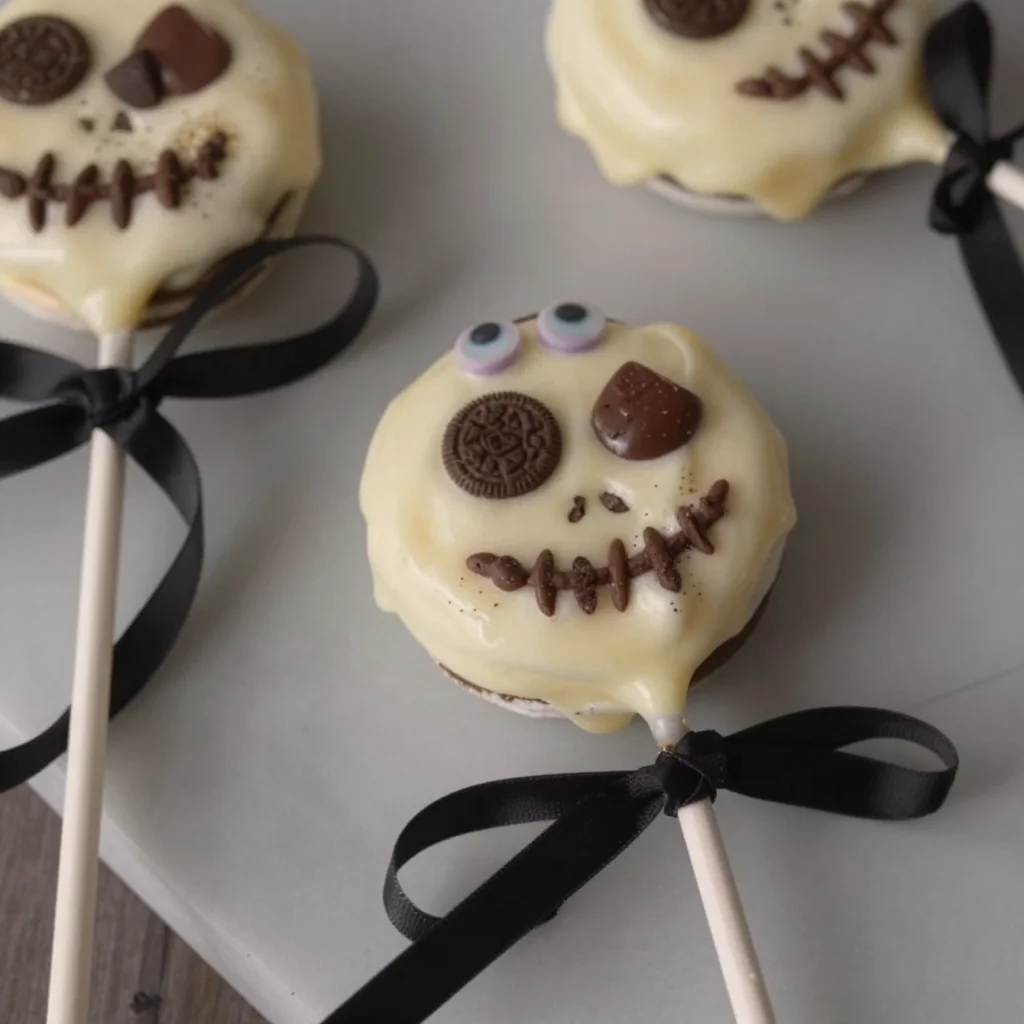
Spooky Skeleton Oreos: A Sweet Treat to Haunt Your Halloween
Halloween is just around the corner, and with it comes the excitement of spooky treats that can delight kids and grown-ups alike. Today, I’m thrilled to share one of my all-time favorite Halloween recipes: Spooky Skeleton Oreos! These adorable little snacks are not only super easy to make but also bring a dash of whimsical fun to any Halloween gathering. Whether you’re hosting a costume party, prepping for trick-or-treaters, or just looking to indulge in some sweet treats, these Skeleton Oreos are sure to steal the show.
Picture this: you walk into a kitchen filled with the warm aroma of melted chocolate, and there on the counter lies a line of beautifully crafted Skeleton Oreos all ready to be devoured. They’re just as fun to make as they are to eat! The best part? They’re customizable, allowing you to let your creativity run wild while crafting spooky little skeletons. I love getting friends and family involved, turning the kitchen into a little Halloween factory where we can all enjoy some laughs, stories, and of course, lots of delicious snacking.
Let’s dive into the delightful world of Spooky Skeleton Oreos, where you’ll find tips, tricks, and stories that make this treat a must-have for your Halloween festivities. So, grab your mixing bowls, put on your apron, and let’s create some magic in the kitchen!
A Sweet Memory Shared: Halloween Treats with My Grandma
When I think about Halloween, my mind drifts back to the joyful chaos of my childhood spent in my grandmother’s kitchen. Every year, she would transform her cozy space into a candy haven, filled with pumpkin decorations, colorful streamers, and, of course, the most delightful array of sweet treats. One year in particular stands out in my memory: it was the first time she let me help in the kitchen. We had just pulled out a batch of freshly made caramel popcorn, and while we were waiting for it to cool, she encouraged me to get creative with some melted chocolate and her stash of sprinkles.
That day, we spent hours laughing, decorating, and making our own little spins on traditional Halloween candies. It was a simple, sweet memory that sparked not only my love for cooking but also my desire to make food a joyful experience for others. Now, every Halloween, I try to recreate that sense of magic—turning ordinary ingredients into something that excites and delights. So, as we craft these Spooky Skeleton Oreos together, let’s celebrate the community and joy that cooking can bring!
Ingredients
To create your very own Spooky Skeleton Oreos, you’ll need the following ingredients:
-
Oreo Cookies (16 cookies): The classic chocolate sandwich cookie acts as the skeleton’s body. If you’re looking for a twist, try using golden Oreos for a different flavor profile!
-
Melting Chocolate or Chocolate Chips (12 ounces): Use either option for a smooth coating that brings the skeletons to life. White chocolate is a fun option too; just make sure to color it for a spooky effect.
-
White Frosting (1 cup): This will act as our glue and decoration, giving our skeletons their bone-like appearance. Feel free to make your own using powdered sugar, butter, and milk for a more homemade touch!
-
Mini Chocolate Chips (for eyes): These tiny morsels will be the perfect spooky touch! For an extra creepy look, consider using candy corn or even gummy eyeballs instead.
-
Candy Eyes (optional): These adorable little candies can give your skeletons an extra fun factor. They come in varying sizes and colors, perfect for enhancing the already spooky vibe.
Step-by-Step Instructions
Getting started is half the fun! Follow these simple steps to make your Spooky Skeleton Oreos:
-
Prep Your Workspace: Begin by gathering all your ingredients and tools. Lay out parchment paper on a baking sheet to prevent sticking. This step makes cleanup a breeze and keeps your skeletons looking sharp!
-
Melt the Chocolate: If you’re using melting chocolate, follow the package instructions, but typically, you’ll want to microwave it in 30-second intervals, stirring between each interval until smooth. If you’re using chocolate chips, add a teaspoon of coconut oil to help it melt more smoothly. Heat gently, as overheating can lead to a clumpy texture — we want a silky finish for our skeletons!
-
Coat the Oreos: Dip each Oreo into the melted chocolate, ensuring it’s completely coated. Use a fork to lift the cookie out of the chocolate, allowing the excess to drip off. Place it on your parchment paper. It’s like giving each skeleton a delightful chocolate bath!
-
Chill to Set: Once all your Oreos are coated and placed on the parchment paper, pop them in the fridge for about 10-15 minutes. This helps the chocolate set faster so when you decorate, the frosting adheres perfectly without sliding off.
-
Add the Frosting: After the chocolate has set, grab your white frosting and start piping out the skeletal features. Use a small round piping tip (or even just cut a tiny hole in the corner of the frosting bag) to outline the skeleton’s skull, ribcage, and limbs. You can be as detailed as you like; every skeleton has its own personality!
-
Decorate the Face: Now comes the fun part! Using mini chocolate chips or candy eyes, press them onto the white frosting to create spooky facial features. If your skeleton is feeling adventurous, why not give them a goofy or silly expression?
-
Final Touches: Once you’re finished decorating, let the frosting dry for about 10 minutes. This will ensure your adorable skeleton details stay put. With each one, you’ll see the character and charm come alive!
-
Serve & Enjoy: Arrange your Skeleton Oreos on a festive platter. You can even add some spooky-themed props around them for extra flair, like faux cobwebs or mini pumpkins.
Serving Suggestions
These Spooky Skeleton Oreos are best served on a fun Halloween-themed platter. Staging them with some spooky decorations like skeleton figurines or autumn leaves can create an inviting presentation that’s perfect for any Halloween celebration. For extra fun, consider pairing them with milkshakes or hot chocolate for a cozy, delightful treat!
Recipe Variations
-
Chocolate Dipped Pretzel Sticks: Instead of just Oreos, dip pretzel sticks in the melted chocolate and decorate them like skeleton bones. They offer a crunchy contrast that pairs beautifully with the creaminess of the Oreos!
-
Vegan Alternatives: Look for vegan Oreos and use dairy-free chocolate for a plant-based twist. You can even make your own frosting using coconut cream and powdered sugar for a vegan-friendly option!
-
Flavorful Oreos: Try using flavored Oreos like mint or peanut butter for unique flavor profiles. The mint flavor adds a refreshing touch, while peanut butter brings a delightful richness.
-
Colorful Skeletons: Use colored melting chocolate instead of the standard white for a fun and colorful twist. Imagine skeletons in bright green, orange, and purple—perfect for spicing up the Halloween vibe!
-
Add Sprinkles: Want a bit more texture? Use Halloween-themed sprinkles as a topping after you’ve piped the frosting. They add a pop of color and a festive touch to your skeleton creations.
Chef’s Notes
As a home chef, I’ve always been a bit of a perfectionist, especially when it comes to decorating. I once had a hilarious mishap while making these Skeleton Oreos for a party; I accidentally dipped a cookie too long in the chocolate, and it ended up being a chocolate blob instead of a skeleton. My friends and I laughed and decided that “melted skeleton” could be the new Halloween treat!
These spooky Oreos have evolved over time for me. Originally, I would use just white frosting for the bones, but I’ve since learned about the joy of color and creativity in decorating. Each batch becomes a canvas for my creativity, letting me express my personality through food—and I encourage you to see it the same way!
FAQs and Troubleshooting
1. Why did my chocolate become clumpy during melting?
If you overheat the chocolate, it can seize up and become clumpy. Make sure to heat it in small intervals, stirring in between, and never let it get too hot. Adding a little coconut oil can help keep it smooth!
2. How do I store leftover Skeleton Oreos?
Store your Skeleton Oreos in an airtight container at room temperature for up to three days. If you live in a hot area, consider refrigerating them to keep the chocolate from melting.
3. Can I make the cookies ahead of time?
Absolutely! You can prepare the coated Oreos a day in advance and wait to decorate them until closer to your event. Just make sure they’re stored properly until you’re ready to bring them to life with frosting and decorations.
4. What’s the best way to pipe the frosting?
Practice makes perfect! If you’re new to piping, test it on a piece of wax paper first to get the hang of it. You can also use a small zip-top bag with a corner snipped off if you don’t have a piping bag.
Nutritional Info (Optional)
Since these treats are delicious but a little indulgent, I’m not diving too deep into the nutritional content, but here’s a quick overview: a single Spooky Skeleton Oreo has roughly 130 calories, with about 6-8 grams of fat, depending on the chocolate and toppings used. If you’re counting calories or watching your sugar intake, feel free to adjust portions or add healthier swaps!
Final Thoughts
With Halloween approaching, let’s make it a season filled with laughter, creativity, and, of course, delicious treats! These Spooky Skeleton Oreos are not only a hit but a wonderful way to create memories in the kitchen, just like I did with my grandma. Food has a magical way of connecting us, and what better way to share that joy than through a fun and festive recipe?
So, grab some friends or family, put on some spooky tunes, and let’s whip up a batch (or two) of these delightful Skeleton Oreos! Share your creations, get creative, and enjoy the delicious treats that come alive in your kitchen. Happy Halloween, and happy cooking!
PrintSpooky Skeleton Oreos

Delightful and customizable Halloween treats that combine Oreos and melted chocolate, perfect for any spooky gathering.
- Prep Time: 15 minutes
- Cook Time: 30 minutes
- Total Time: 45 minutes
- Yield: 4 servings
- Category: Dessert
- Method: No-Bake
- Cuisine: American
- Diet: Vegetarian
Ingredients
- Oreo Cookies (16 cookies)
- Melting Chocolate or Chocolate Chips (12 ounces)
- White Frosting (1 cup)
- Mini Chocolate Chips (for eyes)
- Candy Eyes (optional)
Instructions
- Prep your workspace by laying out parchment paper on a baking sheet.
- Melt the chocolate in 30-second intervals, stirring until smooth.
- Coat each Oreo with melted chocolate and place on parchment paper.
- Chill in the fridge for 10-15 minutes to set the chocolate.
- Add the white frosting to outline the skeleton’s features.
- Decorate the face with mini chocolate chips or candy eyes.
- Let the frosting dry for about 10 minutes.
- Serve and enjoy on a festive platter.
Notes
For fun variations, consider using flavored Oreos or colorful melting chocolate.
Nutrition
- Serving Size: 1 serving
- Calories: 130
- Sugar: 8g
- Sodium: 50mg
- Fat: 7g
- Saturated Fat: 4g
- Unsaturated Fat: 2g
- Trans Fat: 0g
- Carbohydrates: 15g
- Fiber: 1g
- Protein: 1g
- Cholesterol: 0mg
Keywords: Halloween, desserts, spooky treats, Oreos, chocolate