Mozzarella Sticks: The Golden, Crispy, & Perfectly Melty Snack We All Deserve
Hey there, friend! Let’s be real for a second: is there any sound more universally joyful than the crisp *crunch* of biting into a perfectly fried mozzarella stick? Followed, of course, by that legendary, stretch-for-days cheese pull. It’s a tiny moment of pure, unadulterated happiness, a little edible hug that says “party time” or “yes, you absolutely deserve this snack.”
Today, we’re not just making mozzarella sticks; we’re reclaiming them. We’re taking them from the realm of late-night freezer finds and elevating them to a homemade masterpiece you can be genuinely proud of. And I promise you, the magic is in the method, not the mystery. The secret to that iconic melty center that *stays put* until you bite into it? It’s all about a little patience and your freezer. That’s it!
This recipe is your new go-to for game day spreads, movie nights that feel special, or impromptu gatherings where you want to be the hero who brought “the good stuff.” We’re using simple ingredients you likely have on hand, and I’ll walk you through every single step with all my best kitchen hacks. So, tie on that apron, put on some fun music, and let’s turn simple cheese into something truly magical. Get ready for the ultimate crunchy, cheesy, utterly satisfying bite.
The Great Mozzarella Stick Mission of ‘03
PrintMozzarella Sticks : Golden, Crispy, and Perfectly Melty
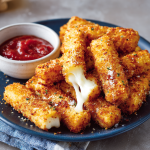
These mozzarella sticks are a crunchy, cheesy snack classic—ideal for parties, game day, or when you’re just craving something seriously satisfying. That cheese pull? Unbeatable. Freezing before frying is the key to achieving melty centers without a blowout.
Ingredients
12 mozzarella string cheese sticks (or block mozzarella, cut into sticks)
1 cup all-purpose flour
2 large eggs
2 tbsp milk
1½ cups Italian-style breadcrumbs
½ tsp garlic powder (optional)
¼ tsp salt
¼ tsp black pepper
Oil for frying (vegetable or canola)
Instructions
Prep breading station:
Bowl 1: Flour
Bowl 2: Beaten eggs + milk
Bowl 3: Breadcrumbs + seasoning
Coat each cheese stick in flour, then egg, then breadcrumbs. Repeat egg + breadcrumb step again for double coating.
Freeze coated sticks for at least 1 hour (or up to overnight).
Heat oil to 350°F (175°C) in a deep pan.
Fry 3–4 at a time, ~1–2 minutes, until golden brown.
Drain on paper towels. Serve hot with marinara or ranch.
Nutrition
- Calories: 130
- Fat: 8g
- Protein: 6g
My love affair with mozzarella sticks started not in a restaurant, but in my best friend Jamie’s kitchen during a sleepover in 2003. We were two determined 12-year-olds with a serious craving and a box of frozen sticks that had… seen better days. The result was a tragicomic kitchen disaster: exploded cheese swimming in oil, a smoke alarm serenade, and sticks that were somehow both burnt and frozen in the center.
But from those greasy ashes rose a mission. I became obsessed with cracking the code. How did *restaurants* do it? Through trial and (mostly) error in my mom’s kitchen, I learned the golden rules: the double coat, the crucial freeze, and the exact oil temperature. The first time I pulled a batch of golden, intact, oozy sticks from the pot, I felt like a culinary wizard. I ran to the phone (a cordless landline, of course) to call Jamie. “I did it! They’re perfect!” That moment—of sharing a perfectly cheesy, crispy victory with a friend—is the heart of this recipe for me. It’s about turning a simple snack into a shared, joyful experience.
Your Simple, Star-Powered Ingredients
Gathering your lineup is the first step to success! Here’s what you need and why each ingredient matters:
- 12 mozzarella string cheese sticks: The undisputed champion for this job. They’re already perfectly portioned, low-moisture (which means less melt-out!), and have a great pull. Chef’s Insight: If you can only find a block of low-moisture mozzarella, cut it into ½-inch x 3-inch sticks. Pat them very dry with paper towels first.
- 1 cup all-purpose flour: Our foundational layer. It creates a dry surface for the egg wash to cling to, ensuring our breadcrumb armor sticks. Substitution Tip: For a gluten-free version, your favorite 1:1 GF flour blend works beautifully here.
- 2 large eggs + 2 tbsp milk: The “glue”! Whisking the eggs with a splash of milk lightens the mixture, making for a thinner, more even coating that fries up extra crisp.
- 1½ cups Italian-style breadcrumbs: They come pre-mixed with herbs and Parmesan flavor, giving you a huge head start on taste. Flavor Boost: Want extra punch? Add ¼ cup of grated Parmesan cheese and ½ tsp each of dried oregano and basil to the crumbs.
- ½ tsp garlic powder, ¼ tsp salt, ¼ tsp black pepper: Our seasoning trio. The garlic powder (optional but recommended!) adds a savory depth that plays so nicely with the marinara later.
- Oil for frying (vegetable, canola, or peanut): You’ll need enough to come about 1.5 inches up the side of a heavy pot or Dutch oven. A neutral oil with a high smoke point is key for achieving that golden color without any off-flavors.
Let’s Build & Fry: Your Foolproof Roadmap to Cheesy Bliss
Ready? Here’s where the fun begins. I’ll guide you through each step with all my favorite tricks to ensure success.
Step 1: Set Up Your Breading Station (Like a Pro!)
Organization is your best friend for breading! Get three shallow bowls or plates. In the first, place your flour. In the second, whisk the eggs and milk until completely smooth and unified. In the third, mix your breadcrumbs with the garlic powder, salt, and pepper. Line them up in that order: Flour, Egg, Breadcrumbs. Keep one hand for dry ingredients (flour and crumbs) and one for wet (egg wash) to avoid ending up with “club hands” coated in breading!
Step 2: The Double-Coat Maneuver
Take a cheese stick. Roll it firmly in the flour, shaking off any excess. This isn’t a thick batter—just a light, even dusting. Next, dunk it fully into the egg wash, let the excess drip off for a second. Now, roll it in the breadcrumb mixture, pressing gently so a nice, even layer adheres. Here’s the magic trick: go back into the egg wash, then the breadcrumbs one more time. This double coat is your insurance policy against cheese leaks. It creates a sturdy, golden fortress around the melty treasure inside.
Step 3: The All-Important Freeze
Place your beautifully breaded sticks on a parchment-lined baking sheet or plate. Do not let them touch! Pop the entire tray into the freezer for at least 1 hour, but ideally 2-4. Overnight is fantastic if you’re planning ahead. This step is NON-NEGOTIABLE. It solidifies the cheese and sets the coating, so when they hit the hot oil, the outside crisps up long before the inside turns into a lava flow. Patience here pays off in perfect cheese pulls, I promise.
Step 4: Fry Time – Let’s Get Golden
In a heavy-bottomed pot or Dutch oven, heat your oil to 350°F (175°C). Use a candy/deep-fry thermometer for accuracy; guessing is the enemy of perfect frying. Once hot, carefully lower in 3-4 frozen sticks at a time. Don’t crowd the pan, or the oil temperature will drop and make them greasy. They’ll fry quickly—just about 1-2 minutes, until they’re a uniform, glorious golden brown. Use tongs or a slotted spoon to gently turn them if needed. Remove and let them drain on a wire rack set over a baking sheet (this keeps them crispier than paper towels alone!). Repeat with the remaining sticks.
Step 5: The Grand Finale – Serve Immediately!
These are at their peak of perfection about 60 seconds after leaving the oil. The coating is at maximum crispness and the cheese is molten. This is not a “let them sit” kind of situation. Get them to your people, stat!
Serving Your Masterpiece
Presentation is part of the fun! Pile your golden mozzarella sticks high on a platter or in a basket lined with a red-and-white checkered parchment paper for that classic trattoria vibe. Place small bowls of warm marinara sauce (homemade or a great store-bought one you’ve doctored up with a pinch of red pepper flakes) and cool, creamy ranch dressing right in the center for dipping. For a next-level spread, add a bowl of zesty arrabbiata sauce, a garlic aioli, or even a balsamic glaze for drizzling. They’re the ultimate shareable snack, so dig in together!
Play With Your Food! Delicious Twists & Swaps
Once you’ve mastered the classic, the world is your cheesy oyster! Try these fun variations:
- The “Everything Bagel”: Swap Italian breadcrumbs for panko, and after the final breading, roll the stick in Everything Bagel seasoning.
- Spicy Sriracha Kick: Add 1 tablespoon of Sriracha to the egg wash mixture. Use plain breadcrumbs and add a teaspoon of smoked paprika to them.
- Gluten-Free & Air Fryer Friendly: Use gluten-free flour and breadcrumbs. Instead of frying, spray frozen sticks generously with oil and air fry at 400°F for 6-8 minutes, flipping halfway.
- Keto/Panko-Style: Replace the flour with almond flour and the breadcrumbs with crushed pork rinds or grated Parmesan cheese baked until crisp for the coating.
- “Stuffed” Sensation: Before breading, carefully make a lengthwise slit in a string cheese and tuck in a thin slice of pepperoni or a sliver of sun-dried tomato.
A Few More Bites of Wisdom from My Kitchen
This recipe has been my party MVP for years, and it’s evolved with every batch. I once tried to rush the freezing step (30 minutes? Surely that’s enough!) and created a cheesy oil slick. Lesson learned—respect the freeze! I’ve also found that letting the breaded sticks “rest” in the freezer for a few hours or overnight actually makes the frying process less hectic; you can bread days ahead and fry straight from frozen when guests arrive.
The biggest laugh came when I accidentally used powdered sugar instead of flour in the first bowl during a holiday cooking marathon. Let’s just say sweet, fried cheese is… an acquired taste I do not possess. Now, I clearly label my canisters! The point is, kitchens are for joy and a little friendly chaos. Even the “mistakes” become stories. So have fun with this, make it your own, and get ready for the compliments to roll in.
Your Questions, Answered!
Help! My cheese exploded out during frying. What went wrong?
The most likely culprits are the freeze or the oil temperature. First, did you freeze the breaded sticks for a full hour minimum? They need to be solid. Second, was your oil at a steady 350°F? Too low, and the coating won’t seal quickly; too high, and it burns before the cheese even warms up. A thermometer is your best investment for frying.
Can I make these ahead of time?
Absolutely, and I highly recommend it! You can bread and freeze the sticks for up to a month. Store them in a single layer on a tray until frozen solid, then transfer to a freezer bag. Fry directly from frozen—no need to thaw, just add maybe 30 seconds to the fry time.
What’s the best way to reheat leftovers?
While best fresh, you can revive leftovers in an air fryer or toaster oven at 375°F for 3-5 minutes until hot and re-crisped. The microwave will make them soggy, so avoid it if you can!
Can I bake these instead of frying?
You can, but expect a different texture—they’ll be more of a toasted, crunchy coating than a light, shattering crisp. For baking, place frozen sticks on a greased rack over a baking sheet, spray generously with oil, and bake at 425°F for 8-10 minutes, flipping once. The air fryer method (see Variations) is a superior “no-fry” option!
Nutritional Information (Approximate, Per Stick)
Note: Values are estimates based on frying and can vary with oil absorption and specific ingredients used.
- Calories: 130
- Fat: 8g
- Saturated Fat: 3.5g
- Carbohydrates: 9g
- Protein: 6g
- Sodium: 200mg

Final Thoughts
These mozzarella sticks are more than just a snack—they’re a little moment of joy you can make at home. The crispy coating, the molten, stretchy cheese, and that satisfying crunch all come together with a few simple tricks: a double breading, a crucial freeze, and the perfect oil temperature. Once you master the method, you’ll see just how easy it is to turn everyday ingredients into a crowd-pleasing, movie-night-worthy treat.
Whether you stick to the classic recipe or experiment with twists like spicy sriracha, stuffed cheese, or gluten-free versions, the goal is the same: golden, melty, irresistible bites that bring people together. So grab your cheese, fire up the fryer (or air fryer!), and get ready to serve smiles—one perfectly crispy stick at a time.