No-Bake Huckleberry Cheesecake: A Slice of Heaven
Hi friend! I’m so excited to share one of my absolute favorite recipes with you today: No-Bake Huckleberry Cheesecake. Picture this: warm sunshine pouring through the kitchen window, a gentle breeze carrying the sweet scent of summer fresh huckleberries, and the promise of a decadent dessert that doesn’t require a single ounce of baking. Sounds dreamy, right? This cheesecake is the perfect treat for any occasion, whether you’re hosting a backyard barbecue or simply treating yourself after a long week.
Huckleberries are one of my all-time favorite ingredients and they hold a special place in my heart. Growing up, my family took annual summer trips to the mountains, where the vibrant wildflowers danced in the breeze, and fields of huckleberries awaited. My siblings and I would spend hours picking these little gems, our fingers stained purple by the time we headed back home. My mom would always transform our meager haul into something magnificent—pies, jams, and yes, even cheesecakes. The joy of sharing those desserts with family and friends made each meal feel like a celebration.
Now, let’s bring a little bit of that joy into your kitchen! This No-Bake Huckleberry Cheesecake is not just easy to make; it’s also a great way to utilize those delightful berries. With its rich, creamy filling and a crumbly chocolate crust, it’s a dessert that makes every day feel special. So, roll up your sleeves, grab your apron, and let’s make something amazing together!
Personal Story
Whenever I think of huckleberries, I’m instantly transported back to those summer days roaming the hills with my family. One particular memory stands out: I remember a sunny afternoon, my siblings and I cheering each other on as we raced to fill our baskets. There were giggles, playful shoves, and the occasional mossy rock where someone inevitably tripped, sending us all into fits of laughter. When we finally made it home, my mom gathered us in the kitchen, our little finds all piled up on the counter. She whipped up a no-bake huckleberry cheesecake, and the four of us dove into it with spoons, thrilled to taste the fruits of our labor. That cheesecake always tasted like our adventure and, quite frankly, it tasted like summer loveliness.
Now, as an adult, I’ve put my own spin on that classic recipe. This No-Bake Huckleberry Cheesecake captures all the nostalgia but adds a little bit of magic with the chocolate crust and whipped cream layers. Every bite is a sweet reminder of family, adventure, and joy. I can’t wait for you to make it and create your own delicious memories!
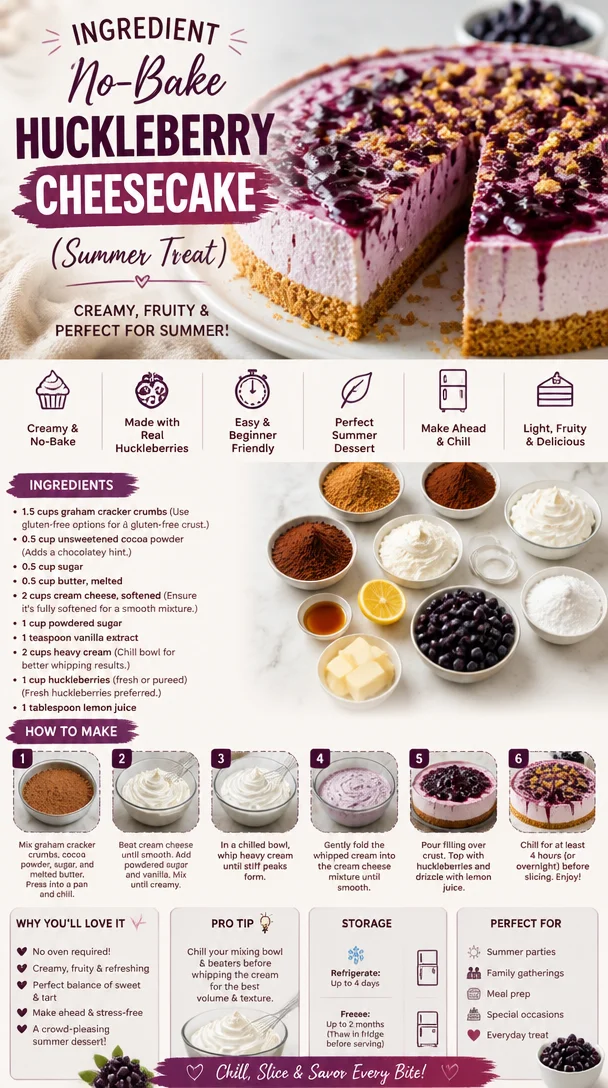
Ingredients
Here’s what you’ll need for this scrumptious No-Bake Huckleberry Cheesecake:
-
1.5 cups graham cracker crumbs
- A classic for cheesecake crust! You can use gluten-free options if needed for a gluten-free base. I love experimenting with different flavored graham crackers for an extra kick!
-
0.5 cup unsweetened cocoa powder
- Adds a delightful chocolatey hint to the crust. If you’re not a fan of chocolate, you can reduce the amount or omit it altogether for a classic graham cracker flavor.
-
0.5 cup sugar
- This is crucial for sweetening the crust and balancing out the tartness of the huckleberries. Feel free to switch to coconut sugar or a zero-calorie sweetener if you’re watching your sugar intake.
-
0.5 cup butter, melted
- This binds the crust together. I recommend using unsalted butter to keep the flavors balanced, but if you only have salted on hand, just skip any additional salt.
-
2 cups cream cheese, softened
- Make sure it’s fully softened for a creamy, smooth filling. If you need a lighter option, you can substitute half of the cream cheese with Greek yogurt.
-
1 cup powdered sugar
- It sweetens and helps to achieve that dreamy texture in the filling. For a sugar-free option, you could use powdered erythritol.
-
1 teaspoon vanilla extract
- A staple ingredient that enhances the flavor profile! Stick with the liquid extract for the best results; imitation vanilla just doesn’t have the same depth.
-
2 cups heavy cream
- Chilling your bowl before whipping will help achieve those fluffy peaks you want for the filling. You could also use coconut cream for a dairy-free version.
-
1 cup huckleberries (fresh or pureed)
- Fresh huckleberries are highly recommended, but frozen will work as well! Just thaw and ensure there’s no excess liquid. If you can’t find huckleberries, blueberries or blackberries make fantastic substitutes.
-
1 tablespoon lemon juice
- A splash of acidity brightens all the flavors. You can use fresh lemon juice or bottled—just avoid the sweetened versions!
Step-by-Step Instructions
Ready to dive into making your No-Bake Huckleberry Cheesecake? Let’s jump right into it!
Step 1: Make the Crust
-
Combine Ingredients:
In a mixing bowl, combine the graham cracker crumbs, cocoa powder, sugar, and melted butter. Mix until everything is evenly coated and crumbly. -
Press into Pan:
Pour the mixture into a 9-inch springform pan (trust me, this is the best choice for cheesecakes). Use the back of a measuring cup or your fingers to firmly press the crumbs into the bottom and a little up the sides of the pan. This will create a sturdy base for your cheesecake, so make sure it’s compact! -
Chill the Crust:
Pop the crust into the refrigerator for at least 30 minutes to set. This step is crucial because it allows the butter to firm up, ensuring your crust holds together beautifully when you slice into it.
Step 2: Prepare the Filling
-
Beat the Cream Cheese:
In a large bowl, beat the softened cream cheese with an electric mixer until it’s smooth and creamy. Don’t skip this step—lumps in your filling will not make for a dreamy cheesecake! -
Add Powders:
Gradually mix in the powdered sugar and vanilla extract, continuing to beat until well combined. This should take about 2–3 minutes, resulting in a fluffy mixture that smells heavenly. -
Whip the Cream:
In a separate chilled bowl, whip the heavy cream until stiff peaks form. This is where the magic happens! Chill your bowl and beaters beforehand for optimal results—you want that cream to whip up nice and fluffy. -
Fold It Together:
Gently fold the whipped cream into the cream cheese mixture with a spatula. The goal is to combine the two without deflating the cream. Use a light hand here; we want it airy! -
Add Huckleberries:
Finally, fold in the huckleberries and lemon juice until just combined. You want those bursts of berry flavor to shine throughout, so don’t over-mix.
Step 3: Assemble the Cheesecake
-
Fill the Crust:
Carefully spoon the filling into the chilled crust, smoothing the top with a spatula. Feel free to create a little swirl or design on the top if you’re feeling fancy! -
Chill to Set:
Cover the pan with plastic wrap and pop it back into the refrigerator. The cheesecake needs to chill for at least 4 hours, but overnight is even better. This allows all the flavors to meld and the cheesecake to firm up beautifully.
Step 4: Serve and Enjoy
-
Release and Slice:
When you’re ready to serve, carefully run a knife around the edge of the springform pan, then release and remove the outer ring. Slice into wedges and serve chilled. -
Garnish (Optional):
For a touch of elegance, garnish each piece with a dollop of whipped cream and a few fresh huckleberries. This extra touch makes it feel like a celebration!
Serving Suggestions
This No-Bake Huckleberry Cheesecake is best served chilled. You can present it on a lovely cake stand to show off its layers! Pair it with a light dessert wine for adults, or offer a refreshing herbal iced tea for a more laid-back vibe. And don’t forget to grab a few spoons for those who will want seconds!
Recipe Variations
Here are a few creative twists you can try:
- Chocolate Swirl: Drizzle some melted chocolate over the top of the cheesecake before setting in the fridge for a rich, chocolaty treat.
- Berry Blast: Mix in other berries or even swirl some berry puree into the filling for a beautiful marbled effect.
- Nutty Crunch: Add finely chopped nuts to the crust for added texture and flavor. Almonds and pecans work beautifully!
- Vegan Version: Substitute the cream cheese with a cashew cream or silken tofu blended until smooth and use coconut cream in place of heavy cream for a dairy-free cheesecake.
- Lemon Zest: For a brighter flavor, add some lemon zest to the filling for an extra burst of sunshine.
Chef’s Notes
Ah, the stories that come from the kitchen! This recipe truly embodies joy for me. I still remember the first time I nailed it—my friends were over, and I told them I was trying out a new cheesecake recipe. I was a bundle of nerves, pacing around, hoping it would turn out okay. After it chilled and I took that first bite, I was elated! A friend exclaimed it was the best thing they’d ever tasted. Our laughter echoed through the kitchen, and my heart was so full. This cake has since been a staple for birthdays, potlucks, and cozy Friday nights at home.
FAQs and Troubleshooting
Q: Can I use frozen huckleberries?
A: Yes, absolutely! Just thaw them and drain any excess liquid so your cheesecake doesn’t become watery.
Q: How do I store leftovers?
A: Keep any leftovers covered in the refrigerator for up to 5 days. I recommend slicing individual pieces and wrapping them in plastic wrap for easy snacking!
Q: My filling turned out lumpy. What went wrong?
A: The most common culprit is not properly softening the cream cheese beforehand. Make sure it’s at room temperature, and mix it until smooth before adding anything else.
Q: What if I don’t have a springform pan?
A: No worries! You can use a regular pie dish; just let the cheesecake set longer, and be gentle while slicing it so it doesn’t break apart.
Nutritional Info
While I don’t usually focus on nutritional info, here’s a rough estimate per slice based on the recipe serving 12:
- Calories: 320
- Protein: 4g
- Carbohydrates: 28g
- Fat: 24g
- Sugar: 16g
Final Thoughts
There you have it, my friends! A delightful No-Bake Huckleberry Cheesecake that brings memories flooding back with every bite. I hope this recipe inspires you to kick back in the kitchen, embrace your creativity, and perhaps share a slice or two with the ones you love. Cooking is all about joy, memories, and of course, a dash (or splash) of cream! So gather your ingredients and let’s make magic happen!
PrintNo-Bake Huckleberry Cheesecake
A rich and creamy no-bake cheesecake featuring fresh huckleberries, all atop a delicious chocolate crust.
- Prep Time: 15 minutes
- Cook Time: 0 minutes
- Total Time: 240 minutes
- Yield: 12 servings 1x
- Category: Dessert
- Method: No-Bake
- Cuisine: American
- Diet: Vegetarian
Ingredients
- 1.5 cups graham cracker crumbs
- 0.5 cup unsweetened cocoa powder
- 0.5 cup sugar
- 0.5 cup butter, melted
- 2 cups cream cheese, softened
- 1 cup powdered sugar
- 1 teaspoon vanilla extract
- 2 cups heavy cream
- 1 cup huckleberries (fresh or pureed)
- 1 tablespoon lemon juice
Instructions
- Combine Ingredients: In a mixing bowl, combine the graham cracker crumbs, cocoa powder, sugar, and melted butter. Mix until everything is evenly coated and crumbly.
- Press into Pan: Pour the mixture into a 9-inch springform pan. Use the back of a measuring cup or your fingers to firmly press the crumbs into the bottom and a little up the sides of the pan.
- Chill the Crust: Pop the crust into the refrigerator for at least 30 minutes to set.
- Beat the Cream Cheese: In a large bowl, beat the softened cream cheese with an electric mixer until it’s smooth and creamy.
- Add Powders: Gradually mix in the powdered sugar and vanilla extract, continuing to beat until well combined.
- Whip the Cream: In a separate chilled bowl, whip the heavy cream until stiff peaks form.
- Fold It Together: Gently fold the whipped cream into the cream cheese mixture with a spatula.
- Add Huckleberries: Fold in the huckleberries and lemon juice until just combined.
- Fill the Crust: Spoon the filling into the chilled crust, smoothing the top with a spatula.
- Chill to Set: Cover the pan with plastic wrap and chill for at least 4 hours.
- Release and Slice: Run a knife around the edge of the springform pan, then release and remove the outer ring.
- Garnish (Optional): Garnish each piece with a dollop of whipped cream and fresh huckleberries.
Notes
Best served chilled. You can customize with other berries or flavors if desired.
Nutrition
- Serving Size: 1 slice
- Calories: 320
- Sugar: 16g
- Sodium: 150mg
- Fat: 24g
- Saturated Fat: 14g
- Unsaturated Fat: 8g
- Trans Fat: 0g
- Carbohydrates: 28g
- Fiber: 1g
- Protein: 4g
- Cholesterol: 70mg
Keywords: no-bake cheesecake, huckleberry, dessert, summer, quick dessert