***
Your New Favorite Fall Treat: Pumpkin Pie Crumble Bars!
Hey there, friend! Anna here, coming to you from my kitchen, which currently smells like a cozy autumn dream. Is there anything better than the warm, spiced scent of pumpkin and cinnamon wafting through the house? It’s the kind of aroma that just wraps you up in a big, comforting hug and promises something delicious is on the way.
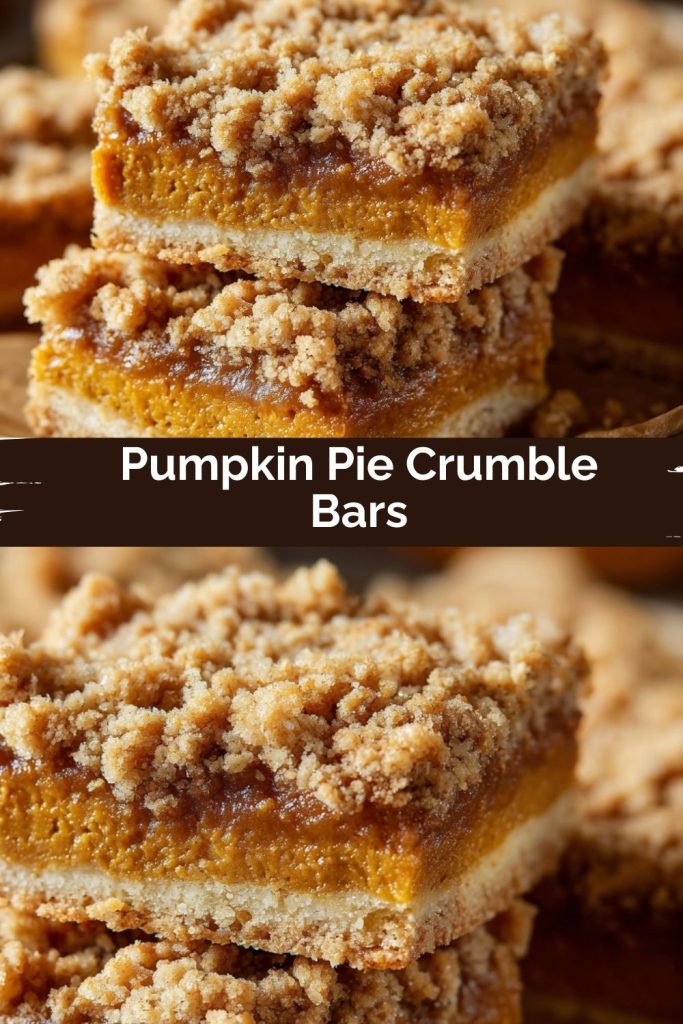
I’m a huge fan of classic pumpkin pie—it’s a timeless treasure, right? But sometimes, you want all that incredible flavor in a simpler, more portable package. Something you can slice, stack, and share without needing a plate and fork. Enter my Pumpkin Pie Crumble Bars! We’re talking a buttery, shortbread-like crust, a layer of perfectly spiced, velvety pumpkin filling, and a glorious, golden crumble topping that adds the most satisfying crunch.
This recipe is the beautiful, delicious love child of a pumpkin pie and a crisp autumn crumble. It’s designed for joy, not stress. Whether you’re hosting a fall gathering, need a standout treat for the school bake sale, or just want to make a regular Tuesday feel special, these bars are your answer. They’re beginner-friendly, deeply satisfying, and packed with all the nostalgic flavors we crave this time of year. So, let’s preheat that oven and bake up some magic together!
A Slice of Nostalgia: My First Baking Victory
PrintPumpkin Pie Crumble Bars
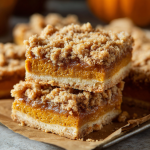
A buttery shortbread base topped with spiced pumpkin filling and a golden crumble—these bars give you all the cozy flavors of pumpkin pie in a simple, sliceable treat. No fork needed, just pure fall comfort.
- Prep Time: 15 min
- Cook Time: 30–35 min
- Total Time: 50 min + cooling
- Yield: 16 bars 1x
Ingredients
Crust & Crumble
1 cup unsalted butter, softened
1 cup granulated sugar
2 cups all-purpose flour
1 teaspoon vanilla extract
½ teaspoon salt
Pumpkin Filling
1¼ cups pumpkin purée
½ cup granulated sugar
1 teaspoon pumpkin pie spice
Pinch of salt (optional)
Instructions
Preheat oven to 350°F. Line a 9×13-inch pan with parchment paper.
Cream butter, sugar, vanilla, and salt. Add flour until a crumbly dough forms. Press two-thirds into the pan.
In another bowl, mix pumpkin, sugar, spice, and salt. Spread over the crust.
Crumble the remaining dough over the top.
Bake 30–35 minutes, until golden and set.
Cool completely before slicing into 16 squares.
Nutrition
- Calories: 220
- Sugar: 15g
- Sodium: 85mg
- Fat: 11g
- Carbohydrates: 29g
This recipe takes me right back to my first “from-scratch” baking attempt. I was about ten years old, determined to surprise my mom with a dessert. The goal was a pumpkin pie, but let’s just say my crust skills were… a work in progress. It was less “flaky and tender” and more “sturdy and resilient.” I was so disappointed, but my mom, being the wonderful cheerleader she is, declared it the best pie she’d ever had. She focused on the filling—the heart of the pie—and that meant the world to me.
That kitchen flop taught me a beautiful lesson: it’s the love and the flavor that truly matter, not perfection. These Pumpkin Pie Crumble Bars are my homage to that memory. They give you that incredible, spiced pumpkin filling we all adore, but the crust and topping are literally foolproof. No rolling pin, no tears, no stress—just a simple press-and-crumble situation that delivers maximum buttery goodness every single time. It’s the guaranteed victory I wish I’d had all those years ago!
Gathering Your Ingredients
Here’s the beautiful part: you probably have most of this in your pantry right now! This is a simple, humble ingredient list that comes together to create something truly spectacular.
For the Crust & Crumble:
- 1 cup (2 sticks) unsalted butter, softened – This is the key to our rich, tender base and topping. Using unsalted lets you control the salt level. Chef’s Tip: True softened butter should yield slightly to gentle pressure. If you forget to take it out, you can quickly soften it by cutting it into chunks and letting it sit for 15-20 minutes. Don’t microwave it to mush!
- 1 cup granulated sugar – Sweetens the crust and balances the spices in the filling.
- 2 cups all-purpose flour – The structure of our crumble. Spoon and level it into your measuring cup to avoid packing in too much.
- 1 teaspoon pure vanilla extract – A warm, floral note that makes the crust taste like a sugar cookie. It’s a simple upgrade that makes a big difference.
- ½ teaspoon salt – Do not skip this! Salt is the flavor enhancer that makes the sweet and buttery elements truly sing.
For the Pumpkin Filling:
- 1¼ cups pumpkin purée – Be sure to use 100% pure pumpkin purée, NOT pumpkin pie filling. The pie filling is pre-sweetened and spiced, which will throw off our entire recipe. Libby’s is my go-to brand for its consistent texture and flavor.
- ½ cup granulated sugar – This is less sugar than a traditional pie, allowing the natural, earthy flavor of the pumpkin and the warm spices to really shine through.
- 1 teaspoon pumpkin pie spice – The cozy, aromatic soul of the filling! If you don’t have any pre-mixed, see my variation below for a quick DIY blend.
- Pinch of salt (optional) – I always add this tiny pinch to the filling, too. It just helps round out all the flavors perfectly.
Let’s Make Some Magic: Step-by-Step Instructions
Ready? This is the fun part. Put on some music, and let’s turn these simple ingredients into something incredible.
Step 1: Preheat and Prep!
Preheat your oven to 350°F (175°C). This is our golden rule—always preheat for even baking! Then, line a 9×13-inch baking pan with parchment paper, leaving a little overhang on two opposite sides. This is my favorite chef hack—it creates a “sling” that lets you lift the entire baked square out of the pan for super clean, easy slicing. No wrestling with the pan! A little light spritz of cooking spray on the pan first will help the parchment stick in place.
Step 2: Create the Crust & Crumble Mixture
In a large bowl, combine the softened butter, 1 cup of granulated sugar, vanilla extract, and salt. Use a hand mixer or a sturdy wooden spoon to cream them together until the mixture is light and fluffy. This incorporates air, which contributes to a lovely texture. Now, add the 2 cups of flour. Mix on low speed (or by hand) until a soft, crumbly dough forms. It should look like coarse sand but will hold together when you pinch it. Don’t overmix! We want tenderness, not toughness.
Step 3: Form the Base Layer
This is where we multitask! Take about two-thirds of this crumbly mixture and dump it into your prepared pan. Use your fingers or the flat bottom of a measuring cup to press it down firmly into an even layer. This pressed layer is our crust. Pressing it firmly is key—it ensures we have a solid base that won’t crumble when we slice our bars later.
Step 4: Whisk Together the Pumpkin Filling
In a separate medium bowl, add your pumpkin purée, the remaining ½ cup of sugar, the pumpkin pie spice, and that optional tiny pinch of salt. Whisk it all together until it’s completely smooth and beautifully combined. You’ll see the color become uniform—a deep, warm orange. Give it a taste (my favorite part!) and adjust the spices if you’re feeling adventurous. Want more cinnamon? Go for it!
Step 5: Assemble Your Masterpiece
Now, pour and spread that gorgeous pumpkin filling over your pressed crust. Use a spatula or the back of a spoon to gently spread it into a smooth, even layer, making sure to get it into all the corners. Grab the remaining one-third of your crumble dough and sprinkle it evenly over the top of the pumpkin layer. No need to press it down—we want those lovely, craggy bits to get golden and crispy in the oven.
Step 6: Bake to Golden Perfection
Slide your pan into the preheated oven and bake for 30-35 minutes. You’re looking for the top crumble to be a beautiful light golden brown and the edges of the pumpkin filling might be just starting to bubble ever so slightly. Your kitchen will smell absolutely divine. Once it’s done, carefully remove the pan and place it on a wire rack.
Step 7: The Most Important Step: Patience!
I know, I know. This is the hardest part. But you must let these bars cool completely in the pan before you even think about slicing them. I usually let mine cool for at least 2-3 hours, or even pop them in the fridge for a bit at the end. This allows the pumpkin layer to fully set, ensuring you get clean, beautiful bars instead of a gooey, delicious mess (which is still tasty, but not as pretty!).
Step 8: Slice and Savor!
Once completely cool, use the parchment paper sling to lift the entire block out of the pan onto a cutting board. Use a sharp knife to slice it into 16 squares. Wiping the knife clean between cuts gives you the cleanest edges. Now, enjoy your handiwork!
How to Serve These Autumn Delights
These bars are fantastic all on their own, eaten out of hand with a cup of coffee for the perfect afternoon pick-me-up. But if you really want to take them over the top for a dessert, here’s how I love to serve them: Place a bar on a plate and add a generous dollop of freshly whipped cream or a scoop of vanilla bean ice cream. The contrast of the cool, creamy topping with the spiced, room-temperature bar is absolute heaven. A light dusting of cinnamon or a tiny drizzle of caramel sauce on top makes it feel truly restaurant-worthy!
Make It Your Own: Delicious Variations
The beauty of this recipe is its versatility! Here are a few ways to mix it up:
- Nutty Crumble: Add ½ cup of chopped pecans or walnuts to the crumble topping for a fantastic crunch.
- Ginger Snap: Stir ¼ cup of finely chopped crystallized ginger into the pumpkin filling for a warm, spicy kick.
- DIY Spice Blend: No pumpkin pie spice? No problem! Use ½ tsp cinnamon, ¼ tsp ginger, ⅛ tsp nutmeg, and ⅛ tsp allspice or cloves.
- Oat-y Topping: Replace ½ cup of the flour in the crust/crumble with old-fashioned oats for a heartier, chewier texture.
- Chocolate Chip Twist: Who says pumpkin and chocolate don’t mix? Sprinkle ⅓ cup of semi-sweet or dark chocolate chips over the pumpkin layer before adding the top crumble.
Anna’s Chef Notes & Kitchen Stories
This recipe has been a staple in my fall rotation for years, and it’s evolved in little ways. I initially made it with a full can of pumpkin, but found that 1¼ cups gives the perfect ratio of filling to crust—too much and it can be a bit wet. The vanilla in the crust was a happy accident one day when I was feeling extra, and it stuck because it was just that good!
A funny story: I once brought these to a potluck, and a friend spent five minutes trying to figure out what kind of “exotic” spice I’d used that made them so much better than her usual pumpkin bars. She was convinced it was cardamom or something fancy. I laughed and told her the secret was just a full teaspoon of vanilla and properly softened butter! It’s a great reminder that mastering the basics—good technique and quality ingredients—is what creates truly memorable food.
Your Questions, Answered!
Q: My crumble topping sank into the pumpkin layer. What happened?
A: This usually means your butter was too warm or melted, or the pumpkin layer was too wet. Make sure your butter is just softened, not melty. Also, be sure you’re using pure pumpkin purée, not pie filling, as the latter has more moisture. Finally, don’t be afraid to really press that base layer down firmly—it acts as a barrier.
Q: Can I make these gluten-free?
A: Absolutely! I’ve had great success using a 1:1 gluten-free all-purpose flour blend (like Bob’s Red Mill or King Arthur) in place of the regular flour. The texture is nearly identical.
Q: How should I store these bars, and how long do they keep?
A: Once cooled and sliced, store them in an airtight container at room temperature for up to 2 days. For longer storage (up to 5 days), keep them in the fridge. They also freeze beautifully for up to 3 months! Just wrap individual bars in plastic wrap and place them in a freezer bag. Thaw at room temperature whenever a craving strikes.
Q: My base came out really hard. How can I prevent that?
A: This is likely from overmixing the dough. Once you add the flour, mix just until the dough comes together. Overmixing develops the gluten in the flour, which can lead to a tougher crust. Also, ensure you’re measuring your flour correctly (spoon and level!) as too much flour is a common culprit for dry, hard baked goods.
Nutritional Information (Per Bar)
Please note: This is an approximate estimate calculated using an online tool. Actual values may vary based on specific ingredients used.
- Calories: 220
- Fat: 11g
- Carbohydrates: 29g
- Sugar: 15g
- Protein: 2g
- Fiber: 1g
- Sodium: 85mg
Final Thoughts
Pumpkin Pie Crumble Bars are proof that fall baking doesn’t have to be fussy to be unforgettable. They bring all the cozy, nostalgic flavors of a classic pumpkin pie but in a form that’s simple to make, easy to share, and absolutely irresistible. The buttery crust, silky pumpkin filling, and golden crumble topping come together in perfect harmony—like autumn itself wrapped up in a sweet little square.
Whether you’re baking these for a gathering, a bake sale, or just because you’re craving something pumpkin-spiced and soul-warming, I hope they bring joy to your kitchen the way they do to mine. Sometimes, the best seasonal traditions are the ones we create fresh—and I have a feeling these bars will quickly become a new fall favorite in your home, too.