Your New Favorite Healthy Treat is Just 10 Minutes Away!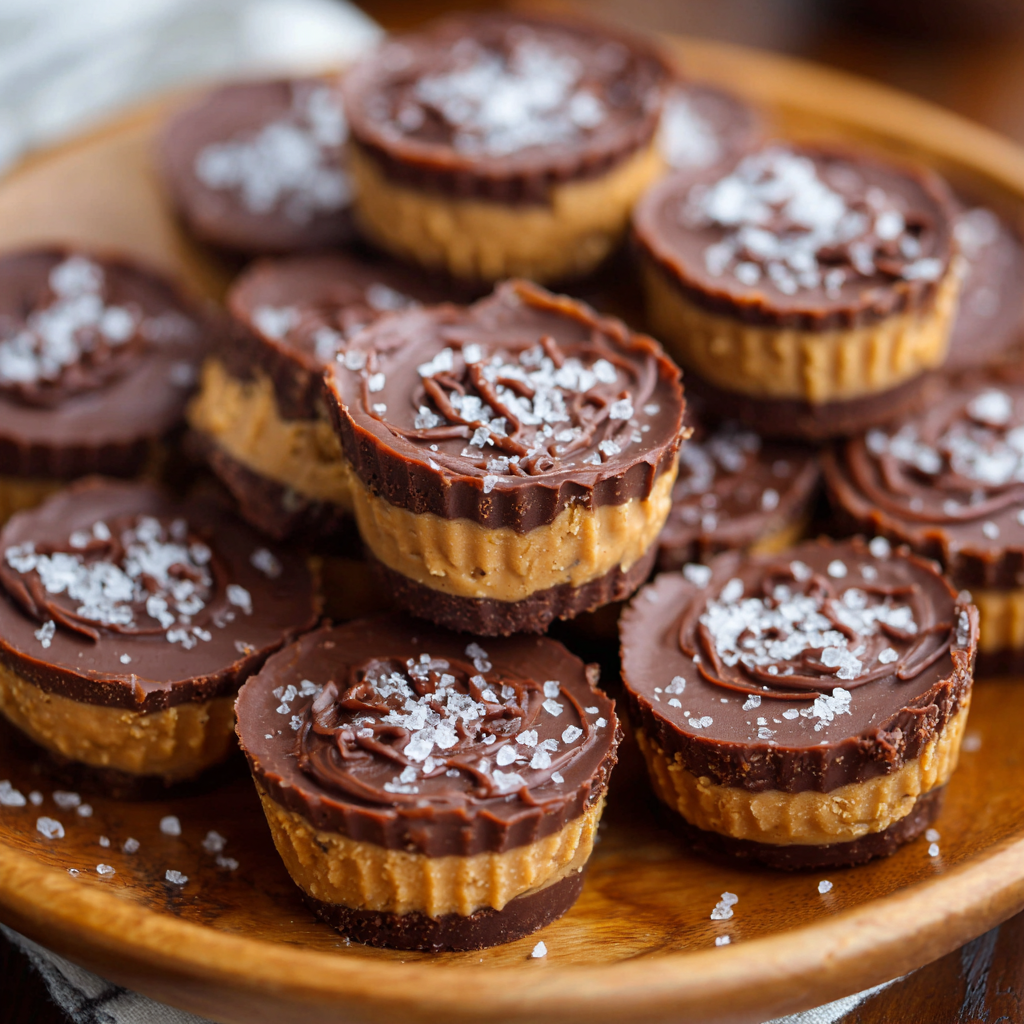
Hey there, friend! Can we talk about cravings for a second? You know the ones I mean. That 3 PM slump hits, or you’re cozying up for a movie night, and your brain starts whispering… chocolate. And not just any chocolate, but something rich, creamy, and maybe a little salty. But then that other, more practical voice chimes in, reminding you of goals and that sugar crash waiting in the wings. It’s a classic kitchen conundrum!
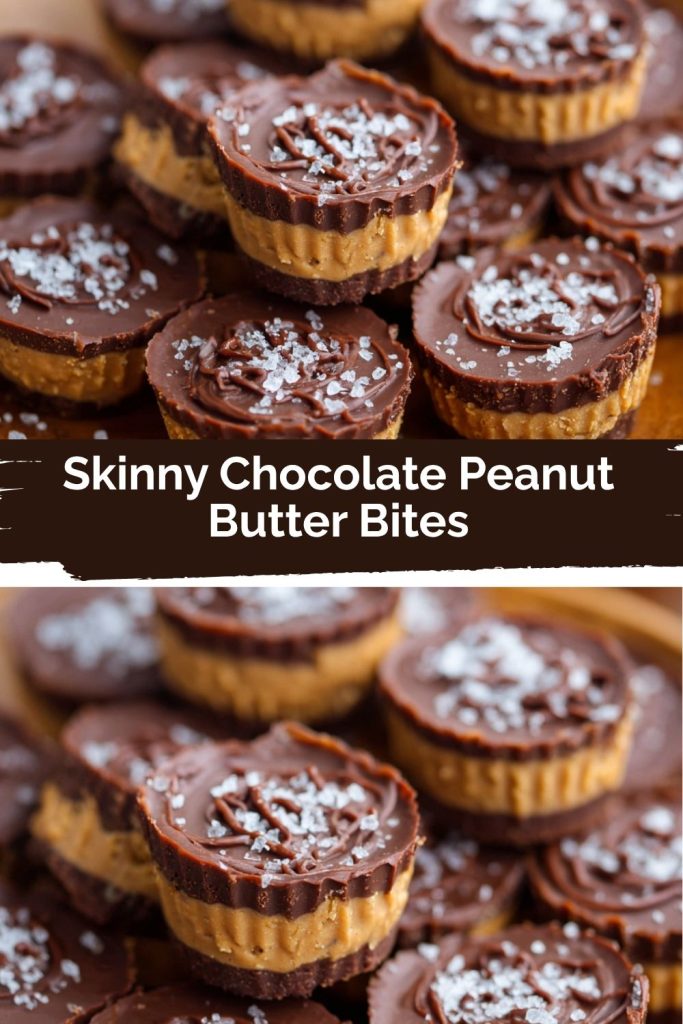
Well, what if I told you there’s a solution that doesn’t involve choosing between willpower and indulgence? A treat that’s so deliciously satisfying, it feels like a secret cheat code, but is made with simple, wholesome ingredients you can feel good about. Enter: my legendary Skinny Chocolate Peanut Butter Bites.
These little rounds of joy are my absolute go-to for a quick sweet fix. They’re no-bake, require just a handful of pantry staples, and come together in about 10 minutes of active time. The magic happens in the freezer, where they transform into a firm, decadent bite with a luscious chocolate base and a creamy, dreamy peanut butter top. They’re perfectly portioned, so you can enjoy one (or two!) without derailing your day. Think of them as your healthy, homemade answer to a certain famous peanut butter cup, but with a vibe that’s all their own. So, let’s ditch the guilt and grab the coconut oil—it’s time to make your snack dreams a reality!
The Accidental Recipe That Stole My Heart
PrintSkinny Chocolate Peanut Butter Bites

Craving something sweet but still want to stay on track? These freezer peanut butter bites are rich, creamy, chocolatey, and perfectly portioned. Just a few ingredients, no baking, and totally satisfying.
- Prep Time: 10 minutes
- freeze time: 30 minutes
- Total Time: 40 minutes
Ingredients
Chocolate Layer (Bottom):
Skinny chocolate (your choice of low-carb chocolate or homemade chocolate mixture)
Peanut Butter Layer (Top):
½ cup natural peanut butter
¼ cup coconut oil
¾ tsp vanilla extract
3 scoops stevia powder (or to taste)
Instructions
Prep Your Mold
Use an ice cube tray or silicone mold for shaping the bites.
Create the Chocolate Base
Pour a thin layer of melted skinny chocolate into the bottom of each mold cavity.
Make the PB Mixture
In a bowl, mix together peanut butter, coconut oil, vanilla, and stevia until smooth.
Top It Off
Spoon the peanut butter mixture over the chocolate layer.
Freeze
Place in the freezer for 30 minutes or until fully set.
Store
Keep bites stored in the fridge or freezer—they melt quickly at room temp!
Nutrition
- Calories: 110
- Fat: 10g
- Carbohydrates: 2g net (depends on chocolate used)
- Protein: 2g
I have to confess, these bites weren’t born from some grand, planned recipe development session. They were a happy accident, a classic “kitchen sink” moment that turned into a family favorite. It was a sweltering summer afternoon a few years back. My little one was having a major meltdown, the air conditioning was struggling to keep up, and turning on the oven was absolutely out of the question. But the craving for something sweet was real.
I stared into the pantry, willing inspiration to strike. A jar of natural peanut butter sat next to a tub of coconut oil. My favorite skinny chocolate bar was hiding behind the oats. In a moment of desperation (and genius, if I do say so myself!), I thought, “What if I just… melt and layer?” I whisked the peanut butter with the coconut oil and a splash of vanilla, melted the chocolate, and poured them into the first thing I saw: a star-shaped silicone ice cube tray my daughter loved.
Thirty minutes later, we popped one out. The texture was cool and firm, yet it melted luxuriously in our mouths. The combination of the dark, bitter chocolate and the sweet, salty peanut butter was pure magic. My daughter’s tears were forgotten, replaced by a chocolatey grin. That’s the moment I knew this wasn’t just a quick fix; it was a recipe worth sharing. It’s a reminder that sometimes the best dishes come from a place of joyful improvisation, not perfection.
Gathering Your Magical Ingredients
Here’s the beautiful part: you only need a few simple things to create this magic. The quality of your ingredients really shines here, so use the best you have on hand!
- For the Chocolate Layer:
- Skinny Chocolate (about 1 cup, melted): This is your canvas! “Skinny chocolate” can be a sugar-free chocolate bar (like Lily’s or ChocZero), or you can make your own by melting together 3 tablespoons of coconut oil, 3 tablespoons of cocoa powder, and a sweetener like stevia or monk fruit to taste. Chef’s Insight: Using a darker chocolate (85% cacao or higher) creates a wonderful bittersweet contrast to the sweet peanut butter layer.
- For the Peanut Butter Layer:
- ½ cup Natural Peanut Butter: The key word here is natural! You want the kind where the ingredients are just “peanuts” and maybe “salt.” The oils that separate are crucial for the right texture. Avoid processed peanut butters with added sugars or hydrogenated oils, as they can make the mixture grainy. Substitution Tip: Any nut or seed butter works wonderfully here! Almond butter, cashew butter, or even sunflower seed butter are fantastic alternatives.
- ¼ cup Coconut Oil: This is what gives the peanut butter layer its firm, sliceable texture once frozen. Make sure it’s measured in its solid state for accuracy. Chef’s Insight: Refined coconut oil has a neutral taste, while unrefined (virgin) coconut oil will impart a subtle tropical flavor. Both work great—it’s your choice!
- ¾ tsp Vanilla Extract: A splash of vanilla is the secret weapon that rounds out all the flavors and adds a warm, comforting depth. Don’t skip it!
- 3 scoops Stevia Powder, or to taste: We’re using a concentrated sweetener to keep the carbs low. Start with this amount and taste your mixture! You can add more if you like it sweeter. Substitution Tip: You can use 1-2 tablespoons of maple syrup, honey, or agave if you don’t mind the added sugar. Just note that the bites will be a bit softer.
Let’s Build These Bites! (Step-by-Step)
Ready for the fun part? This process is so simple and satisfying. Let’s walk through it together.
- Prep Your Mold. First things first, grab your mold! I’m a huge fan of silicone molds because the bites pop out effortlessly. An ice cube tray works perfectly too. Just give it a quick spritz with cooking spray if it’s not silicone, just to be safe. Place it on a small baking sheet for stability—this makes transferring it to the freezer a breeze. Chef’s Hack: Using a mini muffin tin with paper liners is another great option for a classic “cup” shape!
- Create the Chocolate Base. Gently melt your skinny chocolate. You can do this in a double boiler, or in short 20-second bursts in the microwave, stirring well between each burst. We don’t want it scorched! Once it’s smooth and liquid, use a small spoon to pour a thin layer into the bottom of each mold cavity. You don’t need much—just enough to cover the bottom. This is your foundation! Tap the mold gently on the counter to settle the chocolate into an even layer.
- Make the PB Mixture. In a small bowl, combine the natural peanut butter, solid coconut oil, vanilla extract, and stevia. Now, here’s a pro tip: if your peanut butter is super stiff or the coconut oil is rock hard, you can gently warm the mixture for about 15 seconds in the microwave to make it easier to stir. Whisk everything together until it’s completely smooth, creamy, and well-combined. Give it a taste! This is your chance to adjust the sweetness. Add more stevia if you’d like.
- Top It Off. Now, carefully spoon the peanut butter mixture over the chocolate layer in each mold. Try to divide it evenly among the cavities. You can smooth the tops with the back of your spoon for a neat finish, or leave them a little rustic—they’ll taste amazing either way! The two layers might try to mingle a bit, and that’s totally okay. It just adds to the homemade charm.
- Freeze to Set. Carefully transfer your baking sheet with the mold into the freezer. Let the bites set completely. This usually takes about 30 minutes, but if your freezer is packed or you want to be extra sure, give them a full hour. You’ll know they’re ready when they’re firm to the touch.
- Pop, Store, and Enjoy! Once they’re frozen solid, pop the bites out of the mold. If they’re being stubborn, you can gently flex the silicone mold or run the bottom of the ice cube tray under warm water for just a second. Immediately transfer your beautiful bites to an airtight container. Store them in the freezer for the best texture (they’re like a delicious frozen custard!) or the fridge if you prefer them a tad softer. Heads up: They melt quickly at room temperature because of the coconut oil, so enjoy them straight from the cold!
How to Serve Your Masterpiece
These bites are stars all on their own, but presentation is part of the fun! For a simple treat, just pile a few onto a small plate or into a little bowl. If you’re feeling fancy, let them sit at room temperature for exactly 2-3 minutes before serving—this takes the edge off the deep freeze and allows the flavors to bloom. For a dinner party, arrange them on a elegant platter and dust with a little extra cocoa powder or a flaky sea salt. They’re the perfect, guilt-free finale to any meal!
Get Creative! Flavor Twists & Swaps
The basic formula is a perfect playground for creativity. Here are a few of my favorite ways to mix it up:
- Almond Joy Vibe: Add a tablespoon of shredded unsweetened coconut to the peanut butter layer, and press a whole almond on top before freezing.
- Salty Sweet Supreme: Sprinkle a few grains of flaky sea salt (like Maldon) on top of each bite right after you add the peanut butter layer.
- Cookie Dancer: Stir a tablespoon of mini, sugar-free chocolate chips into the peanut butter mixture for a little extra texture.
- Nut-Free Delight: Use sunflower seed butter instead of peanut butter for a nut-free version. (Fair warning: it can turn a bit green due to a reaction with the baking soda, but it’s perfectly safe and still delicious!)
- Mocha Kick: Add ¼ teaspoon of instant espresso powder to the chocolate layer for a subtle coffee flavor that pairs amazingly with the peanut butter.
Anna’s Extra Kitchen Notes
Over the years, this recipe has become a true staple in my house, and it’s evolved in little ways. I used to be so careful about keeping the layers perfectly separate, but one busy day I got a little lazy and just swirled the two mixtures together with a toothpick before freezing. The result was a marbled masterpiece that my friends now request! It just goes to show that sometimes the “mistakes” are the best discoveries.
I also learned the hard way about the importance of using natural peanut butter. One time, in a pinch, I used a conventional brand, and the bites never fully set—they were a delicious but messy paste! So, learn from my mistake and stick with the drippy, oily, natural stuff for the perfect texture. These bites have been with me through potlucks, stressful weeks, and countless movie nights. I hope they become a little pocket of joy in your kitchen, too.
Your Questions, Answered!
Here are answers to some common questions to ensure your bite-making is flawless.
- Q: Why are my bites soft and not setting?A: This usually boils down to two things: 1) You didn’t use natural peanut butter. The added stabilizers in conventional PB prevent proper firming. 2) Your freezer isn’t cold enough, or you haven’t let them freeze long enough. Give them more time! Also, ensure you’re using the full ¼ cup of coconut oil, as it’s the primary setting agent.
- Q: Can I use a different sweetener?A: Absolutely! Liquid sweeteners like maple syrup or honey work, but they will prevent the bites from getting quite as firm. Powdered erythritol or monk fruit blends are great granulated sugar-free options that will help maintain a firmer texture. Just adjust to your taste.
- Q: How long do these keep in the freezer?A: They keep beautifully for up to 3 months in an airtight container in the freezer. They never last that long in my house, but it’s good to know! There’s no need to thaw them; just eat them straight from the freezer.
- Q: My peanut butter layer is hard to mix. What should I do?A: No worries! This is common, especially if your kitchen is cool. Simply place the bowl with the PB and coconut oil mixture in the microwave for 15-20 seconds to gently soften it. Don’t melt it completely—just warm it enough to make it stir-able.
Nutritional Information*
*Please note: This is an estimate based on the specific ingredients I used and can vary greatly depending on your choices, especially the type of chocolate.
Per Serving (1 bite, recipe makes approximately 12):
- Calories: ~110
- Fat: 10g
- Protein: 2g
- Total Carbohydrates: 3g
- Net Carbs: 2g (depending on chocolate used)
Prep Time: 10 minutes | Freeze Time: 30 minutes | Total Time: 40 minutes
Final Thoughts
At the end of the day, these Skinny Chocolate Peanut Butter Bites are more than just a snack—they’re little moments of joy tucked neatly into your freezer. They prove that “healthy” doesn’t have to mean boring, and indulgence doesn’t have to come with guilt. With just a handful of ingredients and a few minutes of effort, you’ve got a treat that feels special every single time you pop one out of the mold.
Whether you’re taming an afternoon craving, surprising your kids with a sweet after-school bite, or sneaking one (or two!) while curled up on the couch, these bites are here to deliver comfort in the simplest way possible. They’re quick, customizable, and always satisfying—a recipe worth keeping on repeat.
So next time that chocolate craving whispers in your ear, smile, head to the freezer, and know you’ve got the perfect answer waiting for you.
“`