Spooky & Cheesy: Cheese Witch Finger Cookies that Will Enchant Your Guests
Ah, the magical world of Halloween treats! As the leaves turn crisp and the air fills with the scent of pumpkin spice, it’s time to conjure up some ghoulish delights in the kitchen. Today, I’m sharing one of my absolute favorite festive recipes: Cheese Witch Finger Cookies! Yes, you heard that right—cookies that are delightfully spooky but made with cheesy goodness. These bewitching bites are not only a hit at Halloween gatherings, but they’re also a fantastic way to add a nostalgic touch to your holiday spread.
When I was a kid, Halloween was all about more than just the costumes; it was a celebration of creativity in the kitchen! My mom would whip up all sorts of eerie snacks, but these cheese cookies stole the show each year. I vividly recall the excitement in the air as we crafted these creepy but delicious treats together. The laughter, the little fingers dabbling in dough—it’s a memory that warms my heart even now. I remember how everyone would giggle together as they nibbled on the “fingers” and pretended to cast spells. These cookies were the perfect blend of savory, spooky, and satisfying, making them a must-have in our home.
Whether you’re planning a Halloween party or just want to add some whimsy to your day, these Cheese Witch Finger Cookies will become a tradition in your household, too. So, don your apron, grab your favorite spooky playlist, and let’s dive into this deliciously cheesy adventure!
Ingredients
-
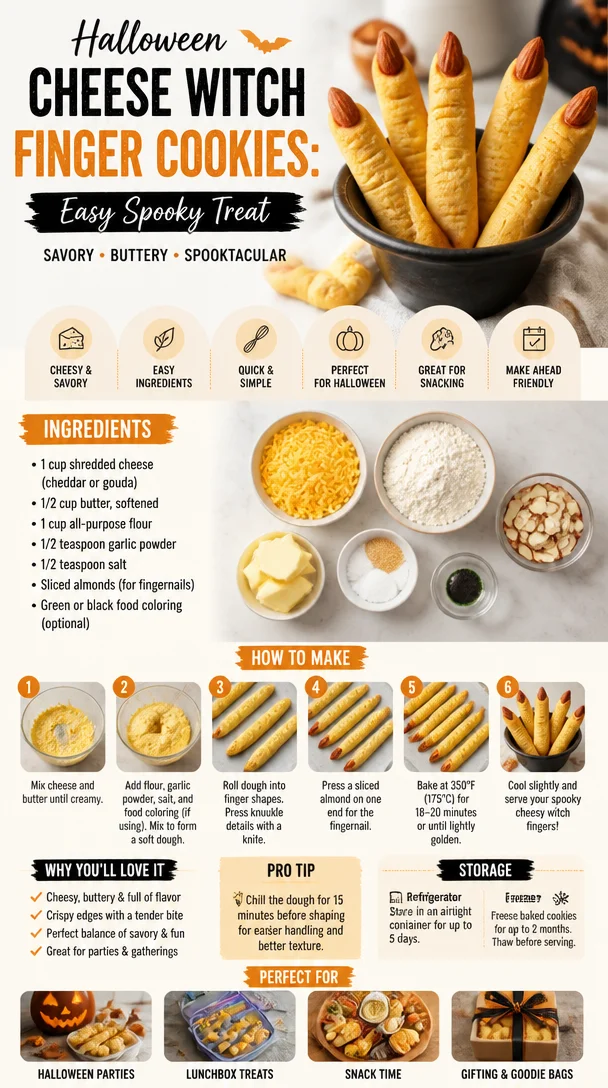
1 cup shredded cheese (cheddar or Gouda)
Great for flavor, cheese adds a savory twist to these cookies. Cheddar lends a sharper taste, while Gouda offers a creamy, buttery flavor. If you’re looking for something lactose-free, try a dairy-free cheese shred! -
1/2 cup butter, softened
The base of our cookies! Butter adds richness and helps create a crumbly texture. If you want to cut down on dairy, you can substitute with vegan butter or coconut oil. -
1 cup all-purpose flour
The backbone of any cookie! All-purpose flour gives structure. You can also swap half of it with whole wheat flour for a nuttier flavor or even gluten-free flour if that’s what you prefer. -
1/2 teaspoon garlic powder
A dash of garlic gives these cookies a savory edge that’s irresistible. Feel free to sprinkle in some herbs like dried rosemary or thyme for an herby kick. -
1/2 teaspoon salt
Balances the flavors beautifully. You can adjust this to taste, especially if using salted butter. -
Sliced almonds (for fingernails)
These add a wicked touch to the cookies, making them look just like witchy fingers! If almonds aren’t your thing, you could easily use pumpkin seeds or even small chocolate chips for a different vibe. -
Green or black food coloring (optional)
Want to make your witch fingers extra creepy? A little food coloring will go a long way! You can play with how much you add to create that perfect eerie green.
Step-by-Step Instructions
-
Prep Your Oven and Baking Sheet: Preheat your oven to 350°F (175°C). Line a baking sheet with parchment paper to ensure your cookies don’t stick. (Trust me, burnt cheese is not the vibe we’re going for!)
-
Whip Up the Dough: In a large mixing bowl, cream together the softened butter and shredded cheese until well combined and fluffy. This step is essential for achieving that delightful texture—use a hand mixer for best results, or mix vigorously by hand!
-
Mix Dry Ingredients: In a separate bowl, whisk together the flour, garlic powder, and salt. Adding the flour mixture this way helps to evenly distribute the garlic powder and salt throughout the dough.
-
Combine Wet and Dry: Gradually add the dry ingredients to the cheese mixture, stirring until a soft dough forms. If it feels too crumbly, don’t panic! You can add a splash of water or an extra teaspoon of butter to help bring it together.
-
Shape Your Fingers: It’s time for the fun part! Take small amounts of dough (about a tablespoon) and roll them into finger-like shapes. Make them as creepy or as cute as you like! After shaping, gently press a sliced almond into one end of each cookie to create a "nail."
-
Add Some Color: If you’re going for the spooky factor, dip the other end of the cookie in a bit of food coloring or brush some on with a toothpick for added effect.
-
Bake: Place the cookies on your prepared baking sheet, leaving a little space between each one. Bake for about 15-20 minutes, or until they turn a lovely golden brown. Keep an eye on these mischievous cookies—those edges can go from perfect to burnt in a heartbeat!
-
Cool and Serve: Let them cool for a few minutes on the baking sheet, then transfer to a wire rack to cool completely. This will help them crisp up just right!
Serving Suggestions
Once your spellbinding Cheese Witch Finger Cookies are ready, it’s time to serve! Arrange them on a spooky-themed platter, perhaps surrounded by some googly-eyed candy or nestled among faux spider webs for fun! You can even place them in an eerie cauldron centerpiece for a touch of whimsy. These cookies are perfect as a conversation starter at Halloween parties and will inspire giggles and hungry hands!
Recipe Variations
-
Herb-Infused: Try adding fresh or dried herbs like rosemary or oregano for a herby twist. It adds an extra layer of flavor that complements the cheese beautifully.
-
Spicy Touch: If you like a kick, mix in a pinch of cayenne pepper or red chili flakes into the dough for a spicy surprise.
-
Cheesy Combinations: Experiment with different cheese blends, like pepper jack for heat or mozzarella for a gooey texture.
-
Nut-Free Option: Skip the almonds altogether and create fun little bumps in the dough for nails—use chocolate chips or other candies instead to suit your taste.
-
Sweet & Savory: For a unique twist, try adding a sprinkle of cinnamon to the dough for an unexpected flavor combination that dances on your taste buds.
Chef’s Notes
These Cheese Witch Finger Cookies have truly evolved over time. What started as a simple cheesy cookie recipe has transformed into a seasonal masterpiece that brings back warmth and laughter every Halloween. I’ve seen families come together over these quirky cookies, and it’s such a joy to share that experience with others. Plus, while the recipe is perfect for Halloween, who says you can’t whip these up any time of year? Let your creativity run wild—the possibilities for finger-shaped creations are endless!
FAQs and Troubleshooting
-
Why are my cookies too crumbly?
If your dough feels too crumbly, a quick fix is to add a teaspoon or two of softened butter or a splash of water to achieve a better consistency. -
Can I make the dough ahead of time?
Absolutely! You can prepare the dough, wrap it tightly in plastic wrap, and refrigerate it for up to 3 days before baking. Just remember to allow it to come to room temperature before shaping. -
Why did my cookies spread too much?
This could happen if the butter was too warm or if the dough was not chilled long enough before baking. Make sure your butter is just softened, not melted, and consider chilling the shaped cookies in the fridge for 15 minutes before baking. -
Can I freeze these cookies?
Yes! These cookies freeze beautifully. Simply freeze them on a baking sheet, and once solid, transfer them to a freezer-safe bag. Bake from frozen, adding a couple of extra minutes to the baking time.
Nutritional Info
Each cookie (depending on size) generally contains around 100 calories, 5g of protein, 7g of fat, and 8g of carbohydrates. Of course, this can vary based on the ingredients you choose to use!
Final Thoughts
There you have it, my dear friends—Cheese Witch Finger Cookies that are bound to become a beloved Halloween tradition in your home! Don’t be afraid to experiment and make this recipe your own; remember, cooking is all about joy, creativity, and a sprinkle of love. Whether you’re sharing with friends, family, or indulging yourself, these cookies are sure to bring smiles and perhaps a few playful shrieks! Happy haunting and happy baking!
PrintCheese Witch Finger Cookies

Spooky and cheesy cookies perfect for Halloween festivities.
- Prep Time: 20 minutes
- Cook Time: 20 minutes
- Total Time: 40 minutes
- Yield: 24 servings 1x
- Category: Dessert
- Method: Baking
- Cuisine: American
- Diet: Vegetarian
Ingredients
- 1 cup shredded cheese (cheddar or Gouda)
- 1/2 cup butter, softened
- 1 cup all-purpose flour
- 1/2 teaspoon garlic powder
- 1/2 teaspoon salt
- Sliced almonds (for fingernails)
- Green or black food coloring (optional)
Instructions
- Prep your oven and baking sheet: Preheat your oven to 350°F (175°C). Line a baking sheet with parchment paper.
- Whip up the dough: In a large mixing bowl, cream together the softened butter and shredded cheese until well combined and fluffy.
- Mix dry ingredients: In a separate bowl, whisk together the flour, garlic powder, and salt.
- Combine wet and dry: Gradually add the dry ingredients to the cheese mixture, stirring until a soft dough forms.
- Shape your fingers: Take small amounts of dough and roll them into finger-like shapes. Press a sliced almond into one end of each cookie.
- Add some color: Dip the other end of the cookie in food coloring for a spooky effect.
- Bake: Place the cookies on your prepared baking sheet and bake for about 15-20 minutes.
- Cool and serve: Let them cool for a few minutes on the baking sheet, then transfer to a wire rack to cool completely.
Notes
These cookies can be made ahead of time and freeze well.
Nutrition
- Serving Size: 1 cookie
- Calories: 100
- Sugar: 1g
- Sodium: 200mg
- Fat: 7g
- Saturated Fat: 4g
- Unsaturated Fat: 2g
- Trans Fat: 0g
- Carbohydrates: 8g
- Fiber: 0g
- Protein: 5g
- Cholesterol: 15mg
Keywords: Halloween, cheese cookies, spooky treats, festive baking