***
Maple-Glazed Pumpkin Poptarts: Your New Favorite Fall Treat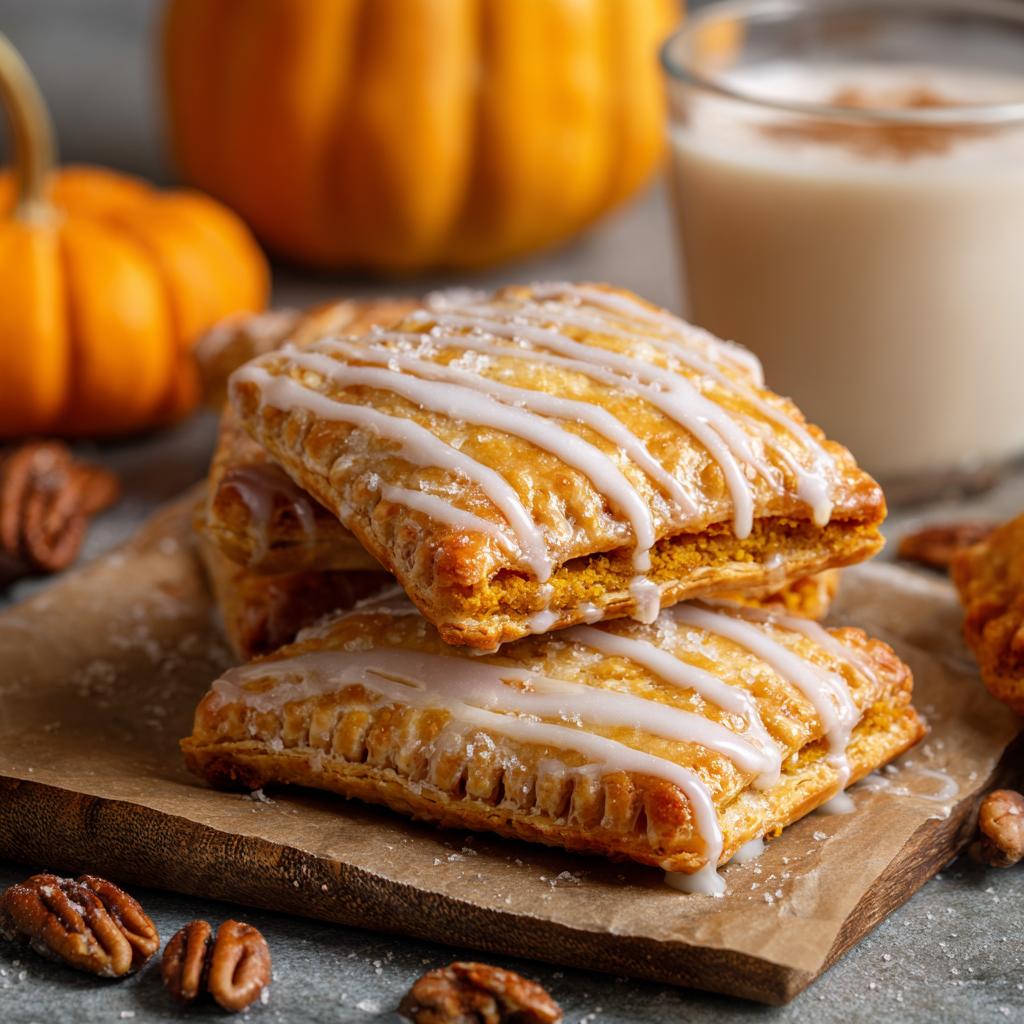
Hey there, friend! Anna here. Is there anything better than that first truly crisp autumn morning? The kind where you can see your breath, the leaves are putting on a fiery show, and all you want is something warm, spiced, and utterly delicious to go with your steaming mug of coffee. For years, my answer to that craving was a certain store-bought, toaster-friendly pastry. You know the one. It was a nostalgic treat, for sure, but I always wished it had a little more *oomph*—more real pumpkin flavor, a flakier crust, and a glaze that actually tasted like maple, not just sugar.
So, I took to my kitchen, my happy place, with a mission: to create the ultimate homemade pumpkin poptart. A pastry that would capture the very essence of fall in one handheld, gloriously messy bite. After more than a few batches (a delicious hardship, I assure you), I landed on this recipe. These Maple-Glazed Pumpkin Poptarts are everything I dreamed of and more. We’re talking a flaky, buttery crust that shatters with every bite, a rich, spiced pumpkin filling that’s creamy with a hint of tang from a secret ingredient, all finished with a simple, dreamy maple glaze. They’re a project of love, but I’ve streamlined the process so you can feel like a pastry chef without the stress. Trust me, your kitchen is about to smell incredible, and your family is going to be so impressed. Let’s turn this cozy day into a baking adventure!
A Poptart Pact and a Kitchen Full of Laughter
PrintMaple-Glazed Pumpkin Poptarts

These Maple-Glazed Pumpkin Poptarts take everything you love about autumn and tuck it into a golden, buttery pocket. Doubled for more deliciousness, with added cream cheese and warm spices, these DIY poptarts are a must-bake for cozy mornings or dessert on the go.
- Prep Time: 20 min
- Cook Time: 18 min
- Total Time: 40 min
Ingredients
Filling:
1 cup canned pumpkin
⅔ cup packed brown sugar
½ tsp maple flavoring
½ tsp pumpkin pie spice
Dash of salt
2 oz cream cheese, softened (adds creaminess and tang – optional twist)
Pastry:
2 refrigerated pie crust rolls (or 1 double crust pack)
Glaze:
1 cup powdered sugar
½ tsp maple flavoring
2 Tbsp milk
Optional: sprinkle of cinnamon or chopped pecans for topping
Instructions
Preheat oven to 375°F. Line a baking sheet with parchment.
Mix pumpkin, brown sugar, maple, spice, salt, and cream cheese until smooth.
Roll out pie crust and cut into rectangles (~3×4 inches).
Spoon filling onto half the rectangles, leaving a border. Top with remaining rectangles and press edges with a fork to seal.
Poke tops with a fork to vent. Bake 15–18 minutes or until golden brown.
Whisk glaze ingredients until smooth. Drizzle over cooled poptarts and top with cinnamon or pecans
Nutrition
- Calories: 290
- Fat: 15g
- Carbohydrates: 35g
- Protein: 3g
This recipe always takes me back to my first apartment after college. My best friend, Sarah, and I were broke, but we were determined to host a “Fancy Fall Brunch” for our friends. Our budget meant boxed wine and a very ambitious from-scratch menu. The centerpiece was going to be homemade poptarts—a idea I thought was brilliant at the time. Well, our first attempt was… a learning experience. The filling was runny and erupted like a pumpkin volcano in the oven, and our rustic “seal” on the edges was anything but, leaving us with more filling on the baking sheet than in the pastries.
We stood there, covered in flour and laughing until we cried, eating the salvaged (and slightly deformed) pastries straight off the rack. They were a mess, but they were *our* mess, and they tasted like pure joy and friendship. That kitchen failure became a core memory for me. It taught me that the best recipes aren’t about perfection; they’re about the stories you create while you’re making them. This version is the polished, perfected result of that day—every step tested and foolproofed so your baking story is all triumph and deliciousness, with maybe just a little bit of joyful mess.
Gathering Your Cozy Baking Squad: The Ingredients
One of the things I love most about this recipe is how it uses simple, accessible ingredients to create something truly special. Let’s break them down, because knowing your “why” makes all the difference!
For the Filling:
- 1 cup canned pumpkin puree: Not pumpkin pie filling! We want pure, unadulterated pumpkin. It gives our poptarts that gorgeous color and classic fall flavor. Chef’s Tip: If you have homemade roasted pumpkin puree, even better! Just make sure it’s thick and not watery.
- ⅔ cup packed brown sugar: The molasses notes in brown sugar are a match made in heaven with pumpkin and spice. It creates a deeper, caramel-like sweetness than white sugar would.
- ½ tsp maple flavoring: This is our flavor power-up! While extract works, a high-quality maple flavoring often has a richer, more authentic taste that really shines through. Substitution: No problem! Use 1 tsp of pure maple extract if that’s what you have.
- ½ tsp pumpkin pie spice: The cozy flavor bomb! This blend of cinnamon, ginger, nutmeg, and allspice is the heart of the filling. Feel free to adjust to your taste—I often add an extra pinch!
- Dash of salt: Never underestimate the power of salt! It balances the sweetness and makes all the other flavors pop.
- 2 oz cream cheese, softened: This is my secret weapon! It adds an incredible creaminess and a slight tang that cuts through the sweetness, making the filling taste more sophisticated and less one-note. Dietary Swap: For a dairy-free version, a plant-based cream cheese works wonderfully here.
For the Pastry & Glaze:
- 2 refrigerated pie crust rolls (or 1 double crust pack): This is our brilliant shortcut to flaky, buttery perfection without the fuss of making dough. Let them sit at room temperature for 15 minutes before unrolling—it prevents cracking!
- 1 cup powdered sugar: The base of our simple, sweet glaze. It creates that smooth, drizzle-able consistency we’re after.
- ½ tsp maple flavoring: Carrying that maple magic right through to the finish.
- 2 Tbsp milk: This brings our glaze together. Start with 1 tablespoon and add the second as needed to reach your desired consistency. Substitution: Any milk you have on hand works—dairy, almond, oat, you name it!
- Optional: sprinkle of cinnamon or chopped pecans: The finishing touch! A little sprinkle adds texture and makes them look professionally pretty.
Let’s Build Some Magic: Step-by-Step Instructions
Alright, apron on? Let’s do this! I’ll walk you through each step with all my favorite tips and hacks to ensure poptart perfection.
Step 1: Preheat and Prep. First things first, preheat your oven to 375°F (190°C). This ensures it’s perfectly hot and ready when our pastries are assembled. Line a large baking sheet with parchment paper. This is non-negotiable for me—it prevents sticking and makes cleanup an absolute dream.
Step 2: Create the Pumpkin Filling. In a medium bowl, combine your pumpkin puree, packed brown sugar, maple flavoring, pumpkin pie spice, salt, and that lovely softened cream cheese. Use a whisk or a fork to beat it all together until it’s completely smooth and creamy. No lumps! Give it a little taste (chef’s perk!) and adjust the spices if you want. Set this bowl aside. Chef’s Hack: If your cream cheese is still a little cool, pop the mixture in the microwave for 10-second bursts, stirring in between, to help it incorporate smoothly.
Step 3: Roll and Cut the Pastry. Carefully unroll your first pie crust onto a lightly floured surface. If it cracks a little at the seams, just press it back together—no one will ever know. Use a sharp knife or a pizza cutter to slice the dough into rectangles. I aim for roughly 3×4 inches, which usually gives me 4 rectangles per crust. Don’t worry about them being perfectly identical! A little rustic charm is part of their homemade appeal. Repeat with the second crust. You should have 16 rectangles total (8 for the bottoms and 8 for the tops).
Step 4: Fill and Seal. This is the fun part! Place 8 of your rectangles onto the prepared baking sheet. Spoon about 1 ½ to 2 tablespoons of the pumpkin filling into the center of each rectangle, spreading it out slightly but leaving a solid ½-inch border around all the edges. This border is crucial for a good seal! Carefully place the remaining 8 rectangles on top as the lids. Use the tines of a fork to firmly press and crimp the edges together on all four sides. This not only creates that classic poptart look but also locks the filling inside. Finally, take your fork and poke 4-5 sets of holes in the top of each poptart. This is your steam vent—it lets the hot air escape so the pastries don’t puff up like pillows and burst open!
Step 5: Bake to Golden Perfection. Slide your beautiful creations into the preheated oven and bake for 15-18 minutes. You’re looking for a beautiful golden brown color on the crust and maybe even a little bit of the filling bubbling up through the steam holes. That’s a good sign! Chef’s Tip: Rotate the baking sheet halfway through for even browning, especially if your oven has hot spots like mine.
Step 6: Cool and Glaze. Once they’re gorgeously golden, pull them out of the oven and let them cool on the baking sheet for at least 10-15 minutes before you even think about glazing. I know it’s hard to wait, but if you glaze them while they’re hot, the icing will just melt and slide right off. While they’re cooling, whisk together your powdered sugar, maple flavoring, and milk until it’s smooth and drizzle-able. Once the poptarts are just warm to the touch, drizzle that glorious glaze all over the top. I like to use a spoon, but you can also put the glaze in a small zip-top bag, snip off the corner, and pipe it for more control. Finish with a sprinkle of cinnamon or chopped pecans right away, so they stick to the glaze.
How to Serve Up These Handheld Hugs
These poptarts are delicious at any temperature! Enjoy them warm from the oven when the glaze is still a little soft, or at room temperature for a perfect on-the-go treat. For the full nostalgic experience, pop a cooled one in the toaster oven for a few minutes to re-crisp the crust and warm the filling. They are absolutely divine with a hot cup of coffee, a cold glass of milk, or a chai latte for the ultimate cozy moment. They’re the star of any brunch spread, the perfect packed lunch surprise, or the best after-school snack that will make you the most popular person in the house.
Make It Your Own: Delicious Variations
The beauty of this recipe is how easily you can customize it! Here are a few of my favorite twists:
- Apple Cinnamon Twist: Swap the pumpkin filling for a cup of finely diced, sautéed apples mixed with brown sugar, cinnamon, and a pinch of nutmeg.
- Gingerbread Spice: Replace the pumpkin pie spice with a blend of ginger, cinnamon, and a pinch of cloves for a holiday-inspired version.
- Dairy-Free Delight: Use plant-based cream cheese and your favorite non-dairy milk in the glaze for an equally delicious treat that everyone can enjoy.
- Nutty Crunch: Add a tablespoon of finely chopped pecans or walnuts right into the pumpkin filling for an extra layer of texture.
- Brown Butter Glaze: Take your glaze to the next level by browning 2 tablespoons of butter first, then whisking it with the powdered sugar and maple flavoring. You might need less milk. It’s life-changing!
From My Kitchen to Yours: Chef’s Notes
This recipe has evolved so much from that first messy attempt in my apartment kitchen! The addition of cream cheese was a total happy accident—I had a leftover block from a bagel brunch and thought, “why not?” It turned out to be the missing piece that took the filling from good to “can I have another?” glorious. I’ve also learned that the sealing step is the most important. Don’t be shy—really press that fork down hard to make an impression. It ensures all that yummy filling stays right where it belongs. And finally, embrace any imperfections! A little filling that sneaks out or a slightly lopsided rectangle just adds to the homemade charm. These aren’t meant to be machine-made; they’re meant to be made with love, and that’s always beautiful.
Your Questions, Answered: FAQs & Troubleshooting
Q: My filling leaked out everywhere! What did I do wrong?
A: Oh, I’ve been there! This usually happens for one of two reasons: either you didn’t leave enough of a border when spooning on the filling (aim for a good ½-inch!), or the edges weren’t sealed tightly enough. Really press down with that fork to create a tight seal. A little leakage is normal, but a lot usually points to the seal.
Q: Can I make these ahead of time?
A: Absolutely! You have two great options. 1) Unbaked: Assemble the poptarts, place them on the parchment-lined sheet, and freeze them solid. Once frozen, transfer them to a freezer bag. Bake straight from frozen, adding 3-5 minutes to the baking time. 2) Baked: Bake and cool them completely, then store in an airtight container at room temperature for 2 days or freeze for up to 3 months. Reheat in a toaster oven.
Q: My glaze is too thin/too thick. How can I fix it?
A: Glaze consistency is easy to adjust! Too thin? Whisk in more powdered sugar, a tablespoon at a time. Too thick? Add more milk, just a teaspoon at a time, until it reaches a drizzle-able consistency. It should ribbon off your whisk.
Q: Can I use homemade pie crust?
A: Of course! If you have a favorite double-crust pie dough recipe, this is a wonderful way to use it. Just roll it out to about ⅛-inch thickness and proceed with the recipe as written.
Nutritional Information*
*This is an estimated calculation provided for convenience.
Per poptart: ~290 calories | 15g fat | 35g carbs | 3g protein
Final Thoughts
These Maple-Glazed Pumpkin Poptarts are everything I wanted those childhood toaster pastries to be—flaky, cozy, and bursting with real autumn flavor. They carry a little nostalgia, a lot of homemade love, and just enough messiness to remind you they’re made in a real kitchen, not a factory.
For me, they’re more than just a recipe. They’re a bite of crisp mornings, laughter in the kitchen, and the joy of taking something familiar and making it your own. Whether you’re serving them warm from the oven with coffee, tucking them into lunchboxes, or sneaking one as a midnight snack (no judgment here!), they’re guaranteed to bring smiles.
So the next time the air turns chilly and you’re craving something sweet, roll out some dough, grab that can of pumpkin, and bake a little happiness. Trust me—your house will smell amazing, your heart will feel full, and you’ll never look at a boxed pastry quite the same way again.