***
Let’s Bake a Little Piece of My Heart: Soft Italian Anise Cookies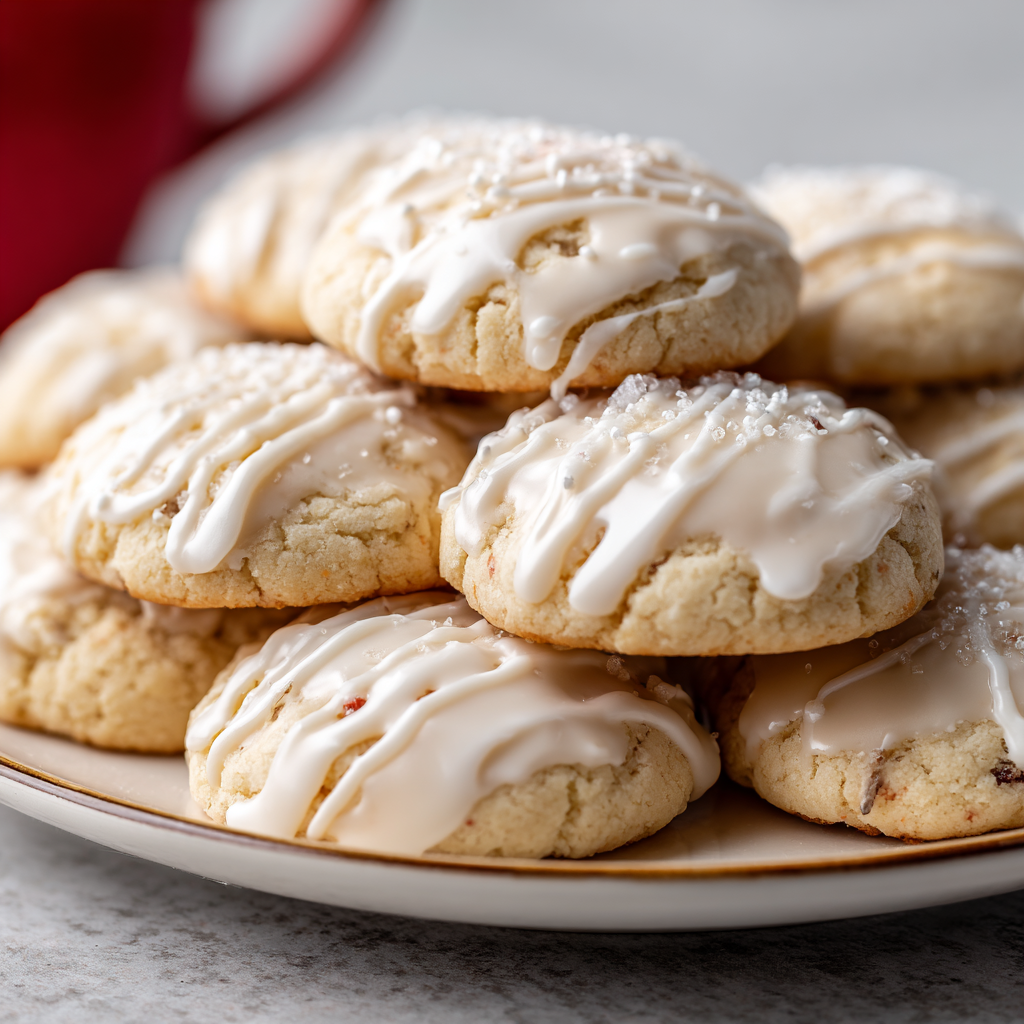
Hello, my friend, and welcome to my kitchen! Is there anything more wonderful than the smell of cookies baking? It’s a universal language of comfort, of celebration, of home. And today, we’re whipping up a batch of what I lovingly call “little clouds of joy” – my family’s cherished Italian Anise Cookies.
Now, if you’ve never had one before, let me paint you a picture. Imagine a cookie that’s not quite a cookie and not quite a cake, but a perfect, soft, and pillowy hybrid. It’s delicately sweet, with the subtle, sophisticated flavor of anise that tastes like a gentle whisper of black licorice and sweet fennel all at once. They’re topped with a simple, crisp glaze that sets perfectly, making them as beautiful as they are delicious.
What I absolutely adore about this recipe, beyond the incredible flavor, is its no-fuss nature. There’s no chilling required for this dough, which means from bowl to baking sheet is a matter of minutes. We’re making a double batch because, trust me, you’ll want plenty to share (and a few to sneak for yourself). This is more than a recipe; it’s a tradition, a story, and a whole lot of love, all baked into one magical treat. So, are you ready? Let’s preheat that oven and create some magic together!
A Sprinkle of Nostalgia: Cookies, Chaos, and Grandma’s Apron
PrintItalian Anise Cookies
These soft, pillowy Italian Anise Cookies are a cherished holiday treat—lightly sweet, delicately flavored, and topped with a sweet glaze that sets perfectly. No chilling needed, which means faster baking and more time to enjoy. This double batch gives you plenty to share, plus some creative twists to make them your own.
- Prep Time: 20 minutes
- Cook Time: 10–12 minutes
- Total Time: 44 minute
- Yield: 84 cookies 1x
Ingredients
1 cup (226 g) unsalted butter, softened
1 cup (200 g) granulated sugar
6 large eggs, room temperature
4 teaspoons anise extract
1 teaspoon vanilla extract
6 cups (750 g) all-purpose flour
8 teaspoons (2 tbsp + 2 tsp) baking powder
½ teaspoon salt
Glaze:
2½ cups (300 g) powdered sugar
3–5 tablespoons milk (adjust for desired consistency)
½ teaspoon anise or vanilla extract
Optional: food coloring, sprinkles, or nonpareils
Instructions
Preheat oven to 350°F (175°C). Line baking sheets with parchment paper.
In a large bowl, cream together butter and sugar until light and fluffy (about 2 minutes).
Beat in eggs one at a time. Add anise and vanilla extracts.
In a separate bowl, whisk together flour, baking powder, and salt. Gradually add to wet ingredients and mix until dough forms.
Scoop dough into 1-inch balls and place 2 inches apart on baking sheets.
Bake 10–12 minutes or until bottoms are lightly golden. Cool on wire racks.
For the glaze: whisk powdered sugar, milk, and extract until smooth. Dip cooled cookies into glaze and decorate. Let set completely.
Nutrition
- Calories: 79
- Sugar: 6g
- Fat: 3g
- Carbohydrates: 12g
- Protein: 1g
Every time I crack open a bottle of anise extract and that distinct, sweet aroma fills the air, I’m instantly seven years old again, standing on a wobbly stool in my Grandma Rosa’s kitchen. The counters would be dusted with a fine layer of flour, and the radio would be tuned to an Italian station, the voices a melodic backdrop to our baking chaos.
My job was the “egg cracker” and the official taste-tester of the glaze. Grandma would let me dip my finger in the sugary mix, her eyes twinkling as she’d say, “Anna, bella, does it need more milk?” I felt so important. She didn’t use measuring cups the way I do now; it was all “un po'” of this and “una manciata” of that—a little of this, a handful of that. Her hands, weathered and strong, would shape the dough with a speed and grace I could only watch in awe. These cookies weren’t just a holiday treat; they were a symbol of her love, a tangible piece of our heritage that she proudly shared with everyone who walked through her door. Baking them now, in my own kitchen, I feel that same connection, that same joy. It’s my way of keeping her spirit, and that beautiful, flour-dusted chaos, alive.
Your Cookie Crew: Gathering the Ingredients
One of the secrets to these cookies’ perfect texture is the simplicity of the ingredients. Let’s gather our team! Remember, using room-temperature ingredients is a little chef’s hack that makes for a smoother, fluffier dough.
For the Cookies (Our Double Batch!):
- 1 cup (226 g) unsalted butter, softened: This is the heart of our cookie, providing that rich, tender crumb. If you only have salted butter, that’s okay! Just omit the extra ½ teaspoon of salt later on.
- 1 cup (200 g) granulated sugar: For just the right amount of sweetness. It creames with the butter to create that dreamy, light base.
- 6 large eggs, room temperature: Room temp is key here! Cold eggs can cause the creamed butter to seize up. They act as the main leavening agent, giving our cookies their signature lift and cake-like texture.
- 4 teaspoons anise extract: The star of the show! This gives the cookies their classic, aromatic flavor. If you’re new to anise, you can start with 3 tsp and add more to taste.
- 1 teaspoon vanilla extract: The vanilla is the perfect supporting actor, rounding out the anise flavor and adding a layer of warmth.
- 6 cups (750 g) all-purpose flour: The structure of our cookie. I always fluff my flour with a spoon before scooping and leveling it off to avoid dense cookies.
- 8 teaspoons (that’s 2 tablespoons + 2 teaspoons) baking powder: This is our chemical leavener, working with the eggs to make our cookies puff up beautifully. Yes, it seems like a lot, but it’s correct for this double batch!
- ½ teaspoon salt: Don’t skip this! Salt is a flavor enhancer that makes the sweetness and anise pop.
For the Glaze & Decoration:
- 2½ cups (300 g) powdered sugar: This creates that smooth, crisp, classic glaze that sets perfectly.
- 3–5 tablespoons milk: Whole milk is great, but any milk will work. We start with 3 tbsp and add more until it’s a dippable consistency.
- ½ teaspoon anise or vanilla extract: You can match the cookie flavor or use vanilla for a slightly different note.
- Optional: Food coloring, sprinkles, or nonpareils: This is where you get to play! Traditionally, these are seen with white glaze and rainbow nonpareils, but make them your own. A pale pink for Valentine’s? Green and red for Christmas? Go for it!
The Fun Part: Let’s Make Some Magic!
Okay, apron tied, favorite playlist on? Let’s dive into the making. This is a straightforward process, but I’ve got a few little secrets to share along the way to ensure cookie perfection.
- Preheat and Prep. First things first, get that oven preheating to a cozy 350°F (175°C). This gives it plenty of time to reach the perfect, even temperature. Line your baking sheets with parchment paper. Chef’s Hack: A tiny dab of butter under each corner of the parchment will keep it from sliding around and driving you crazy!
- Creaming is Key. In a large bowl, cream together your softened butter and granulated sugar. We’re not just mixing them; we’re creaming them. Beat them on medium-high speed for a good 2-3 minutes until the mixture is pale, fluffy, and light. This step incorporates air, which is crucial for that soft, pillowy texture. Don’t rush this!
- Incorporate the Eggs. Now, with the mixer on a lower speed, add your room-temperature eggs one at a time. Let each egg fully incorporate before adding the next. This prevents the batter from curdling and ensures a smooth, emulsified dough. Once they’re all in, scrape down the bowl and beat in the anise and vanilla extracts. Your kitchen should be smelling amazing right about now.
- Combine the Dry Ingredients. In a separate bowl, whisk together your flour, baking powder, and salt. Why whisk? It evenly distributes the baking powder so every cookie rises uniformly. Now, gradually add these dry ingredients to the wet mixture. I usually do it in three parts, mixing on low speed until *just* combined after each addition. Chef’s Note: The dough will be quite soft and sticky—this is exactly what we want! It’s what keeps the cookies so tender.
- Scoop and Shape. Using a small cookie scoop (about 1 tablespoon size) or two spoons, portion the dough into 1-inch balls. Roll them gently between your palms—a light touch is best here. Place them about 2 inches apart on your prepared baking sheets. They don’t spread a huge amount, but they do puff up!
- Bake to Perfection. Bake for 10-12 minutes. You’re looking for the bottoms to be a very light golden brown, and the tops should still be pale and just set. Do not overbake! The cookies will continue to set as they cool. Overbaking is the number one enemy of a soft cookie.
- Cool Completely. Let the cookies cool on the baking sheet for about 5 minutes before transferring them to a wire rack to cool completely. This is non-negotiable for the glaze! A warm cookie will make the glaze melt right off.
- Create the Glaze. While the cookies cool, whisk together your powdered sugar, 3 tablespoons of milk, and your extract of choice. You want a consistency that is thin enough to dip and drip off smoothly, but thick enough to coat the cookie. Add more milk, a teaspoon at a time, until you get there. If you’re using food coloring, now’s the time to add a drop or two.
- Dip and Decorate! Now for the artistry! Holding a cooled cookie by its sides, dip the top directly into the glaze. Lift it, let the excess drip off for a second, and then place it back on the wire rack. Immediately shower it with sprinkles or nonpareils before the glaze sets. This is a fantastic step to get kids involved in!
- Let the Glaze Set. Patience, my friend! Let the glazed cookies sit at room temperature for at least an hour, or until the glaze has hardened completely. Then, they’re ready to stack, share, and devour!
Sharing the Joy: How to Serve Your Masterpieces
These cookies are stars all on their own! I love serving them piled high on a beautiful vintage cake stand for a truly rustic, inviting look. They’re the perfect companion to a mid-afternoon cup of coffee or tea, where the slight bitterness of the drink beautifully complements the cookie’s gentle sweetness. For a holiday gathering, arrange them on a platter with other Italian classics like pizzelles and biscotti. Honestly, they bring a touch of magic to any table, any time of day.
Make Them Your Own: Delicious Twists & Swaps
One of the best things about a classic recipe is making it your own! Here are a few of my favorite ways to play with this dough:
- Lemon Bliss: Swap the anise extract for 2 teaspoons of lemon extract and add the zest of one lemon to the dough. Top with a lemon juice-based glaze.
- Almond Joy: Use 2 tsp almond extract instead of anise. Top the glaze with a single, toasted almond for an elegant finish.
- Chocolate Dip: Not an anise fan? Skip it and use 2 tsp vanilla extract. Once baked and cooled, dip half the cookie in melted chocolate instead of the white glaze.
- Festive Funfetti: Add ½ cup of rainbow sprinkles to the dough along with the flour for a confetti cookie that’s perfect for birthdays!
- Gluten-Free Friendly: You can use a 1:1 gluten-free all-purpose flour blend with great success. The texture might be a *touch* more crumbly, but still absolutely delicious.
From My Kitchen to Yours: A Few Final Thoughts
This recipe has evolved so much from my grandma’s “pinch of this” method, and I love that it now has a life in kitchens all over the world. One of my favorite kitchen stories involves the first time I made these for my now-husband. I was so nervous, wanting to impress him with a piece of my family. I accidentally used salt instead of sugar in the glaze (a tragic, tragic mix-up!). We still laugh about those “savory surprise” cookies. It just goes to show, we all have kitchen flops, and it’s the love and the laughter that truly matter.
Over the years, I’ve found that these cookies actually taste even better the next day, as the anise flavor mellows and deepens. I always make them a day ahead if I’m serving them for a party. They freeze beautifully, too—just place them in a single layer on a baking sheet to freeze solid, then transfer to a freezer bag. They’re little pockets of joy, ready whenever you need one.
Your Questions, Answered!
I’ve gotten so many wonderful questions about these cookies over the years. Here are the most common ones to help you on your baking journey.
Q: My dough is really sticky and hard to handle. What did I do wrong?
A: You did nothing wrong! This is a very soft, sticky dough, and that’s what keeps the cookies so tender. If it’s unmanageable, you can pop it in the fridge for 15-20 minutes to firm up slightly. My preferred method, though, is to lightly wet my hands with cold water before rolling the dough balls. It prevents sticking without adding extra flour, which can make the cookies tough.
Q: Can I use anise seed instead of anise extract?
A: You can, but the flavor profile will be different. Extract gives a pervasive, sweet flavor throughout the cookie. Using seeds (I’d recommend 2-3 tablespoons, lightly crushed) will give you little bursts of a more potent, herbal licorice flavor. It’s a delicious variation if you prefer that texture and taste!
Q: My glaze is too thin/too thick. How can I fix it?
A> Easy fixes! If it’s too thin and running right off the cookie, whisk in more powdered sugar, a quarter cup at a time. If it’s too thick and gloopy, add more milk, just a teaspoon at a time, until it reaches a smooth, dippable consistency. Think of the thickness of heavy cream.
Q: Why are my cookies dry or dense?
A> The most common culprits are over-measuring the flour (always fluff, spoon, and level!) or overbaking. Remember, you only want the bottoms lightly golden. Also, ensure your baking powder is fresh—if it’s old, it won’t leaven properly, leading to dense cookies.
A Little Note on Nutrition
Yield: ~84 cookies
Prep Time: 20 minutes
Bake Time: 10-12 minutes
Calories per cookie: Approximately 79
Macros: Carbs: 12g | Fat: 3g | Protein: 1g | Sugar: 6g
Final Thoughts
Italian Anise Cookies are more than a sweet bite—they’re a memory you can hold in your hand. Every batch feels like an invitation to slow down, pour a cup of coffee, and share a little piece of love with the people around you. Whether you stick with the classic glaze and rainbow sprinkles or try one of the fun twists, these soft, pillowy cookies always manage to bring joy.
They’re the kind of treat that carries family stories forward, that turns an ordinary day into a celebration, and that reminds us how something as simple as flour, sugar, and a splash of anise can feel like home. Bake them, share them, freeze them for a rainy day—but most importantly, let them bring a little comfort and connection into your kitchen, just like they always have in mine.