***
Craving a Flavor Adventure? Let’s Make Crispy Chicken Katsu Bowls!
Hey there, friend! Can I let you in on a little secret? Some of the very best meals aren’t found in fancy restaurants with tiny portions, but right in your own kitchen, built in a big, beautiful bowl. I’m talking about those magical, mix-everything-together creations that are a total party for your taste buds. And today? We’re making one of my all-time favorites: Crispy Chicken Katsu Bowls.
Imagine this: a bed of fluffy, steamy rice. On top, a golden-brown, impossibly crunchy piece of panko-crusted chicken that shatters with every bite. We’re surrounding it with cool, crisp cucumber, creamy avocado, and vibrant steamed edamame. Then, we’re tying this whole beautiful mess together with a drizzle of spicy, tangy, umami-packed mayo and a sprinkle of toasty sesame seeds. It’s a symphony of textures and flavors—crunchy, creamy, salty, spicy, and fresh—all happening at once.
This recipe is my love letter to Japanese comfort food, but with the easy-going, “use-what-you-have” spirit I bring to my own kitchen. It might look like a restaurant-level dish, but I promise, it’s completely achievable and so much fun to make. We’re going to walk through every step together, from the super-simple marinade that gives the chicken its deep flavor, to my little chef’s trick for getting that crust extra crispy. So, are you ready to turn an ordinary weeknight into a mini culinary getaway? Grab your favorite skillet and let’s get cooking!
The Train Ride That Started It All
PrintCrispy Chicken Katsu Bowls : Crunchy, Saucy & Packed with Umami
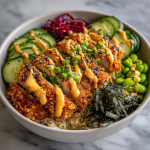
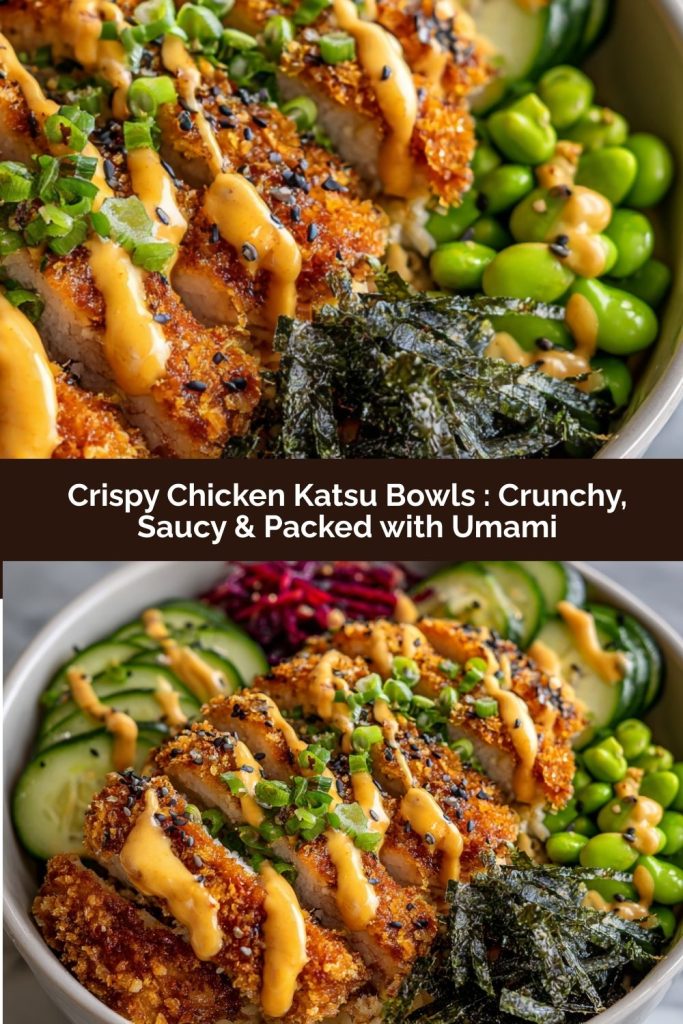
These Crispy Chicken Katsu Bowls are a flavor explosion in every bite—crunchy panko-coated chicken, steamy rice, vibrant veggies, and a drizzle of spicy mayo to tie it all together. Inspired by Japanese comfort food and finished with bold twists, these bowls are everything: satisfying, fresh, and easy to customize for any craving.
- Prep Time: 30 minutes
- Cook Time: 15 minutes
- Total Time: 45 minutes
- Yield: 8 1x
Ingredients
For the Chicken Katsu:
1 ⅓ cups tamari or soy sauce
2 tablespoons toasted sesame oil
2 tablespoons honey
4 teaspoons grated ginger
4 tablespoons chopped green onions
2 teaspoons, plus 6 tablespoons sesame seeds
8 chicken cutlets (or 4 boneless chicken breasts sliced in half)
2 cups Panko breadcrumbs
Chili flakes, to taste
2 bags frozen shelled edamame (steamed or microwaved)
For the Bowls:
6–8 cups cooked rice
Sliced cucumber
Diced avocado
Pickled ginger
Nori sheets (cut into strips or crumbled)
For the Spicy Mayo:
⅔ cup olive oil mayo
2–4 tablespoons sriracha (to taste)
4 teaspoons soy sauce or tamari
2 teaspoons honey
Instructions
Marinate the Chicken: In a large bowl, mix tamari, sesame oil, honey, ginger, green onions, and 2 tsp sesame seeds. Add chicken and marinate for at least 20 minutes.
Bread the Chicken: Place Panko, chili flakes, and remaining sesame seeds in a shallow bowl. Press chicken into crumbs until well coated.
Cook the Chicken: Heat oil in a skillet over medium heat. Pan-fry chicken cutlets 3–4 minutes per side or until golden and cooked through. Drain on paper towels.
Make Spicy Mayo: Stir together mayo, sriracha, soy sauce, and honey in a small bowl. Adjust heat to taste.
Assemble Bowls: Layer rice, sliced chicken katsu, edamame, cucumber, avocado, pickled ginger, and nori. Drizzle with spicy mayo and extra sesame seeds.
Nutrition
- Calories: 880
- Sodium: 1040mg
- Fat: 38g
- Carbohydrates: 84g
- Protein: 42g
This recipe always takes me back to one specific, rain-drizzled afternoon in Tokyo. I was jet-lagged, a little lost, and desperately in need of comfort food. I ducked into a tiny, bustling train station restaurant, pointed at a picture of a katsu donburi bowl on a laminated menu, and found my place in the universe for the next twenty minutes.
When that bowl arrived, it was pure magic. The steam carried the most incredible savory scent. The chicken was so crispy it echoed in my ears with each bite, yet the meat underneath was incredibly juicy. It was simple, hearty, and absolutely perfect. That meal was more than just food; it was a feeling of warmth and discovery. I came home obsessed with recreating that feeling in my own kitchen, and after many (very delicious) trials, this bowl was born. It’s my way of capturing a little bit of that Tokyo train station magic and sharing it with you, no passport required.
Gathering Your Katsu Bowl Ingredients
One of the things I love most about this recipe is how flexible it is. Don’t stress if you’re missing one or two things—I’ve got substitution ideas for you! This is about building a fantastic meal, not following a rigid rulebook.
For the Chicken Katsu & Marinade:
- 1 ⅓ cups tamari or soy sauce: This is our flavor foundation. Tamari is a gluten-free alternative to soy sauce that’s a bit richer and less salty. If you only have regular soy sauce, that works perfectly! We’re using a good amount because it’s the base of our powerful, quick marinade.
- 2 tablespoons toasted sesame oil: Don’t skip the “toasted” part! That’s where the deep, nutty flavor comes from. It’s a flavor powerhouse, so a little goes a long way.
- 2 tablespoons honey: This adds a touch of sweetness to balance the saltiness of the tamari. Maple syrup or agave nectar are great swaps if you need them.
- 4 teaspoons grated ginger: Fresh is best here for that bright, zingy kick! I keep a knob of ginger in my freezer and just grate it frozen—it’s a total game-changer and lasts forever.
- 4 tablespoons chopped green onions: We’re using the green parts for a fresh, oniony bite. Save a few extra for a pretty garnish at the end!
- 2 teaspoons, plus 6 tablespoons sesame seeds: The 2 tsp go in the marinade for flavor, and the 6 tbsp get mixed with the panko for an incredible, nutty crunch.
- 8 chicken cutlets (or 4 boneless chicken breasts, sliced in half horizontally): Using thin cutlets is key for quick, even cooking. If you’re slicing your own, place the breast flat on your cutting board, put your hand on top, and carefully slice it horizontally into two thinner pieces. It’s easier than it sounds!
- 2 cups Panko breadcrumbs: Panko is a non-negotiable for the perfect katsu crunch! They’re Japanese-style breadcrumbs that are flakier and airier than traditional breadcrumbs, giving you a lighter, crispier crust that doesn’t get soggy.
- Chili flakes, to taste: This is your chance to control the heat! A pinch for a whisper of warmth, or a hefty sprinkle if you like it spicy.
- 2 bags frozen shelled edamame: Our easy, protein-packed veggie. Just steam or microwave according to the package directions. No edamame? Frozen peas work in a pinch!
- Neutral oil for frying: Canola, vegetable, or avocado oil are perfect. You want something with a high smoke point.
For the Bowls & Spicy Mayo:
- 6–8 cups cooked rice: Short-grain white or brown rice is classic, but quinoa or cauliflower rice are fantastic healthy swaps.
- Sliced cucumber, diced avocado, pickled ginger, nori sheets: This is your bowl’s “fresh bar”! The cool cucumber and creamy avocado balance the hot, crunchy chicken. Pickled ginger (the pink kind you get with sushi) adds a bright, tangy punch, and crumbled nori (seaweed) gives that final hit of salty, oceanic umami.
- ⅔ cup olive oil mayo, 2–4 tablespoons sriracha, 4 teaspoons soy sauce, 2 teaspoons honey: This quartet combines to make the most addictive sauce you’ll ever taste. It’s creamy, spicy, salty, and slightly sweet all at once. Adjust the sriracha to your preferred heat level!
Let’s Build Those Beautiful Bowls: A Step-by-Step Guide
Okay, friend, apron on! We’re going to break this down into simple, manageable stages. I’ll be with you every step of the way with my best tips and tricks to ensure katsu success.
Step 1: The Flavor Infusion (Marinate the Chicken)
In a large bowl, whisk together the tamari, toasted sesame oil, honey, grated ginger, chopped green onions, and those 2 teaspoons of sesame seeds. This marinade is a powerhouse of umami! Now, add your chicken cutlets, making sure each one is fully submerged. Let it hang out for at least 20 minutes. Chef’s Hack: If you have more time, marinating for up to 2 hours in the fridge is even better. But 20 minutes will still pack a huge flavor punch, making it perfect for a weeknight.
Step 2: The Crunch Creation (Bread the Chicken)
This is the fun, slightly messy part! Place your panko breadcrumbs, the remaining 6 tablespoons of sesame seeds, and your desired amount of chili flakes into a shallow dish (a pie plate works perfectly). Give it a mix. Now, take one marinated chicken cutlet, let the excess marinade drip off, and press it firmly into the panko mixture. Flip it and press again, ensuring every single inch is coated in those glorious, crunchy crumbs. Pro Tip: Use one hand for the wet chicken and the other for the dry panko. This will prevent your fingers from becoming a breadcrumb-covered mess! Place the breaded cutlets on a clean plate or wire rack as you finish them.
Step 3: The Golden Brown Sizzle (Cook the Chicken)
Pour about ¼ to ½ inch of neutral oil into a large, heavy-bottomed skillet (I love my cast iron for this) and heat it over medium heat. To test if the oil is ready, flick a tiny panko crumb into it—if it sizzles immediately, you’re good to go! Carefully lay the chicken cutlets in the hot oil, without crowding the pan (you may need to cook in batches). Fry for 3-4 minutes per side, until the coating is a deep, golden brown and the chicken is cooked through. My Golden Rule: Don’t move the chicken for the first 2 minutes! This allows that gorgeous crust to form and seal. Once cooked, transfer the katsu to a wire rack set over a baking sheet (this keeps the bottom from getting soggy) or a plate lined with paper towels.
Step 4: The Magic Sauce (Make the Spicy Mayo)
While the chicken is resting, let’s whip up the easiest, most delicious sauce. In a small bowl, stir together the mayo, sriracha, soy sauce, and honey. Taste it! Want it spicier? Add more sriracha. Want it a touch sweeter? A bit more honey. This sauce is your canvas—make it yours. If it’s too thick for drizzling, you can thin it out with a teaspoon of water or lime juice.
Step 5: The Grand Finale (Assemble the Bowls)
This is where the magic happens. Start with a generous base of fluffy rice in each bowl. Slice your crispy chicken katsu against the grain into beautiful, easy-to-eat strips and place it proudly on top of the rice. Artfully arrange your edamame, cucumber, and avocado around it. Add a little pile of pink pickled ginger and a sprinkle of crumbled nori strips. Now, for the pièce de résistance: drizzle everything generously with that glorious spicy mayo and finish with one last sprinkle of sesame seeds. Take a second to admire your creation—you made that!
How to Serve Your Katsu Masterpiece
Presentation is part of the fun! I love using wide, shallow bowls so you can see all the colorful components. Serve the bowls immediately while the chicken is still warm and crispy. I always put the extra spicy mayo and a little dish of soy sauce on the table for my family to customize their own bowls. It’s a truly interactive, shareable meal that’s as much a joy to eat as it is to make. Pair it with a cold glass of iced green tea or a crisp lager for the full experience!
Make It Your Own: Delicious Recipe Variations
The beauty of this bowl is its versatility! Don’t be afraid to play around with these ideas:
- Pork or Turkey Katsu: Thin pork loin chops or turkey cutlets work beautifully in place of chicken.
- Tonkatsu Sauce Twist: Swap the spicy mayo for a classic store-bought or homemade Tonkatsu sauce (it’s a fruity, savory Worcestershire-style sauce).
- Veggie-Powered: For a vegetarian version, use thick slices of firm tofu or even large, flat portobello mushroom caps. The breading and frying process is exactly the same!
- Korean-Inspired: Add a big spoonful of kimchi for a fermented, spicy kick and use gochujang (Korean chili paste) in the mayo instead of sriracha.
- Low-Carb/Lighter Bowl: Swap the rice for a base of shredded cabbage or mixed greens for a lighter, crunchier foundation.
Anna’s Chef’s Notes & Kitchen Stories
This recipe has been a staple in my home for years, and it’s evolved in the funniest ways. The first time I made it, I was so excited that I overcrowded the pan, and the chicken steamed instead of frying. We ended up with slightly soggy, but still tasty, katsu! It was a valuable lesson in patience. Now, I never skip the wire rack step—it makes all the difference for that ultimate crunch.
Another fun memory: my daughter once decided she was my “sous-chef” and took it upon herself to triple the amount of sesame seeds in the panko. We ended up with what we now call “Super-Se-Same Katsu,” and it was honestly one of the best versions we’ve ever had! So don’t be afraid of a little kitchen experimentation. The best family recipes are the ones that come with their own stories.
Your Katsu Questions, Answered!
I’ve gotten a lot of questions about this recipe over the years, so I’ve gathered the most common ones here to help you out.
Q: My breading is falling off the chicken while frying! What did I do wrong?
A: This usually happens for one of two reasons. First, the oil might not be hot enough. A lukewarm oil will make the breading absorb oil and slip right off. Make sure that test panko crumb sizzles vigorously! Second, you might not have pressed firmly enough when breading. Really press that panko into the chicken to create a solid, adhesive crust.
Q: Can I bake the chicken katsu instead of frying it to make it healthier?
A: Absolutely! For a baked version, place your breaded cutlets on a wire rack set over a baking sheet (this is key for air circulation and crispiness). Spray or brush them lightly with oil and bake in a preheated 425°F (220°C) oven for about 15-20 minutes, flipping halfway through, until golden brown and cooked through. The crunch won’t be *quite* the same as deep-frying, but it’s still delicious!
Q: I don’t have time to marinate the chicken. Can I skip it?
A> You can, but you’ll be missing out on a lot of the deep, savory flavor that makes this dish so special. If you’re truly in a rush, instead of marinating, you can simply brush the chicken with a mixture of the tamari and sesame oil right before you bread it. It’s a quick flavor boost that’s better than nothing!
Q: How do I store and reheat leftovers?
A: Store the components separately in airtight containers in the fridge for up to 3 days. To reheat the chicken and bring back the crunch, do not use the microwave. Instead, reheat it in a 375°F (190°C) oven or toaster oven for about 10 minutes, or in an air fryer for 3-4 minutes, until warm and crispy again.
Nutritional Information (Per Serving)
Please note: This is an estimate and can vary based on specific ingredients used and portion sizes.
- Calories: ~880
- Fat: 38g
- Carbohydrates: 84g
- Protein: 42g
- Sodium: 1040mg
Final Thoughts
If there’s one thing I love most about these Crispy Chicken Katsu Bowls, it’s how they bring a little spark of adventure into an ordinary day. They’re the kind of meal that feels special without asking you to jump through hoops—comforting enough for a cozy night at home, but bright and bold enough to whisk you right back to that perfect bowl in a bustling Tokyo train station. Every element plays its part: the shatteringly crisp chicken, the cool crunch of cucumber, the creamy avocado, that pop of sweet edamame, and of course, the spicy mayo that ties it all together like a perfect little bow.
What makes this recipe a keeper is its flexibility. You can swap in tofu or pork, switch up your base, turn the heat up or down, and still end up with a bowl that tastes like something from your favorite restaurant—but better, because you made it. And honestly? That moment when you slice into that golden katsu and hear the crunch… that’s kitchen magic you can’t buy.