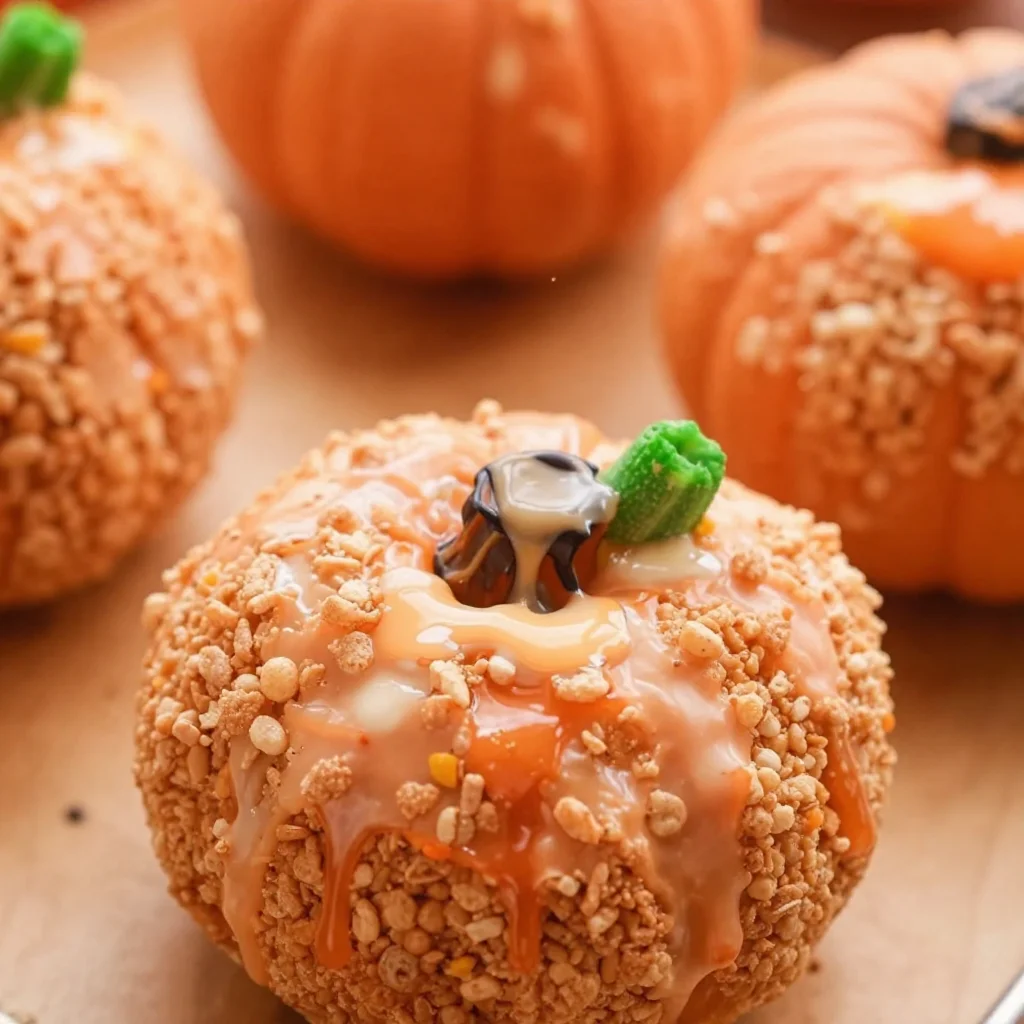
Rice Krispie Treat Pumpkins: A Fall Favorite to Delight Your Inner Child
As the leaves begin to change and the crisp autumn air rolls in, there’s something undeniably magical about this season. The vibrant oranges, deep reds, and golden yellows paint the landscape, drawing us into a world that seems almost enchanted. It’s during this time of year that we often find ourselves reminiscing about our childhood. Remember when the scent of freshly baked goods filled the kitchen, and the delightful crunch of a Rice Krispie treat made everything feel just a little bit more special?
Today, we’re diving into the whimsical world of Rice Krispie Treat Pumpkins! These treats are not only a fun and simple way to celebrate the season, but they’re also a fantastic way to bring a touch of nostalgia into your kitchen. Imagine harvesting a patch of these delightful, no-bake pumpkin treats, with their bright orange color and adorable green stems, all while beckoning the creativity of your little ones (and maybe even your inner child).
This recipe is close to my heart, as it takes me back to family gatherings during the fall. I would gather around the dining table with my siblings, where my mom would teach us the art of making these deliciously gooey treats, all while sharing stories of her childhood. Fast forward to today, and I’m thrilled to share this fantastic twist on the classic Rice Krispie treat. So, put on your favorite autumn playlist, grab your apron, and let’s make some Rice Krispie Treat Pumpkins that will melt hearts and create memories!
A Sweet Recipe to Recall
One of my fondest memories connected to Rice Krispie treats happened on a chilly October afternoon when I was about ten years old. My family had decided to host a pumpkin carving party, and of course, we needed snacks to fuel our creativity! We made our way to the kitchen, and to my delight, my mom pulled out the box of Rice Krispies, big bags of marshmallows, and a mound of butter.
My siblings and I eagerly gathered around, each of us taking charge of different tasks. It was a delightful chaos! I’d melt the butter in a large pot while my brother poured in the marshmallows, and my sister measured out the Rice Krispies. We all took turns stirring the sticky mixture, laughing when a gooey strand of marshmallow managed to cling to our noses. The smell was heavenly—sweet, buttery, and oh so tempting!
Once the mixture was ready and cooled a bit, we shaped them into pumpkins, using orange food coloring to give them their signature shade and Tootsie Rolls for stems. Our dining table transformed into a playful fall-inspired zone, with laughter echoing throughout the house. Those moments of simple togetherness—of creating something special with my family—are memories I hold dear.
So now, let’s create some delicious Rice Krispie Treat Pumpkins in our own kitchens, keeping those cherished memories alive and adding some new ones to treasure!
Ingredients
To create these delightful Rice Krispie Treat Pumpkins, gather the following ingredients:
-
3 tablespoons butter: This will help to glue everything together and add a rich flavor. You can substitute with coconut oil if you’re looking for a dairy-free option.
-
1 package (10 oz, about 40) JET-PUFFED Marshmallows, OR 6 cups JET-PUFFED Miniature Marshmallows: Marshmallows are the star of the show! They provide that gooey sweetness that makes Rice Krispie treats so irresistible. If you’re not a fan of marshmallows, you can try making a batch with marshmallow fluff.
-
6 cups Rice Krispies cereal: This classic cereal gives our pumpkins their crunchy texture. If you’re avoiding gluten, check for gluten-free Rice Krispies or use a similar puffed rice cereal.
-
Orange food coloring: Just a few drops will transform your treats into vibrant pumpkins. You can also use natural colorings like beet juice for a natural option.
-
Green candy for stems (like Tootsie Rolls): These give our pumpkins their charming little stems. If Tootsie Rolls aren’t available, consider using green licorice or green gumdrops.
-
Black icing for decoration (optional): This is where you can get creative—use black icing to draw faces if you want to turn these pumpkins into Jack-o’-lanterns!
Step-by-Step Instructions
Now, let’s dive into creating our Rice Krispie Treat Pumpkins! Follow these step-by-step instructions, and I promise you’ll have a blast along the way.
-
Melt the Butter: In a large saucepan, melt the 3 tablespoons of butter over medium heat. Stir it frequently to prevent it from browning. The aroma of melted butter is like a warm hug!
-
Add the Marshmallows: Once the butter is melted, add the marshmallows to the pan. Stir continuously until they are completely melted and smooth. This may take around 2–3 minutes. Fun tip: keep your heat moderate; if you turn it up too high, the marshmallows may scorch.
-
Incorporate Orange Food Coloring: At this point, add your desired amount of orange food coloring to the melted marshmallow mixture. Stir until the color is uniform—this is the magical moment when the treat starts to look like a pumpkin!
-
Mix in the Rice Krispies: Remove the pan from the heat and gently fold in the 6 cups of Rice Krispies cereal. Use a spatula or wooden spoon and fold slowly to avoid crushing the cereal. The texture will be sticky, and you might want to keep a bowl of water nearby to wet your hands so they don’t stick.
-
Shape the Pumpkins: Allow the mixture to cool slightly. Once it’s manageable (but still warm), use your hands to shape the mixture into pumpkin-sized balls. Aim for about the size of a baseball. The warmth will help you mold them easily! You can create different sizes for variety.
-
Create the Stems: Take your green candy (like Tootsie Rolls) and shape small pieces into stems. Gently press them into the top of each pumpkin. You could even twist the ends to give them a more vine-like appearance!
-
Decorate with Icing: If you’re feeling crafty, use black icing to draw little faces on your pumpkins. You can go for friendly smiles, spooky grins, or leave them bare—the choice is yours!
-
Let Them Set: Place your pumpkins on a wax paper-lined tray and let them cool completely. After they’ve set for about 30 minutes, they’ll be ready to enjoy!
Serving Suggestions
When it comes to serving, there are endless possibilities to make your Rice Krispie Treat Pumpkins shine! You can arrange them on a festive platter, perhaps with some faux leaves and harvest-themed decorations to give it an autumnal flair. They make for a terrific centerpiece at Halloween parties or family gatherings. You could also gift them in a clear cellophane bag tied with a ribbon for a personal touch. Whether you’re presenting them at a potluck or simply indulging at home, they’re bound to bring smiles all around!
Recipe Variations
Want to get creative? Here are some fun variations you can try:
-
Chocolate-covered Pumpkins: Dip the cooled pumpkins halfway in melted chocolate for a decadent twist!
-
Caramel Drizzle: Drizzle some caramel sauce over your pumpkins for an extra sweet surprise.
-
Spiced Treats: Add a sprinkle of cinnamon and nutmeg to the Rice Krispies before molding for a warm, spicy flavor.
-
Nutty Crunch: Mix in chopped nuts or seeds for an added crunch and nutty flavor.
-
Candy Corn Accent: Use candy corn as additional decoration for a colorful touch that screams fall!
Chef’s Notes
This recipe has evolved over the years from just a simple treat to a fun activity I share with friends and family. I love experimenting with flavors and colors, and it’s always a thrill to see the joy these pumpkin treats bring to others. One year, we even used edible glitter for a sparkly effect, and you could see the wide eyes of my niece lighting up with wonder!
Cooking is not just about the end result. It’s about the memories we create and the love we pour into every bite. So, don’t stress if your pumpkins aren’t perfectly round; they are still delicious, and each one has its own unique character!
FAQs and Troubleshooting
1. Why did my treats turn out too hard?
If your Rice Krispie Treats are too hard, it might be because they were cooked for too long or not enough marshmallows were used. Keep an eye on the melting process to avoid overcooking.
2. Can I use other cereals?
Absolutely! You can substitute Rice Krispies with other puffed cereals like Cocoa Pebbles for a chocolatey treat or try Cheerios for a different texture.
3. How should I store leftovers?
Store your Rice Krispie Treat Pumpkins in an airtight container at room temperature. They’ll stay fresh for several days—if they last that long!
4. Can I make these treats ahead of time?
Yes! You can make them a day in advance. Just keep them stored in an airtight container to maintain their freshness.
Nutritional Info
While these treats are predominantly made of sugar and butter, they also have that nostalgic warmth that brings joy! It’s best to enjoy them as an occasional treat rather than a daily snack.
Final Thoughts
As you gather your loved ones and whip up these delightful Rice Krispie Treat Pumpkins, I hope you experience the joy of cooking that I cherish so much. Whether you’re creating more memories like the ones I shared or simply adding a festive touch to your day, remember that the best part of any recipe is the laughter, stories, and moments that come along with it. So, let’s get cooking and make this autumn truly magical—one pumpkin at a time! Happy feasting!
PrintRice Krispie Treat Pumpkins
Celebrate the fall season with these delightful Rice Krispie Treat Pumpkins, a fun and easy way to bring nostalgia into your kitchen.
- Prep Time: 15 minutes
- Cook Time: 10 minutes
- Total Time: 25 minutes
- Yield: 12 servings 1x
- Category: Dessert
- Method: No-Bake
- Cuisine: American
- Diet: Vegetarian
Ingredients
- 3 tablespoons butter
- 1 package (10 oz, about 40) JET-PUFFED Marshmallows OR 6 cups JET-PUFFED Miniature Marshmallows
- 6 cups Rice Krispies cereal
- Orange food coloring
- Green candy for stems (like Tootsie Rolls)
- Black icing for decoration (optional)
Instructions
- Melt the butter in a large saucepan over medium heat.
- Add the marshmallows to the pan and stir until they are completely melted and smooth.
- Incorporate the desired amount of orange food coloring into the melted marshmallow mixture.
- Mix in the Rice Krispies cereal by gently folding it into the mixture.
- Shape the mixture into pumpkin-sized balls using your hands.
- Create small pieces of your green candy for the stems and gently press them into the top of each pumpkin.
- Decorate with black icing as desired.
- Let the pumpkins cool completely on a wax paper-lined tray for about 30 minutes.
Notes
Store in an airtight container at room temperature for several days. Happy feasting!
Nutrition
- Serving Size: 1 pumpkin
- Calories: 150
- Sugar: 16g
- Sodium: 45mg
- Fat: 5g
- Saturated Fat: 3g
- Unsaturated Fat: 1g
- Trans Fat: 0g
- Carbohydrates: 29g
- Fiber: 0g
- Protein: 1g
- Cholesterol: 15mg
Keywords: Rice Krispie, pumpkins, Halloween, fall recipes, no-bake dessert