Bewitching Halloween Treats: Let’s Make Some Delicious Witch Fingers!
Hello, my cheeky culinary friends! Today, we’re gearing up to create an eerie yet delightful treat that’s perfect for Halloween: Witch Fingers, or in Spanish, “Dedos de Bruja.” These creepy, edible fingertips are sure to be a hit at your Halloween gatherings, whether you serve them at a spooky party or simply enjoy them while watching your favorite thriller.
Halloween is such a fun time of year, isn’t it? With all the tricks, treats, and memories that come along with it, there’s something magical in the air. The twinkling lights, the spooky decorations, and of course, that sweet smell of treats wafting through the air bring a wave of nostalgia just thinking about it. So grab your apron and let’s conjure up some Witch Fingers that’ll have everyone howling with delight!
A Personal Touch: My Witchy Kitchen Memories
Let me take you down memory lane. When I was a little girl, my mom and I would spend hours in the kitchen, especially during Halloween. She always had a knack for staging the perfect spooky snacks that made us giggle and shriek with glee. One year, she decided to make these Witch Fingers, and I remember the uncontained laughter as we shaped the dough into little fingers, using slivered almonds for the nails. As we baked, we whispered ghost stories, our imaginations running wild with images of friendly witches who were just looking for some delicious treats to share.
Today, these Witch Fingers invite the same joy and fearsome fun into my kitchen, so I’m thrilled to share how to make them with you! If you’re ready to bring some delicious creeps into your home this Halloween, let’s dive into this wickedly wonderful recipe!
Ingredients: What You’ll Need
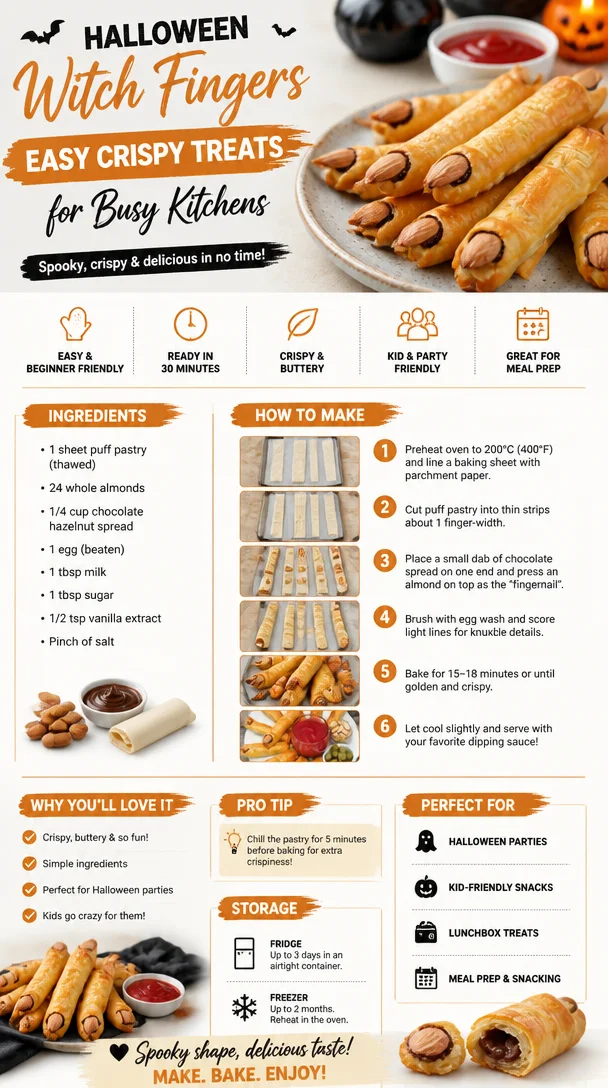
For these Witch Fingers, you won’t need any magic potions, just some simple ingredients to create these spooky delights!
-
1 cup (225g) unsalted butter, softened
- The key to a lovely soft dough! For a dairy-free option, substitute with coconut oil or a plant-based butter.
-
1 cup (100g) powdered sugar
- Sweetness is essential! You could use granulated sugar but expect a less smooth texture.
-
1 teaspoon vanilla extract
- Adds a beautiful flavor! Almond extract can be a fun alternative if you want a twist.
-
2 ½ cups (315g) all-purpose flour
- The backbone of our cookies! For a gluten-free option, consider using almond flour, but the texture may vary.
-
½ teaspoon salt
- Balances the sweetness! Feel free to adjust based on your preference.
-
1 teaspoon baking powder
- Helps our cookies rise a bit! Baking soda could be used as a substitution, but the texture will change slightly.
-
Slivered almonds (for nails)
- These gruesome-looking additions add realism! Hazelnuts sliced in half can work in a pinch.
-
Red gel food coloring (optional)
- Drizzle on afterwards to add some “blood.” Or, try raspberry jam for a more natural approach!
With these ingredients on deck, you’ll be well on your way to creating a delightful dish that’s equal parts fun and delicious!
Step-by-Step Instructions: Crafting the Witch Fingers
-
Preheat Your Oven:
Heat your oven to a delightful 350°F (175°C). This ensures our cookies bake perfectly and with a lovely touch of golden brown. Make sure your oven rack is in the center so the heat distributes evenly. -
Cream Together Butter and Sugar:
In a large mixing bowl, beat together the softened butter and powdered sugar until it’s light and fluffy. This is where the magic happens! Take your time; this step is essential for a tender texture. -
Mix in the Vanilla:
Add the vanilla extract and beat for an additional minute. You’re not just adding flavor here; you’re creating an aromatic walk down Halloween lane! -
Combine Dry Ingredients:
In another bowl, whisk together the flour, salt, and baking powder. Gradually add the dry ingredients to the butter mixture, mixing just until combined. Don’t overmix — we want soft, tender cookies, not tough ones! -
Shape the Fingers:
Take about two tablespoons of dough and roll them into fingers about 3-4 inches long. You want them to be a bit chunky! Then, press the dough down slightly to create a knuckle look. Use a knife to create “knuckle” lines, adding character to your witchy fingers. -
Attach Almonds:
At the tip of each finger, gently press a slivered almond to mimic a wicked nail. This is when your cookies start to get their spooky personality! -
Bake:
Place your witch fingers on a parchment-lined baking sheet, spacing them a couple of inches apart, and pop them into the oven for 15-18 minutes, or until they are just lightly golden on the edges. Keep an eye on them — we don’t want them to get too crispy! -
Cool and Decorate:
Once baked, allow the cookies to cool on the sheet for about 5 minutes before transferring them to a wire rack. This is when you can drizzle some red gel food coloring or add a bit of raspberry jam to finish them off!
Serving Suggestions: Presenting Your Creepy Creations
When serving these Witch Fingers, embrace the spookiness! You could place them on a spooky-themed platter, surrounded by fake spiderwebs or alongside small cauldrons filled with chocolate or gummy worms. A little bit of imagination goes a long way in making these treats pop!
Recipe Variations: Creative Twists to Try
Want to mix things up a bit? Here are some fun variations you can try with your Witch Fingers:
- Chocolate Chip Fingers: Add mini chocolate chips into the dough for a sweet surprise in every bite.
- Spiced Version: Toss in a teaspoon of cinnamon or pumpkin spice for a fall twist that’ll get you in the autumn spirit.
- Gingerbread Fingers: Add molasses and ginger to make a deliciously spiced version perfect for Halloween.
- Gluten-Free Option: Use a gluten-free flour blend in place of regular flour for a wholly inclusive treat.
- Nut-Free Variation: Use sunflower seeds or pumpkin seeds for the nails—creepy and nut-free!
Chef’s Notes: A Bit of Flavour and Fun
I have to tell you, every time I make these Witch Fingers, I can’t help but smile at the reactions I get from my friends and family. It’s an instant conversation starter, and the giggles that ensue only add to the delight. It’s funny how something that looks so creepy can taste so heavenly! Over the years, this recipe has evolved in our family; we’ve added different flavors, fun decorations, and I’ve even created a mini “witch’s cauldron” using a small pot filled with chocolate dip for added fun!
FAQs and Troubleshooting
Q1: Why did my cookies spread too much?
A: The cookies may have spread if the butter was too soft. Be sure to cream your butter and sugar well and refrigerate the dough for about 30 minutes if needed before shaping.
Q2: Can I freeze the dough?
A: Absolutely! You can freeze the unbaked dough for up to a month. Just thaw in the fridge overnight before baking!
Q3: What if I don’t have slivered almonds?
A: No worries! You can use pecans, hazelnuts, or even chocolate chips for a different look and flavor.
Q4: Can I make these ahead of time?
A: Yes! These cookies store well in an airtight container at room temperature for up to a week. The flavors even get better over time!
Nutritional Info
This section can help you maintain a little balance at your Halloween party. Each cookie is approximately 150 calories, with moderate sugar and fat content. Enjoy them in moderation, and don’t forget to pair with a veggie platter for a healthy balance!
Final Thoughts
There you have it, culinary companions! In just a few easy steps, you’ve conjured up a bewitchingly delicious treat perfect for Halloween. Whether you’re aiming to frighten or delight, these Witch Fingers are certain to add a magical twist to your festivities. Remember, the key ingredient in all cooking is a bit of fun and love! So don’t be shy; let your imagination run wild, and know that every bite of your creepy creations will be a taste of joy.
Happy Halloween baking, my friends! 🍬✨
PrintWitch Fingers
Creepy yet delightful Witch Fingers perfect for Halloween gatherings.
- Prep Time: 15 minutes
- Cook Time: 18 minutes
- Total Time: 33 minutes
- Yield: 24 servings 1x
- Category: Dessert
- Method: Baking
- Cuisine: American
- Diet: Vegetarian
Ingredients
- 1 cup (225g) unsalted butter, softened
- 1 cup (100g) powdered sugar
- 1 teaspoon vanilla extract
- 2 ½ cups (315g) all-purpose flour
- ½ teaspoon salt
- 1 teaspoon baking powder
- Slivered almonds (for nails)
- Red gel food coloring (optional)
Instructions
- Preheat your oven to 350°F (175°C).
- Cream together the butter and powdered sugar until light and fluffy.
- Mix in the vanilla extract and beat for an additional minute.
- Combine the flour, salt, and baking powder in another bowl.
- Add the dry ingredients to the butter mixture, mixing just until combined.
- Shape about two tablespoons of dough into fingers about 3-4 inches long.
- Attach slivered almonds to resemble nails.
- Bake for 15-18 minutes or until lightly golden on the edges.
- Cool on the sheet for 5 minutes before transferring to a wire rack.
- Decorate with red gel food coloring or raspberry jam if desired.
Notes
Serve on a spooky-themed platter for added effect. Experiment with different variations like chocolate chip or gluten-free alternatives!
Nutrition
- Serving Size: 1 finger
- Calories: 150
- Sugar: 10g
- Sodium: 125mg
- Fat: 8g
- Saturated Fat: 5g
- Unsaturated Fat: 3g
- Trans Fat: 0g
- Carbohydrates: 18g
- Fiber: 0g
- Protein: 1g
- Cholesterol: 30mg
Keywords: Halloween, Witch Fingers, spooky snacks, treats, cookies