***
Your New Favorite Loaf is Here: No-Knead, All-Ease Sourdough Sandwich Bread
Hey there, friend! Let’s talk about something near and dear to my heart: the simple, soul-satisfying magic of a perfect loaf of sandwich bread. You know the one. It’s soft enough for a PB&J, sturdy enough for a stacked turkey club, and toasts up to a gorgeous, buttery gold. But if you’ve ever felt a little intimidated by the world of sourdough—all that precise kneading, tight shaping, and anxiety over the perfect ear—I’m here to tell you there’s a better way. A more joyful, less stressful way.
This, my friend, is your gateway to sourdough bliss. This No-Knead Sourdough Sandwich Bread is the loaf I make more than any other in my kitchen. It’s the workhorse, the weeknight hero, the bread my kids beg for. It’s soft, slightly tangy, and has a pillowy-soft crumb that is just begging to be slathered with jam. The best part? It’s almost entirely hands-off. No fancy equipment, no complex techniques. We’re letting time and our sourdough starter do all the heavy lifting.
So, if you’ve got a jar of starter bubbling away on your counter (even that discard you were about to toss!), you’re just a few simple steps away from the most comforting, bakery-style bread you can make at home. Grab your favorite mixing bowl and let’s turn this ordinary day into a delicious one.
The Loaf That Started It All
PrintNo-Knead Sourdough Sandwich Bread : Soft, Fluffy & Perfect for Everyday
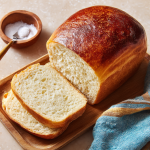
This no-knead sourdough sandwich bread is the soft, slightly tangy loaf your kitchen needs. It’s beginner-friendly, hands-off, and bakes up beautifully golden with a tender crumb and pillowy texture. A little sweetness from honey and richness from olive oil give it bakery-style flavor, perfect for toast, grilled cheese, or hearty sandwiches.
- Prep Time: 1 hour
- combined rise time: 12 hours
- Cook Time: 45 minutes
- Total Time: 13 hours 45 minutes
- Yield: 2 loaves / 32 slices 1x
Ingredients
⅔ cup (130g) sourdough starter discard or fed within 24 hours
2⅔ cups (600g) warm filtered water (95–100°F)
½ cup (112g) granulated sugar or ¼ cup raw honey
7–8 cups (1000g) bread or all-purpose flour (weighed preferred)
3 tablespoons (40g) extra-virgin olive oil
4 teaspoons (18g) salt
Optional twist: 2 tablespoons milk powder for added softness
Optional: 1 tablespoon flax or chia seeds for texture
Instructions
In a large mixing bowl, combine warm water, sourdough starter, and sweetener of choice. Whisk to dissolve.
Add flour, salt, olive oil, and optional milk powder or seeds. Mix with a dough whisk or sturdy spoon until a shaggy dough forms—no kneading necessary.
Cover and let rest for 30 minutes. Stretch and fold the dough 3–4 times, resting 30 minutes between each if time allows (optional, but improves texture).
Cover tightly and allow to rise in a warm spot for 10–12 hours or until doubled and bubbly.
Lightly grease two 9×5″ loaf pans or one large 12×4.5″ pan. Turn dough out onto a floured surface, divide, and gently shape into loaves.
Place into pans, cover, and let rise again for 1–2 hours until puffy and just over the rim.
Preheat oven to 375°F (190°C). Bake for 40–45 minutes until golden and hollow-sounding when tapped.
Cool in pans for 10 minutes, then transfer to a rack to cool fully before slicing.
Nutrition
- Calories: 215
- Sugar: 4g
- Fat: 4g
- Carbohydrates: 40g
- Fiber: 1g
- Protein: 6g
I have to share a little story with you. This recipe wasn’t born in a flash of culinary genius; it was born out of pure, chaotic, “I-need-to-feed-these-people” necessity. A few years ago, during a particularly wild snowstorm that left our pantry looking a little sad, I realized we were out of bread. My starter was looking peckish, and my two little ones were already asking for grilled cheese for the tenth time that week.
I needed a loaf that was forgiving, that didn’t require a trip to the store, and that could be made with one eye on the dough and the other on the epic fort being built in my living room. I threw this recipe together, crossed my fingers, and let it rise overnight. The next morning, the kitchen smelled like a dream, and I pulled out two loaves of the most beautiful, golden bread. It was soft, it sliced like a dream, and it made the most incredible grilled cheese of our lives. That stormy week, this bread became more than just food; it was a warm, tangible piece of comfort. It’s been a Reynolds family staple ever since.
Gathering Your Ingredients
One of the things I love most about this recipe is its beautiful simplicity. Here’s what you’ll need to create your own kitchen magic. Remember, baking is part science, part art, so I’ve included my favorite little tips and swaps for each ingredient.
- ⅔ cup (130g) Sourdough Starter: You can use active starter or discard that’s been fed within the last 24 hours! Discard will give you a milder tang, while a bubbly, active starter will give you a more pronounced sourdough flavor and a slightly better rise. Don’t have a starter? Here’s my guide to making your own!
- 2⅔ cups (600g) Warm Filtered Water (95–100°F): Warm water helps wake up the wild yeast. Think bathwater temperature—not too hot, or you’ll send the yeast into a sleepy forever-nap. I use filtered because sometimes the chlorine in tap water can inhibit the yeast.
- ½ cup (112g) Granulated Sugar or ¼ cup Raw Honey: This is our yeast food and it adds a lovely, subtle sweetness that balances the tang. Honey will give a more complex flavor, while sugar keeps it simple. Don’t worry, it won’t taste sweet!
- 7–8 cups (1000g) Bread or All-Purpose Flour: I highly recommend using a kitchen scale for this! It’s the key to consistency. Bread flour will give you a slightly chewier, taller loaf thanks to its higher protein content, but all-purpose flour works beautifully for a softer crumb. We’ll start with 7 cups and add more as needed.
- 3 tablespoons (40g) Extra-Virgin Olive Oil: This is our secret weapon for a soft, tender crumb and a beautifully golden crust. It also helps the bread stay fresh longer. You can swap it for melted butter or a neutral oil like avocado.
- 4 teaspoons (18g) Salt: So important for flavor! Don’t add it directly to the starter/water mix, as salt can slow down yeast activity. We’ll mix it in with the flour.
- Optional: 2 tablespoons Milk Powder: My little chef’s hack for an even softer, richer, bakery-style texture and crumb. It’s a game-changer, but the bread is still fantastic without it.
- Optional: 1 tablespoon Flax or Chia Seeds: For a lovely little texture and a healthy boost. You could also add sunflower seeds or rolled oats!
Let’s Make Some Magic: Your Step-by-Step Guide
Ready? This is where the fun begins. Put on some good music, because we’re about to create something amazing with very little effort.
Step 1: Wake Up the Party. In a very large mixing bowl (I mean it, give that dough room to grow!), whisk together your warm water, sourdough starter, and honey (or sugar). You’re looking for a milky, fairly smooth mixture. This is where we’re waking up our wild yeast and giving them a little snack. You should see a few little bubbles already—that’s a good sign!
Step 2: Create a Shaggy Masterpiece. Now, add 7 cups of the flour, salt, olive oil, and your optional milk powder or seeds. Grab a dough whisk or a sturdy wooden spoon and mix until you no longer see dry patches of flour. The dough will be sticky, shaggy, and look a bit like a mess. This is perfect! We are not kneading. If the dough is still extremely wet and sticky, you can add the remaining 1 cup of flour, a little at a time, until it becomes a cohesive, but still soft, mass.
Step 3: The Optional (But Worth It) Power-Up. Cover the bowl with a damp kitchen towel or plastic wrap and let the dough rest for 30 minutes. After its little nap, we’re going to do a series of “stretch and folds.” Wet your hand, grab one side of the dough, stretch it upwards, and fold it over the center. Give the bowl a quarter turn and repeat 3-4 more times. This builds strength and structure without any kneading! Do this 2-3 more times with 30-minute rests in between if you have the time. If you don’t, no stress—the long ferment will still work its magic.
Step 4: The Long, Lazy Rise. This is the secret to that incredible flavor and open crumb. Cover the bowl tightly and let it rise in a warm spot in your kitchen for 10-12 hours, or until it has doubled in size and is covered with little bubbles. I often mix this before bed and let it rise overnight. Waking up to a bubbly, alive dough is the best kind of morning surprise!
Step 5: Shape with a Gentle Touch. The next morning, lightly grease two 9×5-inch loaf pans (or one large 12×4.5-inch pan). Turn your wonderfully puffy dough out onto a lightly floured surface. It will be soft and airy! Gently divide it in two, and without punching all the air out, shape each piece into a loose loaf by folding the sides into the center and rolling it into a log. The key here is to be gentle to preserve all those beautiful air bubbles we worked so hard to create.
Step 6: The Final Proof. Place your shaped loaves into the prepared pans, seam-side down. Cover them lightly with that damp towel again and let them rise for 1-2 hours, or until they look puffy and have just crested the rim of the pan. This is called proofing, and it’s the final step before baking.
Step 7: Bake to Golden Perfection. Preheat your oven to 375°F (190°C). Once hot, slide your loaf pans in and bake for 40-45 minutes. You’ll know it’s done when the top is a deep, golden brown and the loaf sounds hollow when you tap it on the bottom. If you have a thermometer, the internal temperature should read about 190-200°F.
Step 8: The Hardest Part: Let it Cool! I know, the smell is intoxicating and you want to dive right in. But patience, my friend! Let the loaves cool in the pan for 10 minutes, then turn them out onto a wire rack to cool completely. Slicing into warm bread can make it gummy, so letting it cool ensures you get that perfect, sliceable texture.
How to Serve Your Masterpiece
Once it’s fully cooled, it’s time for the grand unveiling! Use a sharp serrated knife for clean slices. This bread is the ultimate all-rounder. It makes the most incredible toast—slathered with salted butter and a drizzle of honey. It’s the star of your next epic grilled cheese or turkey club. It’s perfect for dipping into a warm bowl of soup, or simply enjoyed with a smear of almond butter for an afternoon pick-me-up. However you choose to enjoy it, do it with a smile—you baked bread!
Mix It Up! Fun Recipe Variations
Once you’ve mastered the basic loaf, the flavor world is your oyster! Here are a few of my favorite ways to mix things up:
- Everything Bagel Loaf: Knead 2-3 tablespoons of everything bagel seasoning into the dough during the shaping stage. You can also sprinkle more on top right before baking.
- Whole Wheat Honey: Swap out 3 cups of the all-purpose flour for whole wheat flour. The honey complements the nutty flavor perfectly.
- Cheesy Herb Swirl: During shaping, roll the dough out into a rectangle, sprinkle with 1 cup of shredded cheddar and 1 tablespoon of fresh herbs (like rosemary or thyme), then roll it up like a jelly roll before placing it in the pan.
- Cinnamon Raisin: Add 1 tablespoon of cinnamon to the dry ingredients and fold in 1 cup of plumped raisins during the final shaping.
- Dairy-Free/Vegan: Use maple syrup instead of honey and a neutral oil instead of butter if using. It works like a charm!
Anna’s Chef’s Notes & Kitchen Stories
This recipe has been a living, evolving thing in my kitchen. The first time I made it, I was so nervous I checked on the rising dough every hour! I’ve learned to trust the process. The beauty of a no-knead dough is its forgiveness. Your kitchen temperature, the vitality of your starter, the humidity—they all play a role. If it rises faster or slower than the time I’ve given, don’t panic. Look for the visual cues (doubled in size, bubbly) rather than the clock.
A funny story: I once forgot the salt. Just completely spaced it. The resulting loaves were… well, they were very bland and had a weird texture. We still ate it (toasted with a lot of jam), but it was a powerful reminder of salt’s crucial role in both flavor and controlling yeast activity. Don’t be like me! Don’t forget the salt.
Your Questions, Answered!
Q: My bread is very dense. What happened?
A: This is the most common question! A dense loaf is usually due to one of three things: 1) Under-proofing: The dough didn’t rise enough during either the bulk ferment or the final proof. Let it go longer next time until it’s truly puffy and doubled. 2) Over-flouring: You added too much flour during mixing, making the dough too stiff to rise properly. Always measure by weight if you can! 3) An inactive starter: Make sure your starter is bubbly and active before you use it. Try the float test—a spoonful of starter should float in a glass of water.
Q: Can I speed up the rise time?
A: You can, but the long, slow fermentation is what develops that wonderful sourdough flavor and texture. If you’re in a pinch, you can place the bowl in a warm spot (like an oven with the light on) to cut the bulk rise down to 6-8 hours. The flavor will just be milder.
Q: The top of my bread is very pale. How do I get a darker, golden crust?
A: For a deeper color, you can brush the top of the loaves with an egg wash (1 egg + 1 tbsp water) or just a bit of milk right before baking. Also, make sure your oven is fully preheated! Ovens can sometimes run cool.
Q: How do I store this bread?
A: Once completely cool, store it in a plastic bag at room temperature for 4-5 days. For longer storage, slice it and freeze it in a freezer bag. You can pop frozen slices straight into the toaster!
Nutritional Information*
*This is an estimate provided for informational purposes only. I am not a nutritionist.
Per Slice (approx. 32 slices total):
Calories: 215 | Carbohydrates: 40g | Protein: 6g | Fat: 4g | Sugar: 4g | Fiber: 1g
Prep Time: 1 hour | Combined Rise Time: 12 hours | Bake Time: 45 minutes | Total Time: 13 hours 45 minutes | Yields: 2 loaves

Final Thoughts
There’s something deeply satisfying about pulling a warm, golden loaf of homemade bread from your own oven—especially when it’s this easy. This No-Knead Sourdough Sandwich Bread takes all the fuss out of traditional bread-making and replaces it with pure joy and comfort. It’s soft, tangy, and endlessly versatile—the kind of loaf that becomes part of your weekly rhythm before you even realize it.
Whether you’re building the ultimate grilled cheese, making morning toast for the family, or sneaking a buttered slice straight from the cooling rack (no judgment here), this recipe is here to make every bite a little cozier. Trust the process, enjoy the aroma, and let your kitchen fill with that simple, home-baked magic—because this, my friend, is what comfort tastes like.