Fall’s Favorite Bite-Sized Magic: No-Bake Pumpkin Truffles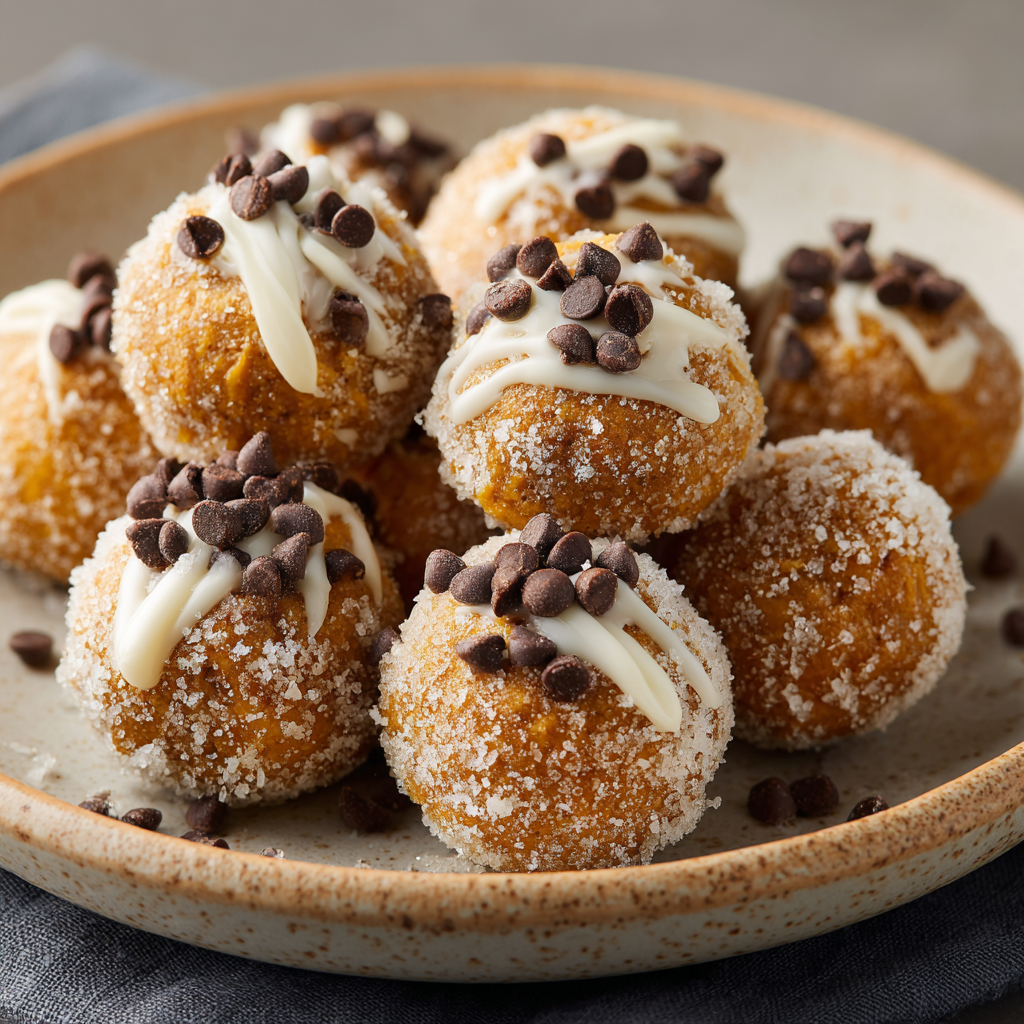
Hey there, friend! Anna here. Can you feel it? That crisp, cool air that whispers of cozy sweaters, crackling bonfires, and all things pumpkin. It’s the season of warmth, of gathering, and most importantly, of incredibly delicious treats that make your heart (and your taste buds) do a happy dance. And I have just the thing to kick off your fall baking—or should I say, no-baking—spree!
Let me introduce you to my Pumpkin Truffle Bites. Imagine, if you will: a creamy, spiced pumpkin filling that tastes like the very soul of autumn, hugged by a coat of sparkling sugar. Each one is crowned with a cute little chocolate chip stem, making them look like adorable, bite-sized pumpkins. They’re ridiculously easy to make, require zero oven time, and are guaranteed to be the star of any potluck, party, or just your average Tuesday night craving session. We’re about to create some serious kitchen magic together, and I promise, it’s going to be a joyful, stress-free, and utterly delicious adventure. So, tie on your favorite apron, and let’s get ready to roll!
A Patch of Pumpkin Memories
PrintPumpkin Truffle Bites
Creamy, spiced, and coated in sugar, these no-bake pumpkin truffles are bite-sized treats bursting with fall flavor. Rolled in sugar with a white chocolate swirl and topped with a chocolate chip stem, they’re as cute as they are craveable.
- Prep Time: 15 minutes
- chill: 1 hour
- Total Time: 1 hour 15 minutes
- Yield: About 24 truffles 1x
Ingredients
Truffle Filling
1 tablespoon butter
4 oz cream cheese, softened
½ cup canned pumpkin purée
1 (14 oz) can sweetened condensed milk
1½ teaspoons pumpkin pie spice
½ cup graham cracker crumbs
⅓ cup white chocolate chips
Orange food coloring (optional)
For Finishing
Granulated sugar (for rolling)
Chocolate chips (for topping/stems)
Instructions
In a saucepan over medium-low heat, melt butter. Add cream cheese and stir until smooth.
Add pumpkin purée, sweetened condensed milk, and pumpkin pie spice. Stir continuously until thickened, about 10–12 minutes.
Stir in graham cracker crumbs and white chocolate chips until melted and fully combined.
Optional: Add a few drops of orange food coloring and stir to blend evenly.
Remove from heat and chill mixture for at least 1 hour until firm.
Once firm, scoop and roll into 1-inch balls. Roll in granulated sugar for sparkle.
Press a chocolate chip into the top of each truffle to create a stem.
Keep refrigerated until ready to serve.
Nutrition
- Calories: 130
- Sugar: 15g
- Fat: 6g
- Carbohydrates: 18g
- Protein: 2g
This recipe always takes me right back to my kids’ first proper pumpkin patch adventure. There was more mud than anticipated, my youngest was determined to bring home a pumpkin bigger than she was, and the promise of hot cider was the only thing keeping everyone moving. We finally got home, triumphant and slightly filthy, with a car full of orange gourds. The tradition was always to roast the seeds immediately, filling the house with that toasty, salty scent. But one year, we had a little leftover pumpkin purée from another project sitting in the fridge. I looked at it, looked at my tired-but-happy crew, and thought, “We need a fast, fun treat. Now.”
We threw ingredients together, laughing and covered in pumpkin patch dirt, and ended up rolling these little truffles in sugar right there on the kitchen counter. They were devoured in minutes, and a new fall tradition was born. Now, every time I make them, I’m right back in that messy, happy, perfect moment. It’s a reminder that the best recipes aren’t about perfection; they’re about the joy you whip up along the way.
Gathering Your Pumpkin Truffle Toolkit
Here’s everything you’ll need to create these little spheres of autumnal bliss. The beauty of this list is its simplicity—most items are pantry staples! I’ve included my chef-y insights and swaps to make this recipe your own.
- 1 tablespoon butter – This is our rich, melting base. It adds a lovely depth of flavor and helps create a smooth start for our filling. Unsalted is best so we control the saltiness, but salted will work in a pinch!
- 4 oz cream cheese, softened – Key word: softened! This is the secret to a luxuriously creamy, no-lump texture. Take it out of the fridge at least 30 minutes before you start. For a lighter version, Neufchâtel cheese works beautifully.
- ½ cup canned pumpkin purée – Not pumpkin pie filling! We want pure, unadulterated pumpkin. It gives our truffles that iconic flavor and gorgeous color.
- 1 (14 oz) can sweetened condensed milk – This is the magic ingredient that provides sweetness, creaminess, and helps the mixture set firmly. There’s no great substitute for its unique texture, so this one’s essential!
- 1½ teaspoons pumpkin pie spice – The warm, aromatic heart of the truffle. Feel free to adjust to your taste! If you don’t have a blend, make your own with cinnamon, ginger, nutmeg, and a pinch of cloves.
- ½ cup graham cracker crumbs – This is my favorite hack! They add a subtle crust-like flavor and help absorb any excess moisture, giving the truffles a perfect, roll-able consistency.
- ⅓ cup white chocolate chips – They melt into the filling, adding pockets of creamy sweetness that complement the pumpkin spice so well. A chef’s secret for extra decadence!
- Orange food coloring (optional) – Purely for fun! A drop or two will give you that vibrant, picture-perfect pumpkin hue. Gel food coloring gives the most intense color without thinning the mixture.
- Granulated sugar (for rolling) – This creates that beautiful, sparkling, slightly crunchy exterior that contrasts wonderfully with the creamy interior. For a festive twist, try using coarse sugar or even cinnamon sugar!
- Chocolate chips (for topping/stems) – Regular semi-sweet chips are perfect for creating the adorable little “stems” on top of our pumpkin bites.
Let’s Make Some Magic: Step-by-Step
Ready to create? Follow these steps for foolproof, fabulous truffles. I’ll be right here with my best tips and tricks!
Step 1: The Melting Start. Grab a medium-sized saucepan and place it over medium-low heat. Add your tablespoon of butter and let it melt until it’s just starting to foam. This low and slow approach is key—we never want to rush this or crank the heat, as we could scorch the dairy ingredients we’re adding next. Patience, my friend, is your first secret ingredient!
Step 2: Creamy Base. Now, add your softened cream cheese. Using a flexible spatula or a whisk, stir it continuously into the melted butter. You’ll watch those little cream cheese lumps slowly melt away into a smooth, velvety base. This should only take a minute or two. If there are a few tiny lumps, don’t panic! They’ll usually smooth out as we go.
Step 3: Spiced & Sweet. It’s time for the main event! Add the pumpkin purée, the entire can of sweetened condensed milk, and that glorious pumpkin pie spice. Stir, stir, stir! Keep that spatula moving to ensure everything is beautifully combined. You’ll notice the mixture will start to loosen up and then slowly begin to thicken. This is exactly what we want!
Step 4: The Simmering Thicken. Here’s where the transformation happens. Continue stirring almost continuously for about 10-12 minutes. You’re not looking for a rolling boil, just a gentle simmer with lazy bubbles popping up here and there. You’ll know it’s ready when you drag your spatula across the bottom of the pan and the mixture doesn’t immediately flood back in; it will leave a clear path for a second or two. This means it’s thick enough to hold its shape later! This step is crucial, so set a timer and enjoy the amazing smell filling your kitchen.
Step 5: Crunch & Melt. Remove the pan from the heat. Immediately stir in the graham cracker crumbs and the white chocolate chips. The residual heat will melt the chips perfectly. Keep stirring until you have a uniform, thick mixture. If you’re using food coloring, now’s the time to add a drop or two and stir it through until you achieve that perfect pumpkin orange.
Step 6: The Big Chill. Transfer your beautiful pumpkin mixture to a bowl and press a piece of plastic wrap directly onto its surface. This prevents a yucky skin from forming. Now, pop it into the refrigerator for at least 1 hour, or until it’s very firm. Pro tip: if you’re in a hurry, spreading it into a shallow dish will help it chill faster! You can even make this a day ahead.
Step 7: The Roll & Sparkle. Time for the fun part! Place some granulated sugar in a small bowl. Using a small cookie scoop (a 1-inch melon baller or even a teaspoon works too), portion out the mixture. Roll it quickly between your palms to form a smooth ball. Immediately roll it in the sugar to coat it completely. If the mixture gets too soft and sticky, just pop it back in the fridge for 15 minutes. Your hands are warm, and that’s okay!
Step 8: The Final Touch. Take a chocolate chip and gently press it into the top of each sugar-coated truffle to create the adorable pumpkin stem. And voila! You’ve just created a masterpiece.
How to Serve These Pumpkin Gems
Presentation is part of the fun! Arrange these little pumpkins on a beautiful platter or a rustic wooden board. They look absolutely charming nestled inside mini parchment paper cupcake liners, which also keeps them from sticking together. For a real showstopper, pile them high on a cake stand for your next gathering. They pair wonderfully with a hot cup of coffee, a mug of spiced tea, or even a glass of cold milk. Keep them refrigerated until just before serving to ensure they stay firm and delicious!
Get Creative: Delicious Variations
Love to play with your food? Me too! Here are a few fun ways to mix up this recipe:
- Ginger Snap Crunch: Swap the graham cracker crumbs for crushed ginger snap cookies. It adds a wonderful spicy zing!
- White Chocolate Dip: Instead of rolling in sugar, dip the chilled balls in melted white chocolate and let them set on parchment paper. Drizzle with a little dark chocolate for an elegant finish.
- Nutty Delight: Roll the finished truffles in finely chopped pecans or walnuts instead of sugar for a lovely toasty flavor and crunch.
- Dairy-Free Twist: Use vegan butter, dairy-free cream cheese, and a plant-based sweetened condensed milk alternative (like coconut condensed milk). Check that your chocolate chips are dairy-free too!
Anna’s Chef Notes
This recipe has seen a few iterations over the years! The first batch was actually a little too soft because I was impatient and didn’t let the mixture thicken enough on the stove. We ended up eating them with spoons straight from the bowl—which was still delicious, but not exactly a portable truffle! That’s how I learned the “spatula test” is your best friend. I also once, in a pre-coffee haze, accidentally used evaporated milk instead of sweetened condensed milk. Let’s just say the result was… not sweet. Or successful. We all have kitchen mishaps; they’re just opportunities to laugh and learn (and order pizza). The addition of white chocolate chips was a happy accident that turned into a permanent upgrade. Trust the process, and most importantly, have fun with it!
Your Questions, Answered!
Q: My mixture is still very sticky and hard to roll after chilling. What can I do?
A: Don’t worry! This usually means the mixture could use a bit more thickening agent or a longer chill. Try stirring in an extra tablespoon or two of graham cracker crumbs. Also, ensure you chilled it for the full hour—sometimes if your fridge is packed, it needs a bit longer. If your hands are very warm, try rinsing them in cold water and drying them thoroughly before rolling.
Q: Can I freeze these truffles?
A: Absolutely! They freeze wonderfully. Place the finished, sugared truffles on a parchment-lined baking sheet and freeze until solid (about 1-2 hours). Then, transfer them to a freezer-safe bag or container. They’ll keep for up to 2 months. Thaw in the refrigerator for a few hours before serving.
Q: Why do I have to cook the mixture on the stove? Can’t I just mix it cold?
A: The stovetop step is non-negotiable for food safety and texture. It cooks the pumpkin purée and cream cheese just enough, and it’s crucial for dissolving the sugar in the condensed milk and thickening the entire mixture so it can firm up properly. Skipping this will give you a runny, un-rollable mixture.
Q: My white chocolate chips stayed chunky and didn’t melt all the way. Help!
A: This can happen if the pan is removed from the heat too quickly. Make sure the mixture is nice and hot when you add them, and stir vigorously. If a few small chunks remain, it’s not a disaster—they’ll add little bursts of flavor! For a completely smooth texture, you can use finely chopped white chocolate instead of chips, as it will melt faster.
Nutritional Information (Approximate, per truffle)
Calories: ~130 | Protein: 2g | Fat: 6g | Carbohydrates: 18g | Sugar: 15g
Please note: This is an estimate provided by an online nutrition calculator. It is not a substitute for professional dietary advice.
Prep Time: 15 minutes | Chill Time: 1 hour | Servings: About 24 truffles

Final Thoughts
These No-Bake Pumpkin Truffle Bites are proof that fall magic can fit right in the palm of your hand. They’re sweet without being fussy, adorable enough to steal the show at any gathering, and simple enough to whip up on a weeknight when that pumpkin craving strikes. Every bite is like a little celebration of the season—warm spice, creamy pumpkin, a sparkle of sugar, and a whole lot of joy.
So whether you’re making them for a holiday party, packing them into lunchboxes for a sweet surprise, or just treating yourself after a long autumn day, I hope these little pumpkin gems bring as many smiles to your home as they have to mine. After all, fall is all about savoring the small, cozy moments—and these truffles are the tastiest way to do just that.