***
Your Fearless Guide to the Perfect, Easy Loaf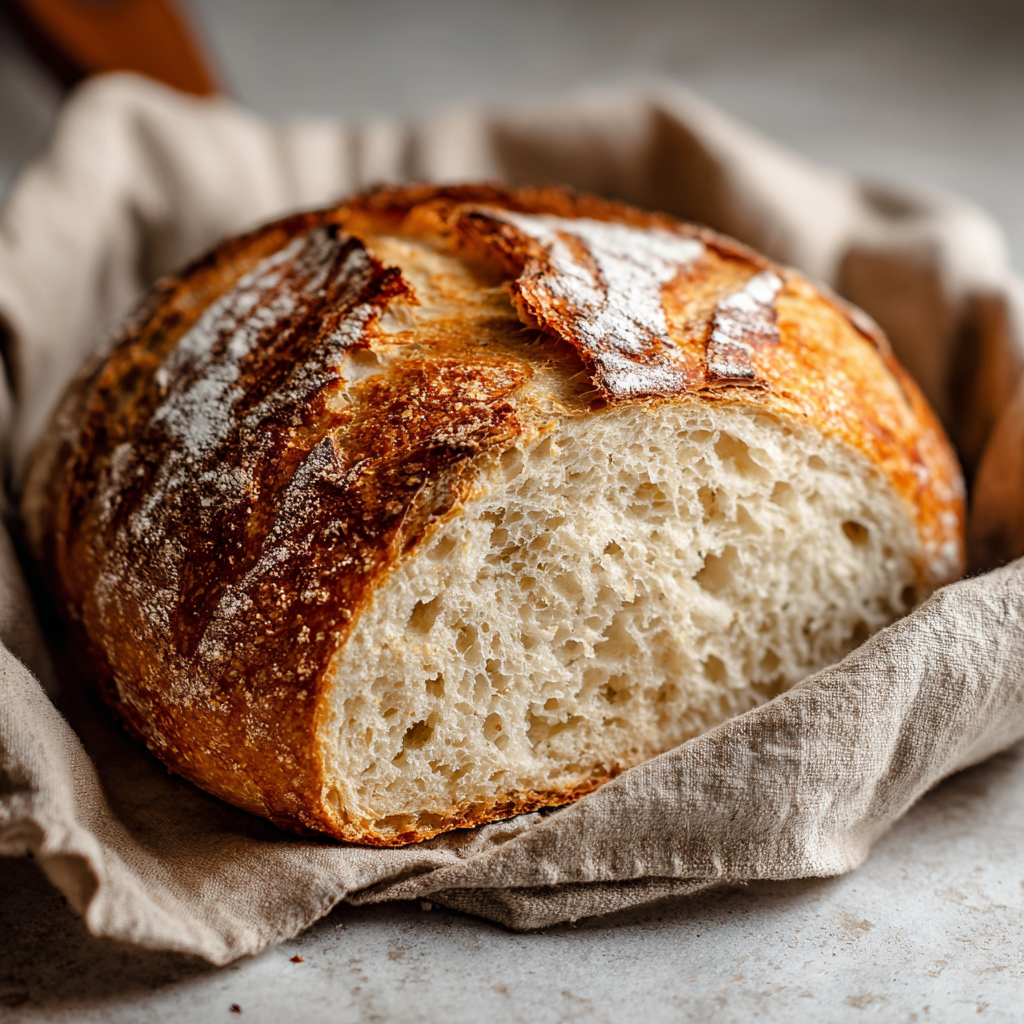
Hey there, friend! Anna here. Can I let you in on a little secret? For the longest time, I thought making real, tangy, crusty sourdough bread was a skill reserved for bakers with forearms of steel and years of patience. I’d see those gorgeous, blistered loaves on social media and think, “That’s beautiful, but it’s just not for me.” My starter would often feel like a high-maintenance pet I wasn’t qualified to care for.
But then I discovered the magic of no-knead, Dutch oven sourdough. And let me tell you, it was a total game-changer. This method is my kitchen soulmate—it’s forgiving, it’s patient, and it does most of the work for you while you’re busy living your life. It’s the recipe that finally made me feel like a true bread baker, and it’s the one I’m most excited to share with you today.
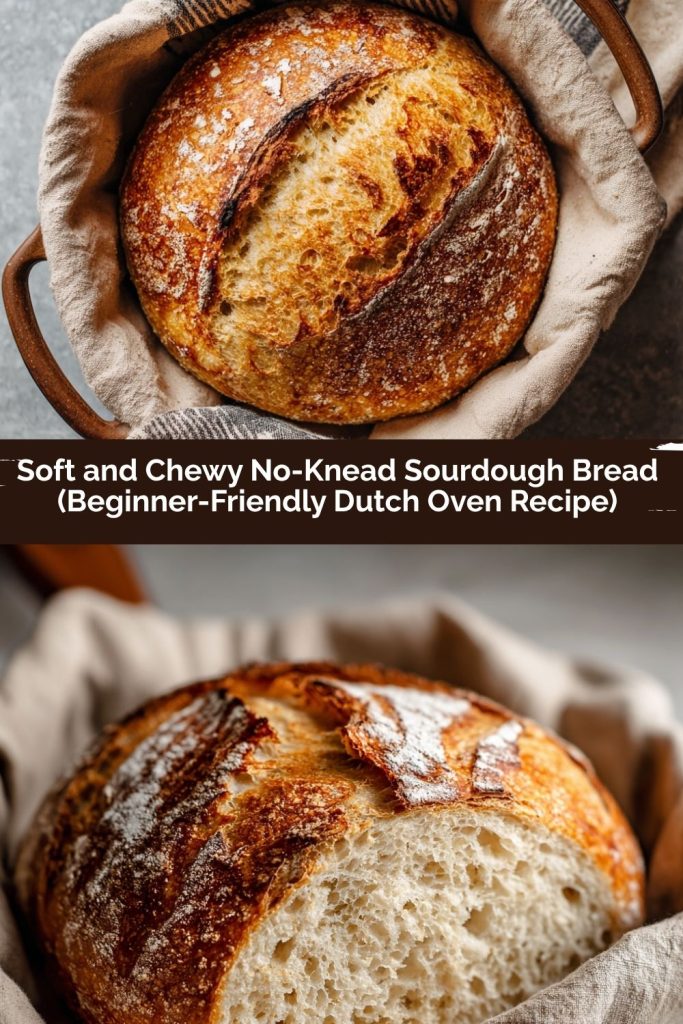
This Soft & Chewy Sourdough Bread is the perfect starting point for new bakers and a cozy go-to for seasoned sourdough lovers. No kneading required, just time, patience, and a bubbly starter. We’re talking about a loaf with a soft, pillowy crumb, a golden, crackly crust, and that signature tang in every single slice. It bakes up beautifully in a Dutch oven, which creates its own steamy environment for that professional-grade oven spring. It’s easy, it’s foolproof, and it is incredibly rewarding. So, if you’ve ever felt intimidated by sourdough, consider this your official invitation to leave those fears at the oven door. Let’s cook up something amazing together!
The Loaf That Started It All
PrintSoft and Chewy No-Knead Sourdough Bread (Beginner-Friendly Dutch Oven Recipe)

This Soft & Chewy Sourdough Bread is the perfect starting point for new bakers and a cozy go-to for seasoned sourdough lovers. No kneading required, just time, patience, and a bubbly starter. With a soft crumb and golden crust, it bakes beautifully in a Dutch oven and delivers that signature tang in every slice. Easy, foolproof, and incredibly rewarding!
- Prep Time: 20 minutes
- rest and rise time: 16 hours
- Cook Time: 45 minutes
- Total Time: 1 loaf (~12 slices)
Ingredients
100g active sourdough starter
375g warm water
500g bread flour or all-purpose flour
10g salt
Instructions
Mix: In a large bowl, mix starter and water. Add flour and salt. Stir until a sticky dough forms.
Rest & Fold: Cover and let rest for 30 minutes. Then perform 3–4 stretch and folds over the next 2 hours (every 30 mins).
Bulk Fermentation: Let dough rise at room temp for 8–12 hours until doubled.
Shape & Rest: Shape into a round. Let rest 30 mins. Place in floured banneton or bowl.
Cold Proof: Cover and refrigerate for 12–18 hours.
Bake: Preheat Dutch oven to 450°F (230°C). Score dough and bake:
20 mins covered
20–25 mins uncovered until golden and crusty
Cool: Let cool fully before slicing.
Nutrition
- Calories: 140
- Fat: 0.5g
- Carbohydrates: 28g
- Protein: 4g
I’ll never forget the first time this bread truly worked for me. It was a snowy Sunday, the kind of day that begs for the warmth of the oven and the smell of toasting flour. My starter, “Dough-Brad Pitt,” was peaking at just the right time, all bubbly and enthusiastic. I mixed the simple ingredients, did my stretch and folds while dancing to some 80s hits, and let time work its slow, steady magic.
The next morning, the kitchen was cold, but my dough was sitting in its banneton, looking puffy and alive. I preheated my chunky, blue Dutch oven—a wedding gift I’d mostly used for stews. When I tipped the dough in, it landed with a soft *plop*. I scored it with a shaky hand, clinked the lid on, and crossed my fingers. Forty-five minutes later, I lifted the lid. And there it was. A masterpiece. A loaf so gorgeous, so perfectly rounded and golden, with an ear I could have sworn was winking at me. The sound of the crust cracking as it cooled was my personal symphony. That loaf wasn’t just bread; it was a jolt of pure, unadulterated kitchen confidence. It’s the feeling I want for every single one of you.
Gathering Your Magical Ingredients
See? Only four simple ingredients! The magic isn’t in a long, complicated list, but in how we treat them. Here’s what you’ll need and a little “chef’s insight” on each one.
- 100g Active Sourdough Starter: This is the heart and soul of your bread! Make sure your starter is “active” and “peaking”—meaning it’s been fed 4-8 hours prior, has doubled in size, and is full of bubbles. It should have a pleasant, slightly sweet and tangy aroma. If it smells like nail polish or alcohol, it’s likely past its peak and needs a refresh. Chef’s Tip: Do the float test! Drop a small spoonful of starter into a glass of water. If it floats, you’re good to go!
- 375g Warm Water: Not hot, not cold—think baby bottle warm. Warm water (around 75-80°F/24-27°C) helps to gently wake up the yeast in your starter and encourages a happy, active fermentation. Using a kitchen scale for accuracy is key here, as water volume can be tricky.
- 500g Bread Flour or All-Purpose Flour: Bread flour has a higher protein content (around 12-13%), which helps develop more gluten and gives your loaf a better, chewier structure. All-purpose flour (around 10-12% protein) works wonderfully too, yielding a slightly softer, more tender crumb. This recipe is a fantastic playground for both! Substitution Tip: You can swap in up to 100g of whole wheat or rye flour for a portion of the white flour for a deeper, earthier flavor.
- 10g Salt: Don’t forget the salt! It’s not just for flavor; it also strengthens the gluten structure and helps regulate the yeast activity, preventing your dough from over-fermenting. Fine sea salt is my go-to.
Let’s Make Some Bread! (Step-by-Step)
Ready? Apron on! Let’s walk through this together. Remember, sourdough is more of a rhythm than a rigid set of rules. You’ve got this.
- Mix with Love: In a large bowl, whisk your 100g of active starter into 375g of warm water until it looks a bit like cloudy lemonade. This ensures the starter is perfectly distributed. Now, add your 500g of flour and 10g of salt. Using a sturdy spatula or your hands, mix until you no longer see dry bits of flour. The dough will be shaggy, sticky, and a little messy—this is exactly what we want! Chef’s Hack: I like to mix the salt in with the flour before adding it to the water-starter mix. This prevents the salt from directly touching and potentially shocking the fresh starter.
- Rest & Fold (The No-Knead Workout): Cover your bowl with a damp kitchen towel, plastic wrap, or a reusable shower cap (my favorite trick!). Let it rest for 30 minutes. This is the “autolyse” stage, where the flour fully hydrates, making the dough easier to work with and improving the final texture. Now, over the next 2 hours, we’ll perform 3-4 “stretch and folds.” Simply wet your hand, grab one side of the dough, stretch it upwards, and fold it over the center. Turn the bowl a quarter turn and repeat until you’ve gone around the bowl 4-5 times. Do this every 30 minutes. You’ll feel the dough transform from a sticky mess to a smooth, cohesive, and bouncy ball. Chef’s Insight: No need to be aggressive! Gentle stretches are all it takes to build that gluten network.
- Bulk Fermentation (The Long Nap): After your last set of folds, cover the bowl again and let it sit at room temperature for 8-12 hours. This is the “bulk ferment,” where the magic happens! The wild yeast gets to work, fermenting the dough and creating those beautiful air pockets. The time can vary wildly depending on the temperature of your kitchen. Look for the dough to be about doubled in size, dotted with bubbles, and have a slightly domed top.
- Shape & Rest (Prepping for the Oven): Gently tip your dough onto a lightly floured surface. Using a bench scraper or your hands, gently fold the dough into a tight round (a “boule”). Let it rest for 30 minutes, seam-side down. This is the “bench rest,” which allows the gluten to relax before the final shaping. Then, do a final, more confident shaping to create surface tension on the outside of the loaf. Chef’s Tip: A little water on your hands instead of flour can help prevent sticking without adding too much extra flour to the dough.
- Cold Proof (The Flavor Booster): Generously flour a banneton or a medium-sized bowl lined with a floured kitchen towel. Place your shaped dough seam-side UP into the basket. Cover it (a plastic bag works great) and pop it into the refrigerator for 12-18 hours. This “cold proof” is what develops that incredible, tangy sourdough flavor and makes the dough easier to score before baking.
- Bake to Golden Perfection: Place your Dutch oven, with its lid on, into your regular oven. Preheat to 450°F (230°C) for a full 45-60 minutes—yes, get it screaming hot! Carefully take the cold dough from the fridge. Place a piece of parchment paper over the banneton, flip it over, and let the dough drop gently onto the paper. Score the top with a sharp blade, lame, or even a razor blade. A single, confident slash about ½-inch deep is perfect for starters. Carefully transfer the dough (using the parchment as a sling) into the preheated Dutch oven. Put the lid back on. Bake for 20 minutes covered, then remove the lid and bake for another 20-25 minutes uncovered, until the crust is a deep, glorious golden brown.
- The All-Important Cool Down: This is the hardest part! Transfer your beautiful loaf to a wire cooling rack and let it cool completely—for at least 2-3 hours—before you slice it. I know, the aroma is intoxicating, but slicing it warm will result in a gummy, sticky crumb. The bread is still cooking internally as it cools, setting its perfect structure. Trust me, it’s worth the wait!
How to Serve Your Masterpiece
Once it’s fully cooled, it’s time for the feast! This bread is a true all-rounder. For the ultimate experience, slice it thick and slather it with high-quality salted butter that will melt into its warm, tangy pores. It’s the star of a simple soup, the base for an epic avocado toast, or the perfect companion to a cheese and charcuterie board. Don’t forget that the end crust, the “heel,” is the baker’s treat—my family fights over it!
Get Creative! Recipe Variations
Once you’ve mastered the basic loaf, the fun really begins! Here are a few of my favorite twists:
- Seeded & Grainy: Add ½ cup of a mix of seeds (sunflower, pumpkin, sesame) and/or rolled oats during the initial mix for a nutty, textured loaf.
- Garlic & Herb: Fold in 2-3 cloves of minced roasted garlic and 2 tablespoons of chopped fresh rosemary or thyme during your first set of stretch and folds.
- Whole Grain Twist: Substitute 100g of the bread flour with whole wheat or rye flour for a heartier, more complex flavor.
- Cheesy Delight: Incorporate 1 cup of sharp shredded cheddar cheese and a pinch of smoked paprika for the ultimate grilled cheese bread.
- Olive & Rosemary: A classic! Fold in ¾ cup of pitted, chopped kalamata olives and 1 tablespoon of fresh rosemary.
Anna’s Chef’s Notes
This recipe has been my kitchen workhorse for years, and it’s evolved with me. I used to be so nervous about the scoring that I’d barely make a scratch, resulting in some interesting (but delicious) bread explosions! Now, I embrace the slash—it’s the baker’s signature. My biggest lesson? Sourdough teaches you to be flexible. Your kitchen is different from mine. Your starter has its own personality. If it’s a hot summer day, your bulk ferment might be done in 6 hours. If it’s chilly, it might take 14. Learn to read the dough, not just the clock. It’s a living, breathing thing, and baking it is a partnership. Some of my best loaves have come from days when I had to throw the “schedule” out the window. Be patient with yourself and with your dough. The results are always, always worth it.
Your Sourdough Questions, Answered!
I’ve gotten so many wonderful questions about this recipe over the years. Here are the most common ones to help you troubleshoot!
Q: My dough didn’t rise much during the bulk fermentation. What went wrong?
A: This usually points to a starter that wasn’t active and bubbly enough at the time of mixing. Always do the float test! It could also be that your kitchen is too cold. Try placing the dough in the oven with the light on (but the oven OFF) to create a slightly warmer, draft-free environment.
Q: My bread is very dense and gummy. Help!
A: The two most common culprits here are under-fermentation (it needed more time to rise and develop air pockets) and slicing it while it was still warm. Make sure your dough has truly doubled in bulk ferment, and I’ll say it again—please let it cool completely! The structure needs that time to set.
Q: I don’t have a Dutch oven. What can I use instead?
A: No worries! You can create a steamy environment by placing a heavy, oven-safe pot or deep baking sheet on a lower rack while the oven preheats. When you put your bread in (on a preheated pizza stone or baking sheet), carefully pour a cup of hot water into the hot pan below to create a burst of steam. Then close the oven door quickly!
Q: Can I speed up this recipe?
A: You can, but the long, slow fermentation is what builds the incredible flavor and texture. If you’re short on time, you can do a shorter bulk ferment at a warmer temperature (e.g., 4-6 hours in a warm spot) and skip the cold proof, baking it after the bench rest. The crust and flavor won’t be as developed, but you’ll still get a lovely, fresh loaf of bread.
Nutritional Information*
*This is an estimate for 1 slice (based on 12 slices per loaf) and can vary based on specific ingredients used.
- Calories: ~140
- Carbohydrates: 28g
- Protein: 4g
- Fat: 0.5g
Prep Time: 20 minutes
Rest + Rise Time: ~16 hours
Bake Time: ~45 minutes
Yield: 1 loaf (~12 slices)
Final Thoughts
There’s something deeply grounding about baking sourdough. It’s part science, part patience, and a whole lot of love. Every loaf tells a little story—of your starter, your kitchen’s rhythm, and the hands that shaped it. This no-knead method proves that bread baking doesn’t have to be intimidating or complicated; it just asks for a bit of trust in the process. Whether you’re a first-time baker or a seasoned dough whisperer, that first crackle of a cooling loaf never gets old. So here’s to flour on the counter, bubbles in the bowl, and the kind of quiet joy that only comes from pulling your own beautiful loaf out of the oven.